
Choosing the Right Water
When it comes to watering your air plants, choosing the right type of water is crucial for their health and growth. Here are some factors to consider when selecting the water for your air plants:
1. Use Filtered Water: Tap water may contain chemicals, such as chlorine, that can be harmful to air plants. It is best to use filtered water to remove any impurities that could potentially harm your plants.
2. Avoid Hard Water: Air plants are sensitive to minerals present in hard water, such as calcium and magnesium. These minerals can build up on the leaves and hinder their ability to absorb nutrients. If you have access to soft water, it is advisable to use that instead.
3. Rainwater: If possible, collect rainwater to use for watering your air plants. Rainwater is naturally free from chemicals and is rich in nutrients that can benefit the plants.
4. Distilled Water: Another alternative is distilled water, which has been purified through evaporation and condensation. Distilled water does not contain any minerals, making it a safe option for watering air plants.
5. Avoid Bottled Water: While it may seem convenient, bottled water can be expensive and often contains minerals that can harm air plants. It is best to opt for more accessible and affordable water sources.
6. Temperature of the Water: Air plants prefer water that is around room temperature. Water that is too cold or too hot can shock the plants and impede their growth.
By choosing the right water for your air plants, you can provide them with the necessary hydration without risking their health. Next, let’s delve into understanding the watering frequency for air plants.
Understanding the Watering Frequency
Watering frequency is an essential aspect of caring for air plants. While they may not require as much water as traditional potted plants, it is crucial to understand their unique watering needs. Here are some factors to consider when determining the watering frequency for your air plants:
1. Air Plant Species: Different species of air plants have varying water requirements. Some species are more tolerant of dry conditions and require less frequent watering, while others thrive in moist environments and need more frequent hydration. It is essential to research the specific needs of your air plant species.
2. Environment: The environment in which your air plants are situated can affect their watering frequency. For instance, if your air plants are placed in a dry and arid climate, they may require more frequent watering compared to those in a humid environment.
3. Seasonal Variations: Air plants may have different watering needs throughout the year. During hotter months or drier seasons, you may need to water them more often to prevent dehydration. Conversely, during colder months or more humid seasons, you may need to reduce the frequency to avoid overwatering.
4. Observing the Plants: One of the best ways to determine the watering frequency is by observing your air plants. They will provide visual cues that indicate their hydration levels. For instance, if the leaves appear dry, curled, or have a grayish color, it could be a sign that they need watering. On the other hand, if the leaves are mushy or yellow, it may indicate overwatering.
5. Touch Test: Another way to gauge the watering frequency is through a touch test. Gently touch the base of the plant and the leaves. If they feel stiff and taut, it indicates the plant is adequately hydrated. However, if they are soft and pliable, it may suggest the need for watering.
By considering these factors and closely observing your air plants, you can determine the appropriate watering frequency to keep them healthy and thriving. Next, let’s explore the different watering methods for air plants.
Watering Methods for Air Plants
When it comes to watering air plants, there are several methods you can use based on your preference and the needs of your plants. Here are two common watering methods for air plants:
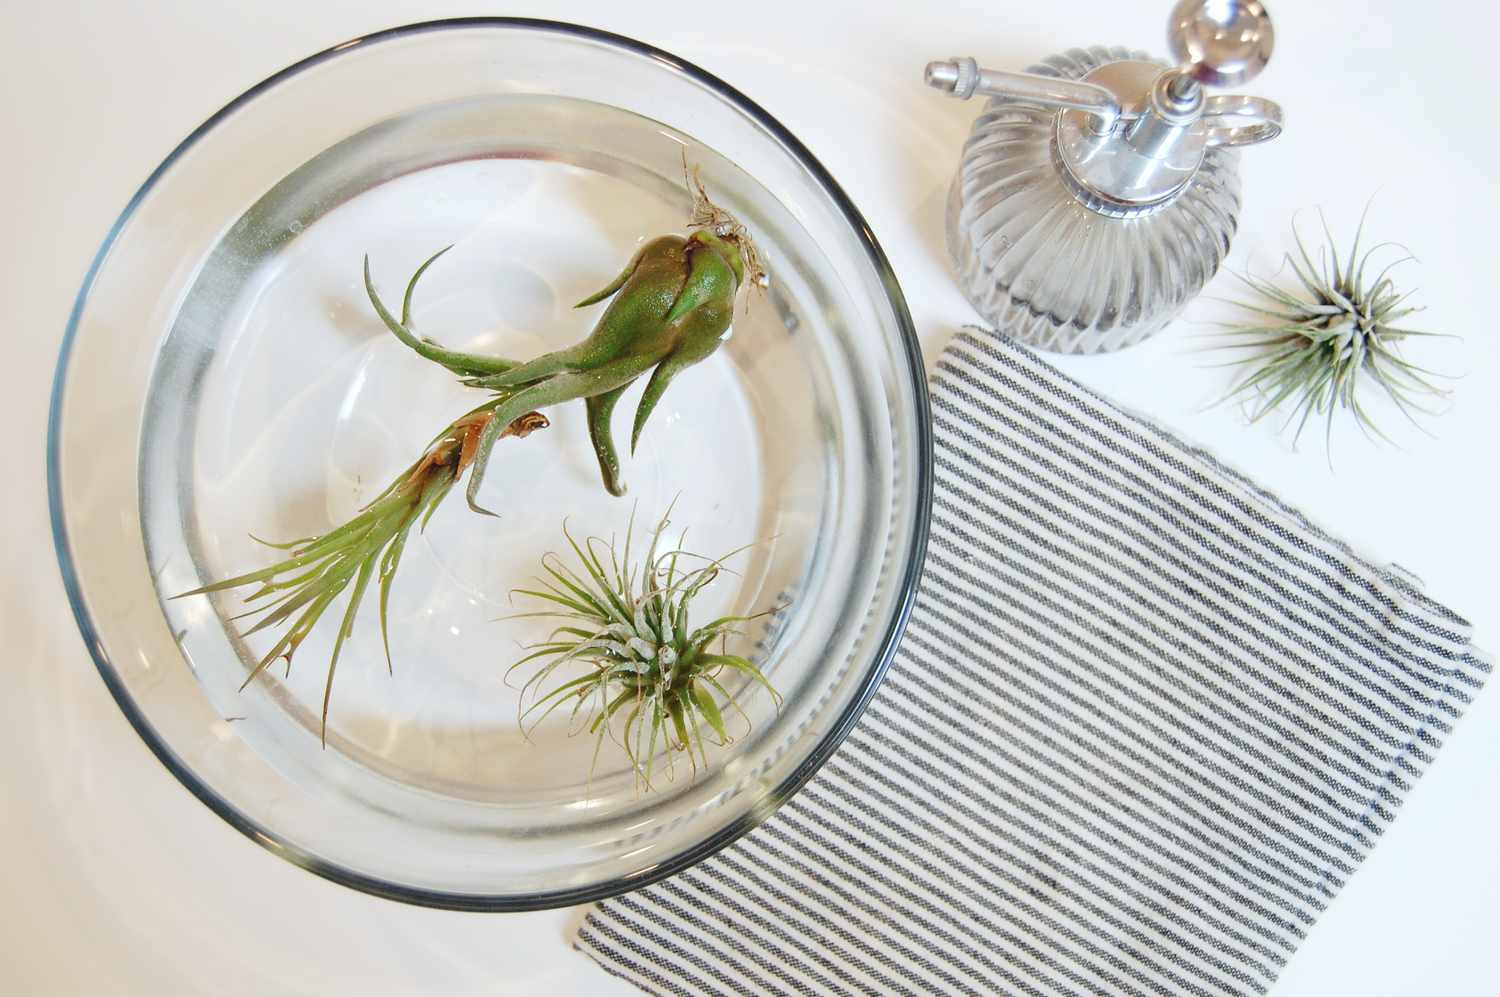
1. Soaking Method: The soaking method is a popular way to hydrate air plants thoroughly. To use this method, fill a bowl or sink with room temperature water. Gently place your air plants in the water, making sure they are fully submerged. Let them soak for about 20-30 minutes. After soaking, carefully remove the plants from the water and let them dry upside down on a towel or in a well-ventilated area. It’s important to ensure that excess water doesn’t accumulate at the base of the plant, as this can lead to rot.
2. Misting Method: Misting is another effective way to provide hydration to air plants. Fill a spray bottle with filtered water and mist the plants thoroughly. Make sure to mist all sides of the leaves, as air plants absorb water through their trichomes, which are tiny structures on their leaves. Misting should be done 1-2 times per week, depending on the humidity levels in your environment.
It’s worth noting that each watering method has its advantages and considerations. The soaking method allows for a deep hydration, ensuring that the entire plant receives moisture. On the other hand, the misting method mimics the natural rainfall air plants would receive in their native habitats. You can also combine these methods based on the needs of your air plants and the environmental conditions.
Remember that after watering, it’s crucial to allow your air plants to dry completely before placing them back in their display. Proper drying helps prevent rot and ensures the long-term health of the plants.
Now that you are familiar with the different watering methods, let’s move on to discussing the environmental factors that play a role in the watering process for air plants.
Soaking Method
The soaking method is a popular and effective way to water air plants, ensuring they receive adequate hydration. This method allows the plants to absorb water through their leaves and roots. Here’s a step-by-step guide on how to use the soaking method for watering air plants:
1. Fill a Bowl or Sink: Start by filling a bowl or sink with room temperature water. It’s important to use water that is at a similar temperature to the air plants’ environment to prevent shock.
2. Submerge the Air Plants: Gently place your air plants in the water, ensuring they are fully submerged. You can gently swish the plants around in the water to ensure all portions are receiving moisture.
3. Soak for 20-30 Minutes: Allow the air plants to soak in the water for about 20-30 minutes. This duration ensures that they have enough time to absorb an adequate amount of water.
4. Remove and Dry: After the soaking period, carefully remove the air plants from the water. It’s important to avoid pulling or tugging on the leaves, as this may cause damage. Let the plants dry by placing them upside down on a towel or in a well-ventilated area. This will help remove excess water and prevent the buildup of moisture at the base of the plants, which can lead to rot.
The soaking method is beneficial because it allows the entire plant, including the roots, to absorb water. It provides a thorough and deep hydration, ensuring that your air plants receive the necessary moisture for healthy growth. However, it’s important to note that the soaking method should not be used excessively, as it can lead to overwatering. Generally, watering air plants using the soaking method once every 1-2 weeks is recommended, depending on the species and environmental conditions.
Now that you are familiar with the soaking method, let’s explore another popular watering technique for air plants: the misting method.
Misting Method
The misting method is a simple and convenient way to provide hydration to air plants. This method involves spraying a fine mist of water onto the plants’ leaves, allowing them to absorb moisture through their specialized structures called trichomes. Here’s a step-by-step guide on how to use the misting method for watering air plants:
1. Prepare a Spray Bottle: Fill a spray bottle with filtered or distilled water. It’s important to use water that is free from chemicals and minerals that could potentially harm the air plants.
2. Mist the Air Plants: Hold the spray bottle about 6 inches away from the air plants and mist them thoroughly. Make sure to mist all sides of the leaves to ensure even hydration. Aim for a fine mist, rather than a heavy stream of water, as this allows the trichomes to efficiently absorb moisture.
3. Adjust the Frequency: The frequency of misting will depend on several factors, including the species of air plants and the humidity levels in your environment. Generally, misting once or twice a week is sufficient for most air plants. However, if you live in a particularly dry climate or during hotter months, you may need to mist more frequently to prevent dehydration.
4. Observe the Plants: Pay attention to how your air plants respond to misting. If the leaves appear plump, vibrant, and healthy, it’s a sign that they are getting enough moisture. On the other hand, if the leaves start to curl, turn brown, or feel dry to the touch, it may indicate that they need more frequent misting.
The misting method is beneficial because it simulates the natural conditions air plants experience in their native environments. It mimics the fine mist of rain or dew that air plants would typically receive. Additionally, misting can also help increase humidity around the plants, which is beneficial, especially in drier environments.
It’s important to note that while misting is a useful watering method, it’s not as effective in providing deep hydration as the soaking method. Therefore, it’s recommended to occasionally incorporate the soaking method or alternate between the two methods to ensure thorough hydration for your air plants.
Now that you’re familiar with the misting method, let’s discuss the importance of allowing your air plants to dry properly after watering.
Drying After Watering
Proper drying after watering is crucial for the health and well-being of air plants. Ensuring that excess water is removed helps prevent the development of rot and fungal growth. Here are some important steps to follow when drying your air plants:
1. Remove Excess Water: After soaking or misting your air plants, gently shake or carefully blot the plants to remove any excess water. Avoid excessive handling or squeezing of the leaves, as this may cause damage.
2. Allow Air Circulation: Place your air plants in a well-ventilated area or on a towel in a location with good air circulation. This allows the remaining water to evaporate more quickly.
3. Upside Down Drying: To avoid water pooling at the base of the plants, it’s recommended to dry them upside down. This allows any excess water to drain away from the leaves and prevents rot or damage to the plant’s core.
4. Drying Time: The drying time will vary depending on factors such as the ambient temperature, humidity levels, and the size of the air plants. Generally, air plants can take anywhere from a few hours to a full day to dry completely.
5. Return to Their Display: Once your air plants are completely dry, you can return them to their display or arrangement. Ensure that the area where they are placed allows for adequate air circulation to prevent trapping moisture, which can lead to rot issues.
It’s important to note that air plants should never be left in standing water or constantly damp conditions, as this can cause them harm. Proper drying after watering helps maintain a healthy balance and prevents issues associated with excess moisture.
Now that you understand the importance of drying your air plants after watering, let’s discuss the environmental factors you should consider when caring for your air plants.
Environmental Factors to Consider
Several environmental factors play a significant role in the overall health and well-being of air plants. Understanding and considering these factors will help you create an optimal growing environment for your air plants. Here are some key environmental factors to consider:
1. Temperature: Air plants thrive in temperatures between 50°F and 90°F (10°C and 32°C). It’s important to avoid extreme temperature fluctuations and protect your plants from prolonged exposure to cold drafts or direct heat sources.
2. Humidity: Air plants are naturally adapted to humid environments, so maintaining proper humidity levels is essential for their health. Ideally, the humidity should be around 50-60%. In drier climates, you can increase humidity by using a humidifier or placing a tray of water near the plants.
3. Air Circulation: Good air circulation is crucial for air plants as it helps prevent the development of fungal diseases and allows their leaves to dry properly after watering. Ensure that there is sufficient airflow around the plants by placing them in areas with natural breezes or using fans to promote circulation.
4. Water Quality: The quality of the water you use to water your air plants can impact their health. As mentioned earlier, using filtered, rainwater, or distilled water is recommended to avoid chemicals and minerals that can harm the plants. Avoid using water that has been treated with water softeners or has high levels of chlorine or fluoride.
5. Light Exposure: Air plants thrive in bright, indirect light. Place them near a window where they can receive filtered sunlight or artificial grow lights if natural light is limited. Avoid placing them in direct sunlight, as this can cause the leaves to scorch and damage the plant.
6. Outdoor Conditions: If you choose to keep your air plants outdoors, make sure to consider the specific environmental conditions of your region. Factors such as temperature fluctuations, humidity levels, and exposure to wind and rain need to be taken into account to ensure the well-being of your plants.
By considering these environmental factors and making the necessary adjustments, you can provide an optimal growing environment for your air plants. Now, let’s discuss the signs of overwatering and underwatering to help you better understand the watering needs of your plants.
Temperature
The temperature in which air plants are kept plays a crucial role in their overall health and growth. Understanding and maintaining the appropriate temperature range is essential for the well-being of these unique plants. Here are some important factors to consider regarding temperature:
Ideal Temperature Range: Air plants thrive in temperatures between 50°F and 90°F (10°C and 32°C). This temperature range provides them with the optimal conditions for growth and allows them to thrive in most indoor environments.
Avoiding Extreme Temperatures: Air plants are sensitive to extreme temperature fluctuations. It is important to protect them from sudden drops or spikes in temperature. Avoid placing air plants in areas near cold drafts, such as windows, or in direct contact with heating sources like radiators or heaters.
Consider Seasonal Differences: Air plants may have different temperature requirements depending on the season. During hotter months, it is important to prevent air plants from being exposed to excessively high temperatures. If necessary, move them to a cooler location or provide shade to protect them from direct sunlight.
Monitoring Temperature Indoors: Regularly check the temperature of the room or area where your air plants are situated. Consider using a thermometer to ensure that the temperature remains within the appropriate range. This will enable you to spot any significant fluctuations and make adjustments accordingly.
Outdoor Considerations: If you choose to keep air plants outdoors, it’s crucial to be mindful of the temperature fluctuations throughout the day and night. Protect your air plants from extreme temperature conditions, such as frost or excessive heat, by moving them indoors or providing appropriate shelter.
By maintaining the appropriate temperature range and protecting air plants from extreme temperatures, you can create an environment where they can thrive. Remember, consistent temperatures within their preferred range will promote healthy growth and longevity for your air plants.
Next, let’s dive into the importance of humidity and how it affects the well-being of air plants.
Humidity
Humidity plays a vital role in the health and well-being of air plants. These unique plants are adapted to tropical and subtropical environments with higher humidity levels. Understanding the importance of humidity and maintaining appropriate levels is crucial for the successful care of air plants. Here are some key points to consider regarding humidity:
Ideal Humidity Range: Air plants thrive in humidity levels around 50-60%. This range provides the necessary moisture for their trichomes, the tiny structures on their leaves that absorb water from the air.
Benefits of Adequate Humidity: Sufficient humidity helps prevent the dehydration of air plants and promotes their overall health. It aids in the absorption of nutrients and moisture, ensuring that they receive the necessary hydration to thrive.
Increasing Humidity: If you live in a dry climate or during seasons with lower humidity levels, there are several ways to increase humidity around your air plants. Consider using a humidifier to add moisture to the air or placing a tray filled with water near the plants. Misting the plants with water can also provide a temporary boost in humidity.
Avoiding Excessive Humidity: While air plants require adequate humidity, it is essential to avoid excessive moisture, which can lead to issues such as rot or fungal growth. Proper air circulation and avoiding waterlogged conditions help maintain a balanced humidity level.
Monitoring Humidity: Keep an eye on the humidity levels in the area where your air plants are located. Consider using a hygrometer to measure humidity accurately. This will help you make adjustments as needed to ensure that the humidity remains within the optimal range.
By maintaining appropriate humidity levels, you can provide a favorable environment for your air plants to thrive. Remember that humidity levels may vary depending on the specific species and the location where you keep your plants. Observing your plants for signs of dehydration or excessive moisture can help you make any necessary adjustments to maintain ideal humidity levels.
Now that you understand the importance of humidity, let’s explore the role of air circulation in caring for air plants.
Air Circulation
Adequate air circulation is essential for the health and well-being of air plants. These unique plants rely on good airflow to receive the necessary nutrients, prevent the buildup of excessive moisture, and minimize the risk of fungal or bacterial diseases. Here are some key points to consider regarding air circulation for air plants:
Preventing Stagnant Air: Stagnant air can create a favorable environment for the growth of harmful microorganisms and inhibit the proper development of air plants. Ensure that your air plants are situated in areas with sufficient air movement to prevent the accumulation of moisture.
Importance of Ventilation: Proper ventilation helps remove excess moisture from the air surrounding air plants. It promotes evaporation after watering and helps prevent the development of rot or fungal issues. Well-ventilated areas also help air plants receive fresh air and exchange gases effectively.
Avoiding Crowded Spaces: If you have multiple air plants in a single display or arrangement, ensure that they are not positioned too closely together. This prevents air circulation from being hindered and reduces the risk of excessive moisture buildup between plants.
Utilizing Fans: If you notice that the air in the area where your air plants are situated is stagnant, consider using a small fan to promote air movement. The gentle breeze from a fan can simulate natural air circulation and aid in the drying process after watering.
Outdoor Considerations: When placing air plants outdoors, natural air movement is generally more abundant. However, it’s important to be mindful of strong winds or excessively damp conditions that can negatively impact the plants. Position them in a location that receives gentle breezes without subjecting them to harsh gusts.
By providing proper air circulation, you help air plants thrive by maintaining a healthier environment. The regular exchange of fresh air and the removal of excess moisture contribute to their overall well-being and reduce the risk of common issues associated with stagnant air.
Now that we’ve explored the importance of air circulation, let’s address the significance of water quality for the care of air plants.
Water Quality
The quality of water used to care for air plants can significantly impact their overall health and well-being. It is essential to consider and prioritize the use of water that is safe and beneficial for these unique plants. Here are some key factors to consider regarding water quality for air plants:
1. Chemicals in Tap Water: Tap water often contains chemicals such as chlorine, fluoride, and other additives that can be harmful to air plants. These chemicals can accumulate on the leaves and hinder their ability to absorb nutrients. It is advisable to use filtered water to remove or reduce these harmful substances before watering your air plants.
2. Minerals in Hard Water: Air plants are sensitive to minerals such as calcium and magnesium found in hard water. These minerals can build up on the leaves over time and interfere with the plants’ ability to absorb water and nutrients. If possible, use soft water or consider using rainwater or distilled water for watering your air plants.
3. Rainwater: Collecting rainwater is an excellent option for watering air plants. Rainwater is naturally free from chemicals and usually contains beneficial nutrients that can nourish the plants. However, be mindful of where you collect rainwater to ensure it is free from pollutants or contaminants.
4. Distilled Water: Another alternative is using distilled water, which has undergone a purification process to remove impurities. Distilled water is free from minerals and chemicals, making it a safe option for watering air plants. However, it is essential to note that distilled water lacks some of the beneficial minerals found in other water sources.
5. Avoiding Bottled Water: While bottled water may seem like a convenient option, many brands contain minerals that are not suitable for air plants. Moreover, bottled water can be expensive and generate unnecessary waste. It is typically more practical and cost-effective to use other water sources.
By using the right quality of water, you provide the best possible care for your air plants. Ensure that the water you use is free from harmful chemicals and minerals that can negatively affect their growth and well-being. Your efforts in using suitable water will contribute to the long-term health and vitality of your air plants.
Now that we’ve discussed the importance of water quality, let’s explore the signs of overwatering and underwatering to help you better understand the watering needs of your air plants.
Signs of Overwatering
Overwatering is a common issue that can negatively impact the health and survival of air plants. It is important to recognize the signs of overwatering to prevent potential damage. Here are some key indicators that your air plants may be receiving too much water:
1. Yellowing or Browning Leaves: If you notice that the leaves of your air plants are turning yellow or brown, it could be a sign of overwatering. Excessive moisture can cause the roots to rot and lead to the decline of the plant.
2. Mushy or Soft Texture: When air plants are overwatered, their leaves may become soft, mushy, or limp to the touch. This is a clear indication that the plant is holding too much moisture and is unable to properly absorb water.
3. Rotting Base or Roots: Overwatering can cause the base of the air plant or its roots to become soft and mushy. This rotting can spread throughout the plant if not addressed promptly and may result in the plant becoming irreversibly damaged.
4. Foul Odor: An unpleasant, musty smell emanating from your air plants is a sign of rot caused by overwatering. This odor is a clear indication that the roots or base of the plant are decaying due to excessive moisture.
5. Lack of New Growth: Overwatered air plants may show signs of stunted growth or a lack of new leaves or pups. This is due to the stress caused by the excess moisture, which can hinder the plant’s ability to develop and thrive.
6. Presence of Fungus or Mold: Excessive moisture can create a favorable environment for the growth of fungus or mold on the leaves or soil surrounding the air plant. If you notice any fuzzy growth or discoloration, it is essential to address the overwatering issue promptly.
It is important to note that the signs of overwatering can vary depending on the severity and duration of the issue. If you suspect that your air plant is overwatered, it is crucial to adjust your watering routine and allow the plant to dry out properly before watering again.
Now that we have explored the signs of overwatering, let’s discuss the signs of underwatering to help you better understand how to care for your air plants.
Signs of Underwatering
Underwatering is another common issue that can adversely affect the health and vitality of air plants. It is important to recognize the signs of underwatering and take the necessary steps to address the problem. Here are some key indicators that your air plants may be in need of more water:
1. Dry, Curling Leaves: One of the earliest signs of underwatering is the appearance of dry and curling leaves. When deprived of sufficient water, air plants will naturally curl their leaves as a way of conserving moisture.
2. Pale or Discolored Leaves: If you notice that the leaves of your air plants are becoming pale or displaying unusual discoloration, it could be a sign of dehydration. The lack of water affects the plant’s ability to maintain its vibrant green color.
3. Brittle Texture: Air plants that are underwatered may exhibit a brittle or crispy texture. The leaves can become dry and fragile, indicating a lack of hydration. These brittle leaves are more prone to breakage and damage.
4. Slow or No New Growth: When air plants do not receive enough water, they may show signs of slowed growth or fail to produce new leaves or pups. The plant conserves its limited resources and focuses on survival rather than growth and reproduction.
5. Leaf Shedding: Underwatered air plants may shed their leaves as a response to stress. This shedding of leaves is a defense mechanism to reduce water loss and preserve energy. If you notice excessive leaf shedding, it is a clear indication that your air plants require more water.
6. Wilted Appearance: When deprived of adequate hydration, air plants may appear wilted or droopy. The leaves may lose their turgidity and appear limp, signaling the need for water to revive and rejuvenate the plant.
If you observe the signs of underwatering, it is essential to adjust your watering routine and ensure that your air plants receive sufficient moisture. Proper hydration will help revive the plants and promote healthy growth and development.
Now that we have explored the signs of underwatering, let’s discuss some additional tips for watering air plants to help you effectively care for these unique plants.
Additional Tips for Watering Air Plants
Proper watering is key to keeping your air plants healthy and thriving. Here are some additional tips to help you effectively water your air plants:
- Establish a Consistent Watering Routine: Set a regular schedule for watering your air plants to ensure they receive consistent moisture. However, be flexible and adjust the watering frequency based on the specific needs of your plants and the environmental conditions.
- Consider the Seasonal Variations: Keep in mind that the watering needs of air plants may vary depending on the season. During hotter months or drier seasons, you may need to water more frequently to prevent dehydration. Conversely, reduce the watering frequency during colder months or more humid seasons to avoid overwatering.
- Avoid Watering Late in the Day: It is best to water your air plants earlier in the day to allow them sufficient time to dry before nightfall. This helps prevent the risk of moisture buildup that can lead to rot or other issues overnight.
- Use a Watering Calendar: Keep track of your watering schedule using a calendar or set reminders on your phone. This will help you stay consistent and ensure that you are providing the proper care for your air plants.
- Monitor Signs of Hydration: Regularly observe your air plants for signs of hydration or dehydration. Pay attention to the appearance, texture, and overall health of the leaves to gauge their watering needs and adjust accordingly.
- Avoid Waterlogged Conditions: After watering your air plants, make sure excess water drains away to prevent waterlogging. Ensure proper airflow and avoid allowing the plants to sit in standing water, as this can lead to root rot and other issues.
- Consider Aerating the Water: Before using tap water or any other water source, let it sit in an open container for a few hours to allow chlorine and other chemicals to dissipate. Aerating the water can also help adjust its temperature to better match the ambient conditions.
- Observe Your Plants’ Response: Every air plant is unique, so pay attention to how your specific plants respond to different watering methods and frequencies. Adjust your watering routine based on the individual needs and behaviors of your plants.
By following these additional tips, you can fine-tune your watering practices and provide optimal care for your air plants. Remember to be attentive, observant, and responsive to the specific needs of each plant to ensure their health and longevity.
Now that you have a comprehensive understanding of watering air plants, you are well-equipped to keep your air plants properly hydrated and thriving. With consistent care and attention, your air plants will continue to beautify your living space and bring a touch of nature into your home or office.