
Preparing Your Rug Doctor Upholstery Cleaner
Before you start using your Rug Doctor Upholstery Cleaner, it’s important to take a few steps to ensure the best results. By following these preparation guidelines, you’ll be ready to tackle any upholstery cleaning task with confidence.
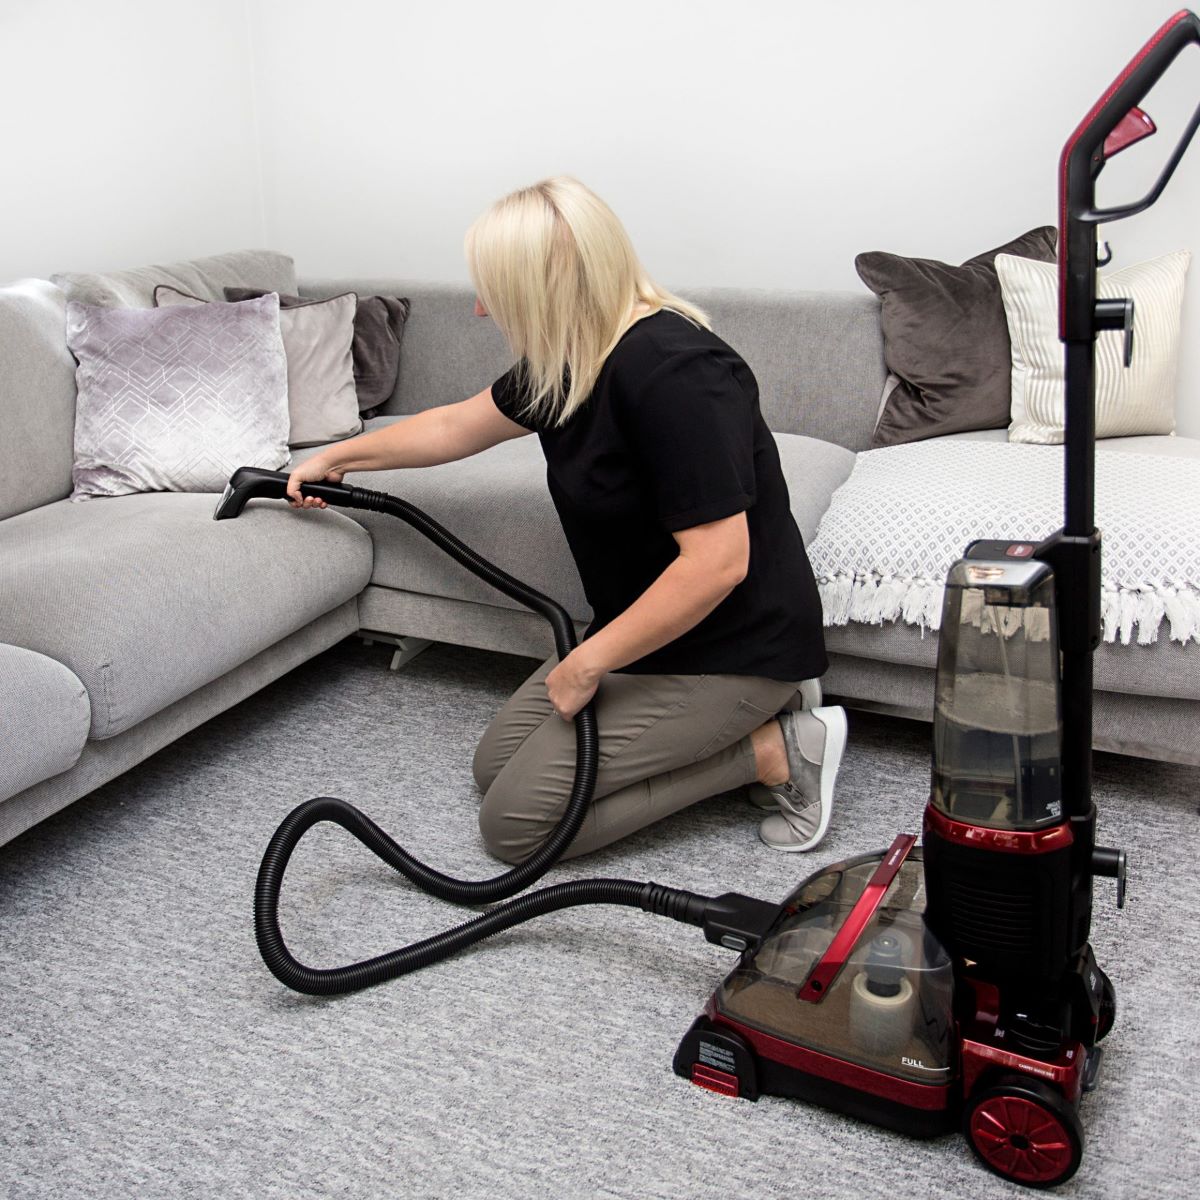
Step 1: Vacuum the Upholstery
Prior to using the Rug Doctor Upholstery Cleaner, it’s crucial to remove any loose dirt, debris, and pet hair from the upholstery. This can be achieved by thoroughly vacuuming the surface using a brush attachment or a handheld vacuum cleaner. By doing so, you’ll prevent the dirt from getting trapped and potentially causing further damage during the cleaning process.
Step 2: Test for Colorfastness
It’s always a good idea to test the Rug Doctor Upholstery Cleaner on a small, inconspicuous area of the upholstery before applying it to the entire surface. This is especially important for delicate or vintage fabrics that may be prone to color bleeding or fading. Apply a small amount of the cleaning solution to an inconspicuous spot and blot it with a clean cloth. If there’s no color transfer or damage, you can proceed with confidence.
By taking these preparatory steps, you’ll ensure that your Rug Doctor Upholstery Cleaner is applied to a clean surface and minimize the risk of any potential damage. With a well-prepped upholstery, you’ll be ready to move on to the next steps of effectively cleaning your furniture.
Step 1: Vacuum the Upholstery
Prior to using the Rug Doctor Upholstery Cleaner, it’s important to thoroughly vacuum the upholstery to remove any loose debris, dirt, and pet hair. This step is essential as it prepares the surface for a more effective deep cleaning process.
Start by selecting the appropriate attachment for your vacuum cleaner. A brush attachment or a handheld vacuum can be effective in gently loosening and removing dirt from the upholstery. If your vacuum has adjustable suction power, set it to a low or medium setting to prevent any damage to the fabric.
Begin vacuuming the upholstery in a systematic manner, moving from top to bottom and left to right. Pay extra attention to areas that are prone to accumulating more dirt, such as armrests, cushions, and crevices. Use short strokes and take your time to ensure thorough removal of debris.
When vacuuming, it’s important to be gentle and avoid applying excessive pressure. Pressing too hard can push dirt deeper into the fabric, making it more difficult to remove. Instead, use light, sweeping motions to lift the dirt and debris off the surface.
If you encounter any stubborn or hard-to-reach dirt, consider using a soft-bristled brush or an upholstery brush attachment to further loosen the particles. Gently brush the affected area in a circular motion to dislodge the dirt before vacuuming it away.
Make sure to pay attention to both the front and back of cushions, as well as any removable upholstery pieces. In the case of removable cushions or covers, take the opportunity to vacuum them separately to ensure a thorough cleaning.
By vacuuming the upholstery before using the Rug Doctor Upholstery Cleaner, you remove the loose dirt and debris that can otherwise hinder the deep cleaning process. This initial step sets the stage for a more effective and efficient cleaning experience, leaving your upholstery refreshed and revitalized.
Step 2: Test for Colorfastness
Before applying the Rug Doctor Upholstery Cleaner to the entire surface, it’s crucial to test for colorfastness to ensure it won’t cause any damage or color bleeding. This step is especially important for delicate or vintage fabrics that may be more prone to discoloration.
To perform a colorfastness test, select a small, inconspicuous area of the upholstery, such as the back or underneath a cushion. Apply a small amount of the Rug Doctor Upholstery Cleaner to a clean cloth and gently blot the test area. It’s essential to avoid rubbing, as this may cause friction and potentially distort the fabric.
After blotting the cleaning solution, inspect the test area for any signs of color transfer or damage. Look for any changes in the fabric’s color, texture, or appearance. If there are no noticeable changes or damages, it’s safe to proceed with using the cleaner on the entire upholstery.
However, if you notice any color bleeding, fading, or alteration in the test area, it’s best to discontinue using the Rug Doctor Upholstery Cleaner. Consult a professional or refer to the manufacturer’s instructions for alternative cleaning methods suitable for the specific fabric.
Keep in mind that some upholstery fabrics may require specialized cleaning techniques or professional services. If you are unsure about the fabric’s compatibility with the Rug Doctor Upholstery Cleaner, it’s always advisable to seek guidance or professional assistance.
By conducting a colorfastness test before applying the cleaning solution to the entire upholstery, you minimize the risk of potential damage or discoloration. This precautionary step helps ensure that your upholstery remains in excellent condition while achieving optimal cleaning results.
Using Your Rug Doctor Upholstery Cleaner
Now that you have prepared your upholstery and tested for colorfastness, it’s time to start using your Rug Doctor Upholstery Cleaner to give your furniture a deep and thorough clean. Follow these steps to achieve the best results:
Step 3: Prepare the Cleaning Solution
Start by preparing the Rug Doctor Upholstery Cleaner according to the instructions provided. Most upholstery cleaners require dilution with water. Ensure that you use the recommended ratio for optimal cleaning effectiveness.
Step 4: Apply the Cleaning Solution
Using a clean cloth or sponge, apply the diluted cleaning solution to the upholstery. Begin with a small section or a test area, spreading the solution evenly over the fabric. Work in a gentle circular motion to ensure thorough coverage.
Step 5: Scrub and Agitate the Upholstery
Using a soft-bristled brush or a sponge, gently scrub the upholstery in a circular or back-and-forth motion. This action helps to loosen dirt, stains, and embedded grime from the fabric fibers. Take care not to use excessive force or scrub too aggressively, as this can damage the upholstery.
Step 6: Extract the Cleaning Solution
After scrubbing, use a clean and absorbent cloth or sponge to blot and extract the excess cleaning solution from the upholstery. This will help remove dirt, stains, and any residue from the fabric.
Step 7: Rinse and Repeat (if necessary)
If needed, rinse the upholstery by dampening a clean cloth with water and gently blotting the cleaned area. This step helps to remove any remaining cleaning solution from the fabric. Repeat steps 4 to 7 on other sections of the upholstery until you have thoroughly cleaned all desired areas.
Step 8: Drying the Upholstery
Allow the upholstery to air dry completely before using or placing any items back on it. Open windows or use fans to promote air circulation and speed up the drying process. Avoid direct heat sources that can damage or shrink the fabric.
By following these steps, you can effectively and safely use your Rug Doctor Upholstery Cleaner to revitalize and clean your furniture. Your upholstery will be left looking refreshed and inviting, ready to be enjoyed once again.
Step 3: Prepare the Cleaning Solution
To effectively use your Rug Doctor Upholstery Cleaner, it’s important to properly prepare the cleaning solution. This step ensures that the solution is mixed correctly, maximizing its cleaning power without causing any damage to your upholstery. Follow these guidelines to prepare the cleaning solution:
Read the Instructions:
Begin by carefully reading and understanding the instructions provided by Rug Doctor for their Upholstery Cleaner. These instructions will include specific details on the recommended dilution ratio and any important considerations for your specific upholstery fabric.
Gather the Materials:
Before you start, gather all the necessary materials: the Rug Doctor Upholstery Cleaner, a clean bucket or container, and clean water. Ensure that the water you are using is at room temperature for the best results.
Measure the Cleaning Solution:
Using a measuring cup or the provided guidelines, carefully measure the recommended amount of the Rug Doctor Upholstery Cleaner. Pour the measured amount into your clean bucket or container.
Add Water:
Next, add the appropriate amount of water to the cleaning solution in the bucket or container. Follow the guidelines provided by Rug Doctor for the correct water-to-cleaner ratio. Avoid adding too much water, as it may dilute the solution and reduce its effectiveness.
Mix Thoroughly:
Using a clean stirring stick or spoon, thoroughly mix the cleaning solution and water together. Ensure that the solution is well-combined and evenly distributed in the container. This will ensure that all parts of the cleaning solution are properly activated for optimal performance.
Check for Consistency:
Check the consistency of the cleaning solution. It should be well-mixed and have a uniform appearance. If the solution seems too thick or too watery, adjust the ratio of the cleaning solution and water accordingly.
Label and Store:
For future reference, label the container with the date and contents of the cleaning solution. Properly sealing the container will help preserve the cleaning solution for future use.
By following these steps, you’ll ensure that your Rug Doctor Upholstery Cleaner is properly prepared and ready for use. A properly mixed solution will enhance the cleaning effectiveness and help you achieve the best results while cleaning your upholstery.
Step 4: Apply the Cleaning Solution
Now that you have prepared your Rug Doctor Upholstery Cleaner solution, it’s time to apply it to your upholstery. This step ensures that the cleaning solution is evenly distributed and can effectively penetrate the fabric to remove dirt and stains. Follow these guidelines for optimal application:
Select a Small Test Area:
Before applying the cleaning solution to the entire upholstery, it’s essential to select a small, inconspicuous test area to ensure compatibility and prevent any potential damage. Choose an area that is not easily noticeable, such as the back or underside of a cushion.
Apply the Solution:
Dip a clean cloth or sponge into the Rug Doctor Upholstery Cleaner solution. Starting with the test area, gently apply the solution to the fabric using a back-and-forth or circular motion. Ensure that the solution is evenly spread over the surface and that the fabric is lightly dampened. Avoid oversaturating the fabric, as excessive moisture can result in longer drying times.
Work in Sections:
To prevent the cleaning solution from drying on the fabric before you can properly clean it, work on your upholstery in sections. This allows you to focus on one area at a time, ensuring sufficient contact time for the solution to work its magic.
Be Gentle:
When applying the cleaning solution, be gentle to avoid damaging the fabric. Use a soft cloth or sponge and apply light pressure. Harsh scrubbing or rubbing can cause fraying or discoloration, especially on delicate upholstery.
Repeat for Tough Stains:
If you encounter tough or stubborn stains on your upholstery, you may need to repeat the application of the cleaning solution. Apply a small amount of the solution directly to the stain, allowing it to dwell for a few minutes. Then, gently blot or agitate the area with a clean cloth or sponge to lift the stain.
By following these steps, you can effectively apply the Rug Doctor Upholstery Cleaner to your upholstery. Even distribution of the cleaning solution ensures that it reaches deep into the fabrics, enabling it to effectively break down and remove dirt and stains from your upholstery.
Step 5: Scrub and Agitate the Upholstery
After applying the Rug Doctor Upholstery Cleaner to the fabric, it’s time to scrub and agitate the upholstery. This step helps to further loosen dirt, stains, and embedded grime from the fabric fibers, ensuring a thorough and effective cleaning process. Follow these guidelines for optimal results:
Select the Right Tools:
Choose appropriate tools for scrubbing and agitating, such as a soft-bristled brush or a sponge. The choice of tool may depend on the type of upholstery material and its level of delicacy. Ensure that the selected tools are clean and free from any debris or dirt to avoid causing additional stains or damage to the fabric.
Gentle and Controlled Scrubbing:
Using the chosen tool, gently scrub the upholstery in circular or back-and-forth motions. Apply light pressure and focus on areas that have visible stains or heavy dirt accumulation. Be careful not to scrub too aggressively, as this can damage the fabric or cause the cleaning solution to penetrate deeper than desired.
Address Stains Carefully:
If you encounter tough stains, give them extra attention during the scrubbing process. Focus on the stain directly and gently work the cleaning solution into the fabric. Use small, repetitive motions to help loosen and lift the stain. Take your time and be patient, as some stains may require multiple attempts and more concentrated effort to remove completely.
Cover All Areas:
Ensure that you scrub and agitate the entire upholstery surface, paying attention to corners, seams, and any crevices where dirt and grime can often accumulate. Work systematically to ensure thorough coverage of all areas, and don’t forget to address both the front and back of cushions or any removable upholstery components.
Check for Colorfastness:
Periodically check for colorfastness during the scrubbing process, especially if you’re using the Rug Doctor Upholstery Cleaner for the first time. Gently blot a small, inconspicuous area with a clean cloth to see if any color transfer occurs. If there are no adverse effects, you can continue scrubbing and agitating with confidence.
By carefully and gently scrubbing and agitating the upholstery, you enhance the cleaning process and improve the effectiveness of the Rug Doctor Upholstery Cleaner. This step ensures that dirt, stains, and grime are thoroughly loosened, preparing them for extraction in the next steps of the cleaning process.
Step 6: Extract the Cleaning Solution
Once you have thoroughly scrubbed and agitated the upholstery with the Rug Doctor Upholstery Cleaner, it’s time to extract the cleaning solution from the fabric. Proper extraction ensures that dirt, stains, and residue are removed, leaving your upholstery fresh and revitalized. Follow these steps to extract the cleaning solution effectively:
Blot and Absorb:
Using a clean and absorbent cloth or sponge, gently blot the upholstery to remove the excess cleaning solution. Start from the top and work your way down, applying light pressure to absorb as much of the solution as possible. This step helps to lift off dirt, stains, and any remnants of the cleaning solution.
Avoid Excessive Moisture:
Be mindful of not oversaturating the fabric with excessive moisture during the extraction process. Too much moisture can prolong the drying time and may lead to potential water damage or shrinkage of the upholstery. Blotting and absorbing the cleaning solution ensures an appropriate level of moisture remains without overloading the fabric.
Repeat if Necessary:
If you notice that there is still visible dirt, stains, or cleaning solution residue on the fabric after blotting, repeat the extraction process. Apply gentle pressure and continue blotting until no more residue appears on the cloth or sponge. This may require several rounds of extraction to ensure a thorough cleaning.
Pay Attention to Hard-to-Reach Areas:
Take extra care to extract the cleaning solution from hard-to-reach areas, such as crevices, seams, or corners. Use a clean cloth or sponge to reach these areas and ensure that no cleaning solution is left behind. Leaving residue in these areas can lead to future staining or attract more dirt and debris.
Allow Sufficient Drying Time:
After the extraction process, allow the upholstery to air dry completely before using or placing any items back on it. Ensure proper air circulation in the room by opening windows or using fans if necessary. Avoid direct heat sources, as they may cause damage or shrinkage to the fabric. Patience is key to allowing the upholstery to dry thoroughly.
By effectively extracting the cleaning solution from the upholstery, you remove dirt, stains, and any leftover residue, leaving your upholstery looking clean and refreshed. This step is crucial in completing the cleaning process and ensuring the best possible results for your furniture.
Step 7: Rinse and Repeat (if necessary)
After extracting the cleaning solution from your upholstery, it’s important to complete the cleaning process by rinsing the fabric. This step helps to remove any remaining residue and ensures a thorough and fresh result. Here’s how to effectively rinse your upholstery:
Rinse with Clean Water:
Dampen a clean cloth or sponge with clean water. Gently blot and wipe the upholstery surface, focusing on areas where the cleaning solution was applied. The goal is to remove any lingering residue from the fabric, leaving it clean and free from any cleaning solution remnants.
Check for Residue:
As you rinse, periodically check the cloth or sponge for any signs of residue. If you notice any discoloration or debris on the cloth, continue rinsing until the cloth comes away clean. This step ensures that no cleaning solution is left behind, which could attract more dirt and potentially damage the fabric over time.
Repeat if Necessary:
If you notice that the cloth or sponge is still picking up residue or if there are visible stains or dirt after rinsing, repeat the process. Apply clean water to a fresh cloth or sponge and continue blotting and wiping the upholstery until you achieve the desired level of cleanliness.
Focus on Troublesome Areas:
Pay extra attention to any troublesome areas or stubborn stains during the rinsing process. Spend extra time and effort gently wiping and blotting these areas to ensure a thorough cleansing. The additional focus in these spots can help remove any lingering discoloration or stubborn dirt.
Allow Adequate Drying Time:
After rinsing, allow your upholstery to air dry completely before using or placing any objects back on it. Proper air circulation, such as keeping windows open or using fans, can help speed up the drying process. Ensure that the upholstery is completely dry to prevent any moisture-related issues.
If necessary, repeat the rinsing process until you are satisfied with the cleanliness of your upholstery. Remember to be patient and thorough, taking the time to achieve the best results possible.
By thoroughly rinsing your upholstery, you remove any residue and ensure a fresh and clean surface. This step is essential in completing the cleaning process, leaving your furniture looking and feeling rejuvenated.
Step 8: Drying the Upholstery
After completing the cleaning and rinsing process, it’s crucial to allow your upholstery to dry properly. Proper drying ensures that the fabric is moisture-free and ready for use. Follow these guidelines to effectively dry your upholstery:
Air Circulation:
Ensure proper air circulation in the room by opening windows or using fans to promote airflow. This helps speed up the drying process and prevents the development of musty odors or mold growth. Avoid using artificial heat sources as they can cause shrinkage or damage to the fabric.
Patience is Key:
Be patient and allow sufficient time for the upholstery to dry naturally. The drying time can vary depending on factors such as fabric thickness, room temperature, and humidity levels. Avoid rushing the process by using the furniture before it is completely dry, as this can lead to dampness or stains.
Check for Moisture:
To ensure that your upholstery is fully dry, perform a moisture check before using it. Place a clean, dry cloth on the surface and leave it for a few minutes. If the cloth feels damp or shows any signs of moisture, continue the drying process until the fabric is completely dry to the touch.
Inspect for Damage:
After the upholstery has dried, inspect the fabric for any signs of damage or lingering stains. If you notice any areas that require further attention, you may need to repeat specific cleaning steps or consider seeking professional assistance for stubborn stains or delicate fabrics.
Protect the Upholstery:
To prevent future stains and maintain the cleanliness of your upholstery, consider using fabric protectors. These products create a barrier that helps repel liquid spills and stains, making them easier to clean up. Follow the instructions provided with the fabric protector to ensure proper application and effectiveness.
By allowing your upholstery to dry completely, you ensure that it’s ready for use and maintain its longevity. Proper drying also helps prevent any potential issues associated with moisture, ensuring a clean and fresh appearance for your upholstery.
Tips and Tricks for Using Rug Doctor Upholstery Cleaner
Here are some helpful tips and tricks to ensure the best results when using the Rug Doctor Upholstery Cleaner:
- Read the Instructions: Before getting started, make sure to carefully read and follow the instructions provided by Rug Doctor for their Upholstery Cleaner. This will ensure that you are using the product correctly and maximizing its cleaning effectiveness.
- Spot Test: Always perform a spot test on a small, inconspicuous area of the upholstery to test for colorfastness and ensure compatibility with the cleaning solution.
- Pre-Treat Stains: For tough stains, consider pre-treating them with a stain remover specifically designed for upholstery. Follow the instructions on the stain remover and allow it to sit for the recommended time before proceeding with the Rug Doctor Upholstery Cleaner.
- Work in Small Sections: It’s best to work on the upholstery in small sections, ensuring that you give each area sufficient attention and time for the cleaning solution to work. This will result in more effective and thorough cleaning.
- Don’t Oversaturate: Avoid over-wetting the upholstery with excessive cleaning solution or water. This can lead to longer drying times, potential water damage, or residue left behind. Use the cleaning solution sparingly and blot excess moisture during the cleaning process.
- Gently Blot Stains: When dealing with stains, gently blot them with a clean cloth instead of rubbing or scrubbing vigorously. Rubbing can spread the stain and damage the fabric fibers, making it harder to remove the stain entirely.
- Proper Ventilation: Ensure proper ventilation during and after the cleaning process to help expedite drying and prevent odors. Open windows, turn on fans, or use dehumidifiers to aid in the drying process.
- Regular Maintenance: To keep your upholstery looking its best, make a habit of regularly vacuuming or brushing the fabric to remove surface dirt, dust, and pet hair. This helps prevent dirt from becoming deeply embedded in the fibers.
- Professional Cleaning: For heavily soiled or delicate upholstery, it may be beneficial to seek professional cleaning services. Professional cleaners have the expertise and specialized equipment to tackle tough stains and handle delicate fabrics with care.
By following these tips and tricks, you can enhance the effectiveness of the Rug Doctor Upholstery Cleaner and maintain the beauty and cleanliness of your upholstery for years to come.
Cleaning Different Types of Upholstery
When using the Rug Doctor Upholstery Cleaner, it’s important to consider the specific needs and requirements of different types of upholstery fabrics. Here are some guidelines for cleaning common upholstery materials:
- Cotton and Linen: Cotton and linen upholstery can generally be cleaned using the Rug Doctor Upholstery Cleaner. However, it’s essential to check the care label and perform a colorfastness test before proceeding. These fabrics can be sensitive to water and may require more delicate cleaning methods.
- Polyester and Microfiber: Polyester and microfiber upholstery are usually more durable and stain-resistant. This makes them easier to clean with the Rug Doctor Upholstery Cleaner. Nonetheless, always check the care label and conduct a spot test to ensure compatibility.
- Leather: Leather upholstery requires specialized care. Avoid using the Rug Doctor Upholstery Cleaner on leather, as it may cause damage. Instead, refer to the manufacturer’s recommendations for proper cleaning methods specifically designed for leather upholstery.
- Velvet and Velvet-like Materials: Velvet upholstery can be delicate and easily damaged if not cleaned properly. It’s best to consult a professional cleaner for velvet or velvet-like materials. They will have the expertise and specialized tools to ensure a gentle and effective cleaning process.
- Silk and Delicate Fabrics: Silk and other delicate upholstery fabrics may require professional cleaning services. The Rug Doctor Upholstery Cleaner may not be suitable for these materials, as they can be sensitive to moisture and specific cleaning agents. Seek professional advice to prevent any potential damage.
- Patterned Fabrics: Patterned upholstery may require additional care during the cleaning process. Be mindful of the pattern and ensure that the Rug Doctor Upholstery Cleaner is evenly distributed across the fabric. Avoid excessive scrubbing that could disrupt the pattern or fade the colors.
- Antique and Vintage Upholstery: Antique and vintage upholstery often require delicate and specialized care. Avoid using the Rug Doctor Upholstery Cleaner on these pieces without consulting a professional. They can offer insights into appropriate cleaning methods that will preserve the unique characteristics of these valuable pieces.
It’s important to note that these guidelines are general recommendations. Always refer to the care instructions provided by the manufacturer or seek professional advice when unsure about the appropriate cleaning method for your specific upholstery fabric. Adapt your cleaning approach accordingly to ensure safe and effective results.
Frequently Asked Questions about Rug Doctor Upholstery Cleaner
Here are some commonly asked questions about Rug Doctor Upholstery Cleaner:
1. Can I use Rug Doctor Upholstery Cleaner on all types of upholstery?
Rug Doctor Upholstery Cleaner can be used on many upholstery fabrics, such as cotton, linen, polyester, and microfiber. However, it’s important to always check the care label and perform a colorfastness test before using the cleaner. Avoid using the cleaner on leather, silk, velvet, or delicate fabrics, as they may require specialized cleaning methods.
2. How often should I clean my upholstery?
The frequency of upholstery cleaning depends on factors such as usage, level of soiling, and the presence of pets or allergies. As a general guideline, it’s recommended to clean upholstery every 12-18 months to maintain its appearance and hygiene. However, high-traffic areas or heavily soiled upholstery may require more frequent cleaning.
3. Can I spot-clean stains with Rug Doctor Upholstery Cleaner?
Rug Doctor Upholstery Cleaner can be used to spot-clean stains on upholstery. Apply a small amount of the cleaner directly to the stain, gently agitate it with a clean cloth or sponge, and blot out the moisture using a separate clean cloth. Be sure to follow the instructions provided by Rug Doctor for spot cleaning.
4. How long does it take for upholstery to dry after using the cleaner?
The drying time of upholstery varies depending on factors such as fabric thickness, room temperature, and air circulation. It typically takes several hours to overnight for upholstery to dry completely after cleaning. To expedite the drying process, open windows, use fans, and ensure adequate air circulation in the room.
5. Can I use Rug Doctor Upholstery Cleaner in a carpet cleaning machine?
No, Rug Doctor Upholstery Cleaner is specifically formulated for upholstery and should not be used in carpet cleaning machines. Instead, use Rug Doctor Carpet Cleaner for carpeted surfaces. Always follow the instructions and guidelines provided by Rug Doctor for the appropriate use of their cleaning products.
6. Can I use Rug Doctor Upholstery Cleaner on outdoor furniture?
Rug Doctor Upholstery Cleaner is designed for indoor use and may not be suitable for outdoor furniture. Outdoor furniture often requires specialized cleaners designed for use in outdoor environments. Check the manufacturer’s recommendations or consult a professional cleaner for guidance on cleaning outdoor upholstery.
7. Can Rug Doctor Upholstery Cleaner remove pet odors?
Rug Doctor Upholstery Cleaner is effective at removing dirt, stains, and general odors from upholstery. However, it may not completely eliminate intense or persistent pet odors. In such cases, consider using an enzyme-based pet odor remover or consult a professional cleaner who specializes in pet odor removal.
8. How can I maintain and prolong the cleanliness of my upholstery?
Regular maintenance is key to prolonging the cleanliness of upholstery. Vacuum or brush your upholstery regularly to remove surface dirt, debris, and pet hair. Address spills and stains immediately to prevent them from setting in. Consider using fabric protectors to repel liquid spills and reduce the chances of stains. Additionally, avoid eating or drinking on upholstered furniture to minimize the risk of spills and stains.
These FAQs provide important information about Rug Doctor Upholstery Cleaner, its compatibility with different upholstery types, usage guidelines, and maintenance tips. If you have any specific concerns or questions, it’s always beneficial to consult the manufacturer or professional upholstery cleaning services for personalized advice.