
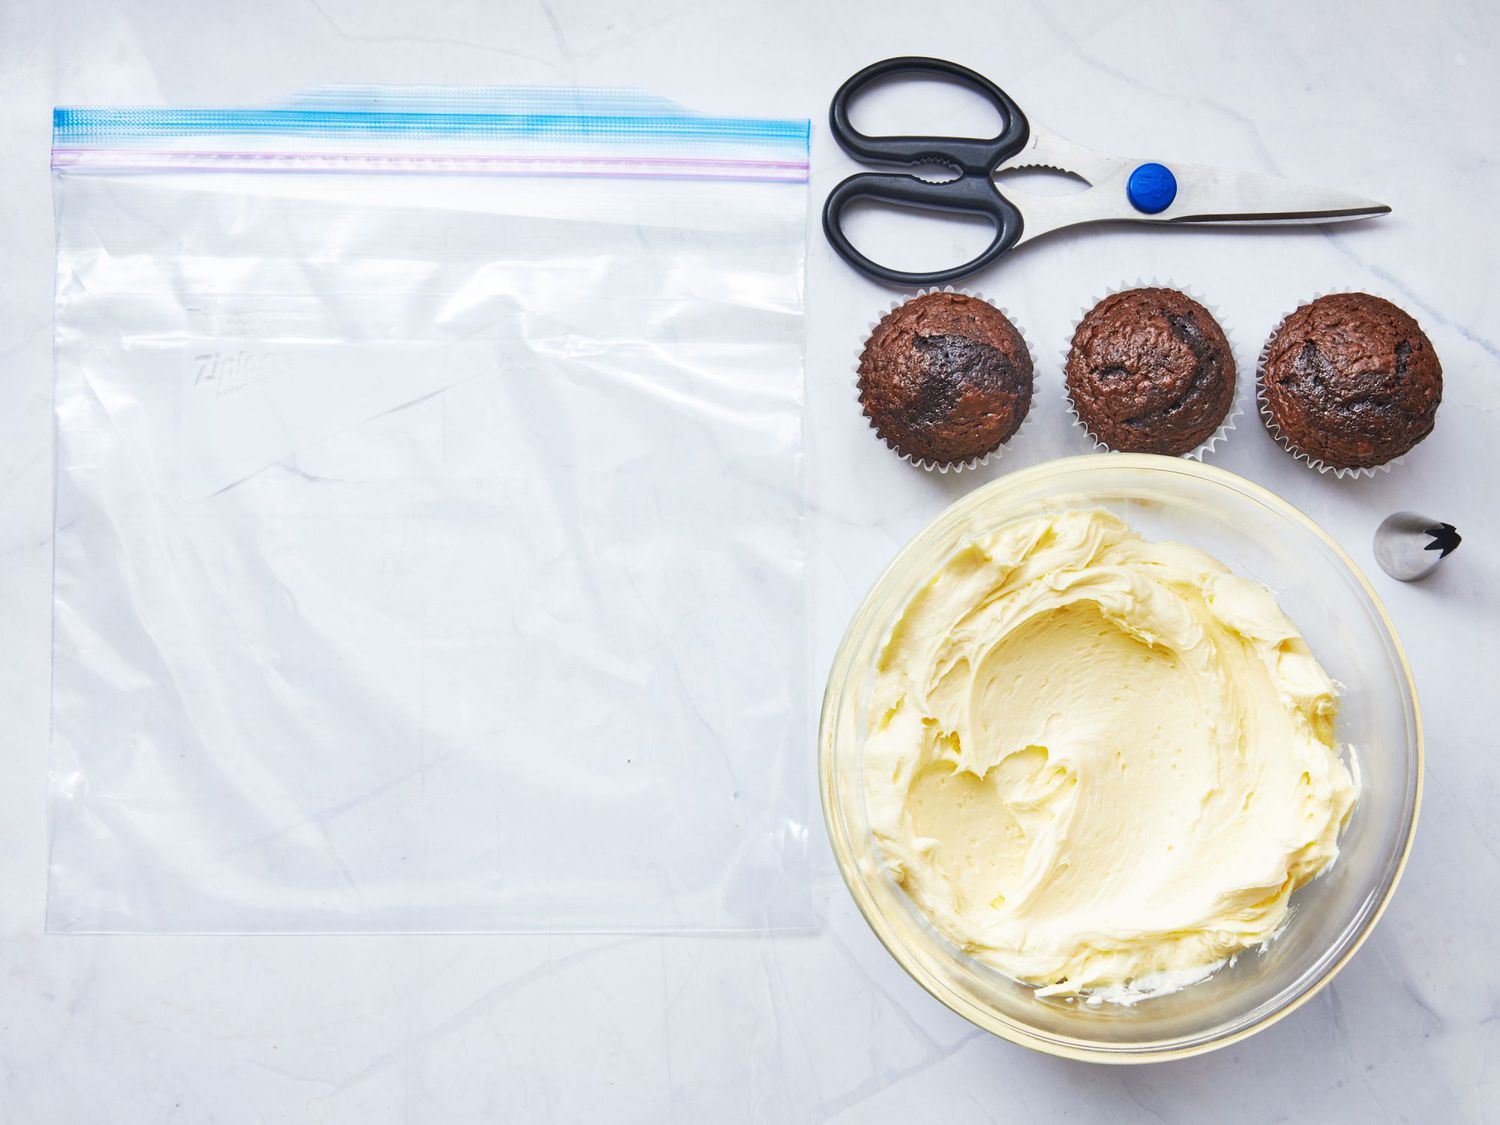
Materials Needed
To turn a plastic storage bag into a piping bag, you will need a few simple materials that you likely already have in your kitchen. Here is a list of what you’ll need:
- A plastic storage bag: Choose a durable bag that is freezer-safe and has a zip-lock seal. A quart-sized or gallon-sized bag will work well.
- Scissors: Make sure you have a pair of sharp scissors on hand.
- Frosting or icing: This can be homemade or store-bought, depending on your preferences. Ensure it is at the right consistency for piping.
- A rubber band: This will come in handy later on in the process.
That’s it! With these simple materials, you’ll be able to transform a regular plastic bag into a handy piping bag, opening up a world of creative possibilities in your baking endeavors. Now that you have your supplies ready, let’s move on to the next steps.
Step 1: Gather Your Supplies
Before we begin, it’s important to gather all the necessary supplies for turning your plastic storage bag into a piping bag. Having everything ready will make the process go smoothly. Here’s what you’ll need:
- A plastic storage bag: Choose a strong, durable bag that is freezer-safe and has a zip-lock seal. This will ensure that the bag doesn’t tear or leak while you’re piping.
- Scissors: Make sure you have a pair of sharp scissors within reach. You’ll need them to cut the tip of the bag later on.
- Frosting or icing: Prepare your desired frosting or icing in a separate bowl. Choose a smooth, pipeable consistency so that it flows easily through the bag.
- A rubber band: This will come in handy for securing the top of the bag and preventing any frosting from spilling out.
Once you have gathered these supplies, find a clean and flat surface to work on. Having a clutter-free area will make the process more organized and efficient.
Remember, it’s important to use a sturdy plastic storage bag that can withstand the pressure of piping. Freezer-safe bags are often more durable and less likely to burst while squeezing the frosting. Additionally, make sure your scissors are sharp to ensure a clean and precise cut.
Preparing all the necessary supplies beforehand will save you time and frustration during the piping process. Now that you have everything you need, let’s move on to the next step: preparing the bag.
Step 2: Prepare the Bag
Now that you have gathered all of your supplies, it’s time to prepare the plastic storage bag for piping. Follow these simple steps:
- Open the plastic storage bag: Start by opening the zip-lock seal of the bag. Make sure it is fully open, allowing easy access for filling.
- Scoop the frosting into the bag: Take your prepared frosting or icing and scoop it into the bag. You can use a spoon or spatula to transfer it. Be mindful not to overfill the bag, as this can make it difficult to control the flow while piping.
- Push the frosting towards one corner: Once the frosting is in the bag, gently push it towards one of the bottom corners. This will make it easier to control the piping and create more precise designs.
- Seal the bag: Squeeze out any excess air from the bag and then seal it tightly. You can use your fingers or a rubber band to secure the top of the bag. This will prevent any frosting from leaking out while you’re piping.
It’s important to ensure that the bag is properly sealed to avoid any mess or interruptions in your piping. The tight seal will keep the frosting contained within the bag, allowing you to have complete control over your decorating.
Now that your bag is prepared and ready to go, you can move on to the next step: cutting the tip of the bag.
Step 3: Add the Frosting
With your bag prepared, it’s time to add the frosting or icing. Follow these steps to ensure a smooth and mess-free process:
- Hold the bag securely: With one hand, firmly hold the sealed top of the bag, ensuring a tight grip to prevent any frosting from escaping.
- Squeeze the frosting towards the tip: Using your other hand, gently apply pressure to the frosting, pushing it towards the cut tip of the bag. This will help eliminate any air bubbles and ensure a continuous flow as you pipe.
- Guide the frosting with your fingers: As you squeeze the frosting towards the tip, use your fingers to guide and control the flow. This will allow you to create precise lines, shapes, and designs as you pipe onto your desired surface.
It’s important to maintain a steady and consistent pressure as you pipe, ensuring that the frosting flows evenly. Take your time and experiment with different amounts of pressure to achieve the desired thickness and shape of your decorations.
Make sure to use gentle and controlled movements to avoid over-squeezing or causing the frosting to splatter. Practice piping on a test surface or parchment paper to get a feel for the pressure needed and the speed at which the frosting flows through the bag.
Now that you have added the frosting to the bag, you are ready to proceed to the next step: twisting and sealing the bag.
Step 4: Twist and Seal the Bag
Once you have added the frosting to the bag, it’s important to twist and seal the top of the bag to maintain control and prevent any frosting from leaking. Follow these steps:
- Hold the bag with one hand: Grip the top of the bag firmly with one hand, ensuring that the frosting is secured.
- Twist the top of the bag: With your other hand, twist the top of the bag clockwise. Continue to twist until the frosting is tightly enclosed in the twisted portion of the bag.
- Secure the twisted portion: To prevent the twisted portion from untwisting, fold it down towards the frosting and press it gently against the bag.
- Optional: Use a rubber band or clip: If you want extra security, you can use a rubber band or clip to secure the twisted portion of the bag. This will ensure that it stays twisted and sealed, allowing you to focus on piping without any interruptions.
The twisting and sealing of the bag are crucial for maintaining control over the frosting flow and preventing any unwanted splatters or leaks. It’s important to have a tight and secure seal so that you can pipe with precision and confidence.
By twisting and securing the bag, you are also able to easily control the amount of frosting that is dispensed when applying pressure to the bag. This allows for more accurate and consistent piping, resulting in beautifully decorated creations.
With the bag twisted and sealed, you’re now ready to move on to the next step: cutting the tip of the bag to create your desired piping size.
Step 5: Cut the Tip
Now that your bag is securely twisted and sealed, it’s time to cut the tip to create the desired size for your piping. Follow these steps to ensure a clean and precise cut:
- Hold the bag with one hand: Grip the twisted portion of the bag firmly with one hand, ensuring that the frosting is secured.
- Use sharp scissors: With your other hand, take a pair of sharp scissors and carefully cut a small portion from the tip of the bag. Start with a smaller cut and gradually increase the size as needed.
- Experiment with different sizes: Depending on the design you want to create, you can cut the tip larger or smaller. A smaller cut will give you more control for intricate details, while a larger cut will allow for thicker lines or frosting dollops.
Take your time while cutting the tip and make small, controlled cuts. This will help you achieve the desired piping size without accidentally cutting too much off at once.
If you’re unsure about the ideal size, it’s always better to start with a smaller cut and gradually increase it as needed. You can always make the hole larger, but once it’s too big, it’s difficult to make it smaller again.
Remember, the size of the cut will determine the thickness of your piping and the amount of frosting that is dispensed when you apply pressure to the bag. Experimentation is key to finding the perfect size for your specific needs and designs.
Now that you have cut the tip of the bag, you’re ready to move on to the next step: practicing the squeezing technique.
Step 6: Practice Squeezing
Before you start decorating your cakes or pastries, it’s important to take some time to practice your squeezing technique with the piping bag. This will help you get a feel for the pressure needed and ensure that you have good control over the frosting flow. Follow these steps to practice squeezing:
- Hold the piping bag correctly: Hold the twisted portion of the bag with one hand, ensuring that the tip is facing downwards.
- Position the bag above your practice surface: Hold the bag above a piece of parchment paper or a practice cake, with the tip slightly touching the surface.
- Apply gentle pressure: Start squeezing the bag gently to apply pressure to the frosting. As you squeeze, you’ll see the frosting start to flow out of the tip.
- Practice consistent pressure: Experiment with applying different amounts of pressure to see how it affects the thickness and shape of the piped design. Aim for a steady and consistent pressure to maintain an even flow of frosting.
- Practice different techniques: Try creating different shapes, lines, and designs by moving the piping bag in different directions and at varying speeds. This will help you gain confidence and dexterity in piping.
Take your time during the practice session and focus on developing a smooth and controlled squeezing technique. Pay attention to the pressure you apply, the speed at which you move the bag, and the consistency of the frosting flow.
Don’t be afraid to make mistakes during practice. It’s all part of the learning process. Use this time to experiment and familiarize yourself with the capabilities of your piping bag.
Once you feel comfortable and confident in your squeezing technique, you’re ready to move on to the final step: decorating your delicious treats!
Step 7: Start Decorating
Now that you’ve mastered the squeezing technique and feel confident with your piping bag, it’s time to let your creativity shine and start decorating your cakes, cookies, or any other delicious treats you have in mind. Follow these steps to create beautiful and impressive designs:
- Choose your design: Decide on the pattern, shape, or design you want to create with your frosting. You can start with simple lines, swirls, or dots, and gradually try more intricate designs as your skills improve.
- Hold the piping bag correctly: Hold the twisted portion of the bag with one hand, making sure to have a steady grip on the bag.
- Position the bag at the desired angle: Hold the bag with the tip slightly above the surface of the cake or treat. Position it at the appropriate angle to achieve the desired shape or line.
- Apply steady and even pressure: Squeeze the bag with a steady and even pressure to create a smooth and consistent flow of frosting. Move the bag in a controlled manner to achieve the desired shape or pattern.
- Practice control and precision: As you pipe, focus on maintaining control and precision in your movements. Adjust the speed and pressure as needed to achieve the desired thickness and shape of your decorations.
- Experiment with different tips: If you have multiple piping tips, don’t be afraid to experiment and switch them out to create various textures and designs. Each tip can offer a unique look and feel to your decorations.
- Have fun and be patient: Decorating with a piping bag takes practice and patience. Don’t get discouraged if your first attempts don’t turn out as expected. Enjoy the process, embrace imperfections, and continue to refine your skills.
Remember, the more you practice, the more comfortable you will become with piping and the more creatively you can decorate your treats. Don’t be afraid to experiment and try new techniques. With time and practice, you’ll be able to create stunning and professional-looking designs.
So go ahead, let your imagination run wild, and enjoy the art of piping with your transformed plastic storage bag!