
Selecting the Right Time and Location
When it comes to transplanting an orchid plant, timing and location play crucial roles in ensuring its successful transition to a new home. Orchids are sensitive plants, and disturbing their roots can cause stress and hinder their growth. Therefore, it’s important to choose the right time and location for transplanting.
Firstly, consider the season. In general, it’s best to transplant orchids during their dormant period, which typically occurs after they have finished flowering. This allows the plant to focus its energy on establishing new roots and acclimating to its new container. However, if your orchid is showing signs of distress or overcrowding, it may be necessary to transplant it outside of its dormant period.
Secondly, assess the current location of your orchid. Is it receiving the right amount of light and temperature? Orchids thrive in bright, indirect light and prefer temperatures between 60°F to 80°F (15°C to 27°C). Choose a new location that can provide similar conditions to minimize shock to the plant.
Additionally, consider the humidity level in the new location. Orchids require a humid environment to thrive. If the air in your home is dry, consider placing a humidity tray or using a humidifier near the orchid to create a suitable microclimate.
Finally, make sure you have enough space in the new location to accommodate the orchid and its potential growth. Orchids need room to spread their roots and foliage. Select a container that is slightly larger than the current one to allow for growth without overwhelming the plant.
By carefully assessing the timing and location for transplanting your orchid, you can provide the best conditions for its successful adaptation to its new home. Remember to take into account the plant’s dormant period, light, temperature, humidity, and space requirements to ensure a smooth transition for your orchid.
Gathering the Necessary Tools and Materials
Before transplanting your orchid plant, it is important to gather all the necessary tools and materials to ensure a smooth and efficient process. Having everything you need on hand will help minimize stress and potential damage to the plant.
Here are the essential tools and materials you will need:
- Pot or Container: Select a new container that is slightly larger than the current one. Choose a pot with drainage holes to ensure proper water drainage and prevent root rot.
- Potting Mix: Use a high-quality orchid potting mix specifically designed to provide the ideal balance of air circulation, moisture retention, and drainage for orchids.
- Gloves: Protect your hands and prevent the transfer of any harmful substances or bacteria to the plant by wearing gardening gloves.
- Shears or Scissors: Have a clean pair of shears or scissors on hand to trim any damaged or overgrown roots during the transplantation process.
- Watering Can or Spray Bottle: Ensure you have a watering can or spray bottle to water the orchid after transplanting.
- Labels: Use labels or markers to identify the orchid and note the date of transplantation. This will help you keep track of your plants and their care requirements.
- Wiping Cloth or Paper Towels: Keep a cloth or paper towels nearby to wipe away any excess potting mix or water during the transplanting process.
- Root Hormone (optional): If you have any damaged or weak roots, a root hormone can help promote healthy root growth and improve the plant’s chances of survival.
Having these tools and materials readily available before beginning the transplantation process will save you time and ensure that you can complete the task smoothly. It is always better to be prepared and have everything you need within reach.
Preparing the New Container
Preparing the new container is an important step in the orchid transplanting process as it sets the foundation for the plant’s future growth and overall health. Proper preparation ensures that the new container provides the necessary conditions for the orchid to thrive and helps prevent any potential issues that may arise during the transplantation.
Here are the steps to prepare the new container:
- Clean the Container: Start by cleaning the new container thoroughly. Wash it with warm soapy water to remove any dirt, dust, or residue that may be present. Rinse it well and allow it to dry completely to prevent the growth of harmful bacteria or fungi.
- Add Drainage Material: Place a layer of drainage material such as small rocks, pebbles, or broken pottery at the bottom of the container. This helps to ensure proper water drainage and prevents the roots from sitting in water, which can lead to rot.
- Fill with Potting Mix: Fill the container with the appropriate orchid potting mix. It should be well-draining and provide adequate aeration for the roots. Avoid using regular garden soil as it can compact and suffocate the roots.
- Tap and Settle the Mix: Gently tap the container on a hard surface to settle the potting mix. This will help eliminate any air pockets and ensure that the mix is evenly distributed throughout the container.
- Level the Surface: Use your fingers or a small garden tool to level the surface of the potting mix. This provides a stable base for the orchid and helps prevent the plant from toppling over.
Once you have prepared the new container, it is ready to receive the orchid. Taking the time to properly prepare the container will provide a suitable environment for the orchid’s roots to grow and establish themselves in their new home. It lays the foundation for overall plant health and better ensures a successful transplantation process.
Preparing the Orchid Plant
Before transplanting your orchid plant into a new container, it is essential to prepare the plant itself. This will help minimize stress and potential damage during the transplantation process, improving the chances of successful adaptation to its new environment.
Here are the steps to prepare the orchid plant:
- Water the Orchid: Thoroughly water the orchid a day or two before the planned transplant. This ensures that the plant is adequately hydrated and eases the removal from the current container.
- Inspect the Plant: Carefully examine the orchid plant for any signs of pests, diseases, or damaged areas. If you notice any issues, take appropriate measures to address them before proceeding with the transplant.
- Remove Dead Flowers and Foliage: Trim off any dead flowers, stems, or yellowing leaves. This helps redirect the plant’s energy towards root development and encourages new growth.
- Trim Long Roots: If the orchid has long, overgrown roots, you can opt to trim them slightly. Use clean and sharp scissors to remove any dead or damaged sections. Ensure that you leave a sufficient number of healthy roots intact to support the plant.
- Disinfect Tools: Before using any tools on the orchid, make sure they are clean and disinfected. This helps prevent the spread of diseases or harmful pathogens.
By preparing the orchid plant before transplanting, you are taking proactive steps to ensure its well-being and increase the chances of a successful transplantation process. By hydrating the plant, inspecting for issues, removing dead flowers and foliage, and trimming overgrown roots, you are promoting the overall health and vitality of the orchid as it transitions to its new container.
Removing the Orchid from its Current Container
When it comes to transplanting an orchid plant, the process of removing it from its current container requires care and delicacy. Taking the right steps to safely extract the orchid ensures minimal damage to the roots and promotes a successful transition to its new home.
Follow these steps to remove the orchid from its current container:
- Moisten the Potting Mix: Before attempting to remove the orchid, moisten the potting mix in the current container. This helps hold the roots together and reduces the likelihood of them getting damaged during the extraction process.
- Gently Tip the Container: Hold the orchid plant at the base and gently tilt the container to one side. Tap the bottom of the container to loosen the plant’s root system. Alternatively, you can carefully squeeze the sides of the container to loosen the potting mix.
- Support the Stem: Hold the stem or the base of the orchid firmly to provide support and prevent any unnecessary bending or snapping of the plant.
- Slowly Slide the Orchid Out: With a gentle and steady hand, slide the orchid out of its current container. If the roots are tightly entangled, use a sterile knife or your fingers to carefully separate them.
It’s important to note that orchid roots are fragile, and excessive force or rough handling can cause damage. Be patient and take your time to ensure the safe extraction of the orchid. If there are any stubborn roots that won’t come free, gently wiggle them back and forth until they release.
Once you have successfully removed the orchid from its current container, proceed with the next steps of the transplanting process to provide the plant with a new and suitable environment for continued growth and development.
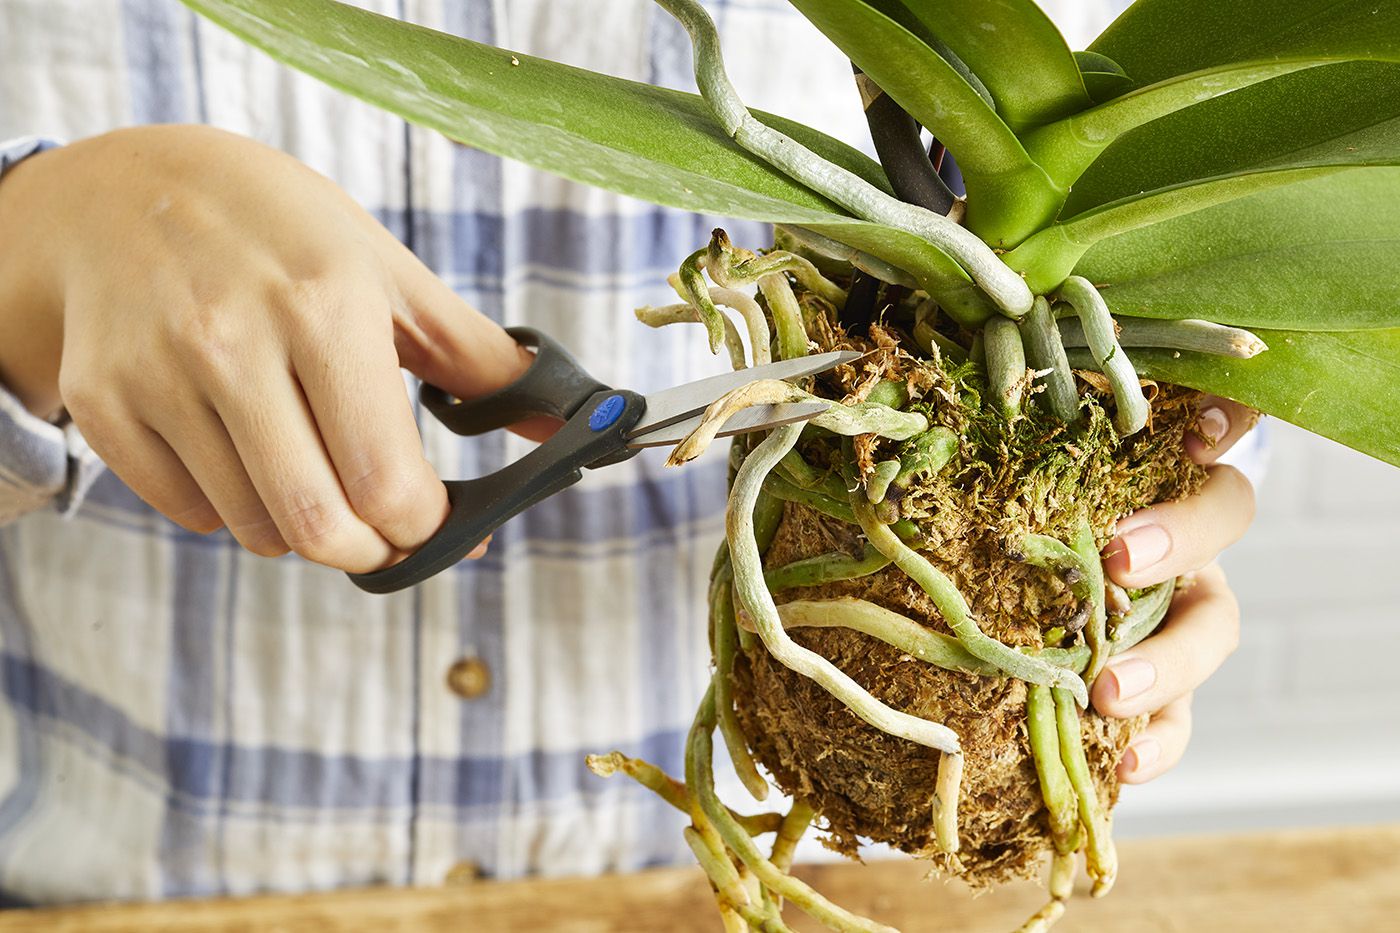
Inspecting the Roots and Trimming if Necessary
After removing the orchid from its current container, it is crucial to inspect the roots to ensure they are healthy and free from any potential issues. This step allows you to identify any damaged or unhealthy roots that may impede the plant’s growth and take appropriate measures to promote optimal root health.
Follow these steps to inspect the roots of your orchid:
- Observe Root Color and Texture: Take a close look at the roots of the orchid. Healthy roots should be firm, plump, and have a greenish or whitish color. Avoid roots that appear mushy, slimy, or brownish, as these may be indications of rot or decay.
- Check for Pest Infestation: Examine the roots for any signs of pest infestation, such as larvae, insects, or webs. If you notice any, it’s important to treat the roots with appropriate insecticides or consult with a professional for guidance.
- Trimming Damaged Roots: If you find any roots that are damaged, dead, or decaying, it is necessary to trim them. Use clean and sterilized shears or scissors to carefully remove these unhealthy sections. Make clean cuts just above the damaged areas, ensuring that you leave behind healthy roots.
It’s important to note that when trimming orchid roots, less is often more. Only remove the damaged portions and avoid excessive trimming, as it can stress the plant further. Ideally, aim to retain a sufficient number of healthy roots to support the orchid’s growth and development.
After trimming, it is recommended to dust the cut ends of the roots with a rooting hormone to stimulate new growth and prevent any potential infection. However, this step is optional and depends on the specific needs of your orchid.
By thoroughly inspecting and trimming the roots of your orchid, you are ensuring the plant’s overall health and promoting its ability to establish a strong and healthy root system in its new container. This step sets the foundation for successful growth and development in the transplanting process.
Placing the Orchid in the New Container
Now that you have inspected the roots and trimmed any damaged portions, it’s time to carefully place the orchid in its new container. Proper placement ensures that the roots are positioned correctly for optimal growth and stability within the container.
Follow these steps to place the orchid in the new container:
- Position the Orchid: Hold the orchid plant at the base and gently lower it into the new container. Make sure to position the orchid towards the center of the container, leaving enough space for the roots to spread out.
- Add Potting Mix: Once the orchid is positioned, fill the gaps around the roots with the orchid potting mix. Gently press the mix around the roots to provide support and stability to the plant.
- Avoid Overpacking: Be cautious not to overpack the potting mix. Give the roots some space to breathe and allow for proper airflow and drainage.
- Check the Depth: Ensure that the base of the orchid, where the stems emerge from the roots, is slightly above the level of the potting mix. This prevents water accumulation and potential rot.
While placing the orchid in its new container, it’s essential to maintain a gentle touch to prevent any unnecessary damage to the roots. Avoid applying excessive pressure or pushing the orchid too deeply into the potting mix, as this can compact the roots and hinder their growth.
Once the orchid is appropriately positioned and surrounded by the potting mix, move on to the next steps of securing the plant and providing the necessary care for its successful transplantation.
Adding New Potting Mix and Securing the Plant
After placing the orchid in the new container, the next step is to add fresh potting mix around the roots and securely anchor the plant. This process provides the orchid with the support, nutrition, and stability it needs to thrive in its new environment.
Follow these steps to add new potting mix and secure the orchid:
- Fill in Gaps: Slowly add fresh potting mix around the orchid’s roots, ensuring that it covers the roots completely. Gently tap or shake the container to allow the mix to settle around the roots.
- Support the Plant: While adding the potting mix, hold the orchid at the base to provide stability and prevent unnecessary movement. Be careful not to damage or disturb the delicate roots.
- Avoid Overpacking: Avoid compacting the potting mix too tightly. It’s important to maintain good airflow and drainage for the roots.
- Secure the Plant: Once the potting mix is added, press it gently around the base of the orchid to secure it in place. This will help prevent the plant from wobbling, ensuring stability as it continues to grow.
When adding fresh potting mix, you can use a mixture specific to orchids, which typically consists of coarse materials like bark, sphagnum moss, and perlite. This allows for excellent drainage and aeration, which are essential for orchid roots.
Ensuring the orchid is securely anchored in the new potting mix reduces stress on the plant and aids in the establishment of healthy roots. By providing the right support and stability, you are setting the stage for successful growth and development.
Watering the Orchid after Transplanting
Proper watering after transplanting is crucial for the orchid’s survival and successful establishment in its new container. Adequate hydration ensures that the plant can recover from the stress of transplantation and encourages healthy root growth.
Here are the steps to effectively water your orchid after transplanting:
- Moisten the Potting Mix: Begin by moistening the potting mix around the orchid gently. Use a watering can or a spray bottle to evenly distribute water. Avoid saturating the potting mix excessively, as it may lead to waterlogged conditions that can harm the roots.
- Monitor Moisture Levels: After watering, check the moisture level of the potting mix regularly. Orchids prefer a slightly drier environment, so allow the top layer of the potting mix to dry out between waterings. Stick your finger about an inch into the mix to assess the moisture level.
- Watering Frequency: The frequency of watering depends on various factors such as the type of orchid, the potting mix used, and environmental conditions. In general, most orchids require watering once a week. However, it is essential to adjust the watering schedule based on the specific needs of your orchid.
- Watering Technique: When watering, make sure to thoroughly wet the potting mix. Allow water to flow freely through the container’s drainage holes, ensuring that excess water drains away completely. Avoid leaving standing water in the container, as it can lead to root rot.
- Consider Humidity: Orchids thrive in humid environments. If the air in your home is dry, consider placing a humidity tray filled with water near the orchid or using a humidifier. This will help create a favorable microclimate around the plant.
It’s important to remember that overwatering can be just as harmful as underwatering for orchids. The goal is to provide the right balance of moisture without drowning the roots. Carefully observe your orchid’s response to watering and adjust accordingly.
By following proper watering techniques and monitoring the moisture levels of your orchid, you are promoting its health and facilitating the successful adaptation to its new container.
Providing the Right Care After Transplanting
After transplanting your orchid into a new container, providing the right care is essential for its health and continued growth. Proper care ensures that the orchid can recover from the transplantation process and adapt successfully to its new environment.
Here are some important care practices to follow after transplanting your orchid:
- Placement: Choose an appropriate location for your orchid. It should receive bright, indirect light, avoiding direct sunlight. Orchids thrive in temperatures between 60°F to 80°F (15°C to 27°C), so aim to keep them in a similar temperature range.
- Avoid Disturbance: Limit any unnecessary handling or movement of the orchid after transplanting. This allows the plant to focus its energy on establishing new roots and acclimating to the new container.
- Air Circulation: Orchids require good air circulation to prevent the growth of harmful bacteria or fungal diseases. Avoid placing the orchid in a stagnant or excessively humid environment.
- Fertilizing: Wait at least a month before fertilizing the newly transplanted orchid to avoid burning or damaging the delicate roots. Once the plant has acclimated, use a balanced orchid fertilizer according to the manufacturer’s instructions.
- Maintain Humidity: Orchids appreciate high humidity levels. If the air in your home is dry, consider using a humidity tray, misting the leaves occasionally, or using a humidifier to create a suitable environment.
- Monitor Watering: It’s important to maintain a consistent and appropriate watering regimen. As mentioned earlier, most orchids prefer a slightly drier environment, so allow the top layer of the potting mix to dry out between waterings. Adjust the watering frequency as needed based on the specific needs of your orchid.
- Regular Inspections: Take time to regularly inspect your orchid for any signs of pests, diseases, or waterlogged conditions. Address any issues promptly to prevent further damage or spread of problems.
Each orchid is unique, so it’s important to observe and understand the specific care requirements of your particular orchid species. Pay attention to any specific care guidelines or advice provided with your orchid to ensure its specific needs are met.
By providing the right care after transplanting, you are promoting the orchid’s health, growth, and successful adaptation to its new container. With patience and proper care, your orchid will flourish and bring you joy for years to come.
Troubleshooting Common Issues
While transplanting an orchid can be an exciting process, it may sometimes come with potential challenges or issues. Understanding and troubleshooting common problems that may arise can help ensure the health and well-being of your orchid.
Here are some common issues that may occur after transplanting an orchid, along with potential solutions:
- Root Rot: Overwatering or poor drainage can lead to root rot, characterized by mushy, brown roots. To address root rot, carefully remove the affected roots, improve drainage, and adjust your watering regimen to ensure the potting mix dries out between waterings.
- Wilting or Drooping: Wilting or drooping leaves may indicate underwatering. Ensure that your orchid is receiving enough water by moistening the potting mix adequately during watering. If the issue persists, check for root rot or examine environmental factors such as humidity and temperature.
- Yellow or Brown Leaves: Yellowing or browning leaves could be a sign of various issues, including overwatering, underwatering, insufficient light, or nutrient deficiencies. Assess the specific conditions of your orchid and adjust watering, lighting, and fertilizing accordingly.
- Lack of Growth or Flowering: If your orchid is not showing signs of new growth or flowering, assess its light, temperature, humidity, and fertilizing conditions. Ensure that it is receiving appropriate levels of light, suitable temperature ranges, sufficient humidity, and proper fertilizer according to its specific needs.
- Pest Infestation: Common pests that may affect orchids include aphids, scale insects, and spider mites. Monitor your orchid regularly for signs of pests such as small insects, sticky residue, or webbing. Treat infestations with appropriate insecticides or use natural pest control methods.
- Leaf Spots or Fungal Diseases: Leaf spots or fungal diseases may occur due to high humidity, poor air circulation, or excessive moisture on the leaves. Improve air circulation, avoid overhead watering, remove affected leaves promptly, and use appropriate fungicides if necessary.
If you encounter any issues or challenges with your orchid after transplanting, it’s important to take prompt action and address the problem. Conduct regular inspections, maintain appropriate environmental conditions, and provide care tailored to the specific needs of your orchid species.
Remember, each orchid is unique, and troubleshooting may require some trial and error. By staying attentive and proactive, you can help ensure the long-term health and vitality of your orchid.