
Selecting the Right Cactus for Your Home
Choosing the perfect cactus for your home is the first step to ensure successful care and growth. With a wide variety of cactus species to choose from, it’s important to consider several factors before making your selection.
Firstly, assess the available space in your home. Cacti come in various sizes, ranging from small miniature varieties to large columnar cacti. If you have limited space, opt for compact and smaller cacti that can be easily accommodated on windowsills or shelves. On the other hand, if you have ample space, you can consider larger cacti as statement pieces in your living area.
Secondly, consider the lighting conditions in your home. Different cacti have different light requirements. Some thrive in bright direct sunlight, while others prefer partial shade. Assess the amount of natural light that enters your home and choose a cactus that matches those conditions. Keep in mind that most cacti require ample sunlight to thrive, so ensure that you have a suitable location to provide them with adequate light.
Next, consider your level of experience in caring for plants. Some cacti are more forgiving and require minimal maintenance, making them perfect for beginners. If you’re new to cactus care, opt for varieties that are known to be resilient and can withstand occasional neglect. However, if you’re an experienced plant caregiver, you can consider more delicate and rare cacti that require precise care and attention.
Lastly, take into consideration the aesthetic appeal of the cactus. Cacti come in a wide array of shapes, colors, and textures. Choose a cactus that aligns with your personal taste and complements your home’s décor. Whether you prefer spiky globular cacti or slender columnar ones, there’s a cactus out there that will add a unique touch to your living space.
By considering these factors carefully, you can select the right cactus that suits your home and your ability to care for it. Remember, each cactus is unique and has different care requirements, so take the time to research and understand the specific needs of the cactus you choose. This will ensure a harmonious and thriving relationship between you and your cactus.
Providing the Ideal Lighting Conditions
Proper lighting is crucial for the health and growth of your cactus. Most cacti originate from desert environments and require ample sunlight to thrive. Here are some tips to provide your cactus with the ideal lighting conditions:
1. Direct sunlight: Many cacti thrive in direct sunlight, so place them near a south-facing window where they can receive at least 6 hours of direct sunlight daily. Keep in mind that some cacti can tolerate more intense sunlight than others, so monitor your cactus and adjust its placement accordingly.
2. Indirect sunlight: If your home doesn’t have a window that receives direct sunlight, you can still provide your cactus with sufficient light by placing it near a window with indirect light. This can be a west or east-facing window, where the intensity of the sunlight is lower compared to south-facing windows.
3. Rotate your cactus: To ensure even growth, rotate your cactus every few weeks, so all sides receive equal exposure to sunlight. This prevents your cactus from leaning or growing lopsided due to uneven light distribution.
4. Avoid extreme heat: While cacti love sunlight, they can be sensitive to extreme heat. Protect your cactus from direct sunlight during the hottest part of the day, especially during the summer months. Consider using curtains or sheer blinds to filter the sunlight if necessary.
5. Supplemental lighting: If you live in an area with limited natural light or during the winter months when sunlight is scarce, consider using artificial grow lights. LED grow lights can provide the necessary light spectrum for your cactus to thrive. Place the lights a few inches above your cactus to mimic natural sunlight.
Remember, finding the right balance of light is crucial as too little or too much light can negatively impact your cactus. Observe your cactus closely and adjust the lighting conditions if you notice signs of sunburn (brown patches on the cactus) or etiolation (stretching of the cactus towards the light).
By providing your cactus with the ideal lighting conditions, you will ensure that it receives the energy it needs for photosynthesis and proper growth. This will result in a healthy and vibrant cactus that will thrive in your home.
Determining the Appropriate Temperature
Temperature plays a crucial role in the overall health and well-being of your cactus. Most cacti are native to arid regions with hot days and cool nights. Providing the appropriate temperature conditions will ensure that your cactus thrives. Here are some guidelines to determine the appropriate temperature for your cactus:
1. Warm temperature: Cacti generally prefer warm temperatures ranging between 70°F (21°C) to 90°F (32°C) during the daytime. Providing a warm environment mimics the natural habitat of cacti and promotes healthy growth. Make sure to keep your cactus away from drafty areas or air conditioning units, as sudden temperature fluctuations can stress the plant.
2. Cool nighttime temperatures: Cacti appreciate a drop in temperature during the nighttime, which simulates their natural environment. Ideally, nighttime temperatures should range between 50°F (10°C) to 60°F (15°C). This drop in temperature allows the cactus to rest and recover from the heat of the day.
3. Avoid extreme temperatures: While cacti are resilient, they are sensitive to extreme temperatures. High temperatures above 100°F (38°C) can cause heat stress, leading to wilting and discoloration of the cactus. Similarly, temperatures below 40°F (4°C) can cause frost damage or even kill the cactus. Protect your cactus from extreme temperature conditions to ensure its well-being.
4. Winter dormancy: Some cacti require a period of dormancy during the winter months, where the temperature needs to be cooler to allow the plant to rest. Research the specific requirements of your cactus species to determine if it requires a dormancy period and adjust the temperature accordingly.
Monitoring the temperature in the area where your cactus is located is essential. Consider using a thermometer to accurately measure temperatures and ensure they are within the recommended range for your cactus. Additionally, avoid placing your cactus near heat sources, such as radiators or heating vents, as they can create localized high temperatures and disrupt the overall temperature balance.
By providing your cactus with the appropriate temperature conditions, you are creating an environment that mimics its natural habitat and allows it to thrive. Remember that each cactus species may have slightly different temperature preferences, so it’s essential to research and understand the specific requirements of your cactus to ensure its optimal growth and health.
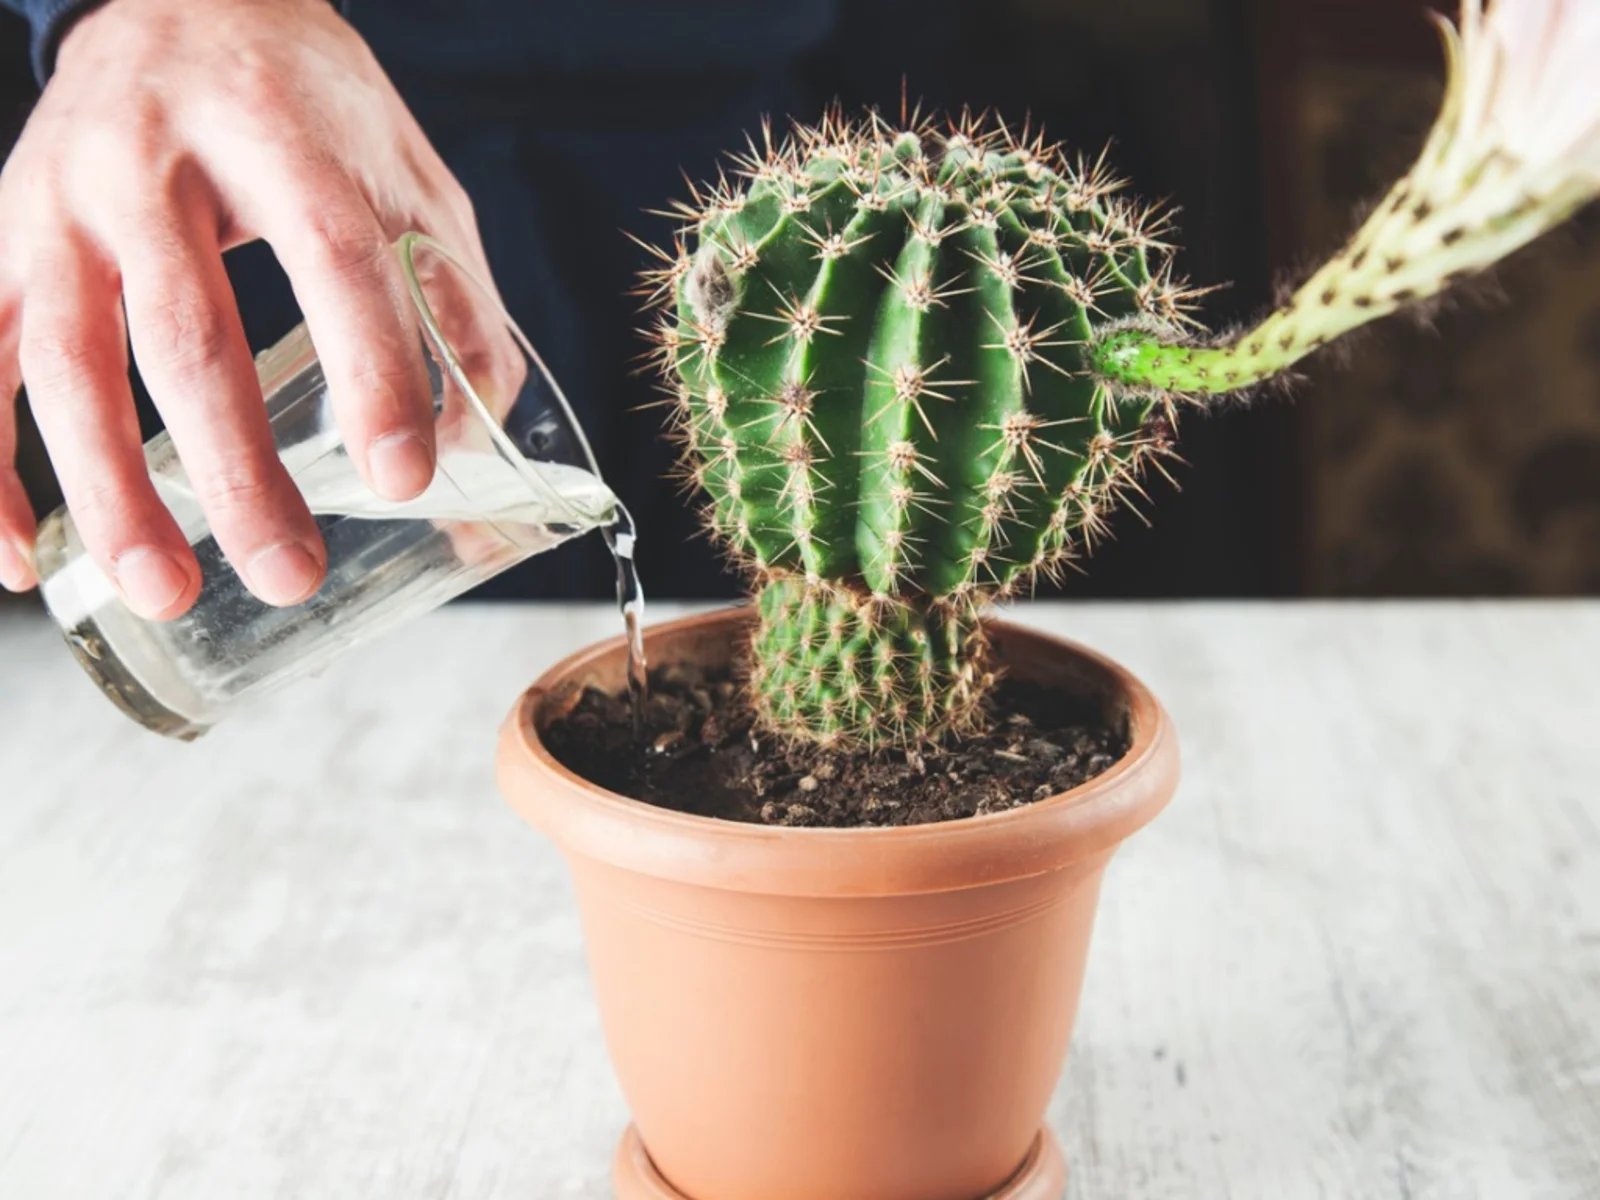
Watering your Cactus Plant
Watering your cactus properly is crucial for its overall health and survival. As desert plants, cacti have adapted to survive in arid conditions with minimal water. Here are some guidelines to ensure you water your cactus plant correctly:
1. Adhere to the “soak and dry” method: Cacti prefer a drier environment, so it’s important to let the soil dry out completely between waterings. When watering, thoroughly saturate the soil, allowing water to drain through the bottom of the pot. Then, wait until the soil is completely dry before watering again. This prevents waterlogged soil, which can lead to root rot and other issues.
2. Frequency of watering: The watering frequency will depend on factors such as the size of your cactus, the climate conditions, and the type of potting mix used. As a general rule, water mature cacti every 2-4 weeks, adjusting the interval based on how quickly the soil dries out. Young or newly planted cacti may require more frequent watering initially.
3. Watering during dormancy: Some cacti go through a period of dormancy, usually in winter, where they require less water. During this time, reduce watering frequency and only provide enough water to prevent extreme dehydration. This allows the cactus to rest and prepare for new growth in the upcoming season.
4. Use the right watering method: To avoid overwatering or damaging the cactus, use a watering can or a narrow spout container to deliver water directly to the soil. Avoid spraying or misting the cactus, as this can lead to moisture accumulation in the spines or cause fungal infections.
5. Watch for signs of under or overwatering: Pay attention to the condition of your cactus. Signs of underwatering include shriveled or wrinkled appearance, while overwatering signs include yellowing, mushy or rotting sections, and wilting. Adjust your watering routine accordingly to address any signs of water stress.
Remember, it’s better to underwater your cactus than to overwater it. Cacti have adapted to survive in harsh conditions, so they can tolerate periods of drought. When in doubt, it’s always safer to water less frequently and monitor your cactus closely. Different cactus species may have specific water requirements, so research the specific needs of your cactus to ensure optimal care.
By following these watering guidelines, you can ensure that your cactus receives the right amount of water and avoids the common pitfalls of overwatering. This will help your cactus stay healthy, thrive, and bring joy to your home for years to come.
Creating the Perfect Soil Mix
The right soil mix is essential for the proper growth and health of your cactus. As desert plants, cacti have unique soil requirements that differ from typical houseplants. Here are some tips for creating the perfect soil mix for your cactus:
1. Ensure good drainage: Cacti thrive in well-draining soil that allows excess water to flow out easily. Create a soil mix that consists of materials like coarse sand, perlite, or pumice to improve drainage. Avoid using heavy or compacted soils that retain moisture, as this can lead to root rot.
2. Use a porous medium: Incorporate materials like finely crushed lava rock or expanded clay pellets into your soil mix. These porous materials improve aeration, prevent compaction, and provide additional drainage for your cactus roots.
3. Avoid organic matter: Cacti are adapted to low-nutrient environments, so it’s best to avoid using organic matter, such as compost or peat moss, in your soil mix. These materials can retain moisture and promote the growth of harmful fungi or bacteria that can damage your cactus.
4. Opt for a mineral-rich mix: Cacti require minerals like calcium, potassium, and magnesium for healthy growth. You can include mineral additives in your soil mix, such as crushed limestone or granite dust, to provide these essential nutrients to your cactus.
5.
6. Consider commercial cactus soil mixes: If you’re unsure about creating your own soil mix, you can opt for commercially available cactus soil mixes. These pre-mixed blends are specifically formulated to meet the unique requirements of cacti and ensure proper drainage and aeration.
When creating your cactus soil mix, make sure to thoroughly mix all the ingredients to ensure uniform distribution. Avoid compacting the soil mix too tightly when potting your cactus, as this can hinder proper drainage and root development.
Remember, each cactus species may have slightly different soil preferences, so it’s essential to research the specific needs of your cactus to provide the best possible growing conditions.
By creating the perfect soil mix for your cactus, you’re providing a well-draining medium that mimics its natural habitat and promotes healthy root development. This will contribute to the overall health and longevity of your cactus.
Fertilizer and Nutrient Requirements
Fertilizing your cactus is essential to provide it with the necessary nutrients for healthy growth. While cacti are adapted to low-nutrient environments, they still require periodic feeding to maintain optimal health. Here are some guidelines for fertilizing your cactus:
1. Choose a balanced fertilizer: Look for a balanced, water-soluble fertilizer specifically formulated for cacti and succulents. A balanced fertilizer contains equal amounts of nitrogen (N), phosphorus (P), and potassium (K). These nutrients are essential for overall plant growth, root development, and flowering.
2. Follow a fertilizing schedule: Cacti have lower fertilizer requirements compared to other houseplants. During the growing season, which is typically spring and summer, apply fertilizer once every 4 to 6 weeks. During the winter months or when your cactus is in dormancy, withhold fertilizing as the plant’s growth slows down.
3. Dilute the fertilizer: It’s important to dilute the fertilizer according to the manufacturer’s instructions. Using a higher concentration than recommended can burn the roots or cause nutrient toxicity. Follow the recommended dosage and mix the fertilizer with water before applying to your cactus.
4. Apply fertilizer to moist soil: Water your cactus thoroughly before applying fertilizer. This helps prevent fertilizer burn and allows the nutrients to be evenly distributed in the soil. Apply the diluted fertilizer solution directly to the soil, avoiding contact with the cactus stems or spines.
5. Monitor signs of nutrient deficiency: Pay attention to your cactus’s appearance to identify signs of nutrient deficiency. Symptoms may include pale or yellowish foliage, stunted growth, or reduced flowering. If you notice any signs, adjust your fertilizer application or consult a plant expert for guidance.
6. Avoid overfertilizing: Overfertilizing can be harmful to your cactus, leading to salt build-up or nutrient imbalances. Always err on the side of caution and apply fertilizer sparingly. Remember, cacti are adapted to low-nutrient environments, and excessive fertilization can cause more harm than good.
7. Consider organic alternatives: If you prefer a more organic approach, you can opt for slow-release organic fertilizers or organic compost. These provide a more gentle release of nutrients over time and can help improve the overall soil quality.
Keep in mind that the specific nutrient requirements may vary depending on the cactus species. It’s important to research your specific cactus’s nutritional needs and adjust your fertilization practices accordingly.
By providing the appropriate fertilization, you’re ensuring that your cactus receives the necessary nutrients for healthy growth and vibrant blooms. Remember to always fertilize in moderation and monitor your cactus’s response to ensure it thrives in its environment.
Container and Pot Selection
Choosing the right container or pot is important for the health and well-being of your cactus. The container you select should provide adequate space for your cactus to grow, as well as promote proper drainage. Here are some tips for selecting the perfect container for your cactus:
1. Choose a container with drainage holes: Proper drainage is crucial for cacti to prevent waterlogged soil and root rot. Select a pot with drainage holes at the bottom to allow excess water to escape. This helps maintain a healthy moisture balance in the soil.
2. Consider the size: The size of the container should accommodate the current size of your cactus, with a bit of room for growth. Avoid using containers that are too large, as excess soil can retain moisture and lead to root rot. A snug fit will encourage healthy root development.
3. Select a material: The material of the pot can have an impact on moisture retention and breathability. Terracotta or clay pots are porous and allow excess moisture to evaporate more easily. This helps prevent overwatering and promotes better air circulation around the roots. Plastic pots are a lightweight and affordable alternative, but they may retain more moisture, so extra care is needed in monitoring watering.
4. Consider aesthetics: Choose a pot that complements the overall aesthetics of your home or garden. There are a variety of styles and colors available, allowing you to find one that matches your personal taste and enhances the visual appeal of your cactus display.
5. Grouping and repotting: If you have multiple cacti or succulents, consider grouping them together in a larger container. This creates a visually pleasing arrangement and makes watering and maintenance more convenient. Additionally, as your cactus grows, it may require repotting into a larger container to provide sufficient space for its roots. Monitor the growth of your cactus and repot as needed, ensuring that you use a new container with proper drainage.
When repotting or transferring your cactus to a new pot, handle it with care to avoid damaging the roots or skin. Use a well-draining cactus-specific soil mix and follow proper repotting techniques to ensure a successful transition.
Remember, the right container is essential for the health and growth of your cactus. It should have adequate drainage, sufficient space, and complement your desired aesthetic. By selecting the perfect pot, you’re providing an optimal environment for your cactus to thrive.
Pruning and Trimming Techniques
Pruning and trimming your cactus plants not only helps maintain their aesthetic appeal but also promotes healthy growth and prevents potential issues. While cacti are generally low-maintenance, occasional pruning can be beneficial. Here are some techniques to effectively prune and trim your cactus:
1. Use clean and sterilized tools: Before pruning, ensure that your tools are clean and sterilized to prevent the spread of diseases or pathogens. Use sharp and sterile tools, such as pruning shears or a clean knife, to make precise cuts.
2. Remove dead or damaged parts: Regularly inspect your cactus for any dead or damaged parts, such as discolored or shriveled segments. These areas can become vulnerable to pests or diseases, so it’s important to remove them promptly. Make clean cuts near the base of the damaged section, ensuring that no stubs are left behind.
3. Trim overgrown or unruly branches: If your cactus has branches that are growing excessively or becoming too crowded, you can use pruning shears to trim them back. Start by identifying the point where you want to make the cut and then make a clean slicing motion to remove the desired section. This can help maintain the shape and size of your cactus.
4. Handle spined cacti with caution: Some cacti have sharp spines, making them challenging to handle during pruning. Use gloves and a towel or folded newspaper to grip and protect yourself while working with spined cacti. Take extra care to avoid getting pricked by the spines when making cuts.
5. Allow cuttings to callus: After pruning, let the cut ends of the cactus callus over for a few days before replanting or propagating. This helps prevent rotting and promotes successful root formation.
6. Disinfect tools between plants: If you’re pruning multiple cactus plants, clean and sterilize your tools in between plants to prevent the spread of any potential diseases or pests.
Remember, pruning should be done with care and only when necessary. Avoid excessive pruning, as it may disrupt the growth and health of your cactus. It’s important to strike a balance between maintaining the desired shape and allowing your cactus to grow naturally.
By regularly pruning and trimming your cactus plants, you can help regulate their growth, remove any potential hazards or issues, and maintain their overall health and beauty. Observe your cactus closely, and prune selectively to ensure it remains a stunning addition to your home or garden.
Dealing with Pests and Diseases
While cacti are generally resilient plants, they are not immune to pests and diseases. It’s important to be proactive in preventing and addressing any issues that may arise. Here are some tips for dealing with common pests and diseases that can affect your cactus:
1. Identify the problem: Regularly inspect your cactus for any signs of pests or diseases. Look for unusual discoloration, wilting, disfiguration, or presence of pests such as scales, mealybugs, or spider mites. Identifying the problem early can help you take swift action.
2. Isolate affected plants: If you notice any signs of pests or diseases, immediately isolate the affected cactus to prevent the issue from spreading to other plants. Quarantine the plant in a separate area until you are able to treat and resolve the problem.
3. Handpick pests: For larger pests like mealybugs or scales, you can gently remove them using a cotton swab dipped in rubbing alcohol. Carefully dab the pests to eliminate them. Avoid squashing the pests, as it can lead to a sticky residue that attracts more pests.
4. Use insecticidal soaps or oils: If pests are persistent, you can use insecticidal soaps or oils specifically formulated for cacti. Follow the instructions provided and apply the solution directly to the affected areas of the cactus. Be sure to cover all surfaces, including the undersides of leaves and stems.
5. Prevent overwatering: Overwatering can lead to root rot and create a favorable environment for fungal disease. Avoid overwatering your cactus and ensure that the soil dries out completely between waterings. Maintaining proper soil moisture is crucial for preventing root-related issues.
6. Monitor environmental conditions: Pests and diseases are often more prevalent in high humidity or crowded conditions. Ensure adequate airflow around your cactus plants and avoid overcrowding them. Maintain a clean growing environment by removing fallen leaves or debris that may harbor pests.
7. Remove and treat infected parts: If your cactus has severe fungal or bacterial infection, it may be necessary to remove the affected parts. Use clean and sterilized tools to make clean cuts near the base of infected areas. Treat the remaining sections with a fungicide or bactericide to prevent further spread.
8. Seek professional help if needed: If the pest or disease issue persists or becomes severe, it’s advisable to consult a plant professional or entomologist for advice and guidance. They can provide specific recommendations or treatments based on the specific problem you are facing.
Remember, prevention is key when it comes to pests and diseases. Regularly inspect your cactus plants, maintain proper care practices, and create a healthy growing environment to minimize the risk of issues. With prompt action and diligent care, you can keep your cacti thriving and free from pests and diseases.
Repotting your Cactus Plant
Repotting your cactus is an essential part of its care routine. Over time, your cactus may outgrow its current pot, the soil may become depleted, or the roots may become crowded. Repotting allows for better root growth, provides fresh soil, and promotes overall plant health. Here are the steps to successfully repot your cactus:
1. Choose the right time: The best time to repot your cactus is during its active growing season, typically in spring or early summer. This is when the plant has the highest chance of recovering quickly from the repotting process.
2. Prepare the new pot: Select a new pot that is slightly larger in size and has drainage holes at the bottom. Ensure the pot is clean and sterilized to prevent the introduction of any potential pests or diseases.
3. Prep the cactus: Carefully remove the cactus from its old pot. If the roots are tightly packed, gently loosen them using a wooden tool or your fingers. Be cautious of the spines and use protective gloves if necessary.
4. Inspect the roots: Take this opportunity to inspect the roots for any signs of damage or rot. Trim off any brown or mushy roots using clean and sterilized scissors or pruning shears. This helps promote healthy root growth in the new pot.
5. Add fresh soil: Fill the new pot with a well-draining cactus-specific soil mix, leaving enough space to accommodate the root ball of the cactus. Avoid using regular potting soil, as it can be too moisture-retentive for cacti.
6. Place the cactus: Gently place the cactus in the new pot, ensuring that the root ball sits evenly on the soil surface. Adjust the position if needed, making sure not to bury the cactus too deeply.
7. Backfill and settle the soil: Gradually backfill the pot with the soil mix, gently pressing it down to secure the cactus and eliminate any air pockets. Be cautious of the spines and use a spoon or chopstick to assist in the process.
8. Allow for recovery: After repotting, give your cactus some time to recover and adjust to its new environment. Place the repotted cactus in bright indirect light and refrain from watering for a week or two to allow the roots to settle.
It’s important to note that not all cacti require frequent repotting. Some slow-growing species may only require repotting every two to three years, while faster-growing ones may need it annually. Always assess the condition of your cactus and its current pot to determine if repotting is necessary.
By repotting your cactus, you provide it with fresh soil, ample space for root growth, and a renewed environment for optimal health. Remember to monitor your cactus closely after repotting, adjusting your care routine as needed to ensure its successful transition into its new pot.