
Safety Precautions
When it comes to replacing a lamp cord, safety should be your top priority. Here are some important precautions to keep in mind before starting the replacement process:
- Ensure that the lamp is unplugged before beginning any work. This will help prevent any possibility of electrical shocks.
- Work in a well-lit area to avoid accidental injuries.
- Wear protective gloves to protect your hands from potential cuts or burns.
- If your lamp has been recently used, allow it to cool down completely before touching any part of it.
- Inspect the lamp for any visible damages or loose connections. If you notice any, it’s essential to fix them before proceeding with the cord replacement.
- Make sure to use the correct wattage and type of bulb recommended for your lamp to prevent overheating and potential fire hazards.
- Always refer to the manufacturer’s instructions or consult a professional if you are unsure about any aspect of the replacement process.
By following these safety precautions, you can ensure a secure and successful lamp cord replacement. It’s always better to err on the side of caution when working with electrical components to avoid any potential accidents or damage to the lamp.
Gather Your Tools and Materials
Before diving into the lamp cord replacement, it’s important to gather all the necessary tools and materials. This will ensure a smooth and efficient process. Here are the items you’ll need:
- A replacement lamp cord: Measure the length of the old cord and purchase a new one that matches the specifications.
- A screwdriver: Depending on the lamp type, you may need a flathead or Phillips screwdriver to dismantle the lamp.
- Wire strippers: These will help you remove the insulation from the old cord and prepare the new one.
- Electrical tape: Use this to secure the new cord connections and prevent any electrical hazards.
- A pair of pliers: These will come in handy for bending and twisting wires during the replacement process.
- Scissors: Use them to cut the new cord to the appropriate length.
- A marker or label: To mark the wires and keep track of their connections.
- A work surface: Find a clean and stable area to perform the replacement work.
As you gather your tools and materials, make sure they are in good working condition and free from any damages. This will ensure the safety and success of your lamp cord replacement.
Identify the Type of Lamp Cord Replacement
Before proceeding with the lamp cord replacement, it’s important to determine the type of replacement cord you need. There are two primary types of lamp cords:
- Plug End Replacement: In this type, the cord terminates with a plug that you can easily detach and replace. If your lamp cord has a damaged or faulty plug, this type of replacement will suffice. Simply disconnect the old plug and attach the new one according to the manufacturer’s instructions.
- Internal Cord Replacement: This type involves replacing the entire cord, including the wiring that connects to the lamp socket. If your cord is damaged beyond the plug or if you want to upgrade to a longer or more durable cord, an internal replacement is required. This process involves disassembling the lamp and replacing the cord from the socket up to the plug end.
To identify which type of replacement cord you need, examine your lamp’s existing cord. If the issue lies only with the plug, a plug end replacement will suffice. However, if the cord itself is damaged or if you want a complete replacement, you’ll need to opt for an internal cord replacement.
It’s important to note that different lamp models may have specific requirements when it comes to the type of replacement cord. Refer to the manufacturer’s instructions or consult a professional if you’re unsure about the suitable replacement option.
By identifying the type of lamp cord replacement needed, you can ensure that you acquire the correct replacement cord and proceed with the appropriate steps for a successful replacement.
Unplug the Lamp and Remove the Shade
Before you begin working on the lamp cord replacement, it’s crucial to ensure the lamp is completely disconnected from the power source. This will help prevent any potential electrical accidents or shocks. Follow these steps to unplug the lamp and remove the shade:
- Turn off the lamp: If the lamp is currently on, switch it off using the lamp’s switch or by unplugging it from the wall outlet.
- Unplug the lamp: Locate the power cord connected to the lamp and unplug it from the wall or power strip.
- Remove the light bulb: Carefully unscrew the light bulb from the lamp socket and set it aside. You may want to use a cloth or glove to protect your hands from the heat of the bulb if it’s recently been used.
- Set the shade aside: Gently remove the lampshade, taking care not to damage it. Place it in a safe and clean location to prevent any accidental breakage.
By unpluging the lamp and removing the shade, you ensure your safety and create a clear workspace to proceed with the next steps of the lamp cord replacement process.
Disassemble the Lamp
With the lamp unplugged and the shade removed, it’s time to disassemble the lamp to gain access to the old cord. Follow these steps to disassemble the lamp:
- Examine the lamp base: Take a close look at the lamp base and locate any visible screws, nuts, or fittings that hold the lamp together.
- Remove the lamp base components: Using the appropriate screwdriver, carefully remove any screws or fittings securing the lamp base components. Keep track of the screws and set them aside in a safe place.
- Separate the lamp parts: Once the screws or fittings are removed, gently separate the lamp parts, such as the base, body, and any other components. Take note of how the parts are connected, as you’ll need to reassemble them later.
- Access the old cord: Inside the lamp base, you will find the old cord connected to the lamp socket. Carefully trace the cord and identify the points where it is connected to the lamp socket and any other internal wiring.
Depending on the lamp design and construction, you may encounter variations in the disassembly process. Some lamps may have additional components or hidden screws that need to be removed. Refer to the manufacturer’s instructions or seek professional advice if you encounter any difficulties.
By disassembling the lamp, you create the necessary access to remove the old cord effectively and proceed with the replacement process smoothly.
Remove the Old Cord
Now that the lamp is disassembled, it’s time to remove the old cord. Follow these steps to safely disconnect and remove the old cord:
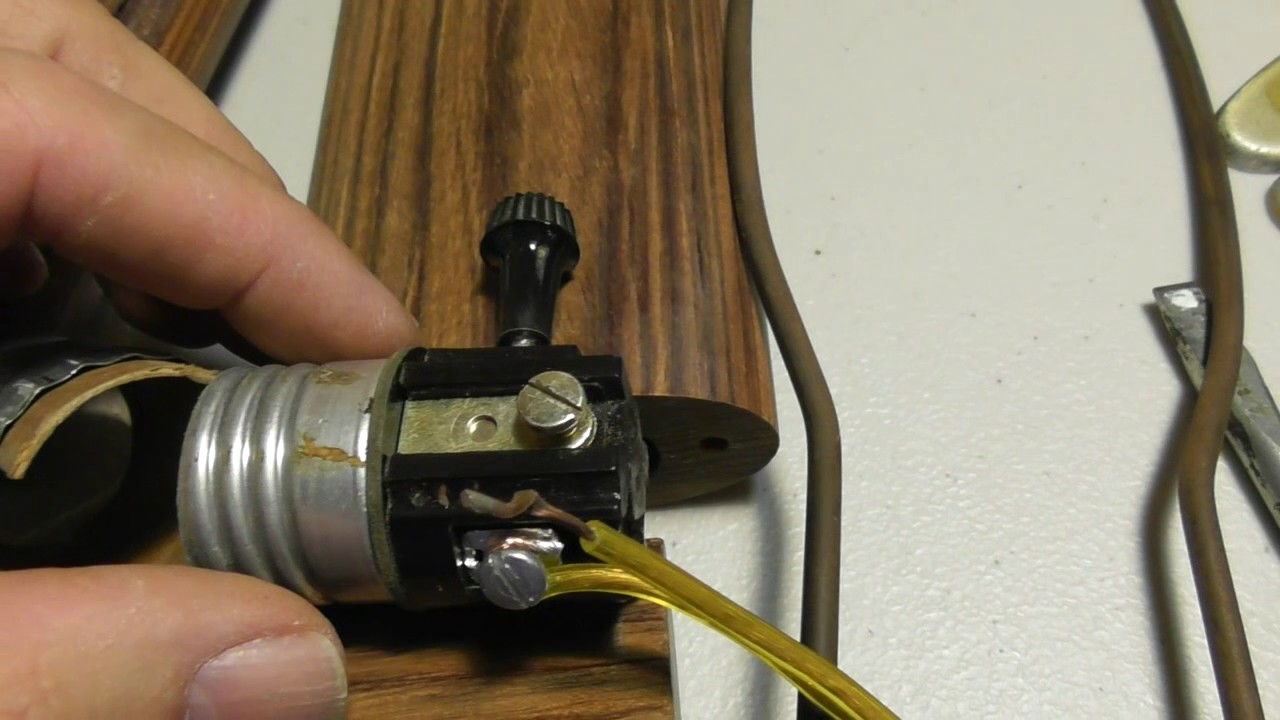
- Identify the cord connections: Take a close look at the cord and locate where it is connected to the lamp socket and any other internal wiring.
- Disconnect the cord from the lamp socket: Depending on the type of connection, you may need to unscrew a terminal or release a clamp to detach the old cord from the lamp socket. Use a screwdriver or pliers, if necessary, to loosen the connection.
- Remove any additional wiring connections: If the old cord is connected to any other internal wiring, such as a switch or other components, carefully disconnect the wires using wire cutters or pliers. Remember to note the color coding or labeling of the wires to ensure proper reconnection later.
- Pull out the old cord: Once all the connections are released, gently pull the old cord out of the lamp base. Be cautious not to damage any other components or wiring during this process.
It’s important to handle the old cord with care and dispose of it properly according to local regulations. Do not reuse a damaged or frayed cord as it can pose safety hazards.
By removing the old cord properly, you create space for the installation of the new cord and ensure a clean and efficient replacement process.
Prepare the New Cord
Now that the old cord has been removed, it’s time to prepare the new cord for installation. Follow these steps to ensure the new cord is ready for use:
- Measure and cut the new cord: Using a pair of scissors, measure the length needed for the new cord. It should be the same length as the old cord or slightly longer if desired. Cut the cord carefully, ensuring a clean and straight edge.
- Strip the wire ends: Using wire strippers, carefully remove a small section of the insulation from both ends of the new cord. Make sure to expose enough bare wire for a secure connection.
- Twist the wires: If the new cord has multiple wires, such as a hot wire and a neutral wire, twist each set of wires together to keep them organized and prevent any fraying.
- Attach any necessary connectors: If the new cord requires additional connectors, such as a replacement plug or terminal, follow the manufacturer’s instructions to attach them securely to the wire ends.
It’s essential to ensure that the new cord is in good condition and free from any damages or fraying. Verify that it matches the specifications of the old cord to guarantee compatibility with the lamp and its electrical requirements.
By preparing the new cord properly, you set the stage for a successful installation and ensure a reliable electrical connection within the lamp.
Thread the New Cord Through the Lamp
With the new cord prepared, it’s time to thread it through the lamp to connect it to the lamp socket. Follow these steps to properly thread the new cord:
- Identify the cord entry point: Examine the lamp base and locate the entry point where the cord needs to be threaded. This is typically a small hole or opening designed for the cord to pass through.
- Feed the new cord through the entry point: Insert the end of the new cord into the entry point and carefully push it through the lamp base. Use gentle, steady pressure to ensure it doesn’t get stuck or damaged.
- Guide the cord to the lamp socket: As you thread the new cord through the lamp base, guide it toward the lamp socket or any internal wiring connections. Take care to avoid any sharp edges or moving parts that could potentially damage the cord.
- Route the cord along the lamp base: Inside the lamp base, ensure the cord follows the designated path along the base, away from any moving components or other internal connections. This will prevent it from getting tangled or interfering with other parts of the lamp.
During the threading process, it may be helpful to have another person assist by holding the lamp and guiding the cord from the top while you thread it through the base. This will provide better control and help prevent any accidental damage.
By properly threading the new cord through the lamp, you ensure a secure and organized connection to the lamp socket, setting the stage for the successful reassembly of the lamp.
Reassemble the Lamp
With the new cord threaded through the lamp, it’s time to reassemble the lamp to its original form. Follow these steps to successfully reassemble the lamp:
- Refer to your notes or photographs: If you took any notes or photographs during the disassembly process, now is the time to reference them. They will help you remember the correct order and orientation of the lamp parts.
- Connect the cord to the lamp socket: Locate the ends of the new cord inside the lamp base. Depending on the lamp design, you may need to reconnect the cord to the appropriate terminals or wires inside. Ensure a secure connection by tightening any screws or properly attaching any connectors.
- Reattach the lamp base components: Begin reassembling the lamp by carefully aligning the lamp base components in their original positions. Use the screws or fittings you previously removed to secure everything back together. Ensure that the lamp base is stable and all connections are properly tightened.
- Replace the lampshade: Once the lamp base is reassembled, it’s time to place the lampshade back onto the lamp. Align the shade properly and make sure it sits securely in place. Adjust it as needed to ensure proper balance and alignment.
Take your time to ensure that each step is done diligently and securely. Double-check all connections and components to ensure they are properly reassembled and tightened.
By reassembling the lamp carefully, you bring it back to its functional state and prepare it for the final steps of the replacement process.
Test the Replacement Lamp Cord
After reassembling the lamp, it’s essential to test the replacement lamp cord to ensure it functions properly and safely. Follow these steps to test the cord:
- Plug in the lamp: Carefully insert the plug end of the new cord into a suitable power outlet. Ensure that the outlet is in good working condition.
- Switch on the lamp: Use the lamp’s switch or knob to turn it on. If the lamp has a separate switch for the socket, make sure to turn it on as well.
- Observe the lamp’s operation: Check if the lamp turns on and produces light. Pay attention to any flickering, buzzing, or other unusual behavior. Additionally, test any features that the lamp may have, such as adjustable brightness or multiple settings.
- Check for proper functionality: Rotate the switch or knob to test the different settings, if applicable. Verify that the lamp responds as expected and adjusts the light output accordingly.
If the lamp fails to turn on or exhibits any abnormal behavior, immediately unplug it and reassess the connections and components. Double-check that all wires are properly connected and that there are no loose connections or damaged parts.
It’s important to emphasize the significance of safety during the testing process. Avoid touching any exposed wires or components while the lamp is plugged in, as it may result in electric shock or injury.
By testing the replacement lamp cord, you can ensure that the lamp functions correctly and safely, providing you with optimal lighting in your space.
Final Steps and Safety Checks
Once you have tested the replacement lamp cord and ensured its proper functionality, there are a few final steps and safety checks to complete before considering the project complete. Follow these steps to wrap up the lamp cord replacement process:
- Secure and tidy up the cord: Organize the excess length of the cord by bundling it neatly using zip ties or cord clips. This will prevent it from getting tangled or becoming a tripping hazard.
- Reposition the lamp: Place the lamp back in its desired location, ensuring that it is stable and correctly positioned.
- Tuck away the power cord: If possible, route the power cord along the baseboards or behind furniture to keep it out of sight and minimize trip hazards.
- Perform additional safety checks: Look over the entire lamp to ensure that all components are securely fastened and that there are no loose wires or exposed connections. Also, check for any signs of overheating or unusual odors during operation.
- Keep an eye on the lamp: After the replacement, it’s a good practice to periodically inspect the lamp for any signs of wear and tear. Regularly check the cord for any fraying or damage that may require future attention or replacement.
- Dispose of old materials responsibly: Properly dispose of the old cord, packaging, and any other materials used during the replacement process according to local regulations.
With the final steps and safety checks completed, you can now enjoy your newly replaced lamp cord with peace of mind, knowing that it is secure and functioning correctly.
Remember, if you have any concerns about the lamp’s performance or if you encounter any electrical issues, it’s always best to consult with a professional electrician for further assistance.