
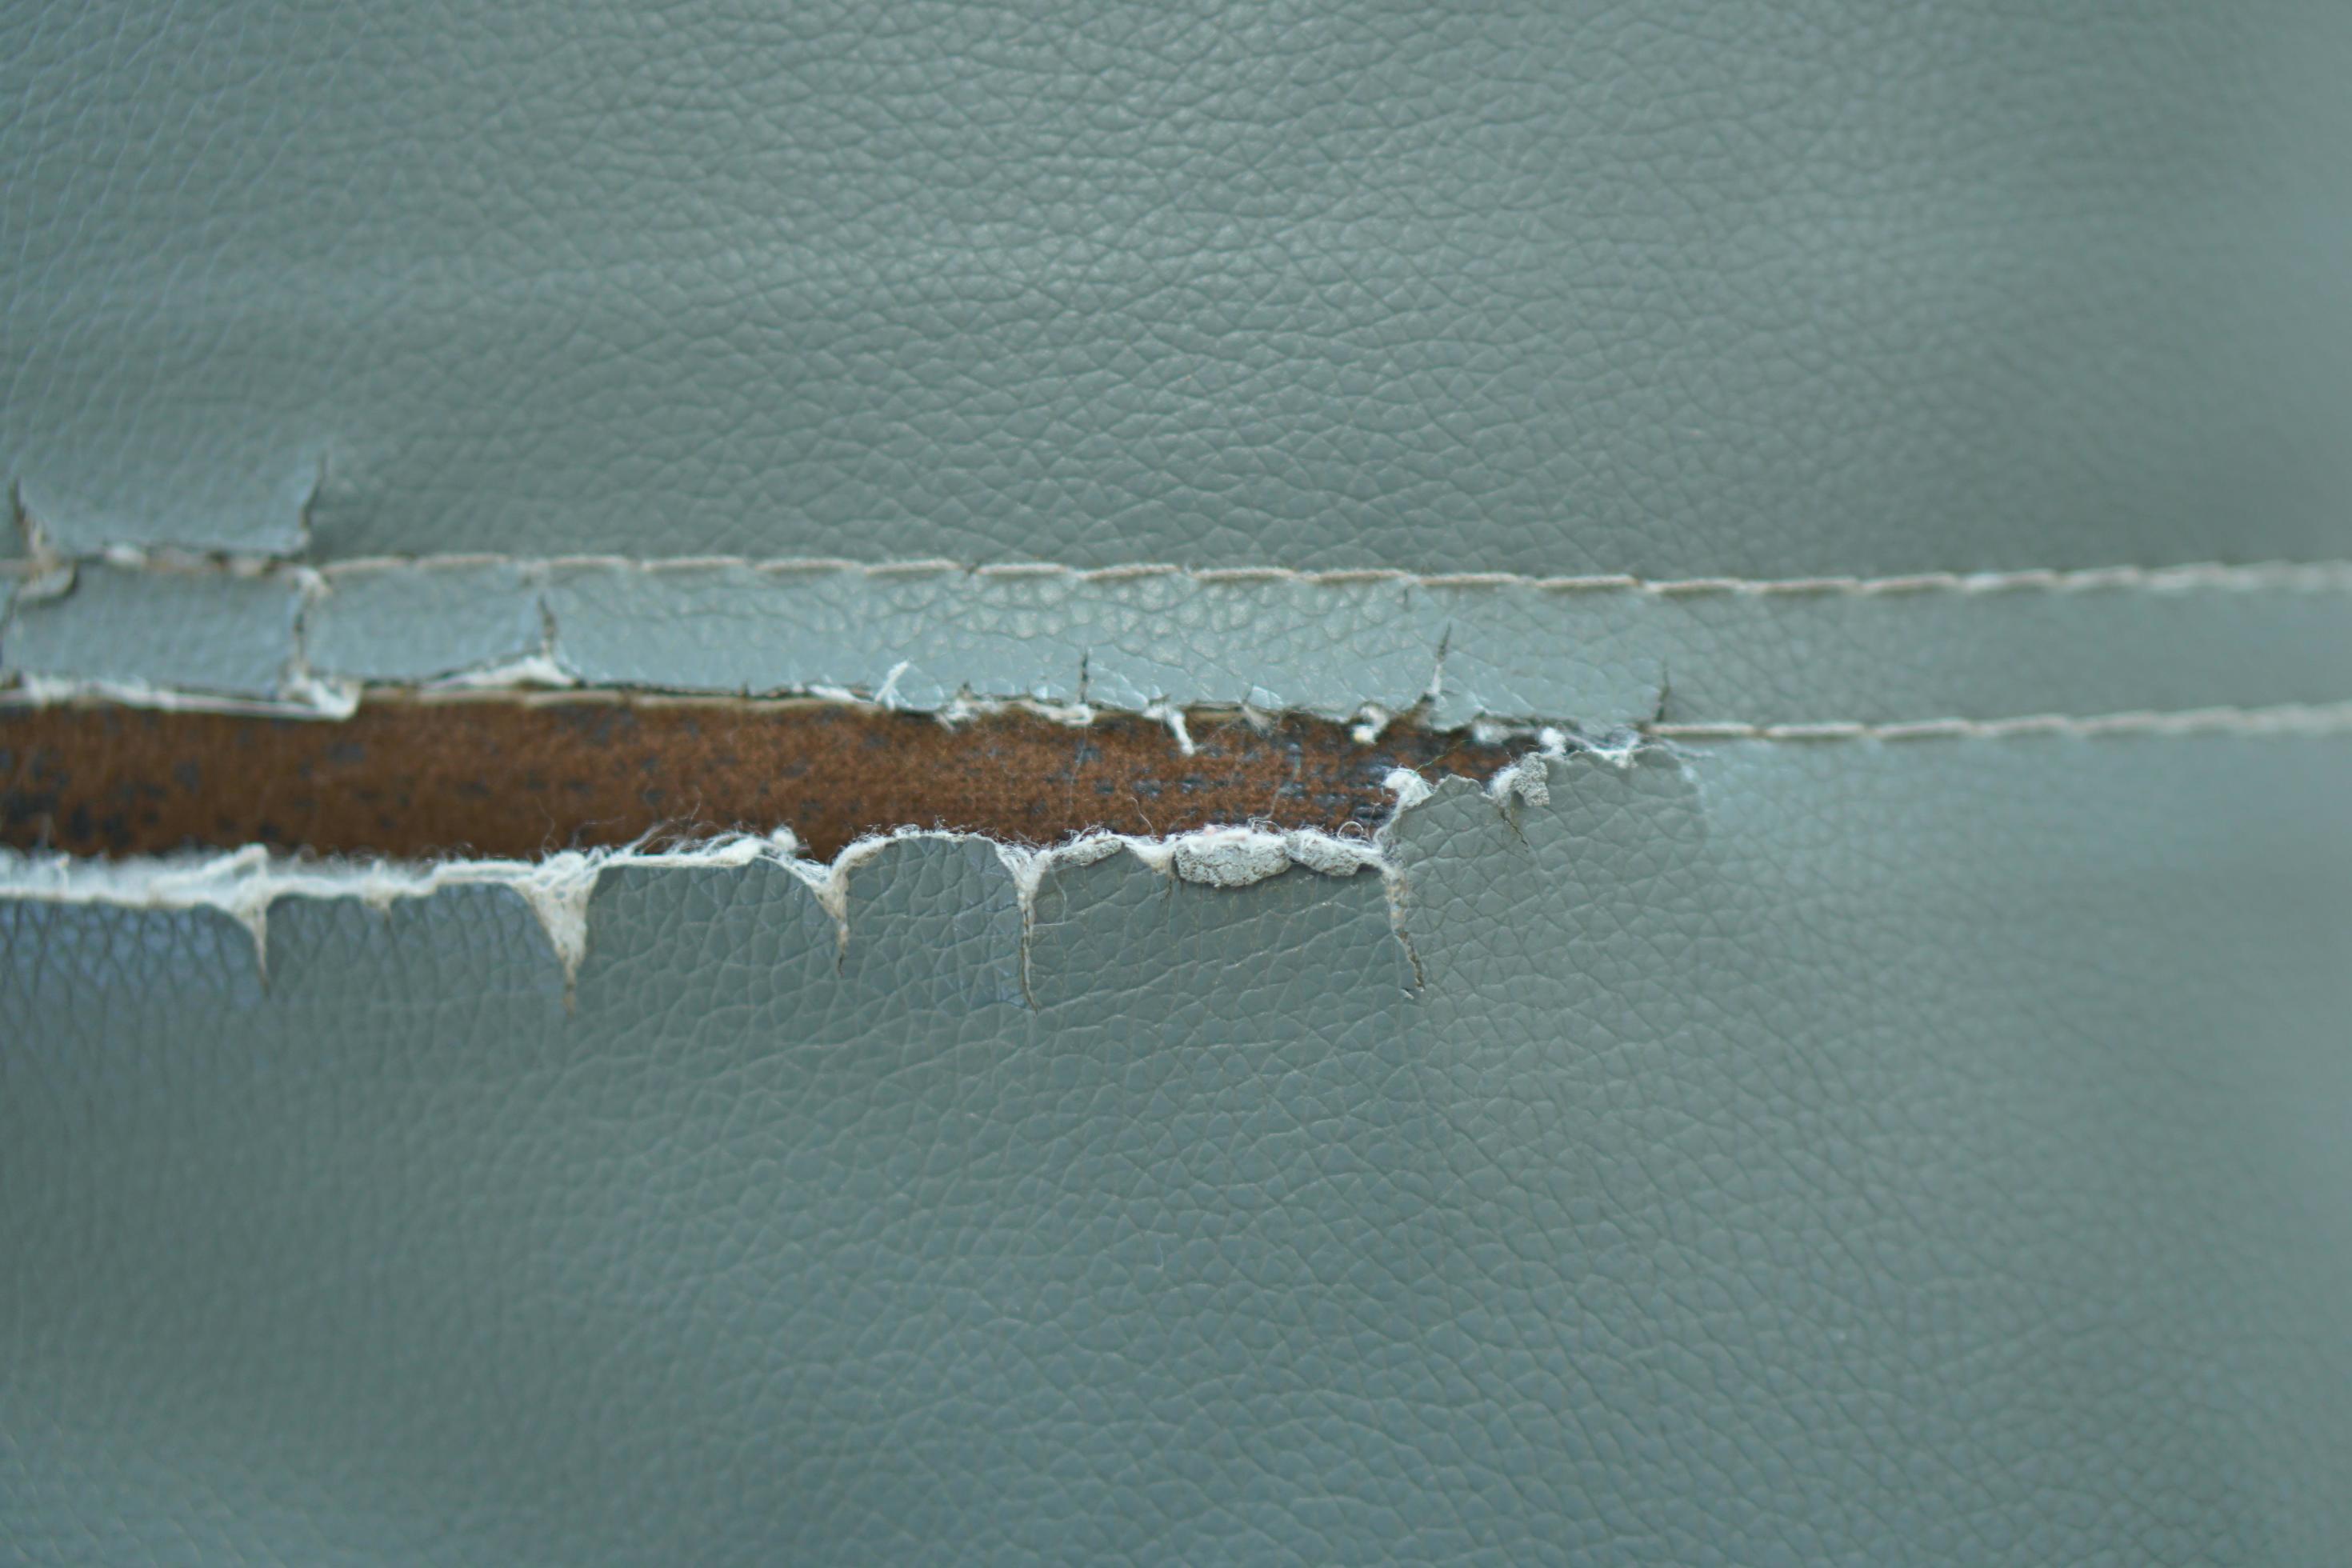
Assess the Damage
When your upholstered sofa suffers from a tear, it’s important to properly assess the extent of the damage before attempting any repairs. By carefully inspecting the tear, you can determine the best course of action to restore your sofa’s appearance and functionality.
Start by examining the size and location of the tear. Is it a small and easily fixable tear, or is it a larger, more complex tear that may require professional assistance? Additionally, consider the type of fabric used on the sofa. Is it a delicate or specialized fabric that requires specific repair techniques?
Next, evaluate the surrounding area of the tear. Are there any loose threads or fraying edges? Taking note of these details will help you determine the necessary steps to repair and prevent further damage.
If the tear is minor, you may be able to repair it yourself using a simple patching technique. However, for larger tears or tears in delicate fabrics, it is recommended to seek the help of a professional upholstery repair service.
Keep in mind that the overall condition of your sofa will also affect the repair process. If the sofa is old or has extensive wear and tear, you may need to consider whether repairing the torn upholstery is worth the investment or if it’s time to consider replacing the sofa altogether.
By assessing the damage carefully, you’ll be able to make an informed decision on the best course of action to restore your torn upholstered sofa. Whether you choose to attempt the repair yourself or seek professional help, taking the time to assess the damage ensures a successful and long-lasting solution.
Gather the Necessary Materials
Before you begin repairing the torn upholstery on your sofa, it’s important to gather all the necessary materials. Having everything prepared and within reach will make the process more efficient and ensure a successful repair.
Here are the materials you’ll need:
- Matching fabric: Obtain a spare piece of fabric that matches the color, pattern, and texture of your sofa’s upholstery. Ideally, this fabric should be from the same roll or batch to ensure a seamless repair.
- Scissors: Use a pair of sharp fabric scissors to cut the patch from the spare fabric and trim any excess fabric after the repair.
- Fabric adhesive: Choose a high-quality fabric adhesive that is suitable for your upholstery. Make sure it’s designed to withstand the wear and tear of everyday use and provides a strong bond.
- Fabric glue: This type of adhesive is specifically designed for fabric and can be used to secure the edges of the patch, providing extra reinforcement for the repair.
- Small paintbrush or applicator: A small paintbrush or applicator will help you evenly apply the adhesive and glue to the damaged area and patch.
- Clean cloth or sponge: It’s essential to have a clean cloth or sponge on hand to gently clean the repaired area and remove any adhesive residue.
While not necessary, you may also want to consider grabbing a ruler or measuring tape to ensure accuracy when cutting out the patch.
Make sure all the materials are readily available before you begin the repair process. This will save you time and prevent any frustration or interruptions during the repair.
Prepare the Damaged Area
Before you can proceed with repairing the torn upholstery on your sofa, it’s crucial to properly prepare the damaged area. Taking the time to prepare the area ensures a smooth and seamless repair that will extend the lifespan of your sofa.
Here are the steps to prepare the damaged area:
- Clean the area: Before starting any repairs, clean the damaged area of the upholstery. Use a soft cloth or sponge dampened with a mild upholstery cleaner or warm water and gentle soap to remove any dirt, stains, or debris. This will help the adhesive and patch adhere better to the fabric.
- Trim any loose threads: Carefully inspect the torn area and trim any loose threads or frayed edges. Use sharp scissors to make clean cuts and ensure a neater repair.
- Smooth out the area: Gently press down on the torn area to smooth it out as much as possible. This will help create a more even surface for the patch to adhere to.
- Straighten the tear: If the tear has caused the fabric to shift or become misaligned, gently pull and realign the fabric to straighten the tear. This will ensure a more seamless and inconspicuous repair.
By properly preparing the damaged area, you’ll create an optimal surface for the repair process. Cleaning the area will remove any dirt or oils that can interfere with the adhesive bond, while trimming loose threads and smoothing out the fabric will result in a neater and more professional-looking repair.
Remember, taking the extra time to prepare the damaged area will contribute to the overall success and longevity of your upholstery repair.
Cut Out a Patch from a Spare Piece of Fabric
Once you have assessed the damage and prepared the torn area, the next step in repairing the upholstery on your sofa is to cut out a patch from a spare piece of fabric. This patch will be used to cover and reinforce the torn area, ensuring a durable and aesthetically pleasing repair.
Follow these steps to cut out a patch:
- Choose the right fabric: Select a spare piece of fabric that closely matches the color, pattern, and texture of the damaged upholstery. The fabric should be of the same type to ensure a seamless blend.
- Measure the area: Use a ruler or measuring tape to determine the size of the torn area. Add a small margin for overlap to the measurements to ensure adequate coverage and a secure bond.
- Mark the fabric: Transfer the measurements onto the spare fabric using a fabric marker or tailor’s chalk. Use a straightedge or ruler to create clean and precise lines. Double-check the measurements and make any necessary adjustments.
- Cut out the patch: Using sharp fabric scissors, carefully cut along the marked lines to create the patch. Take your time and make clean, straight cuts to ensure a professional-looking result.
It’s important to note that the patch should be slightly larger than the torn area to allow for proper coverage and bonding. However, avoid making the patch too large, as it may result in a bulky and noticeable repair.
By cutting out a well-sized patch from a spare piece of fabric, you’ll have the foundation for a successful upholstery repair. Remember to handle the fabric carefully and make precise cuts to achieve the best results.
Apply Adhesive to the Patch
Once you have cut out the patch from a spare piece of fabric, the next step in repairing the torn upholstery on your sofa is to apply adhesive to the patch. Properly applying adhesive ensures a strong and durable bond between the patch and the torn area.
Follow these steps to apply adhesive to the patch:
- Read the instructions: Before using the adhesive, carefully read and follow the manufacturer’s instructions. Different adhesives may have specific application techniques or drying times.
- Prepare the area: Apply a thin layer of adhesive to the torn area of the upholstery. Use a small paintbrush or applicator to spread the adhesive evenly, ensuring full coverage of the torn edges.
- Apply adhesive to the patch: Next, apply a thin layer of adhesive to the backside of the fabric patch. Be sure to cover the entire patch, paying extra attention to the edges where it will be attached to the torn area.
- Position the patch: Carefully position the fabric patch over the torn area, aligning any patterns or textures seamlessly. Gently press the patch onto the adhesive-coated torn area, smoothing out any wrinkles or bubbles.
- Secure the bond: Apply firm pressure to the patch, ensuring a strong bond between the patch and the torn upholstery. Smooth out the fabric to remove any air pockets and help the adhesive adhere properly.
It’s essential to work quickly but carefully when applying the adhesive, as some adhesives may have a limited working time before they start to dry. Take your time to ensure that the patch is properly aligned and securely bonded to the torn area.
By following these steps and using the appropriate adhesive, you will create a strong and reliable bond between the patch and the torn upholstery, bringing your sofa one step closer to being fully repaired.
Press the Patch Firmly onto the Torn Area
After applying adhesive to the patch and aligning it with the torn area of your sofa’s upholstery, the next crucial step is to press the patch firmly onto the torn area. Applying the right amount of pressure ensures a secure bond between the patch and the damaged fabric, resulting in a seamless and long-lasting repair.
Follow these steps to properly press the patch onto the torn area:
- Apply firm, even pressure: Once the patch is in place, press down firmly using your hands or a clean cloth. Apply consistent and even pressure across the entire patch to ensure proper contact and adhesion with the torn fabric.
- Smooth out any wrinkles or bubbles: Check the patch for any wrinkles, bubbles, or uneven areas. If you notice any, gently smooth them out with your fingers, working from the center of the patch towards the edges. This will help create a smooth and seamless appearance.
- Ensure a secure bond: Take your time to ensure that the patch is securely bonded to the torn area. Pay special attention to the edges of the patch, as they may require additional pressure to adhere properly.
When pressing the patch, be careful not to damage or stretch the surrounding fabric. Applying too much force or using sharp tools can lead to further tearing or distortion of the upholstery.
Remember, a strong and secure bond is essential for a successful upholstery repair. By pressing the patch firmly onto the torn area and taking the time to smooth out any imperfections, you’ll achieve a professional-looking repair that will blend seamlessly with the rest of your sofa.
Smooth Out Any Wrinkles or Bubbles in the Fabric
After pressing the patch firmly onto the torn area, it’s important to smooth out any wrinkles or bubbles in the fabric. These imperfections can mar the appearance of the repair and may compromise the bonding between the patch and the upholstery. By taking the time to address these issues, you’ll achieve a seamless and professional-looking result.
Follow these steps to effectively smooth out wrinkles or bubbles in the fabric:
- Inspect the patch: Carefully examine the patched area for any visible wrinkles, bubbles, or uneven sections. These can occur due to uneven application of adhesive or uneven pressure during patch placement.
- Gently stretch the fabric: If you notice any wrinkles or bubbles, gently stretch the fabric in those areas using your fingers. Pull the fabric taut in the opposite direction of the wrinkle or bubble to smooth it out.
- Smooth with light pressure: Apply light pressure with your fingers or a clean cloth to further smooth out any remaining wrinkles or bubbles. Start from the center of the affected area and gently work your way towards the edges, ensuring an even and consistent result.
- Avoid excessive force: Take caution not to apply excessive force or stretch the fabric too much, as this can lead to further damage or distortion.
It’s important to note that some wrinkles or bubbles may persist even after these efforts. If this is the case, you may consider seeking professional assistance or utilizing additional techniques to achieve a smoother finish.
By diligently smoothing out any wrinkles or bubbles in the fabric, you’ll enhance the appearance and integrity of the repaired area. A smooth and seamless patch will seamlessly blend with the surrounding upholstery, ensuring a visually appealing and long-lasting repair.
Allow the Adhesive to Dry Completely
Once you have pressed the patch firmly onto the torn area and smoothed out any wrinkles or bubbles, it’s essential to allow the adhesive to dry completely. Allowing sufficient drying time ensures that the patch securely adheres to the upholstery, creating a strong and durable bond.
Follow these steps to ensure proper drying of the adhesive:
- Refer to the adhesive instructions: Different adhesives have varying drying times, so it’s important to refer to the manufacturer’s instructions for specific guidance. This will provide you with the recommended drying time for the adhesive you’re using.
- Minimize movement and contact: While the adhesive is drying, avoid excessive movement or contact with the repaired area. This will prevent any accidental displacement or disturbance of the patch.
- Allow sufficient drying time: Give the adhesive ample time to dry and set properly. It’s better to err on the side of caution, so consider allowing it to dry for a few hours or even overnight, depending on the specific adhesive’s recommendations.
- Check for firmness: Once you believe the drying time has passed, gently touch the repaired area to ensure that the adhesive has fully dried and set. If it feels firm and secure to the touch, it’s likely that the adhesive has dried completely.
Properly drying the adhesive is crucial to the longevity of the repair. Rushing the process or using the sofa before the adhesive has completely dried can compromise the bond and potentially lead to future damage or detachment of the patch.
By allowing the adhesive to dry completely, you’ll provide the necessary time for it to create a strong and durable bond between the patch and the torn upholstery. This ensures a reliable repair that will withstand the normal use and wear of your sofa.
Trim Any Excess Fabric from the Patch
After allowing the adhesive to dry completely, the next step in the upholstery repair process is to trim any excess fabric from the patch. Trimming the excess fabric ensures a neat and seamless appearance, blending the repaired area seamlessly with the rest of the upholstery.
Follow these steps to properly trim any excess fabric from the patch:
- Assess the patch: Carefully inspect the repaired area and the edges of the patch. Look for any excess fabric that extends beyond the torn area.
- Use sharp fabric scissors: Using a pair of sharp fabric scissors, trim the excess fabric along the edges of the patch. Make small, precise cuts to achieve a clean and even result.
- Take your time: Work slowly and carefully as you trim the excess fabric. It’s better to trim small portions at a time rather than cutting off too much fabric in one go. This allows you to maintain control and avoid accidentally trimming too far.
- Check for a flush fit: Regularly check the patch’s edges against the torn area to ensure a flush fit. The trimmed edges of the patch should align seamlessly with the surrounding upholstery.
It’s important to note that while trimming excess fabric, you should be cautious not to cut into the repaired area or the surrounding upholstery. Take your time, exercise precision, and make small, controlled cuts to achieve the desired result.
By trimming any excess fabric from the patch, you’ll achieve a clean and professional-looking repair. This final step ensures that the repaired area seamlessly blends with the rest of the upholstery, creating a visually appealing finish on your sofa.
Apply Fabric Glue around the Edges of the Patch
After trimming any excess fabric from the patch, the next step in the upholstery repair process is to apply fabric glue around the edges of the patch. Applying fabric glue provides additional reinforcement to the repair, ensuring that the patch remains securely in place over time.
Follow these steps to effectively apply fabric glue around the edges of the patch:
- Select a fabric glue: Choose a fabric glue that is suitable for your upholstery material and is designed to provide a strong and durable bond. Read the instructions on the fabric glue packaging for specific guidance on application.
- Apply a thin layer of glue: Squeeze a small amount of fabric glue onto a clean cloth or onto your fingertip. Apply a thin layer of glue around the edges of the patch, taking care not to apply too much that it seeps through the fabric.
- Spread the glue evenly: Use a clean cloth or your fingertip to spread the fabric glue evenly around the edges of the patch. Be sure to cover the entire edge, ensuring full coverage and a secure bond.
- Press the edges down: Gently press the edges of the patch onto the glued area, ensuring that they adhere properly. Apply light pressure and hold it for a few seconds to allow the glue to establish a strong bond.
It’s important to note that fabric glue may have a recommended drying time listed on the packaging. Allow the glue to dry completely before using the repaired area or applying any additional stress or pressure to it.
By applying fabric glue around the edges of the patch, you’ll provide extra reinforcement to the repair, ensuring that the patch remains securely attached. This step adds durability and longevity to the upholstery repair, allowing your sofa to withstand regular use without compromising the patch.
Allow the Glue to Dry Completely
Once you have applied fabric glue around the edges of the patch, it is crucial to allow the glue to dry completely. Allowing sufficient drying time ensures that the fabric glue sets and creates a strong, durable bond between the patch and the surrounding upholstery.
Follow these steps to ensure proper drying of the fabric glue:
- Refer to the glue instructions: Different fabric glues may have varying drying times and recommendations, so it is important to refer to the instructions provided by the manufacturer. These instructions will specify the recommended drying time for the particular fabric glue you are using.
- Minimize movement and contact: While waiting for the glue to dry, it is advisable to avoid excessive movement or contact with the repaired area. This helps prevent any accidental displacement or disturbance of the patch and the glue.
- Allow sufficient drying time: Give the fabric glue ample time to dry and set properly. The drying time can vary depending on factors such as temperature and humidity, so it is best to err on the side of caution and allow the glue to dry for the recommended duration or even longer.
- Check for dryness: Once you believe the drying time has passed, gently touch the glued area to check if the fabric glue has fully dried. If it feels firm and dry to the touch, it is likely that the glue has dried completely.
Properly drying the fabric glue is essential for the longevity and effectiveness of the repair. Rushing the process or using the sofa before the glue has completely dried can compromise the bond and may lead to the patch detaching or the repair failing over time.
By allowing the fabric glue to dry completely, you ensure a strong and secure bond between the patch and the surrounding upholstery. This step contributes to the overall durability and integrity of the upholstery repair, allowing your sofa to withstand regular use and maintaining the longevity of the repair.
Gently Clean the Repaired Area
Once the fabric glue has dried completely and the upholstery repair is complete, it’s important to gently clean the repaired area. Cleaning the area helps remove any residue or dirt that may have accumulated during the repair process, leaving your sofa looking fresh and restored.
Follow these steps to effectively clean the repaired area:
- Use a soft, clean cloth: Start by using a soft, clean cloth to wipe away any dust or loose particles on and around the repaired area. Gently brush away any debris to ensure a clean surface.
- Create a mild cleaning solution: Prepare a mild cleaning solution by mixing a small amount of warm water with a gentle detergent or upholstery cleaner. Be sure to read the instructions on the cleaning product for specific dilution instructions.
- Dampen the cloth: Moisten the cloth with the cleaning solution, ensuring it is damp but not soaking wet. Excess moisture can potentially damage the upholstery or affect the integrity of the repair.
- Gently clean the repaired area: Lightly dab or blot the repaired area with the damp cloth, focusing on the immediate surrounding area of the patch. Avoid rubbing or scrubbing vigorously, as this may disturb the patch or cause fraying.
- Dry the area: Allow the repaired area to air dry naturally. Avoid using heat sources or hairdryers, as excessive heat can damage the upholstery fabric. Patience is key to ensuring the repaired area dries thoroughly.
It’s important to note that the cleaning products used should be appropriate and safe for your specific upholstery material. Always refer to the manufacturer’s instructions or consult a professional if you are unsure about the best cleaning methods for your sofa.
By gently cleaning the repaired area, you maintain the overall cleanliness and appearance of your sofa. This step ensures that the repaired section blends seamlessly with the rest of the upholstery, providing a visually appealing and well-maintained result.
Consider Using a Fabric Protector to Prevent Future Damage
Once you have repaired the torn upholstery on your sofa, it’s essential to consider using a fabric protector to prevent future damage. A fabric protector creates a barrier that helps repel stains, spills, and dirt, keeping your upholstery looking cleaner and extending its lifespan.
Here are some reasons to consider using a fabric protector:
- Stain resistance: Fabric protectors are designed to repel liquids and prevent them from soaking into the upholstery fibers. This makes it easier to clean up spills and reduces the risk of permanent staining.
- Easier maintenance: Applying a fabric protector can make regular maintenance and cleaning of your sofa much easier. It helps prevent dirt and debris from embedding deeply into the fibers, making vacuuming and spot cleaning more effective.
- Longer-lasting upholstery: By using a fabric protector, you add an extra layer of protection to your upholstery, which can help prevent wear and tear. This can extend the lifespan of your sofa, saving you money in the long run.
- Prolonged appearance: Over time, upholstery can fade or lose its vibrancy due to exposure to sunlight. A fabric protector can help block UV rays and slow down the fading process, keeping your upholstery looking fresh and vibrant for longer.
- Easy application: Fabric protectors are typically easy to apply. Follow the instructions provided by the manufacturer, which may involve spraying the protector evenly onto the upholstery and allowing it to dry.
It’s important to note that fabric protectors do not make upholstery completely impervious to stains and damage. They provide an added layer of protection but do not guarantee absolute prevention. Promptly attending to spills and following proper cleaning techniques are still crucial.
By considering the use of a fabric protector, you take proactive steps to maintain the appearance and longevity of your repaired upholstery. It’s an investment that can help safeguard your sofa against future damage and ensure it stays looking its best for years to come.
Seek Professional Help If Needed
While DIY upholstery repairs can be a cost-effective and rewarding option, there may be instances where seeking professional help is necessary or recommended. Upholstery repair specialists have the expertise, experience, and specialized equipment to handle complex repairs and delicate fabrics.
Here are some situations where it’s important to consider seeking professional help:
- Extensive damage: If the torn area is large or the damage is significant, it may be best to consult a professional. They can assess the extent of the damage and provide appropriate repair solutions that ensure a seamless and durable result.
- Delicate fabrics: Some upholstery fabrics require specific knowledge and techniques to repair. Delicate materials such as silk, velvet, or leather may require the expertise of a professional who is trained in handling and repairing these types of upholstery.
- Antique or valuable pieces: If you have an antique or valuable piece of furniture, it’s wise to consult a professional before attempting any repairs. They have the necessary expertise to handle delicate and irreplaceable items, ensuring that the repair process does not devalue or damage the piece further.
- Inadequate skills or tools: If you don’t have the necessary skills or tools to complete the repair effectively, it’s best to leave it to the professionals. Attempting complex repairs without the proper knowledge or equipment can worsen the damage or result in an unsatisfactory outcome.
- Time constraints: If you’re unable to dedicate the time and effort required for a thorough and meticulous repair, it may be beneficial to seek professional help. Professionals can efficiently complete the repair and ensure a high-quality result while saving you time and potential frustration.
When determining whether to seek professional help, carefully consider the scope of the repair, the specific fabric or material, your skill level, and the value of your furniture piece. Prioritizing the long-term integrity and aesthetics of your upholstery should guide your decision-making process.
Remember, professional upholstery repair services have the expertise and resources to handle a wide range of repairs. Seeking their help can provide you with peace of mind, knowing that your upholstery is in capable hands.