
Gather the necessary supplies
When faced with a cracked glass bowl, the first step is to gather all the necessary supplies for the repair process. Having all the materials at hand will ensure a smooth and efficient repair. Here are the essential items you will need:
- Glass adhesive: Look for a high-quality, clear glass adhesive specifically designed for bonding glass surfaces. Make sure it is suitable for the type of glass your bowl is made of.
- Protective gloves: These will protect your hands during the repair process and prevent any potential injuries.
- Clean cloth: Use a lint-free cloth to clean the cracked glass bowl before applying adhesive. This will ensure proper adhesion.
- Isopropyl alcohol: This will help in removing any dirt, grease, or residue from the surface of the glass bowl.
- Clear tape: You will need tape to hold the cracked glass together while the adhesive cures. Make sure it is transparent to avoid leaving any marks on the glass.
- Small brush or applicator: This will assist in applying the glass adhesive precisely and evenly.
- Plastic wrap: To protect the surrounding area from any excess adhesive that may squeeze out during the repair process.
- Scissors: You may need scissors to cut tape or plastic wrap to the desired size.
Gathering these supplies beforehand will save you time and ensure that you have everything you need to successfully repair the cracked glass bowl. Once you have all the materials ready, you can proceed to the next step of assessing the extent of the crack.
Assess the extent of the crack
Before proceeding with the repair, it is important to assess the extent of the crack in your glass bowl. This will help you determine the appropriate approach and the feasibility of repairing the bowl. Here’s how you can assess the crack:
- Examine the crack: Carefully inspect the crack in the glass bowl. Note its length and any branching or spreading. This will give you an idea of the severity of the damage.
- Check for stability: Gently tap the cracked area with your finger or a small tool. If the crack moves or the pieces of glass shift, it may indicate a more significant structural problem.
- Assess the location: Consider the location of the crack. If it is located near the edge of the bowl or in a high-stress area, it may be more challenging to repair effectively.
- Consider the size: Take into account the size of the crack. Small cracks may be easier to repair, while larger cracks or shattered pieces may require professional assistance.
Based on your assessment, you can determine whether it is reasonable to proceed with the repair or if it would be more practical to replace the glass bowl. Keep in mind that some cracks may be too severe or extensive to repair effectively, and attempting to mend them could compromise the integrity of the bowl.
If you decide that the crack is within a repairable range, you can move on to the next step, which involves cleaning the cracked glass surface to ensure proper adhesion of the adhesive.
Clean the cracked glass bowl
Before applying any adhesive to the cracked glass bowl, it is essential to thoroughly clean the surface. Cleaning ensures that there are no dirt, debris, or oils that may hinder the adhesive’s effectiveness. Here’s how you can clean the cracked glass bowl:
- Put on protective gloves: Before handling any cleaning agents, protect your hands with gloves to avoid any skin irritation or chemical contact.
- Prepare a cleaning solution: Mix a solution of isopropyl alcohol and water in a 1:1 ratio. This solution will effectively remove any dirt or residue from the cracked glass bowl.
- Dampen a clean cloth: Dip a lint-free cloth into the cleaning solution and wring out any excess liquid. The cloth should be slightly damp but not dripping wet.
- Gently wipe the cracked area: Carefully wipe the cracked area of the glass bowl with the damp cloth. Apply gentle pressure to ensure that you remove any dirt or grime.
- Repeat if necessary: If the crack is particularly dirty or has stubborn stains, you may need to repeat the cleaning process using a fresh cloth and cleaning solution.
- Dry the glass bowl: After cleaning the cracked area, use a dry, lint-free cloth to completely dry the glass bowl. Make sure there is no residual moisture before proceeding.
By properly cleaning the cracked glass bowl, you create an optimal surface for the adhesive to adhere to. This ensures a stronger bond and increases the likelihood of a successful repair. Once the glass bowl is clean and dry, you can proceed to the next step of applying the glass adhesive to the crack.
Apply glass adhesive to the crack
With the cleaned and dry cracked glass bowl, it’s time to apply the glass adhesive. The adhesive is the key component that will bind the cracked pieces together and restore the bowl’s integrity. Follow these steps to apply the glass adhesive:
- Put on protective gloves: As a safety precaution, wear protective gloves to avoid any direct contact with the adhesive.
- Prepare the glass adhesive: Read the instructions on the glass adhesive packaging to ensure proper application. Some adhesives may require shaking or mixing before use.
- Apply the adhesive: Using a small brush or applicator, carefully apply a thin layer of adhesive directly onto the cracked surface. Ensure that the adhesive covers the entire crack, applying a bit extra at the edges for a stronger bond.
- Spread the adhesive: With a clean applicator, gently spread the adhesive along the crack, ensuring an even distribution. This will help create a seamless repair.
- Avoid excess adhesive: Be cautious not to apply too much adhesive as it may result in a messy repair. Wipe away any excess adhesive immediately with a clean cloth.
Remember to work swiftly but carefully when applying the glass adhesive. Most adhesives have a limited working time before they start to dry. Follow the instructions provided with the adhesive for specific drying times.
Once you have applied the adhesive to the crack, the next step is to press the cracked glass together to help the adhesive bond the pieces back into place.
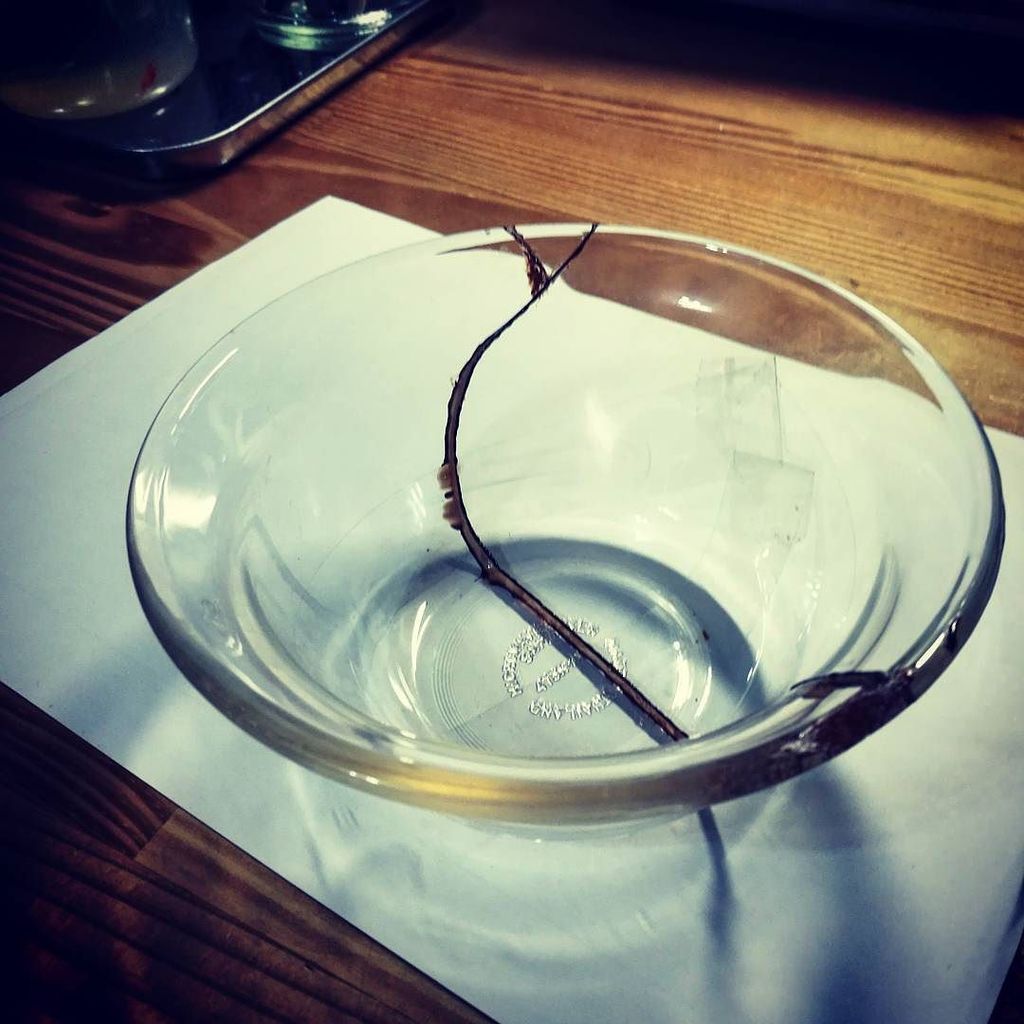
Press the cracked glass together
After applying the glass adhesive to the crack, the next step is to carefully press the cracked glass pieces back together. This ensures a tight bond and allows the adhesive to hold the glass bowl securely. Here’s how you can press the cracked glass together:
- Align the cracked pieces: Carefully reposition the cracked glass pieces so that they fit snugly together. Take your time to ensure proper alignment.
- Apply gentle pressure: Once the pieces are aligned, apply gentle pressure to press the cracked glass together. Use your fingers or a clean cloth to apply even pressure along the crack.
- Hold the pieces in place: Maintain the pressure for a few minutes to allow the adhesive to bond the cracked glass pieces. This step is crucial for a strong and secure repair.
It is important to note that the pressure applied should be gentle to avoid causing further damage to the glass. Applying excessive force may worsen the crack or cause the glass to break further.
Once you have pressed the cracked glass pieces together, the next step is to secure them in place using tape.
Secure the cracked glass with tape
To ensure that the cracked glass remains in place while the adhesive cures, it is vital to secure it with tape. Tape provides stability and prevents the cracked pieces from shifting or separating during the drying process. Follow these steps to secure the cracked glass with tape:
- Cut a piece of clear tape: Use a pair of scissors to cut a piece of clear tape long enough to span across the cracked area. Ensure that the tape is wide enough to cover the crack entirely.
- Position the tape: Carefully place the tape over the cracked area, ensuring that it adheres to both sides of the glass bowl. The tape should be tight enough to hold the cracked pieces together but not too tight to apply excessive pressure.
- Smooth out the tape: Gently smooth out the tape with your fingers or a clean cloth, making sure it adheres firmly to the glass surface. This helps in maintaining a secure bond between the cracked glass pieces.
By securing the cracked glass with tape, you provide additional support to the adhesive and minimize the risk of the cracked pieces shifting or separating. The tape should remain in place until the adhesive has fully cured according to the manufacturer’s instructions.
Now that the cracked glass is secured with tape, it is important to allow the adhesive to cure undisturbed. This brings us to the next step of the repair process: letting the adhesive cure.
Let the adhesive cure
After successfully securing the cracked glass with tape, it is crucial to allow the adhesive to cure completely. Curing time ensures that the adhesive forms a strong bond between the cracked glass pieces, restoring the bowl’s structural integrity. Follow these guidelines to let the adhesive cure effectively:
- Read the instructions: Consult the adhesive manufacturer’s instructions to determine the recommended curing time. Different adhesives may have varying curing times.
- Place the repaired glass bowl in a safe location: Find a stable and level surface to rest the glass bowl. Make sure it remains undisturbed during the curing process.
- Avoid handling or moving the bowl: Refrain from picking up or moving the repaired glass bowl until the adhesive has fully cured. Any movement can compromise the bond between the cracked glass pieces.
- Allow sufficient curing time: Be patient and give the adhesive enough time to cure completely. The curing process may take several hours to a few days, depending on the type of adhesive and the environmental conditions.
It is essential to follow the recommended curing time to ensure that the adhesive reaches its maximum strength. Premature handling or use of the repaired glass bowl can lead to the failure of the repair.
Once the adhesive has fully cured, you can proceed with caution to remove the tape and inspect the repaired area for any necessary touch-ups.
Remove the tape and inspect the repair
Now that the adhesive has had sufficient time to cure, it is time to remove the tape and carefully inspect the repair. Removing the tape allows you to assess the effectiveness of the repair and determine if any further adjustments or touch-ups are needed. Follow these steps to remove the tape and inspect the repaired area:
- Gently peel off the tape: Start by peeling off the tape from one end, taking care not to disturb the repaired glass pieces. Slowly and steadily remove the tape, being mindful not to apply too much force that might cause the cracked glass to separate.
- Inspect the repaired area: Once the tape is removed, carefully examine the crack and the surrounding repaired area. Look for any signs of weakness, gaps, or unevenness in the adhesive.
- Check for stability: Gently tap the repaired area with your finger or a small tool to ensure that the crack remains securely bonded. If there is any movement or separation, it may indicate the need for additional repair or professional assistance.
During the inspection, take note of any imperfections or areas that require attention. If necessary, you can apply a small amount of additional adhesive or perform any touch-ups to further reinforce the repair.
Once you are satisfied with the condition of the repaired glass bowl, the next step is to polish the area to restore its original shine and finish.