
Tools Needed
In order to successfully remove a shelf from your Samsung fridge, you will need the following tools:
- Screwdriver or drill
- Plastic container or bag
- Clean cloth or sponge
- Mild soap or cleaning solution
- Towel or paper towels
These tools will help you safely and efficiently remove the shelf without causing any damage to your fridge or the shelf itself.
First, you will need a screwdriver or drill to release any screws or brackets that may be holding the shelf in place. This will vary depending on the specific model of your Samsung fridge, so be sure to consult the user manual or the manufacturer’s website for specific instructions.
Next, you will need a plastic container or bag to hold any small screws or clips that you remove during the process. This will prevent them from getting lost or accidentally falling into the fridge. It’s important to keep these small parts organized to ensure easy reinstallation if needed.
A clean cloth or sponge, along with a mild soap or cleaning solution, will come in handy to remove any dirt, grime, or spills that may have accumulated on the shelf. Cleaning the shelf before reinstalling or storing it will help maintain its longevity and ensure a hygienic storage environment for your food.
Finally, you will need a towel or paper towels to properly dry the shelf after cleaning. This will prevent moisture from causing any damage or unwanted odors.
By gathering these tools in advance, you will be prepared and equipped to remove the shelf from your Samsung fridge efficiently and without any complications. Now that you have the necessary tools, let’s move on to the step-by-step process of removing the shelf.
Step 1: Empty the Shelf
The first step in removing a shelf from your Samsung fridge is to empty it of all items. This will ensure that nothing gets damaged or falls out during the removal process. It’s also a good opportunity to discard any expired or spoiled food items.
Start by taking out all the items that are currently stored on the shelf. Carefully remove any loose items, such as jars, bottles, or containers, and set them aside. For items that are placed in bins or organizers, take out the entire bin or organizer and place it on a nearby countertop or table.
As you empty the shelf, it’s a good idea to take note of any items that may need to be used or consumed soon. This will help you prioritize what to put back in the fridge once the shelf is reinstalled.
Avoid placing heavy or fragile items on the fridge door or other shelves while you remove the shelf. This will help prevent any accidents or damage. Instead, find a secure and stable surface to temporarily store the items.
By emptying the shelf before removing it, you will have a clear and unobstructed space to work with. This will make it easier to release any clips, screws, or brackets that are holding the shelf in place. It will also minimize the risk of any items falling or getting damaged during the removal process.
Once the shelf is empty, you’re ready to move on to the next step in removing it from your Samsung fridge. Take a moment to gather any tools or supplies you will need for the next steps, such as a screwdriver or drill, a plastic container or bag for screws, and a clean cloth or sponge for cleaning the shelf.
Let’s proceed to Step 2, where we will locate the clips that hold the shelf in place.
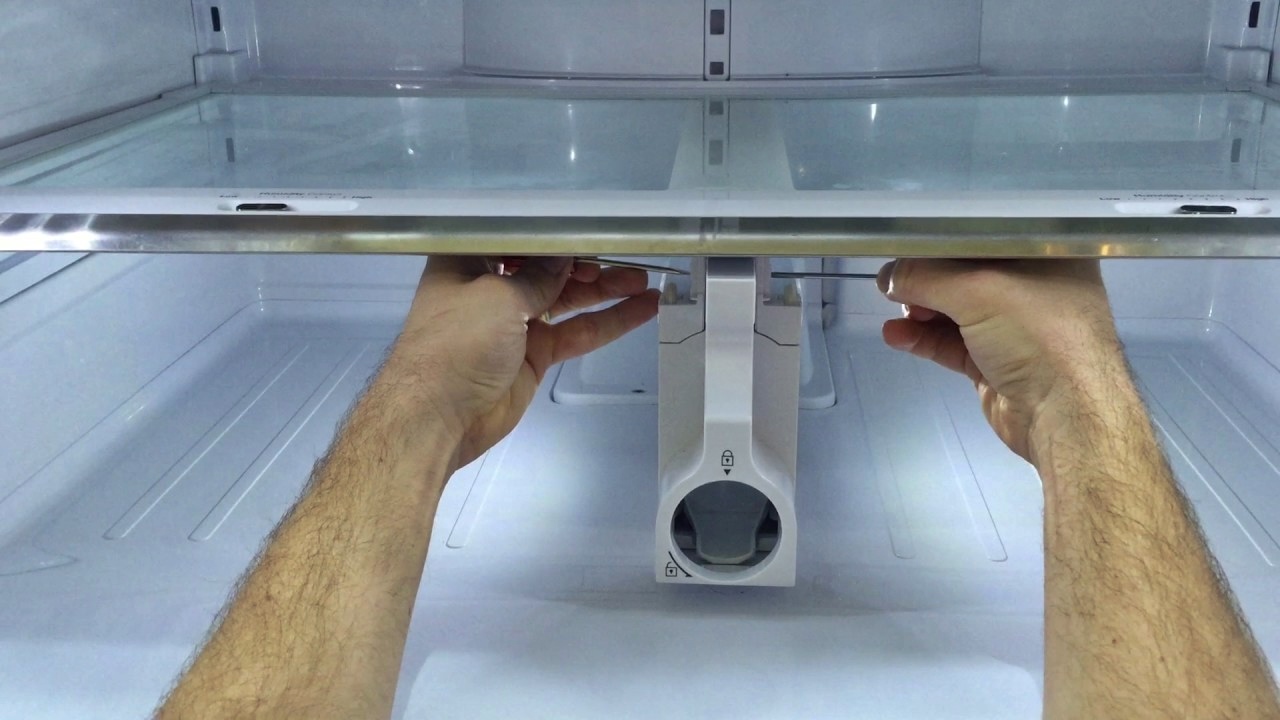
Step 2: Locate the Clips
After emptying the shelf, the next step in removing it from your Samsung fridge is to locate the clips that are holding it in place. Depending on the model of your fridge, there may be different types of clips used.
Start by carefully inspecting the underside of the shelf. Look for any plastic clips or brackets that are attached to it. These clips are usually located near the front and back edges of the shelf, but they can also be found along the sides.
Samsung fridges typically use either snap-on clips or screws to secure the shelves in place. Snap-on clips are designed to snap or lock onto the shelf support brackets on the walls of the fridge. Screws, on the other hand, need to be unscrewed to release the shelf.
Try gently pulling or wiggling the shelf to see if it moves. If it does, it means that the clips are loose or not securely fastened. In this case, you may be able to proceed to the next step without needing to release the clips.
If the shelf doesn’t move, you will need to locate and release the clips. Look for any screws or tabs that are holding the clips in place. These may be hidden under plastic covers or caps, so be sure to check thoroughly.
If your fridge uses snap-on clips, you can release them by applying pressure to the sides or by sliding a flathead screwdriver under the clip and gently prying it off the support bracket.
If your fridge uses screws, use a screwdriver or drill to unscrew them counterclockwise. Place the screws in a plastic container or bag to keep them organized and prevent them from getting lost.
Once you have located and released the clips, you are ready to move on to the next step: releasing the shelf from the clips. This will be covered in Step 3.
Step 3: Release the Clips
Now that you have located the clips that are holding the shelf in place, the next step is to release them. This will allow you to detach the shelf from the fridge.
If your Samsung fridge uses snap-on clips, you can release them by applying gentle pressure to the sides of the clips. Use your fingers or a flathead screwdriver to carefully push or pry the clips off the support brackets.
Start with the clips located at the front edge of the shelf and work your way to the back. If the clips are tight, you may need to use slightly more force, but be cautious not to apply too much pressure to avoid damaging the clips or the shelf itself.
If your fridge uses screws to secure the clips, use a screwdriver or drill to unscrew them counterclockwise. Depending on the number of screws used, you may have to remove multiple screws to release the shelf.
As you release the clips, pay attention to any movement or signs that the clips are no longer holding the shelf. You should feel the shelf become loose or start to move slightly once the clips are released.
Remember to keep the screws or clips in a secure place, such as a plastic container or bag, to prevent them from getting lost during the process. Keeping these small parts organized will make it easier for you to reinstall the shelf if needed.
Once all the clips are released, you have successfully detached the shelf from the fridge. However, be cautious when removing the shelf, as it may still be connected to the fridge by other mechanisms, such as rails or stoppers.
In the next step, we will guide you on how to safely lift the shelf out of the fridge without causing any damage to the appliance or the shelf itself.
Step 4: Lift the Shelf
With the clips released, it’s time to lift the shelf out of your Samsung fridge. This step requires careful handling to avoid any damage to the fridge or the shelf.
Start by positioning yourself in front of the fridge with a firm and stable footing. Place one hand under the front edge of the shelf and the other hand under the back edge.
Gently lift the shelf upwards, keeping it level and parallel to the floor. Make sure to distribute the weight evenly between both hands to maintain balance and stability.
As you lift the shelf, be cautious of any obstructions or other items in the fridge that may interfere with the process. Slowly and steadily lift the shelf until it is clear of the fridge walls and any other supporting structures.
It’s important to note that some Samsung fridges may have additional mechanisms, such as rails or stoppers, that hold the shelf in place even after releasing the clips. If you encounter any resistance while lifting the shelf, double-check for any additional attachments or mechanisms that may need to be disengaged.
If necessary, gently tilt the shelf slightly towards you as you lift, ensuring that it clears any protruding parts or obstacles inside the fridge. Always exercise caution and pay attention to avoid any mishaps or collisions.
Once the shelf is completely lifted out of the fridge, hold it steady and set it on a secure and flat surface. This will allow you to clean and inspect the shelf thoroughly before reinstallation or storage.
Now that you have successfully lifted the shelf out of your Samsung fridge, let’s move on to the next step: removing the shelf from the fridge. This will be covered in Step 5.
Step 5: Remove the Shelf from the Fridge
Now that you have lifted the shelf out of your Samsung fridge, the next step is to carefully remove it from the fridge completely. This will allow you to clean or store the shelf as needed.
Start by assessing the space around the fridge and ensure that you have enough room to safely maneuver the shelf. Clear any nearby objects or obstacles that may obstruct your path or cause accidents.
Hold the lifted shelf steadily with both hands, maintaining a firm grip and ensuring it remains level. Slowly and gently move the shelf away from the fridge, taking care to avoid hitting any surfaces or walls.
As you remove the shelf, be mindful of any wires, cables, or connections that may be attached to the shelf or the fridge. Make sure they don’t get snagged or tangled as you navigate the shelf out of the fridge.
If the shelf is too wide to fit through the fridge door, try tilting it at a slight angle while keeping it level. This may help you maneuver the shelf out of the fridge without any issues.
As the shelf is removed from the fridge, be cautious of any sticky or stubborn residue that may be present on the walls or other surfaces. Take note of any spills or stains and make a mental note to clean and disinfect the fridge later.
Once the shelf is completely clear of the fridge, set it down gently on a secure and flat surface. Avoid placing it on a hard or abrasive surface that may scratch or damage the shelf.
At this point, you have successfully removed the shelf from your Samsung fridge. You can proceed to the next step: cleaning the shelf. This will ensure that it is free from dirt, grime, and any food residue that may have accumulated over time.
Step 6: Clean the Shelf
Now that you have removed the shelf from your Samsung fridge, it’s time to give it a thorough cleaning. This step is essential to maintain hygiene and ensure that the shelf is free from any dirt, spills, or food residue.
Start by inspecting the shelf for any noticeable stains or spills. Use a clean cloth or sponge to wipe away any surface dirt or debris. For stubborn stains, you can dampen the cloth or sponge with mild soap or a suitable cleaning solution.
Gently scrub the surface of the shelf, paying attention to the corners and edges where grime can accumulate. Ensure that the cleaning solution is compatible with the material of the shelf to avoid any damage.
If the shelf is dishwasher-safe, you can also consider placing it in the dishwasher for a thorough cleaning. Consult the user manual or manufacturer’s instructions to determine the dishwasher compatibility of your specific Samsung fridge shelf.
After cleaning the surface, rinse the shelf with warm water to remove any residual soap or cleaning solution. Make sure to rinse it thoroughly to prevent any soapy or chemical residue from coming into contact with your food.
Once the shelf is clean, use a clean cloth or paper towel to dry it thoroughly. This will prevent any moisture from lingering on the surface and potentially causing damage or creating an environment for bacterial growth.
If the shelf has any removable parts or attachments, such as plastic drawers or adjustable dividers, take the opportunity to clean them separately. Follow the same cleaning process for these components and ensure they are completely dry before reattaching them.
By cleaning the shelf thoroughly, you are ensuring a hygienic storage space for your food items. Additionally, a clean shelf will help maintain the longevity of both the shelf and your Samsung fridge.
Once the shelf is clean and dry, you can move on to the next step: reinstalling the shelf (if needed). This will be covered in Step 7.
Step 7: Reinstall the Shelf (if needed)
After cleaning and drying the shelf from your Samsung fridge, the next step is to reinstall it back into the fridge. This step is optional and depends on whether you need to put the shelf back in its original position or if you prefer to keep it stored for later use.
If you have emptied the fridge and removed the shelf for cleaning purposes or reorganization, you might want to reinstall it to restore the storage space and functionality of your Samsung fridge.
Start by lifting the shelf up to align it with the designated grooves or brackets inside the fridge. Slowly slide the shelf into place, ensuring that it sits securely and evenly on the support brackets or rails.
If your fridge has adjustable shelves, take advantage of this feature to customize the storage space according to your needs. Adjust the height or position of the shelf to accommodate taller items or create additional space for organization.
As you reinstall the shelf, make sure it is level and stable without any wobbling or tilting. This will prevent items from shifting or falling when you open and close the fridge door.
If the shelf has clips or screws for securing it in place, follow the instructions in reverse to attach them back to the fridge. Ensure that the clips snap back onto the support brackets or tighten the screws securely.
Double-check that the shelf is securely installed by gently pushing or lightly shaking it. If it feels stable and does not move excessively, then it is properly reinstalled.
However, if you have decided not to reinstall the shelf, you can choose to store it in a safe and dry location. Ensure that it is stored flat to avoid warping or damage.
By reinstalling the shelf (if needed), you are maximizing the storage capacity of your Samsung fridge and maintaining an organized and functional space for your food items.
With the shelf properly reinstalled or safely stored, you can move on to the final step: organizing your fridge for optimal efficiency and convenience.
Step 8: Organize Your Fridge
After reinstalling the shelf or completing the necessary steps for removal and cleaning, it’s time to organize your Samsung fridge for optimal efficiency and convenience. A well-organized fridge ensures that items are easily accessible, reduces food waste, and helps maintain a hygienic storage environment.
Start by categorizing your food items. Group similar items together, such as fruits, vegetables, dairy products, condiments, and beverages. This will make it easier to locate specific items and avoid placing incompatible items near each other.
Consider using separate containers or bins for different categories. Clear plastic containers or organizers can help keep similar items together and prevent them from getting lost or hidden behind other items.
Place frequently used items within easy reach, like near the front or on the top shelf. This ensures that you can quickly grab what you need without having to shuffle through the entire fridge.
Utilize the different compartments and shelves in your Samsung fridge effectively. Use the crisper drawers for storing fruits and vegetables, as they help maintain optimal humidity levels for produce freshness. Keep raw meats or fish on lower shelves to prevent cross-contamination with other food items.
Label or date perishable items to help you keep track of their freshness and ensure they are used before their expiration dates. This will significantly reduce food waste and improve overall food safety.
Regularly check and clean your fridge to maintain cleanliness and prevent unpleasant odors. Wipe spills immediately and periodically empty and clean the crisper drawers, shelves, and walls of the fridge. Consider using baking soda or a natural deodorizer to absorb any lingering smells.
As you organize your fridge, take into consideration the temperature zones within the appliance. Keep sensitive items like dairy and eggs in the designated cooler areas towards the back, where temperatures are more consistent and cooler.
Maximize the available space by using various storage solutions, such as stackable containers or fridge organizers, to make the most of every inch of your Samsung fridge.
Evaluate and adjust your organization system periodically to meet changing needs. As you go about your daily routine and use the fridge, take note of any improvements or adjustments that could optimize your storage and accessibility.
By organizing your fridge in a systematic and thoughtful manner, you can enhance the functionality and efficiency of your Samsung fridge, making it easier to locate and use items, reducing food waste, and creating a pleasant and user-friendly experience.