
Why Remove Plastic Cabinet Shelf Clips?
Plastic cabinet shelf clips can be a convenient way to securely hold shelves in place within cabinets. However, there are several reasons why you may want to remove them:
- Replacing or rearranging shelves: If you want to change the height or position of the shelves in your cabinet, removing the plastic clips is necessary. This allows you to have more flexibility in organizing your cabinet space according to your needs.
- Repairing or renovating cabinets: When performing repairs or renovating your cabinets, it may be necessary to remove the plastic clips. This allows better access to the cabinet interior, making it easier to fix any issues or update the cabinet’s design.
- Cleaning and maintenance: Removing the plastic clips allows you to thoroughly clean both the shelves and the cabinet interior. Over time, dust, grime, and spills can accumulate in these areas, and removing the clips gives you easier access to ensure a thorough cleaning.
- Replacing damaged or worn-out clips: Plastic cabinet shelf clips can become damaged or worn out over time. If this happens, it’s essential to remove the old clips so that you can replace them with new ones. This ensures the proper functioning and stability of the shelves in your cabinet.
- Aesthetic preferences: Some people may choose to remove the plastic shelf clips for aesthetic reasons. Without the visible clips, the shelf may have a cleaner and more streamlined appearance, particularly for glass shelves or open cabinets.
Overall, while plastic cabinet shelf clips serve a useful purpose, there are various reasons why you may need to remove them. Whether it’s for adjusting shelves, performing repairs, cleaning, or personal preferences, understanding how to remove these clips is essential for maintaining your cabinets and maximizing their functionality.
Tools Needed
Before you begin removing plastic cabinet shelf clips, it is important to gather the necessary tools. Having the right tools on hand will make the process smoother and more efficient. Here are the tools you will need:
- Screwdriver: A screwdriver is commonly used to release and remove plastic cabinet shelf clips. Depending on the type of clips used in your cabinet, you may need a flathead or Phillips screwdriver. It is a good idea to have both types available to ensure compatibility.
- Pliers: Pliers can be helpful in gripping and releasing the clips, especially if they are tightly attached. Using pliers provides extra leverage and makes the removal process easier.
- Protective gloves: It is advisable to wear protective gloves during the removal process to protect your hands from any potential sharp edges or friction. Rubber or latex gloves provide a good grip and protect your skin.
- Cloth or towel: Having a cloth or towel nearby will come in handy to wipe away any dust, debris, or cleaning solutions that may be encountered during the removal process. It will also help to keep your work area clean and prevent any potential accidents.
- Cleaning solution: If you plan to clean the shelves or the cabinet interior after removing the clips, having a suitable cleaning solution is essential. Depending on the material of your shelves and the type of stains you need to remove, choose a cleaning solution that is safe and effective.
- Bucket or basin: If you opt to clean the shelves with a liquid cleaning solution, having a bucket or basin to mix and hold the cleaning solution is important. This will make the cleaning process easier and more organized.
Make sure to gather all the necessary tools before you begin removing the plastic cabinet shelf clips. Having these tools readily available will save you time and ensure a smooth removal process. Additionally, wearing protective gloves will help ensure your safety throughout the process. Once you have everything prepared, you can proceed to the next steps of removing the clips.
Step 1: Prepare the Cabinet
Before you start removing the plastic cabinet shelf clips, it is important to properly prepare the cabinet. By taking a few simple steps to prepare, you can ensure a smoother and more efficient removal process. Follow these steps to prepare the cabinet:
- Empty the cabinet: Take out all items from the cabinet, including any shelves that are not attached with the clips. This will provide you with a clear workspace and prevent any items from getting in the way or accidentally falling during the removal process.
- Clean the cabinet: Use a dry cloth or vacuum cleaner to remove any dust, crumbs, or debris from the interior of the cabinet. This will not only make the removal process easier but also create a clean environment for the next steps.
- Identify the clips: Take a moment to locate and identify the plastic cabinet shelf clips. They are typically positioned on the sides or at the back of the cabinet, holding the shelves in place. Understanding their location will help you navigate the removal process more effectively.
- Inspect the clips: Before attempting to remove the clips, inspect their condition. Look for any signs of damage or wear, such as cracks or broken parts. This will help you determine if any clips need to be replaced after removal.
Taking the time to prepare the cabinet before removing the plastic shelf clips is essential. By emptying the cabinet and cleaning the interior, you create a safe and organized workspace. Identifying and inspecting the clips allows you to plan the removal process accordingly and address any potential issues. Once you have completed the preparation steps, you can move on to the next stage of removing the plastic cabinet shelf clips.
Step 2: Locate Clips
Once you have prepared the cabinet, the next step in removing plastic cabinet shelf clips is to locate their exact positions. By identifying the clips, you can focus your efforts on releasing and removing them effectively. Follow these steps to locate the clips:
- Inspect the interior: Take a close look inside the cabinet to locate the plastic shelf clips. They are typically positioned on the sides or at the back of the cabinet and may be attached to the walls or the shelf support brackets.
- Feel for the clips: With your fingers, carefully run them along the sides or the back of the cabinet to feel for the presence of the clips. Plastic clips are usually noticeable due to their raised or protruding nature.
- Check for any hidden clips: In some cases, there may be hidden or concealed clips that are not readily visible. These may be located behind decorative trim or panels. Ensure thorough inspection to identify any hidden clips that need to be removed.
- Take note of the clip positions: As you locate the clips, take note of their positions. This will help you keep track of the number of clips you need to remove and ensure that no clips are accidentally missed during the removal process.
Locating the plastic cabinet shelf clips is an important step in the removal process. By inspecting, feeling, and checking for any hidden clips, you can accurately identify their positions. Taking note of the clip locations helps maintain a systematic approach to their removal. Once you have successfully located the clips, you can proceed to the next step of assessing the type of clips used in your cabinet.
Step 3: Assess Clip Type
Before proceeding with the removal process, it is essential to assess the type of plastic cabinet shelf clips used in your cabinet. Different clip designs may require different removal techniques, so understanding the clip type will help you approach the removal process effectively. Follow these steps to assess the clip type:
- Examine the clip design: Take a close look at the plastic clips and observe their design. They can vary in shape and mechanism. Some common clip designs include push-in clips, screw-on clips, or snap-on clips.
- Check for any securing mechanisms: Determine if the clips have any securing mechanisms, such as screws or locking tabs. These mechanisms may need to be released or unscrewed before the clips can be removed.
- Refer to the cabinet manual or manufacturer: If you have access to the cabinet manual or can find information from the manufacturer, consult these resources to learn more about the specific clip type used in your cabinet. They may provide guidance on the removal process.
- Search online resources: If you are unable to find information from the manual or manufacturer, search online for resources specific to your cabinet’s brand or model. Online forums or support websites may have discussions or tutorials on how to remove the specific type of plastic clip.
Assessing the type of plastic cabinet shelf clips used in your cabinet is crucial for a successful removal process. By examining the clip design, checking for securing mechanisms, and referring to available resources, you can gather the necessary information to proceed with confidence. Understanding the clip type will allow you to approach the removal process with the appropriate technique and tools. Once you have assessed the clip type, you can move on to the next step of releasing the clips.
Step 4: Release Clips
Now that you have assessed the type of plastic cabinet shelf clips used in your cabinet, it’s time to proceed with releasing them. The process of releasing the clips may vary depending on the clip type and mechanism. Follow these steps to release the clips:
- Push-in clips: If your cabinet has push-in clips, locate the small tab or lever on the clip. Push or pull this tab to release the clip’s grip on the shelf. Repeat this step for all the push-in clips in the cabinet.
- Screw-on clips: For screw-on clips, use a screwdriver to loosen and remove any screws that are securing the clips. Once the screws are removed, you can easily detach the clips from the cabinet. Remember to keep track of the screws for reassembly if needed.
- Snap-on clips: To release snap-on clips, gently pry the edges of the clip away from the cabinet or shelf surface using a flathead screwdriver or your fingers. Apply steady pressure until the clip pops off and releases the shelf. Repeat this process for each snap-on clip.
- Hidden clips: If you have located any hidden clips, carefully remove any trim or panel covering them to access the clips. Follow the appropriate removal technique based on the clip type (push-in, screw-on, or snap-on) as described above.
- Work systematically: As you release the clips, work systematically from one side of the cabinet to the other, or from top to bottom. This helps ensure that no clips are missed, and provides a well-organized approach to the removal process.
Remember to handle the clips and any associated screws or hardware with care during the removal process to avoid damaging them or your cabinet. Take your time and be patient, especially when releasing snap-on clips or hidden clips. Once you have successfully released all the clips, you can proceed to the next step of removing the shelves from the cabinet.
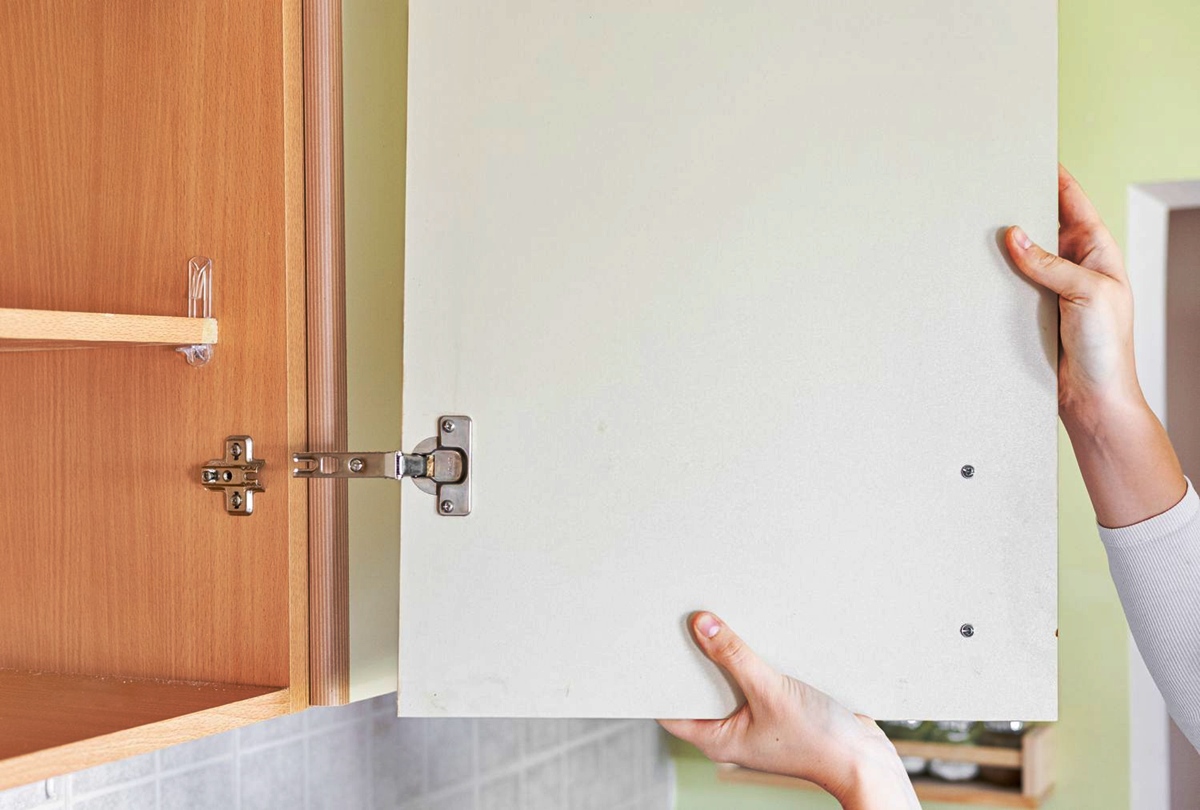
Step 5: Remove Shelf
After successfully releasing the plastic cabinet shelf clips, it’s time to remove the shelves from the cabinet. Removing the shelves allows for easier cleaning, repairs, or repositioning. Follow these steps to remove the shelf:
- Clear the shelf: Before removing the shelf, make sure it is clear of any items or objects. This will prevent any accidental spills or damage during the removal process.
- Gently lift the shelf: Using both hands, gently lift the shelf upwards while keeping it parallel to the cabinet. Take care to prevent any tilting or angling that may cause the shelf to get stuck or snag on the remaining clips.
- Watch for any resistance: As you lift the shelf, be mindful of any resistance or obstruction. If you encounter any resistance, check for any remaining clips that may still be attached. Release them or remove them as necessary before continuing to lift the shelf.
- Set aside the shelf: Once the shelf is completely lifted and free from all clips, set it aside in a safe and secure location. Place it on a soft surface or wrap it in a protective material, such as a towel or bubble wrap, to prevent any damage or scratches.
- Inspect the shelf and clips: While the shelf is removed, take the opportunity to inspect both the shelf and the plastic clips. Look for any signs of damage, wear, or dirt. Clean the shelf if necessary and make note of any clips that need replacement.
Removing the shelf from the cabinet is an important step in the process of working with plastic cabinet shelf clips. By following these steps, you can safely remove the shelf without any issues or damage. Taking the time to inspect and clean the shelf, as well as assess the condition of the clips, ensures proper maintenance and allows for necessary repairs or replacements. With the shelf successfully removed, you can proceed to the next step of cleaning and maintaining the cabinet.
Step 6: Cleaning and Maintenance
After removing the shelf, it is essential to take the time to clean and maintain both the shelf and the cabinet. This step ensures a hygienic and organized space while prolonging the lifespan of your cabinet. Follow these steps for cleaning and maintenance:
- Clean the shelf: Using a suitable cleaning solution and a soft cloth or sponge, clean the surface of the shelf thoroughly. Pay attention to any stains, spills, or sticky residue. Rinse the shelf with clean water and wipe it dry with a towel.
- Clean the cabinet interior: With the shelf removed, take the opportunity to clean the cabinet interior. Use a vacuum cleaner or a dry cloth to remove dust, crumbs, or any other debris. If necessary, use a mild detergent solution to clean any stubborn stains or spills. Wipe the interior dry with a clean cloth.
- Inspect the cabinet: While cleaning, inspect the cabinet for any signs of damage or wear. Look for loose screws or hardware, cracked surfaces, or any other issues that may need attention. Address these concerns promptly to prevent further damage or complications.
- Replace damaged clips: If you noticed any clips that are damaged or worn out during the removal process, now is the time to replace them. Purchase the appropriate replacement clips from your cabinet’s manufacturer or a reputable hardware store. Follow the manufacturer’s instructions or consult a professional if needed for proper installation.
- Reassemble the shelves: Once the shelf and cabinet are thoroughly cleaned and any necessary maintenance is completed, reassemble the shelves back into the cabinet. Use the same plastic cabinet shelf clips or the new replacement clips to secure the shelves in their desired positions.
Cleaning and maintaining your cabinet is essential for its longevity and functionality. By following these cleaning and maintenance steps, you ensure a clean and organized cabinet space while addressing any issues or damages that may arise. Regular cleaning and proper care will help keep your cabinet in optimal condition for years to come.