
Tools Needed
In order to successfully remove the brush roll from your Shark Duo Clean vacuum, you will need the following tools:
- Screwdriver (either Phillips or flathead, depending on the screws)
- Clean cloth or towel
- Dish soap and water (for cleaning the brush roll)
Having these tools on hand will make the process much easier and ensure that you can complete the task without any issues. Additionally, make sure that your vacuum is turned off and unplugged before you begin working on it for your safety.
The screwdriver will come in handy for removing the screws that hold the brush roll access cover in place. Depending on the model of your Shark Duo Clean vacuum, you may need either a Phillips or flathead screwdriver. If you’re unsure which one you need, check the screws on the brush roll access cover before starting.
A clean cloth or towel is essential for wiping away any dirt, debris, or hair that may have accumulated on the brush roll or in the brush roll housing. Keeping your vacuum clean will help maintain its performance and ensure that it continues to operate efficiently.
Lastly, dish soap and water will be used to clean the brush roll itself. Over time, the brush roll can get clogged with hair, dust, and other debris, which can affect its performance. By periodically cleaning the brush roll, you can keep it in optimal condition and prolong its lifespan.
With these tools at your disposal, you’re now ready to move on to the next steps of removing the brush roll from your Shark Duo Clean vacuum cleaner.
Step 1: Turn Off and Unplug the Vacuum
The first step in removing the brush roll from your Shark Duo Clean vacuum is to ensure that it is turned off and unplugged from the power source. This is crucial for your safety and to prevent any accidents while working on the vacuum.
Locate the power switch on your Shark Duo Clean vacuum and turn it off. It is usually located on the main body of the vacuum or on the handle. Once you have switched off the vacuum, unplug it from the power outlet to completely cut off the power supply.
By turning off and unplugging the vacuum, you eliminate the risk of the brush roll moving or spinning while you are working on it. This will prevent any potential injuries or accidents that could occur if the brush roll were to accidentally start moving.
Take a moment to visually inspect the vacuum and ensure that there are no signs of power, such as lights or indicators, that may indicate it is still receiving electricity. It’s always better to be safe and double-check that the vacuum is completely disconnected before proceeding with the next steps.
Remember, the safety of yourself and others should always be the top priority when working with any electrical appliance. By following this simple step of turning off and unplugging the vacuum, you are taking an important precautionary measure before beginning the process of removing the brush roll from your Shark Duo Clean vacuum.
Step 2: Open the Brush Roll Access Cover
With the Shark Duo Clean vacuum turned off and unplugged, the next step is to open the brush roll access cover. This will give you access to the brush roll compartment and allow you to remove the brush roll.
Locate the brush roll access cover on your Shark Duo Clean vacuum. It is typically located on the bottom of the vacuum, near the brush roll area. Look for any latches, tabs, or screws that may be securing the cover in place.
Depending on the model of your vacuum, there may be latches that need to be released or screws that need to be removed to open the brush roll access cover. Use your screwdriver, if necessary, to loosen or remove any screws that are holding the cover in place.
Once any latches or screws have been released, gently lift or slide the brush roll access cover to open it. It may require a bit of force, but be careful not to apply too much pressure to avoid damaging the cover or any other components of the vacuum.
As you open the brush roll access cover, you will see the brush roll compartment exposed. Take a moment to inspect the inside of the compartment for any visible dirt, debris, or hair that may have accumulated. This is a good opportunity to clean out any build-up to ensure optimal performance.
By opening the brush roll access cover, you have successfully completed the second step in removing the brush roll from your Shark Duo Clean vacuum. You are now ready to proceed to the next step of removing the brush roll end caps.
Step 3: Remove the Brush Roll End Caps
After opening the brush roll access cover, the next step in removing the brush roll from your Shark Duo Clean vacuum is to remove the brush roll end caps. These end caps secure the brush roll in place, and removing them will allow you to take out the brush roll for cleaning or replacement.
Inspect the brush roll and locate the end caps. They are typically located at each end of the brush roll and may be made of plastic or another durable material. Check for any clips, tabs, or screws that may be holding the end caps in place.
Depending on the model of your vacuum, the end caps may have clips that need to be released or screws that need to be removed. Use your fingers or a screwdriver to carefully disengage any clips or unscrew the screws to loosen the end caps.
Once the end caps are no longer secured, you can gently pull or pry them off the brush roll. Take care not to forcefully yank or twist them, as this may cause damage to the brush roll or end caps.
After removing the end caps, set them aside in a safe place. This will prevent them from getting lost or damaged during the cleaning or replacement process.
With the end caps successfully removed, you now have access to the brush roll. Take a moment to inspect it and remove any visible dirt, debris, or hair that may have accumulated. This will ensure that the brush roll operates at its best efficiency.
By following this step, you have completed the process of removing the brush roll end caps from your Shark Duo Clean vacuum. You are now ready to move on to the next step of removing the brush roll itself.
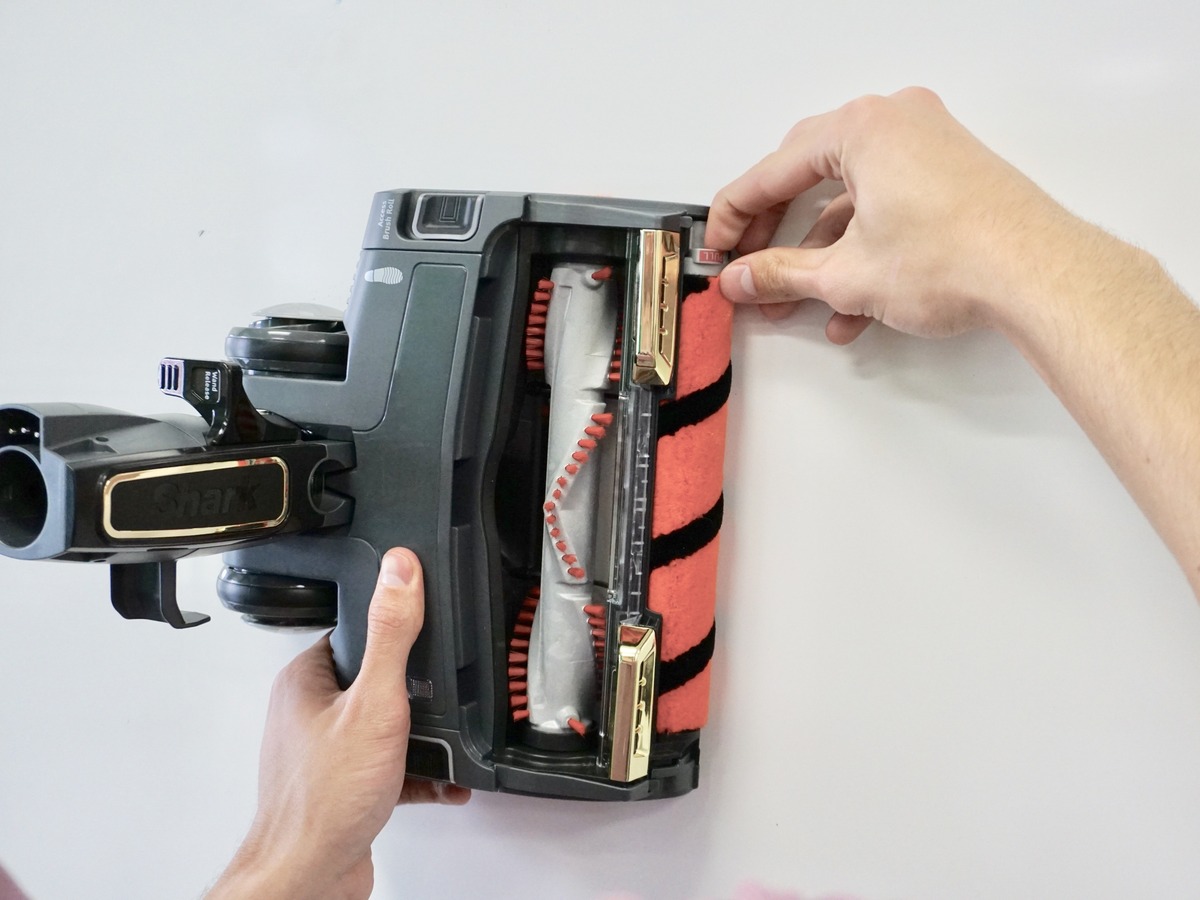
Step 4: Remove the Brush Roll
With the brush roll end caps removed, you can now proceed to remove the brush roll from your Shark Duo Clean vacuum. This step will allow you to thoroughly clean or replace the brush roll if needed.
Grasp the brush roll firmly at both ends with your hands. Gently pull the brush roll out of the brush roll compartment. It may require a bit of wiggling or rocking back and forth to loosen it from its position.
As you remove the brush roll, take note of any resistance or obstruction. If you encounter any difficulty, carefully inspect the brush roll compartment for any debris or tangled hair that may be preventing the brush roll from being removed smoothly.
If there are any obstructions or tangled hair, use your fingers or a pair of tweezers to carefully remove them. Take extra care not to damage the bristles or any other components of the brush roll while doing so.
Once the brush roll is free from any obstructions, continue pulling it out until it is completely removed from the brush roll compartment. Place the brush roll in a safe and clean area to prevent it from getting dirty or damaged during the cleaning or replacement process.
Take this opportunity to inspect the brush roll for any signs of wear or damage. Check the bristles to see if they are frayed or worn down, as this may affect the vacuum’s performance. If necessary, replace the brush roll with a new one to ensure optimal cleaning results.
By removing the brush roll, you have completed an important step in the process of cleaning or replacing the brush roll in your Shark Duo Clean vacuum. You are now prepared to move on to the next step of cleaning the brush roll itself.
Step 5: Clean the Brush Roll
Now that you have removed the brush roll from your Shark Duo Clean vacuum, it’s time to clean it thoroughly. Over time, the brush roll can accumulate dirt, debris, and hair, which can compromise its performance. Cleaning the brush roll will help maintain its efficiency and ensure effective cleaning.
Start by inspecting the brush roll for any visible dirt, debris, or tangled hair. Use your fingers or a pair of tweezers to gently remove any large debris or hair that is wrapped around the bristles. Take care not to pull or tug too forcefully to avoid damaging the bristles.
Once the larger debris is removed, fill a sink or basin with warm water and add a small amount of dish soap. Submerge the brush roll in the soapy water and allow it to soak for a few minutes. This will help to loosen any stubborn dirt and grime.
After soaking, use a clean cloth or brush to gently scrub the bristles of the brush roll. Work your way along the entire length of the bristles, making sure to remove any remaining dirt or buildup. Pay special attention to the ends of the bristles, as these areas tend to collect more debris.
Rinse the brush roll thoroughly under running water to remove any soap residue. Ensure that all the bristles are free from any remaining dirt or debris. Squeeze out any excess water and use a clean towel to pat dry the brush roll.
Allow the brush roll to air dry completely before reassembling and using it. This will prevent any moisture or humidity from causing damage to the brush roll or other components of your vacuum.
With the brush roll now cleaned and dry, you can move on to the next step of reassembling the brush roll and securing the end caps.
By taking the time to clean the brush roll, you are maintaining the performance of your Shark Duo Clean vacuum and ensuring that it continues to deliver optimal cleaning results.
Step 6: Reassemble the Brush Roll
After cleaning the brush roll, it’s time to reassemble it and prepare it for installation back into your Shark Duo Clean vacuum. This step is crucial to ensure that the brush roll is properly secured and can function effectively during cleaning.
Begin by taking the cleaned and dried brush roll and align it with the brush roll compartment in your vacuum. Take note of the orientation of the brush roll, ensuring that it is positioned correctly to match the placement of the bristles.
Gently insert the brush roll into the brush roll compartment, making sure it fits snugly and completely. Wiggle it slightly if needed to ensure a proper fit. The brush roll should be aligned parallel to the floor and sit flush within the compartment.
Now it’s time to reattach the brush roll end caps. Retrieve the end caps that you set aside earlier and align them with the brush roll ends. Make sure that the end caps are properly aligned and securely fit into place.
Depending on your Shark Duo Clean model, you may need to press, snap, or screw the end caps into position. Follow the manufacturer’s instructions to ensure the correct method for your specific vacuum model.
Take a moment to test the brush roll by manually rotating it with your hand. It should spin smoothly and freely without any obstructions or odd sounds. This ensures that the brush roll is securely in place and ready for use.
Once you have confirmed that the brush roll and end caps are properly reassembled, you are ready to move on to the next step of securing the brush roll end caps.
By carefully reassembling the brush roll, you have completed an essential step in the process of reinstalling it in your Shark Duo Clean vacuum. This ensures that the brush roll is properly aligned and ready to deliver effective cleaning results.
Step 7: Secure the Brush Roll End Caps
Once you have reassembled the brush roll in your Shark Duo Clean vacuum, the next step is to securely fasten the brush roll end caps. Properly securing the end caps ensures that the brush roll stays in place during operation and maintains optimal cleaning performance.
Inspect the brush roll end caps to determine the method of attachment. Depending on your vacuum model, the end caps may have clips, tabs, or screws that need to be engaged or tightened.
If your end caps have clips or tabs, align them with the corresponding slots or notches on the brush roll compartment. Push the end caps firmly into place until you hear or feel a click, indicating that they are securely attached.
If your end caps require screws, position them over the designated holes on the brush roll compartment. Use a screwdriver to tighten the screws securely but be careful not to overtighten as it may strip the screw or damage the end caps.
Double-check that the end caps are properly secured by gently tugging on them. They should not easily come loose or wobble. If necessary, adjust or tighten the end caps further until they are securely in place.
Once you are confident that the end caps are securely fastened, visually inspect the brush roll compartment to ensure that everything is properly aligned. The brush roll should be centered and sit flush within the compartment, with the end caps tightly secured.
By securely fastening the brush roll end caps, you have completed an important step in the process of reinstalling the brush roll in your Shark Duo Clean vacuum. This ensures that the brush roll stays in place during operation, providing efficient and effective cleaning performance.
Step 8: Close the Brush Roll Access Cover
After securing the brush roll and end caps, the next step in the process of removing and cleaning the brush roll from your Shark Duo Clean vacuum is to close the brush roll access cover. This step ensures that the brush roll is properly enclosed and protected within the vacuum.
Take the brush roll access cover and align it with the opening of the brush roll compartment. Make sure that all the tabs, hooks, or screws on the cover align with their corresponding slots or holes on the vacuum body.
Gently press or slide the brush roll access cover into place, applying even pressure to ensure it fits correctly. You may hear or feel a click or see the cover visually align with the vacuum body, indicating that it is securely closed.
Double-check that the brush roll access cover is properly closed by gently trying to lift or open it. It should remain securely in place, with no visible gaps or loose areas.
If your vacuum has screws securing the brush roll access cover, use a screwdriver to tighten them until they are snug but be careful not to overtighten as it may damage the vacuum body or cover.
Inspect the brush roll access cover and the surrounding area to ensure that all debris, hair or dust that might have accumulated during the cleaning process has been removed. Wipe down the cover and vacuum body with a clean cloth to provide a clean finish.
By properly closing the brush roll access cover, you have completed an important step in the process of removing and cleaning the brush roll from your Shark Duo Clean vacuum. This ensures that the brush roll is securely enclosed and protected, ready for the next cleaning session.
Step 9: Test the Vacuum
The final step in the process of removing and cleaning the brush roll from your Shark Duo Clean vacuum is to test the vacuum and ensure that it is in proper working condition. Testing the vacuum allows you to confirm that the brush roll is functioning correctly and that the reassembly process was successful.
Plug the vacuum back into the power outlet and turn it on. Listen for any unusual sounds or vibrations that may indicate a problem with the brush roll or its placement.
Move the vacuum across different surfaces, such as carpet or hard floors, to ensure that the brush roll engages properly and provides effective cleaning action. Observe the performance of the vacuum and check for any signs of clogging or reduced suction.
Pay attention to the movement and rotation of the brush roll. It should spin smoothly and evenly, without any wobbling or irregular motion. This indicates that the brush roll is properly installed and aligned.
Additionally, check the bristles of the brush roll while the vacuum is in operation. They should agitate and pick up dirt and debris from the floor, ensuring efficient cleaning performance.
If everything appears to be working correctly and the vacuum is cleaning effectively, you have successfully completed the process of removing and cleaning the brush roll from your Shark Duo Clean vacuum.
However, if you notice any issues or abnormalities during the testing phase, it may indicate that there is a problem with the brush roll or its installation. In such cases, refer to the user manual or contact Shark customer support for further assistance.
By testing the vacuum after reassembling the brush roll, you can have peace of mind knowing that your Shark Duo Clean vacuum is ready to deliver optimum cleaning performance.