
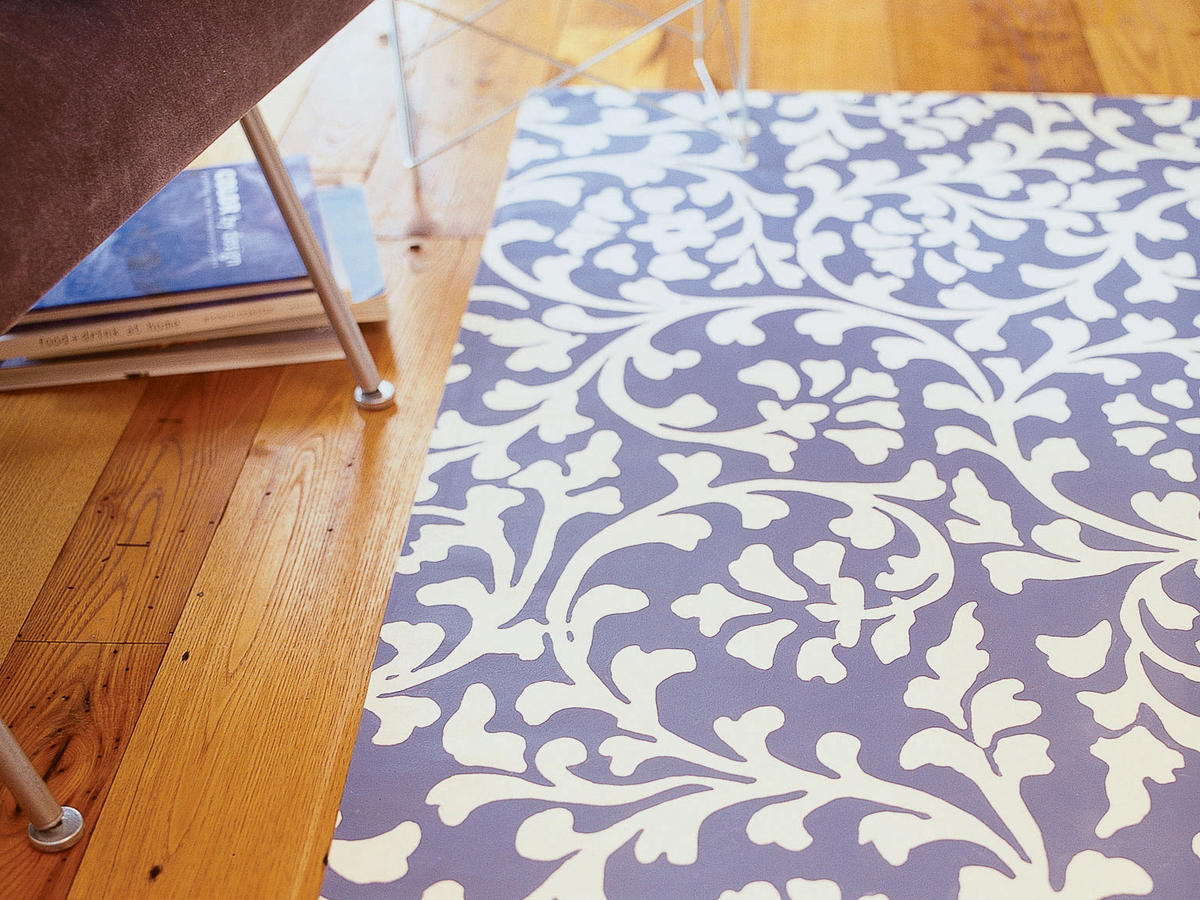
Choosing a Canvas Rug
When it comes to painting a canvas rug, selecting the right canvas is essential. The canvas serves as the foundation for your artwork, so it’s important to choose a canvas that is suitable for painting and durable enough to withstand wear and tear.
There are a few factors to consider when choosing a canvas rug. Firstly, think about the size and shape of the rug you want to create. Measure the space where you plan to place the rug and determine the dimensions accordingly. Remember to leave some extra space around the edges for framing or finishing touches.
Next, consider the material of the canvas. Canvas rugs are typically made of cotton or linen. Cotton canvas is more affordable and easier to work with, while linen canvas is more durable and has a smoother surface. Depending on your budget and artistic preference, choose the material that best suits your needs.
Another important aspect to consider is the weight and thickness of the canvas. A heavier canvas with a higher thread count is more suitable for a canvas rug, as it provides better durability and stability. Look for canvas with a minimum weight of 10 to 12 ounces per square yard for optimal performance.
Additionally, pay attention to the weave of the canvas. A tight weave is ideal for painting as it provides a smooth and even surface. Avoid canvas with a loose or uneven weave, as it may affect the quality of your artwork.
Lastly, consider the level of priming on the canvas. Priming helps to protect the canvas and provides a better surface for paint adherence. Look for a canvas that is already pre-primed or opt to prime it yourself using gesso or acrylic primer.
By carefully choosing a canvas rug that meets your specific requirements, you can ensure a successful painting project. Keep in mind factors such as size, material, weight, weave, and priming to create a canvas rug that not only looks beautiful but also lasts for years to come.
Selecting the Right Paint
When it comes to painting a canvas rug, choosing the right type of paint is crucial to achieve the desired results. The paint you use should be durable, vibrant, and suitable for use on fabric. Here are some factors to consider when selecting the right paint for your canvas rug:
1. Acrylic Paint: Acrylic paint is a popular choice for painting canvas rugs. It is versatile, easy to use, and dries quickly. Look for acrylic paints specifically formulated for fabric, as they adhere well and have better flexibility to withstand foot traffic.
2. Fabric Paint: Alternatively, you can opt for fabric paints designed specifically for use on textiles. These paints are designed to be permanent and provide excellent color saturation. They often come in a wide range of colors and finishes, such as matte, metallic, or glossy.
3. Water-based vs. Oil-based: Consider whether to use water-based or oil-based paint. Water-based paints, such as acrylics and fabric paints, are generally easier to work with, as they are odorless, dry quickly, and can be thinned with water. Oil-based paints, on the other hand, provide a richer color and are more durable but require longer drying times and proper ventilation.
4. Paint Compatibility: Ensure that the paint you choose is compatible with the canvas material. Some paints may require pre-treating the canvas with a fabric medium or heat-set process to ensure proper adhesion and colorfastness.
5. Color Selection: Consider the color palette you want to use for your canvas rug. Look for paints that offer a wide variety of colors and shades to bring your design to life. If possible, test the colors on a small swatch of canvas or paper to determine how they will look on your rug.
6. Quality: Choose high-quality paints from reputable brands. Quality paints provide better coverage, adhesion, and longevity. Although they may be slightly more expensive, they are worth the investment for a more professional-looking and durable finished product.
Remember: Always follow the manufacturer’s instructions on paint application, drying times, and any additional steps required to set the paint on the fabric.
By selecting the right paint for your canvas rug, you can ensure vibrant colors, longevity, and a professional finish. Consider factors such as paint type, compatibility, color selection, and quality to achieve the desired outcome for your painted canvas rug.
Preparing the Canvas Rug
Before you start painting your canvas rug, it’s important to properly prepare the canvas to ensure optimal results. Preparing the canvas rug involves several steps that will help create a smooth and clean surface for painting. Here’s how you can prepare your canvas rug:
1. Cleaning: Begin by cleaning the canvas rug to remove any dirt, dust, or debris. Use a soft brush or vacuum cleaner with a brush attachment to gently remove loose particles from the surface and edges of the rug. If there are any stains or spots, treat them with a mild soap solution or fabric cleaner and gently blot them until they are removed. Allow the rug to dry completely before proceeding to the next step.
2. Stretching: If your canvas rug is not already stretched tightly on a frame, consider stretching it to ensure a taut surface for painting. Secure the corners of the canvas to a wooden frame using staples or tacks, pulling it tightly as you go. This will prevent the canvas from sagging or wrinkling during the painting process.
3. Priming: Prime the canvas rug with a layer of gesso if it is not already pre-primed. Gesso acts as a barrier between the paint and the canvas, providing a better surface for paint adhesion and preventing the paint from soaking into the fabric. Apply the gesso evenly using a brush or a roller, allowing it to dry completely before proceeding.
4. Sanding: For a smoother surface, you can lightly sand the primed canvas rug with fine-grit sandpaper. This will help remove any rough areas or brush strokes, creating a more even and professional-looking finish. After sanding, gently wipe away any dust with a soft cloth or brush.
5. Taping: If you want to create clean edges or borders on your canvas rug, you can use painter’s tape to mask off the areas you want to keep paint-free. This will help you achieve sharp lines and prevent any accidental paint seepage.
6. Protecting the work area: Lay down a drop cloth or plastic sheet to protect your work area from paint spills or splatters. This will make the clean-up process much easier and prevent any damage to your surroundings.
Remember: Properly preparing the canvas rug is essential for achieving a professional-looking and long-lasting painted rug. Take the time to clean, stretch, prime, sand, and protect the canvas before you start painting.
By following these steps, you will create a smooth and well-prepared surface that is ready for the next stage of the painting process.
Creating a Design
When it comes to painting a canvas rug, the design you choose plays a crucial role in the final outcome. Creating a visually appealing and well-thought-out design will make your canvas rug truly unique. Here are some tips on how to create a captivating design for your painted canvas rug:
1. Research and Inspiration: Begin by gathering inspiration from various sources such as magazines, websites, or even nature itself. Look for patterns, motifs, colors, and styles that resonate with you. Research different rug designs, patterns, and cultural motifs to help you develop your own unique design.
2. Consider the Space: Keep in mind the space where the canvas rug will be placed. Consider the existing décor and color scheme of the room. Select a design that complements the surroundings and enhances the overall aesthetic appeal of the space.
3. Sketching & Planning: Start by sketching out your design on paper. This will help you visualize how it will look on the canvas rug and make adjustments if needed. Consider the size and scale of your canvas rug and ensure that the design proportions are suitable for the dimensions.
4. Simplify and Edit: When designing a canvas rug, it’s important to keep the design relatively simple. Complex or intricate designs may not translate well onto a rug, and they can be challenging to paint. Simplify the elements and focus on creating a clear and recognizable design that will be visually appealing at a larger scale.
5. Balance and Harmony: Pay attention to the balance and harmony of your design. Consider the placement of different elements, the use of colors, and the overall composition. Create a focal point or a central design element that anchors the rug, and complement it with supporting elements to create a cohesive and balanced design.
6. Color Selection: Choose a color palette that suits your design and personal preferences. Consider the mood or atmosphere you want to create with your canvas rug. Experiment with different color combinations to bring depth, contrast, and visual interest to your design.
7. Personal Touch: Infuse your design with your own personal touch and creative flair. Use the canvas rug as a medium to express your individuality and style. Add unique elements, symbols, or motifs that have personal significance to make the rug truly special.
Remember: Creating a design for your painted canvas rug should be a fun and creative process. Take the time to plan and sketch out your ideas, ensuring that the design complements the space and reflects your personal style. With a carefully crafted design, your canvas rug will become a functional work of art that enhances any room.
Sketching the Design on the Canvas Rug
Once you have finalized your design, it’s time to transfer it onto the canvas rug. Sketching the design on the canvas rug serves as a roadmap for your painting process and helps ensure accuracy and precision. Follow these steps to effectively sketch your design:
1. Gather Your Materials: Prepare the necessary materials for sketching, including a soft pencil and an eraser. Make sure the pencil is sharp to create fine lines and details on the canvas rug.
2. Place the Design: Position the paper or transparency with your finalized design on top of the canvas rug. Use tape or weights to secure it in place, ensuring it doesn’t move while you sketch. Alternatively, you can trace the design onto tracing paper and transfer it onto the canvas rug using transfer paper.
3. Lightly Trace the Design: Using a soft pencil, gently trace the outline of the design onto the canvas rug. Apply light pressure to avoid indentations or damage to the canvas. Focus on capturing the main elements, shapes, and proportions of the design.
4. Adjust as Needed: Once you have transferred the basic outline, step back and assess the sketch. Make any necessary adjustments to the placement or size of the elements to ensure a balanced composition. Use erasers to correct any mistakes or unwanted lines.
5. Add Details: After you have the general outline of the design, start adding more details and fine lines. Gradually build up the layers of the sketch, paying attention to the intricacies and nuances of the design. Take your time and be patient with this process, as it sets the foundation for the painting.
6. Double Check Accuracy: Take a step back and examine the sketch from a distance. Ensure that the proportions, shapes, and placements of the elements are accurate and visually pleasing. Make any necessary adjustments or corrections before moving on to the next step.
7. Evaluate the Sketch: Once you are satisfied with the sketch, evaluate it in terms of readability and clarity. Consider how the sketch will guide your painting process and whether it effectively represents your design and vision.
Remember: The sketching process is an integral part of painting a canvas rug. It allows you to plan and visualize your design before applying paint to the canvas. Take your time to accurately and thoughtfully sketch your design, as it will serve as the blueprint for the next stages of the painting process.
Outline the Design with a Pencil
After sketching the design on the canvas rug, the next step is to outline it with a pencil. Outlining the design helps define the shapes, edges, and contours, making it easier to paint within the lines and add details later on. Follow these steps to effectively outline the design:
1. Sharpen Your Pencil: Start by ensuring that your pencil is sharp. A sharp pencil allows for more precise and controlled lines, making it easier to outline the design accurately.
2. Lightly Trace the Sketch: Using a light touch, trace over the sketch lines with your sharpened pencil. Apply light pressure to avoid pressing too hard onto the canvas rug, as this can damage the surface. Focus on following the outlines and shapes of the design.
3. Be Mindful of Pressure: Vary the pressure of your pencil to create different line thicknesses and depths. Use a lighter touch for lighter lines and create darker lines by exerting more pressure. This variation adds dimension and visual interest to your outline.
4. Connect the Lines: As you outline the design, ensure that the lines connect smoothly and flow naturally. Pay attention to creating clean edges and crisp lines. Use short, controlled strokes to maintain accuracy and precision.
5. Emphasize Important Elements: If there are specific focal points or elements within your design, consider adding slightly thicker or darker lines to highlight them. This helps draw attention to key areas and adds emphasis to the overall composition.
6. Correct Mistakes: If you make any mistakes or encounter any areas where the outline needs adjustment, use an eraser to gently correct the lines. Take your time to ensure that the outline is as accurate and refined as possible before proceeding to the painting stage.
7. Step Back and Assess: Once you have outlined the entire design, step back and assess the overall appearance and clarity of the outline. Evaluate if any areas need further refinement or adjustments. This step is important as it ensures that your outline accurately represents your intended design.
Remember: Outlining the design with a pencil is a crucial step in preparing the canvas rug for painting. This step helps define the shapes and contours, providing a framework for the subsequent painting process. Take your time, be patient, and pay attention to details to create a clean and well-defined outline.
Mixing the Paint Colors
Once the design is outlined on the canvas rug, the next step is to mix the paint colors. Mixing the right colors is crucial for achieving the desired shades and hues in your design. Here are some tips to help you effectively mix the paint colors for your canvas rug:
1. Gather Your Materials: Prepare your paint palette, paintbrushes, and a clean container of water for rinsing brushes. Ensure that you have all the necessary paint colors you will need for your design.
2. Start with the Primary Colors: Begin by using the primary paint colors—red, blue, and yellow—to create a base for your color palette. These primary colors can be mixed to create a wide range of secondary and tertiary colors.
3. Mix Small Amounts: When starting to mix colors, it’s best to work with small amounts of paint. This allows you to adjust the color gradually, ensuring that you achieve the desired shade without wasting paint.
4. Use a Palette Knife or Brush: Use a palette knife or a clean brush to mix the colors on your palette. Start by placing a small dollop of each color you want to mix and use the palette knife or brush to blend them together. Mix the colors thoroughly until you achieve a consistent color throughout.
5. Experiment and Test: As you mix colors, feel free to experiment and test the shades on a separate piece of canvas, paper, or swatch. This will help you gauge if the color is what you envisioned and make any necessary adjustments before applying it to the canvas rug.
6. Make Gradual Adjustments: If the mixed color doesn’t match your desired shade, make small and gradual adjustments by adding more of the base color or introducing a contrasting color to shift the tone. Remember to mix thoroughly after each adjustment to achieve uniformity.
7. Note Down Your Mixtures: Keeping a record of the color mixtures can be helpful for future reference, especially if you need to reproduce the same shade or tweak it in different areas of the canvas rug.
8. Blend Colors for Transitions: If your design requires color transitions or gradients, blend the colors together on the palette or directly on the canvas rug. Use gentle strokes and blending techniques to achieve smooth and seamless transitions between colors.
Remember: Mixing paint colors is both a skill and an art. Take your time to experiment, test, and adjust the colors until you are satisfied with the result. Having patience and a willingness to explore different combinations will help you achieve the perfect colors for your canvas rug.
Applying the Base Coat
Once you have mixed the paint colors, the next step in painting a canvas rug is applying the base coat. The base coat acts as the foundation for your design and provides a solid background color. Here are some steps to effectively apply the base coat:
1. Prepare Your Workspace: Clear a clean and well-ventilated area for painting. Lay down a drop cloth or plastic sheet to protect your workspace from any paint spills.
2. Select the Base Color: Choose the base color for your canvas rug. This color should complement your design and serve as a backdrop for the other colors to shine. Use a large paintbrush or roller to apply the base coat evenly.
3. Start from the Center: Begin applying the base coat from the center of the canvas rug. Use long, smooth strokes to evenly distribute the paint. Work your way out towards the edges, ensuring complete coverage of the canvas surface.
4. Maintain a Consistent Thickness: Aim to maintain a consistent thickness of the base coat across the entire canvas rug. This will ensure an even and professional-looking finish. Avoid applying the base coat too thickly, as it may affect drying times and the subsequent layers of paint.
5. Blend Edges: Pay attention to blending the base color into the edges of the canvas rug. Use lighter pressure or a dry brush technique to soften the transition between the base coat and the bare canvas. This will create a seamless transition and prevent visible lines or harsh edges.
6. Allow the Base Coat to Dry: Follow the recommended drying times on the paint container before moving on to the next painting stage. Ensure that the base coat is completely dry to avoid mixing the colors or smudging the design when adding details.
7. Assess the Base Coat: Step back and evaluate the base coat once it’s dry. Check for any uneven areas or visible brushstrokes. If necessary, lightly sand any imperfections and apply an additional coat to achieve a smooth and uniform surface.
8. Clean Your Brushes and Tools: After applying the base coat, rinse your brushes and tools thoroughly with water or the appropriate cleaning solution to remove any residual paint. This will ensure that your brushes are ready for the next painting stages.
Remember: Applying the base coat is an important step in the painting process. It sets the foundation for your design and prepares the canvas rug for adding details and highlights. Take your time to apply the base coat evenly and allow it to dry completely before proceeding to the next painting steps.
Painting the Design
After applying the base coat, the canvas rug is ready for the most exciting part – painting the design. This is where your creativity shines as you bring your envisioned design to life. Follow these steps to effectively paint the design on your canvas rug:
1. Refer to Your Sketch: Use your sketched design as a guide for painting. Refer to the outline and details you have sketched to ensure accuracy and consistency with your original vision.
2. Start with the Background: Begin by painting the background elements of your design. Use broad brush strokes or a roller to cover larger areas, working from the background to the foreground. This will help build a foundation for the rest of your design.
3. Work in Layers: When adding colors and details to your design, work in layers. Start with lighter or more diluted colors and gradually build up to darker shades or stronger colors. This layering technique adds depth and dimension to your painting.
4. Use Small Brushes for Details: Switch to smaller brushes as you add finer details to your design. This allows for more precision and control over the brush strokes. Take your time with details, ensuring accuracy and careful application of each stroke.
5. Blend Colors Seamlessly: Use blending techniques to create smooth transitions between different colors. Use a clean brush or a blending brush to gently mix and soften the edges where different colors meet. This creates a more realistic and polished appearance.
6. Add Textures and Patterns: Depending on your design, consider adding textures or patterns to enhance visual interest. Experiment with different brush strokes, techniques, or tools to achieve the desired effect. Don’t be afraid to get creative and add your personal touch.
7. Step Back and Assess: Periodically step back and assess your painting from a distance. This allows you to gain a fresh perspective on the overall composition and identify any areas that may need further adjustment or refinement.
8. Take Breaks and Pace Yourself: Painting a canvas rug can be a time-consuming process. Take regular breaks to rest your eyes and hands. Pace yourself to maintain focus and attention to detail throughout the painting process.
9. Clean Brushes and Tools: Regularly rinse your brushes and tools to remove any dried or excess paint. This will ensure the integrity of your brushes and allow for smoother application of the paint.
Remember: Painting the design on your canvas rug is the culmination of your creativity and vision. Embrace the process, enjoy experimenting with colors and techniques, and stay true to your original design. With each brushstroke, your painted canvas rug will come to life.
Adding Details and Highlights
Once the main design is painted on the canvas rug, it’s time to add the finishing touches by adding details and highlights. This step adds depth, dimension, and visual interest to your artwork. Follow these steps to effectively add details and highlights to your painted canvas rug:
1. Refer to Your Reference: Take a look at your reference materials or inspiration to guide you as you add details. Look for specific elements or areas that can benefit from extra attention and enhancement.
2. Use Small Brushes: Switch to smaller brushes to add fine details. This allows for better control and precision. Use brushes with a fine tip or specialty brushes like liner brushes or detail brushes to achieve more intricate lines and details.
3. Evaluate Shadows and Highlights: Observe your design to identify areas that require shadows or highlights. Shadows add depth and dimension, while highlights bring a sense of light and dimensionality. Consider the direction of light in your design and paint accordingly.
4. Gradation and Blending: Use techniques like gradation and blending to create smooth transitions between shades and colors. Gradation involves gradually transitioning from one color to another, while blending involves softly merging colors together. These techniques add a sense of realism and depth to your artwork.
5. Textures and Patterns: Introduce textures and patterns to certain elements of your design to add visual interest. Experiment with techniques like stippling, cross-hatching, or dry brushing to bring texture and details to specific areas.
6. Incorporate Highlights: Utilize lighter shades or even white paint to create highlights. This helps create reflections or areas of emphasis, bringing attention to specific parts of your design. Apply the highlights sparingly and strategically to avoid overdoing it and diminishing the overall impact.
7. Take Breaks and Step Back: Regularly take breaks to rest your eyes and gain perspective on your artwork. Stepping back allows you to view your canvas rug from a distance, helping you identify areas that need further refinement or adjustments.
8. Don’t Overwork: Resist the temptation to continually adjust and add details to the point where it disrupts the overall harmony of your design. Take a step back and assess when enough detailing has been added to achieve the desired effect.
9. Final Touches: Once you are satisfied with the details and highlights, step back and evaluate your artwork as a whole. Make any final adjustments or touch-ups to ensure a cohesive and visually pleasing result.
Remember: Adding details and highlights to your painted canvas rug is the stage where your artwork truly comes to life. Take the time to add the right amount of detail and carefully consider where to incorporate highlights. The end result will be a visually captivating and engaging piece of art.
Letting the Paint Dry
After completing the painting process, it is essential to allow the paint to fully dry before taking any further steps. Letting the paint dry properly ensures that your artwork is preserved and ready for the next stages of the canvas rug project. Here are some key points to keep in mind when allowing the paint to dry:
1. Follow the Paint Manufacturer’s Instructions: Different types of paint have varying drying times. Read and follow the instructions provided by the paint manufacturer regarding drying times. Allow the paint to dry undisturbed for the recommended duration.
2. Provide Adequate Airflow: Proper airflow aids in the drying process. Ensure that the room is well-ventilated to allow the paint to dry evenly and efficiently. Open windows or use fans to circulate fresh air in the space.
3. Avoid Touching the Surface: It is crucial to resist the temptation to touch or handle the painted surface while it is drying. Touching the paint can smudge or damage the artwork. Exercise patience and exercise caution to maintain the integrity of your painting.
4. Allow Sufficient Drying Time: Drying times vary based on factors such as humidity, temperature, and thickness of the paint layers. It is generally recommended to wait at least 24 hours before proceeding with any additional work, such as sealing or adding a backing to the canvas rug.
5. Test for Dryness: Before moving on, ensure that the paint is completely dry. Test a small inconspicuous area by gently touching it with a clean finger. If there is no paint transfer or smudging, the paint is likely dry. However, it is still advisable to wait the recommended drying time to be certain.
6. Protect the Painting: While the paint is drying, take precautions to protect it from dust, debris, and accidental damage. Keep the canvas rug in a clean and safe area where it won’t be disturbed or come into contact with anything that could harm the paint surface.
7. Patience and Care: The drying process requires patience and careful handling. Avoid rushing to the next steps, as premature handling can jeopardize the quality and integrity of the artwork. Allow the paint to dry naturally and entirely before proceeding with the final stages.
Remember: Properly allowing the paint to dry ensures the longevity and quality of your canvas rug artwork. Take the necessary time and precautions to let the paint dry completely before moving forward with the project. With patience and care, your painted canvas rug will be ready for the final touches and finishing steps.
Sealing the Paint
Once the paint on your canvas rug is completely dry, it’s important to take the necessary step of sealing it. Sealing the paint adds a protective layer, enhances the longevity of your artwork, and prevents it from being easily damaged. Here’s how you can effectively seal the paint on your canvas rug:
1. Choose the Right Sealer: Select a sealer that is appropriate for the type of paint you used and the desired finish. Options include acrylic sealers, varnishes, or clear polyurethane. Consider factors such as durability, compatibility, and the desired level of sheen.
2. Prepare Your Workspace: Find a well-ventilated area to apply the sealer. Lay down a drop cloth or plastic sheet to protect your workspace from any potential drips or spills.
3. Apply Multiple Thin Coats: It’s best to apply several thin coats of sealer rather than one thick coat. This helps ensure even coverage and minimizes the risk of pooling or streaks. Use a brush or a foam applicator to apply the sealer in smooth, consistent strokes.
4. Follow the Instructions: Refer to the instructions provided by the sealer manufacturer for the recommended application techniques, drying times, and any additional guidelines. Adhering to these instructions will help you achieve the best results.
5. Allow Time to Dry: Once you have applied the sealer, allow it to dry completely according to the manufacturer’s instructions. Avoid touching or moving the canvas rug during this time to prevent any smudging or damage to the sealer.
6. Assess and Reapply (if necessary): After the initial coat of sealer has dried, evaluate the finish and assess if additional coats are needed. If you notice any areas that appear uneven or require additional protection, apply further coats of sealer as necessary, following the same application process.
7. Keep the Rug Clean: Sealed canvas rugs are generally easier to clean and maintain. Regularly dust or vacuum the surface gently to remove any loose dirt or debris. If necessary, lightly wipe the rug with a damp, soft cloth, avoiding excessive moisture. Avoid using abrasive cleaners or harsh chemicals that could damage the sealed surface.
8. Periodic Maintenance: Over time, the sealed surface of your canvas rug may require occasional maintenance. Assess the condition of the sealed paint periodically and, if needed, apply an additional coat of sealer to refresh the protection.
Remember: Sealing the paint on your canvas rug is a crucial step to protect your artwork and enhance its longevity. Take the time to carefully choose and apply the appropriate sealer, following the instructions provided. Properly sealed, your canvas rug will be more resistant to wear and tear and easily maintain its vibrant appearance.
Adding a Backing to the Canvas Rug
Adding a backing to your canvas rug is the final step in completing your project. The backing not only enhances the overall appearance of the rug but also provides structural support and protection. Here’s how you can effectively add a backing to your canvas rug:
1. Choose the Right Backing Material: Select a suitable backing material based on your needs and preferences. Common options include non-slip rug pads, felt, or fabric. Consider factors such as thickness, durability, ease of cleaning, and compatibility with your chosen rug design.
2. Measure and Cut the Backing Material: Measure the dimensions of your canvas rug and cut the backing material accordingly, leaving a small allowance for trimming. Ensure that the backing material is slightly smaller than the actual size of the rug to avoid it being visible from the edges.
3. Prepare the Canvas Rug: Clean the surface of the canvas rug to remove any dust or debris. Lay the rug flat on a clean and spacious work area, ensuring that it is smooth and free from wrinkles or creases.
4. Position and Align the Backing: Carefully place the cut backing material onto the backside of the canvas rug, aligning the edges and corners. Ensure that the backing material is centered and evenly positioned beneath the rug.
5. Secure the Backing: Use a strong adhesive suitable for fabric or rug applications to secure the backing material onto the canvas. Apply the adhesive in a thin, even layer on the backside of the canvas rug, avoiding excessive amounts that could seep through or create lumps. Press the backing material firmly onto the adhesive, smoothing out any wrinkles or bubbles as you go.
6. Trim the Excess: After the adhesive has dried, trim any excess backing material that extends beyond the edges of the canvas rug. Use sharp scissors or a utility knife for clean and precise cuts.
7. Allow Adequate Drying Time: Follow the manufacturer’s instructions regarding the drying time of the adhesive. Allow the rug to dry undisturbed on a flat surface until the adhesive has fully cured.
8. Test and Place the Rug: Test the rug to ensure that the backing provides the desired non-slip or cushioning effect. Once you are satisfied, place the canvas rug in its designated location, adjusting as needed.
9. Regular Maintenance: Keep the canvas rug and its backing clean by regularly vacuuming or brushing off any dirt or debris. Spot clean any stains or spills promptly, following the guidelines provided by the backing material manufacturer.
Remember: Adding a backing to your canvas rug enhances its appearance and provides added support and protection. Take your time to choose the appropriate backing material, and ensure proper alignment and installation to achieve a finished product that is durable and visually appealing.