
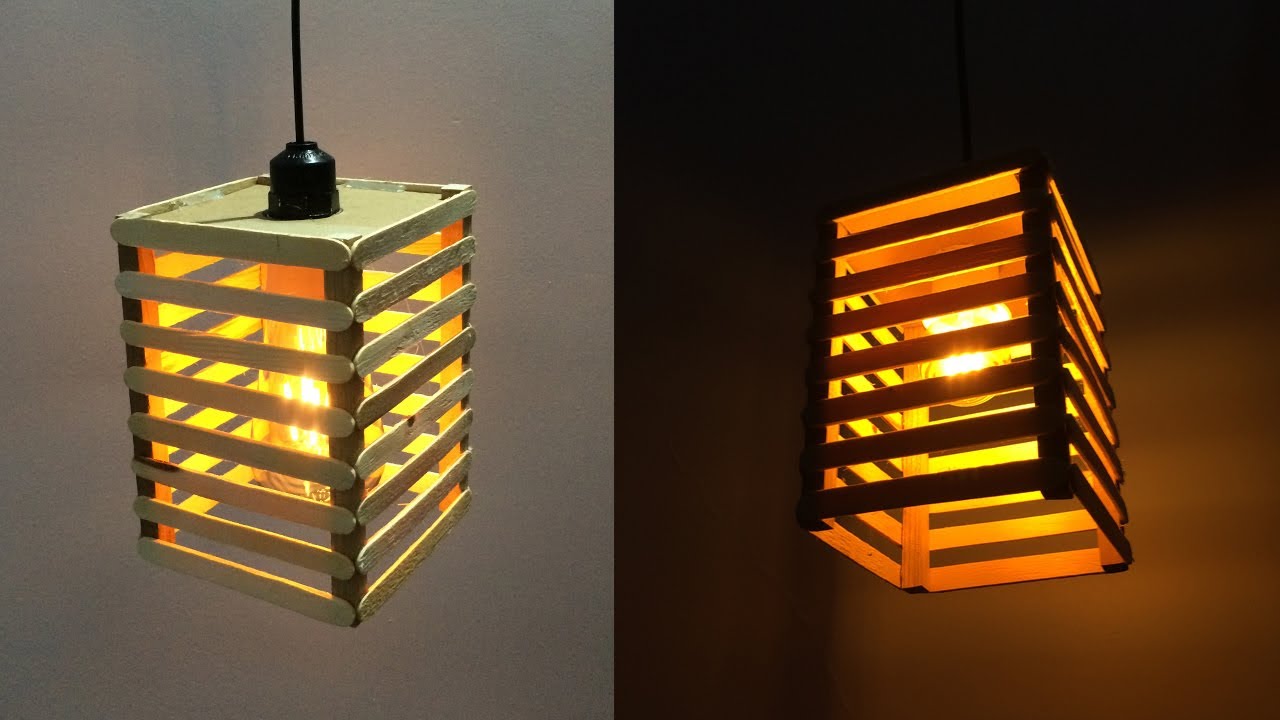
Materials Needed for Making a Hanging Lamp
Creating your own hanging lamp can be a gratifying and cost-effective way to add a unique touch to your home decor. Before you begin this DIY project, gather the following materials:
- Lampshade frame
- Fabric, paper, or other materials for covering the lampshade
- Lamp base and cord set
- Light bulb
- Lamp hardware (such as screws, nuts, and washers)
- Drill and drill bits
- Scissors
- Hot glue gun and glue sticks
- Measuring tape or ruler
- Pliers
- Wire cutters
- Electrical tape
- Safety goggles and gloves
It’s important to invest in good quality materials to ensure the longevity and safety of your hanging lamp. Choose a lampshade frame that matches your desired style, such as a drum or cone shape. Select a fabric or material that complements your home decor, whether it’s a patterned fabric or a textured paper.
When it comes to the lamp base and cord set, consider the size and weight of your lampshade. Opt for a sturdy base that can securely hold the weight of the lampshade and a cord set that is long enough to reach a power source. Additionally, make sure to choose the appropriate light bulb, taking into account the desired brightness and energy efficiency.
Other materials, such as screws, nuts, washers, and electrical tape, will be used to secure and connect various parts of the hanging lamp. Safety goggles and gloves are essential for protecting your eyes and hands during the assembly process.
By gathering these materials before you begin, you’ll ensure that you have everything you need to successfully create your own stunning hanging lamp.
Step 1: Choose the Style of Hanging Lamp
The first step in making a hanging lamp is to decide on the style you want to create. This will set the tone for the entire project and determine the materials and techniques you’ll use.
Consider the overall aesthetic of your home decor and identify the style that will best complement it. Are you going for a modern and sleek look, or do you prefer a more rustic and vintage vibe? There are endless possibilities, so take the time to explore different styles and find inspiration.
Some popular styles for hanging lamps include:
- Industrial: This style features exposed metal hardware and a raw, utilitarian look. It often incorporates materials like steel, iron, and reclaimed wood.
- Bohemian: A bohemian hanging lamp embraces an eclectic mix of colors, patterns, and natural materials. Think rattan, macrame, and beaded details.
- Minimalist: Minimalist hanging lamps are sleek and understated, with clean lines and a simple color palette. These lamps typically feature minimalist materials like glass, metal, or fabric in neutral shades.
- Vintage: If you love the nostalgia of bygone eras, a vintage-style hanging lamp might be perfect for you. Look for antique-inspired lampshades and ornate details.
Once you have chosen a style, use it as a guide for selecting the appropriate materials, such as the lampshade frame and covering fabric. Consider how the style will fit into the overall theme of the room and how it will complement other lighting fixtures and furniture.
Remember, this is your chance to be creative and express your personal style, so don’t be afraid to think outside the box. Mix and match different elements, experiment with colors and textures, and create a hanging lamp that stands out and makes a statement in your space.
Step 2: Select the Type of Light Bulb
Choosing the right type of light bulb for your hanging lamp is crucial as it can greatly impact the ambiance and functionality of the lighting. Here are some factors to consider when selecting the type of light bulb:
- Brightness: Determine the amount of light you want the hanging lamp to emit. Different light bulbs have varying levels of brightness, measured in lumens. Consider the purpose of the lamp – whether it’s for task lighting or creating an ambient glow – and choose the appropriate brightness accordingly.
- Color Temperature: Light bulbs come in a range of color temperatures, measured in Kelvin (K). Lower Kelvin values (around 2700K) produce warm and cozy light, while higher Kelvin values (around 5000K) give off cool and bright light. Consider the mood and ambiance you want to create in the room when selecting the color temperature.
- Energy Efficiency: Nowadays, energy-efficient light bulbs are widely available, such as LED (Light Emitting Diode) and CFL (Compact Fluorescent Lamp) bulbs. These bulbs consume less energy and have a longer lifespan compared to traditional incandescent bulbs, making them more cost-effective in the long run.
- Style and Design: Light bulbs come in various shapes, sizes, and designs. Consider the overall aesthetic of your hanging lamp and choose a light bulb that complements its style. From traditional round bulbs to filament-style bulbs to decorative vintage-inspired options, the choice is yours.
It’s important to remember that some lampshade materials may have specific requirements for the type of light bulb they can accommodate. Check the manufacturer’s guidelines or consult with a lighting specialist if you are unsure about compatibility.
Take your time to research and explore different light bulb options. Consider visiting a lighting store or browsing online to see the variety of choices available. By selecting the right light bulb, you can ensure that your hanging lamp illuminates your space beautifully, creating the desired atmosphere and functionality.
Step 3: Prepare the Lampshade Frame
Before you can start covering your lampshade, you need to properly prepare the lampshade frame. Follow these steps to ensure a sturdy and well-prepared frame:
- Inspect the frame: Carefully examine the lampshade frame for any signs of damage or loose parts. If you spot any issues, repair or replace them before proceeding.
- Clean the frame: Remove any dust or debris from the frame using a soft brush or cloth. This will help the fabric adhere smoothly to the frame later on.
- Measure the frame dimensions: Use a measuring tape or ruler to determine the height and circumference of the lampshade frame. These measurements will guide you when cutting the fabric or material for covering.
- Apply adhesive, if necessary: Depending on the type of lampshade frame, you may need to apply adhesive along the top and bottom edges of the frame. This will help secure the fabric in place. Follow the manufacturer’s instructions for the specific adhesive recommended for your frame.
- Consider embellishments: If you want to add any decorative elements, such as trims, ribbons, or beads, plan for their placement and prepare them ahead of time. This will make it easier to attach them to the fabric later on.
Preparing the lampshade frame sets the foundation for the covering process. By inspecting, cleaning, and measuring the frame, you can ensure that it is in optimal condition and ready to be transformed into a beautiful lampshade.
Remember to take your time during this step and pay attention to the details. A well-prepared frame will make the covering process smoother and lead to a professionally finished hanging lamp.
Step 4: Cover the Lampshade Frame
Now that you have prepared the lampshade frame, it’s time to cover it with the desired fabric or material. Follow these steps to achieve a beautifully covered lampshade:
- Measure and cut the fabric: Using the measurements you took earlier, cut the fabric or material for covering the lampshade frame. Leave some extra material to allow for overlap and secure attachment.
- Position the fabric: Begin by positioning the fabric on the lampshade frame, ensuring that it covers the frame evenly and smoothly. Adjust the fabric as needed to achieve the desired alignment and ensure that any pattern or design is centered properly.
- Secure the fabric: Starting at one end or section of the frame, use a hot glue gun or other appropriate adhesive to attach the fabric to the frame. Take care to smooth out any wrinkles or folds as you go along, ensuring that the fabric lies flat against the frame without any bubbles.
- Continue attaching the fabric: Gradually work your way around the lampshade frame, securing the fabric at regular intervals. Use the adhesive sparingly to avoid excess visible glue or a bulky appearance. It may help to work in small sections, applying the adhesive and then pressing the fabric firmly onto the frame.
- Trim any excess fabric: Once you have covered the entire lampshade frame, trim any excess fabric neatly, leaving a clean edge along the top and bottom of the frame.
- Optional embellishments: If you planned to add any decorative elements, such as trims or beads, now is the time to attach them. Use adhesive or small stitches to secure these embellishments in place, following the desired design.
Take your time during the covering process, ensuring that the fabric is smooth and securely attached to the lampshade frame. This will result in a professionally finished and visually appealing hanging lamp.
Remember to use caution when using hot glue or other adhesives, as they can be hot and may cause burns. Use protective gloves or tools to handle the lampshade frame and fabric, if needed.
Step 5: Attach the Lampshade to the Base
After covering the lampshade frame, the next step is to attach the lampshade to the base securely. Follow these steps to ensure a stable and well-mounted hanging lamp:
- Prepare the lamp base: Double-check that the lamp base is clean and free of any dirt or debris. If necessary, wipe it down with a damp cloth to ensure a clean surface.
- Position the lampshade: Place the lampshade onto the lamp base, aligning it properly and ensuring that it sits evenly and securely on top.
- Attach the lampshade: Depending on the specific lamp base design, you may need to use screws, nuts, washers, or other hardware to secure the lampshade to the base. Consult the manufacturer’s instructions or refer to the specific design of your lamp base.
- Secure the lampshade: Use the appropriate tools, such as a screwdriver or pliers, to tighten the screws or nuts firmly, ensuring that the lampshade is securely attached to the base.
- Check stability: Once the lampshade is attached, gently shake the lamp to test its stability. Make any necessary adjustments or retighten the hardware if the lampshade feels loose or unstable.
It’s important to ensure that the lampshade is properly secured to the base to prevent any accidents or damage. A loose or unstable lampshade can pose a safety hazard and affect the overall functionality of the hanging lamp.
Take your time during this step and pay attention to the details. By securely attaching the lampshade to the base, you’ll have a stable and well-assembled hanging lamp ready for the final steps of installation.
Step 6: Install the Light Bulb and Electrical Components
With the lampshade securely attached to the base, it’s time to install the light bulb and electrical components to bring your hanging lamp to life. Follow these steps to ensure a safe and functional setup:
- Turn off the power: Before you begin any electrical work, make sure to turn off the power to the area where you’ll be working. This will ensure your safety and prevent any accidents.
- Prepare the electrical cord: If necessary, prepare the lamp cord by stripping off a small portion of the insulation from the ends, exposing the wires inside. Use wire cutters and strip about ½-inch of insulation from each wire.
- Connect the wires: Locate the corresponding wires inside the lamp base and lamp cord. Connect the wires together using wire connectors, matching the colors (e.g., black to black, white to white, and green or copper to the ground wire).
- Secure the connections: Once the wires are connected, twist the wire connectors clockwise to secure the connections tightly. Ensure that there are no loose or exposed wires.
- Attach the lamp cord to the base: Depending on the lamp base design, there may be specific instructions for securing the lamp cord to the base. Follow the manufacturer’s guidelines and use screws or clips provided, ensuring that the cord is safely in place.
- Install the light bulb: Check the recommended wattage for your hanging lamp and choose a light bulb accordingly. Screw the light bulb into the socket securely, making sure it fits properly and is in alignment with the lampshade.
- Test the lamp: Once the light bulb is installed, turn on the power and test the lamp. Ensure that the light bulb illuminates properly and that there are no electrical or wiring issues. If necessary, consult a qualified electrician for assistance.
It’s essential to follow proper electrical practices and safety precautions during this step. If you are unsure about any electrical aspects, it’s always recommended to seek professional assistance to ensure a safe and functional hanging lamp.
By installing the light bulb and electrical components correctly, your hanging lamp will be ready to provide stylish illumination and enhance the atmosphere of your space.
Step 7: Hang the Lamp in the Desired Location
Once your hanging lamp is fully assembled and the electrical components are safely installed, it’s time to hang your creation in the desired location. Follow these steps to ensure a secure and visually appealing installation:
- Choose the location: Select the spot where you want to hang your lamp. Consider the height, the surrounding space, and the purpose of the lighting. Ensure that there is access to a power source if needed.
- Locate a sturdy support: Identify a suitable support structure, such as a ceiling hook or a wall bracket, depending on the design and weight of your hanging lamp. Ensure the support can bear the weight of the lamp securely.
- Measure and mark: Measure the distance from the support structure to where you want the lamp to hang. Mark the exact spot on the ceiling or wall where the lamp will be positioned.
- Install the support: Use appropriate tools and hardware to securely install the support structure at the marked spot. Follow the manufacturer’s instructions and ensure that it is firmly attached, allowing for the weight of the lamp.
- Hang the lamp: With the support structure in place, carefully hang the lamp from the hook or bracket. Take your time to align it properly and ensure that it hangs straight and at the desired height.
- Adjust the height: If your hanging lamp allows for adjustable height, use the provided mechanisms to set the lamp at the preferred level. Ensure that it is not too low to pose any safety hazards or obstruct any movement in the room.
- Test the stability: Gently give the lamp a slight shake to test its stability. Make any necessary adjustments to the support or hanging mechanism if the lamp feels loose or unstable.
It’s important to prioritize safety during the hanging process. If you are unsure about the installation, consult a professional handyman or electrician to ensure a secure and stable hanging lamp.
By carefully hanging your lamp in the desired location, you can enjoy the beauty and functionality it brings to your space.
Step 8: Test and Adjust the Lighting
After hanging your lamp, it’s essential to test and adjust the lighting to ensure optimal brightness and ambiance. Follow these steps to fine-tune the lighting of your hanging lamp:
- Turn on the lamp: Switch on the power to illuminate the lamp. Observe the lighting effect to determine if it meets your desired level of brightness and ambiance.
- Assess the lighting quality: Step back and evaluate how the light is dispersed and if it creates the desired atmosphere in the room. Pay attention to any areas that may be overly bright or insufficiently illuminated.
- Add or adjust light bulbs: If you find that the lighting is too dull or too intense, consider adding or replacing light bulbs with lower or higher wattage ones, depending on your preference. Ensure that any changes meet the lamp’s maximum wattage capacity.
- Experiment with light shades: If the lighting feels too harsh, you can experiment with different lampshades or covers to soften and diffuse the light. Fabrics or materials with translucent properties can create a warm and diffused glow.
- Consider dimming options: If you desire dimmable lighting, explore options for installing a dimmer switch or using bulbs compatible with dimming capabilities. Dimming the light can help set the mood and adjust the intensity as desired.
- Make adjustments as needed: Take the time to readjust the lamp’s position or height if necessary. Move the lamp slightly to achieve better lighting distribution or adjust the height to provide more focused lighting for specific areas.
- Test functionality: Ensure that any other features of the hanging lamp, such as switches or adjustable arms, are functioning properly and adjusting as intended.
- Safety check: Double-check that all electrical connections are secure and insulated, and there are no exposed wires or potential hazards. If anything seems amiss or unsafe, consult a professional electrician for assistance.
Testing and adjusting the lighting of your hanging lamp will ensure that it illuminates your space effectively and creates the desired ambiance. Take the time to experiment and make any modifications needed to achieve the perfect lighting setup.
Remember to consider the practicality and functionality of the lighting while balancing it with the aesthetic appeal of your hanging lamp.