
Gather Materials and Tools
Before you embark on building your own shoe shelf, it’s essential to gather all the necessary materials and tools. Having everything prepared beforehand will streamline the process and ensure a smooth construction experience. Here’s a comprehensive list of what you’ll need:
- 1-inch thick plywood sheets
- Measuring tape
- Pencil
- Circular saw or a handsaw
- Sandpaper (medium and fine grit)
- Wood glue
- Nails or screws
- Drill with drill bits
- Screwdriver
- Level
- Paint or stain (optional)
- Paintbrush or foam roller
Make sure to check that you have all the supplies on hand before diving into the project. It’s a good idea to take inventory of your tools and purchase any missing items in advance. This way, you won’t encounter any delays or interruptions while building your shoe shelf.
Once you have everything ready, you’re well-prepared to move on to the next step: measuring and planning your shoe shelf design.
Measure and Plan
Before you start cutting any wood, it’s crucial to measure the space where you intend to place your shoe shelf. Take accurate measurements of the width, height, and depth of the area to ensure a perfect fit. This will help you determine the size and dimensions of your shoe shelf and guide your planning process.
Once you have the measurements, consider the number of shoes you want to accommodate on the shelf. This will help you determine the spacing between the shelves and the overall height of the unit. Remember to leave enough space between each shelf to fit different shoe sizes comfortably.
With the measurements and spacing requirements in mind, you can now start planning the design of your shoe shelf. Decide on the number of shelves you want and how they will be arranged. Consider incorporating any additional features, such as hooks or dividers, which can provide extra functionality to your shoe storage solution.
It’s also worth considering the aesthetics of your shoe shelf. Think about the style of your existing furniture and the overall theme of the room. You may want to match the shelf’s design to the surrounding decor or add a unique touch that makes it stand out.
Use a pencil and a level to mark the measurements and placements on the plywood sheets. This will serve as a guide during the cutting and assembly process.
By taking the time to measure and plan ahead, you will ensure that your shoe shelf fits perfectly into your space and meets your storage needs. With the measurements and design in place, you’re ready to move on to the next step: cutting the wood.
Cut the Wood
With your measurements and plans in hand, it’s time to cut the plywood sheets into the necessary pieces for your shoe shelf. This step requires precision and careful attention to detail to achieve professional-looking results.
Start by marking the dimensions of each piece on the plywood using a pencil and a straight edge. Use the circular saw or handsaw to cut along the marked lines. Take your time and make smooth, accurate cuts to ensure the pieces fit together seamlessly.
Remember to account for the thickness of the saw blade when making your cuts. This will ensure that the final dimensions of the pieces match the measurements you planned for.
If you have multiple shelves, repeat this process for each piece, ensuring that they are all cut to the correct size.
Once all the pieces have been cut, use sandpaper to smooth any rough edges or surfaces. Start with medium-grit sandpaper to remove any large imperfections, and then switch to fine-grit sandpaper for a smoother finish. Sanding the wood will not only enhance its appearance but also prevent any splinters or rough spots from damaging your shoes.
After sanding, wipe away any sawdust or debris from the wood before moving on to the next step. Clean, smooth pieces of wood will result in a cleaner and more professional-looking final product.
With the wood pieces cut and sanded, you’re now ready to move on to the next stage: assembling the shoe shelf.
Sand the Wood
Once you have cut the wood pieces for your shoe shelf, the next step is to sand them. Sanding the wood is essential to create a smooth and polished surface, ensuring both the aesthetics and functionality of your shoe shelf.
Start by using medium-grit sandpaper to smooth any rough edges or surfaces. This will help remove any splinters, uneven spots, or imperfections caused by the cutting process. Sand in the direction of the wood grain, applying even pressure to achieve consistent results.
After sanding with medium-grit sandpaper, switch to fine-grit sandpaper for a smoother finish. This step will refine the surface further and give the wood a more polished look and feel. Again, sand in the direction of the grain, making sure to cover all surfaces of the wood pieces.
While sanding, be mindful of any intricate details or corners of the wood pieces. Use sandpaper wrapped around a small block or your fingertips to reach these areas effectively. Take your time and pay attention to ensure a thorough sanding process.
Wipe away any sawdust or debris from the wood with a clean cloth or tack cloth. This will ensure that the surface is clean and ready for the next step of the process.
If desired, you can also use a wood conditioner before sanding to ensure an even stain or paint application later on. This will help the wood absorb the finish more evenly and prevent any blotchy or uneven coloring.
By sanding the wood, you not only improve its appearance but also create a safe and comfortable surface for your shoes. The smooth finish will prevent any snags or damage to your footwear while adding a professional touch to your shoe shelf.
With the wood sanded and prepped, you’re now ready to move on to the next stage: assembling the shoe shelf.
Assemble the Shelf
Now that you have prepared the wood pieces for your shoe shelf, it’s time to start assembling them. This step will bring your shoe shelf design to life and create a sturdy structure to hold your shoes.
Begin by laying out the wood pieces according to your design and plan. This will help you visualize how the shelf will look once assembled and ensure that you have all the necessary components ready.
Apply wood glue along the edges of the wood pieces that will be joined together. Wood glue provides a strong bond and helps reinforce the structure of your shoe shelf. Use a brush or your finger to spread the glue evenly and ensure proper coverage.
Once the glue is applied, align the pieces together and use clamps to hold them in place. This will prevent the pieces from shifting while the glue dries. Make sure the pieces are aligned properly and level using a level or straight edge to ensure a balanced and stable shelf.
For additional reinforcement, you can also drive nails or screws through the connected pieces. Pre-drill holes to prevent the wood from splitting, then drive the nails or screws in using a drill or a screwdriver. This will further strengthen the joints and provide extra support.
Continue this process until all the wood pieces are assembled, ensuring that each connection is secure. Double-check the alignment and stability of the shelf before moving on to the next step.
Allow the wood glue to dry completely according to the manufacturer’s instructions. This may take a few hours or overnight, depending on the glue used. Patience is key to ensure a strong and durable shoe shelf.
Once the glue is dry and the wood pieces are securely assembled, you’re ready to move on to the next step: adding the shelves to your shoe shelf design.
Add the Shelves
With the main structure of your shoe shelf assembled, it’s time to add the shelves. The shelves will provide the necessary storage spaces for your shoes and complete the functionality of the design.
Begin by measuring and marking the desired height for each shelf. Use a measuring tape and a pencil to ensure consistency and accuracy in your measurements. Consider the spacing between shelves, allowing enough room to accommodate different shoe styles and sizes.
Once you have marked the measurements, apply wood glue to the edges of the shelf supports or the side panels of the shelf structure. Place the shelves on top of the glue, aligning them with the marked measurements. Press them firmly to ensure a secure bond.
If necessary, you can also reinforce the connection between the shelves and the shelf supports by driving nails or screws through the supports and into the shelves. This will add extra stability and prevent the shelves from shifting or sagging over time.
Make sure to check the levelness of each shelf as you add them to the structure. Use a level to ensure that each shelf is horizontal, providing a balanced and visually appealing appearance.
Allow the wood glue to dry completely before proceeding. The drying time will vary depending on the type of glue used, so consult the manufacturer’s instructions for guidance.
Once the shelves are securely attached, take a moment to admire your progress. You’ve successfully added the shelves and transformed the assembled structure into a functional shoe storage solution.
Now, you’re ready to move on to the next step: installing the shoe shelf in your desired location.
Install the Shelf
With the shoe shelf assembled and the shelves in place, it’s time to install it in its designated location. Proper installation ensures stability and functionality, allowing you to enjoy your new shoe storage solution to the fullest.
Before installing the shelf, take a moment to assess the best location for it. Consider factors such as accessibility, available space, and the overall aesthetic of the room. Once you’ve determined the ideal spot, use a measuring tape and pencil to mark the positioning on the wall.
If your shoe shelf is freestanding, place it in the desired location and ensure that it is level. Use a level to check the horizontal position and make adjustments as needed. Once it is level, your freestanding shelf is ready for use.
If your shoe shelf is wall-mounted, use a drill to create pilot holes in the appropriate locations on the wall, matching the markings you made earlier. Ensure that the pilot holes align with the shelf supports or back panel for maximum stability.
Insert wall anchors into the pilot holes, if necessary, to provide additional support for the weight of the shelf and the shoes it will hold. This step is particularly important for heavier or larger shoe shelves.
Attach the shoe shelf to the wall using screws or nails, securing it in place. Double-check the levelness of the shelf to guarantee a balanced and visually pleasing installation.
Once the shoe shelf is securely installed, give it a gentle shake or push to test its stability. It should feel sturdy and not wobble or move easily. If needed, make any necessary adjustments to ensure a secure installation.
Now that the shoe shelf is properly installed, it’s time to move on to the final step: adding a finishing touch with paint or stain.
Paint or Stain the Shelf
After the shoe shelf is installed and securely in place, you can add a finishing touch by painting or staining it. This step allows you to personalize the shelf to match your desired aesthetic and complement the overall style of the room.
If you prefer a more natural look, staining the wood is a great option. Before applying the stain, make sure the wood surface is clean and free from any dust or debris. Use a clean cloth or brush to remove any remaining sawdust or residue.
Apply the wood stain using a brush or a rag, following the manufacturer’s instructions. Make sure to apply an even coat and work along the grain of the wood. Allow the stain to penetrate the wood for the recommended amount of time, and then wipe away any excess stain with a clean cloth.
For a painted finish, start by applying a coat of primer to the wood surface. This will create a smooth base for the paint and improve its adhesion. Allow the primer to dry completely before proceeding.
Next, choose a paint color that complements your room’s decor. Use a paintbrush or foam roller to apply an even coat of paint to the shelf. Allow the paint to dry according to the paint manufacturer’s instructions, and if desired, apply additional coats for better color coverage and durability.
Remember to paint or stain the entire shelf, including the visible surfaces and edges. This will ensure a cohesive look and protect the wood from moisture and wear over time.
Once the paint or stain is dry, inspect the shelf for any touch-ups or areas that may need additional attention. Sand any rough spots or drips, and apply a second coat if necessary for a more polished result.
After completing the paint or stain application, allow the shelf to dry and cure fully before using it to display your shoes. This will ensure that the finish is fully set and durable.
With the painting or staining complete, your shoe shelf is now ready for the final step: organizing and displaying your shoes in style.
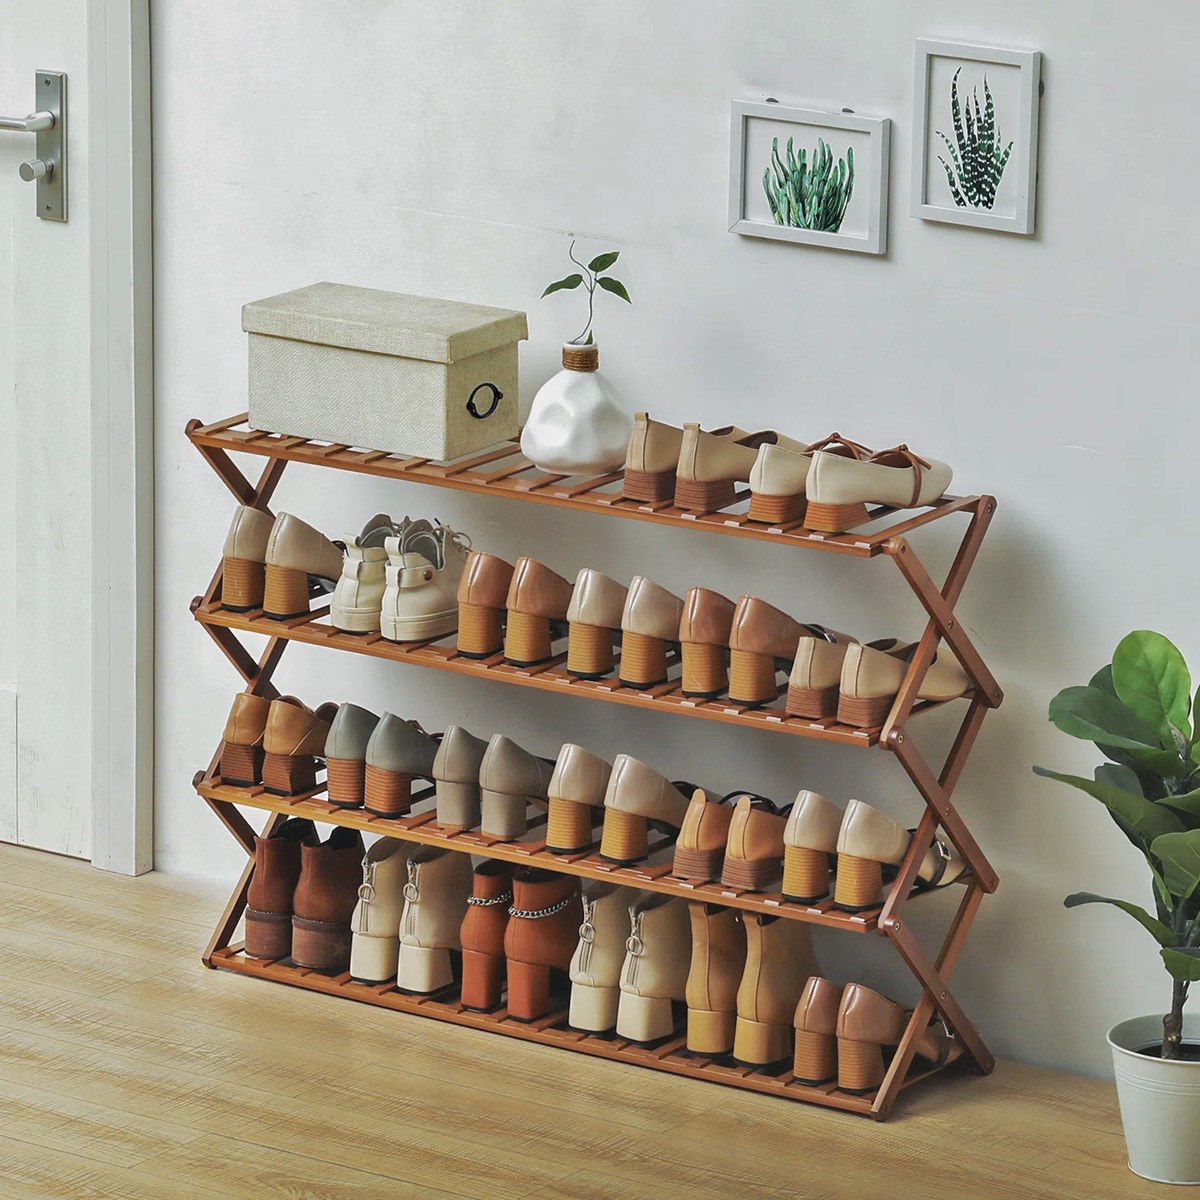
Organize and Display Your Shoes
Now that your shoe shelf is complete, it’s time to start organizing and displaying your shoes in an efficient and visually appealing manner. A well-organized shoe shelf not only makes it easier to find the pair you’re looking for but also adds a touch of style to your space.
Start by sorting your shoes into categories, such as sneakers, heels, flats, or athletic shoes. This will help you determine how to arrange them on the shelves and make the most of the available space.
Consider grouping similar shoe styles or colors together for a more cohesive look. For example, you can place all your black heels on one shelf and your running shoes on another. This makes it easier to find the pair you want and adds order to your shoe collection.
If you have a large shoe collection or limited shelf space, consider using additional storage solutions like shoe boxes or hanging organizers. These can be placed on top of the shelf or hung on the wall to maximize your shoe storage capacity.
When displaying your shoes, consider alternating the orientation for a more visually appealing display. Instead of placing all the shoes facing the same direction, have some facing left and others facing right. This adds depth and interest to the arrangement.
You can also consider adding decorative elements to enhance the overall look of your shoe shelf. This can include small plants, framed pictures, or decorative accents that match the style of your room. A few carefully chosen accessories can transform your shoe shelf into a stylish focal point.
Lastly, regularly maintain and clean your shoe shelf to keep it in optimal condition. Dust the shelves and wipe away any dirt or debris using a soft cloth or cleaning solution suitable for the material of your shoe shelf.
By organizing and displaying your shoes in a thoughtful and visually pleasing way, you can create a functional and aesthetically pleasing space for your footwear collection.