
Choosing the Right Clothes for Your Rug
When it comes to making a rug with old clothes, the first step is to select the right clothing items. You want to choose pieces that are no longer wearable or ones that you’re willing to repurpose for a new project. Here are a few key considerations when selecting clothes for your rug:
- Fabric type: Look for clothes made of sturdy materials such as denim, cotton, flannel, or herringbone. These fabrics tend to hold up well and create a durable rug.
- Colors and patterns: Think about the color scheme and design you want to achieve with your rug. Consider using clothes in different colors and patterns to add variety and a unique visual appeal.
- Size and quantity: Assess the amount of fabric you’ll need based on the desired size of your rug. Keep in mind that you may need more fabric than you initially think, especially if you plan to create intricate designs or patterns.
- Texture: Experiment with different textures by including clothes with varying thickness and materials. This can add an interesting tactile element to your rug.
Don’t be afraid to get creative and mix and match different fabrics to achieve your desired aesthetic. Remember, the goal is to repurpose old clothes and give them new life as a stylish and functional rug.
Once you’ve gathered the clothes you’ll be using for your rug, it’s time to move on to the next step: preparing the fabric.
Preparing the Fabric
Before you can start turning your old clothes into a beautiful rug, you need to prepare the fabric. Follow these steps to get your fabric strips ready:
- Wash and dry: Begin by washing and drying the clothes you’ve selected. This will help remove any dirt, stains, or odors.
- Cut off seams and buttons: Using a pair of sharp scissors, carefully cut off any seams, buttons, or embellishments from the clothing items. You want to have clean strips of fabric without any obstacles.
- Iron the fabric: Lay out each piece of fabric flat and use an iron to remove any wrinkles. This will make it easier to work with when cutting and attaching the fabric strips.
- Decide on strip width: Determine how wide you want your fabric strips to be. This will depend on personal preference and the design you have in mind for your rug. Common strip widths range from 1 inch to 3 inches.
- Mark and cut the fabric strips: Use a ruler and fabric marker to measure and mark the desired width on the fabric. Then, carefully cut along the marked lines to create your fabric strips. Make sure the strips are all the same width for a uniform look.
By taking the time to properly prepare the fabric, you’ll ensure that your rug turns out neat and professional-looking. Once the fabric strips are ready, you can proceed to the next step: choosing a rug base.
Cutting the Fabric Strips
With your fabric prepared, it’s time to move on to cutting the fabric strips for your rug. This step requires attention to detail and precision. Here’s how you can do it:
- Measure the length: Determine how long you want your fabric strips to be. This may depend on the size and shape of your rug, as well as your personal preference. Measure and mark the desired length on each fabric strip.
- Make straight, even cuts: Use fabric scissors or a rotary cutter and a cutting mat to make straight, even cuts along the marked lines. Take your time and ensure that each strip is cut to the same width for a consistent look.
- Consider cutting on the bias: For added visual interest and flexibility, you may choose to cut some of your fabric strips on the bias. This means cutting diagonally across the fabric rather than straight along the grain. Bias-cut strips can create a more dynamic texture and allow for easier shaping of the rug.
- Repeat for all clothes: Cut fabric strips from all of your selected clothes, ensuring that you have enough strips to cover the entire rug base.
Keep in mind that the size and thickness of your fabric strips will also affect the final texture and appearance of your rug. Thinner strips may result in a flatter, more tightly woven rug, while thicker strips can create a chunkier, more plush effect.
Once you have cut all your fabric strips, you’re ready to move on to the next step: choosing a rug base.
Choosing a Rug Base
Now that you have your fabric strips prepared and cut, it’s time to select a suitable base for your rug. The rug base serves as a foundation onto which you will attach the fabric strips. Here are a few options to consider:
- Non-slip rug pad: A non-slip rug pad is a popular choice as it provides stability and prevents the rug from sliding on the floor. Look for a rug pad that is compatible with the size of your rug and provides a strong grip.
- Canvas or burlap fabric: If you prefer a more traditional approach, you can use canvas or burlap fabric as a base for your rug. These materials are sturdy and provide a good surface for attaching the fabric strips.
- Recycled materials: Get even more creative by using recycled materials as your rug base. Old towels, bed sheets, or even discarded T-shirts can be repurposed and sewn together to create a unique base for your rug.
Consider the size and shape of your rug when selecting the base material. Ensure that the base is large enough to accommodate your desired rug size, and that it fits well within the space where you plan to place the rug.
Additionally, think about the texture and thickness of the base material. A thicker base may provide more cushioning, while a thinner one can result in a flatter, more low-profile rug.
Once you’ve chosen your rug base, you’re ready to move on to the next step: attaching the fabric strips.
Attaching the Fabric Strips to the Base
Now that you have your fabric strips and rug base ready, it’s time to start attaching the fabric strips to the base. This step requires patience and attention to detail. Here’s how you can do it:
- Decide on the starting point: Determine where you want to begin attaching the fabric strips to the base. It’s often best to start from one corner or edge of the rug.
- Secure the fabric strip: Take one fabric strip and fold it in half, creating a loop at one end. Place the loop on top of the rug base, with the open ends facing away from you.
- Loop and pull: Take the open ends of the fabric strip, bring them over the rug base, and thread them through the loop. Pull them tight to secure the fabric strip to the base.
- Continue attaching fabric strips: Repeat the looping and pulling process with additional fabric strips, placing them close together to create a tightly woven rug. As you progress, push the attached fabric strips close to each other to minimize gaps.
- Vary colors and patterns: Have fun with your rug design by alternating different colored and patterned fabric strips. This can create an interesting visual effect and add personality to your rug.
- Trim excess fabric: As you reach the end of a fabric strip or need to change colors, trim any excess fabric close to the rug base to maintain a neat appearance.
Take your time and ensure that the fabric strips are securely attached to the base. Double-check that the loops are tight and the fabric is pulled snugly. This will ensure that your rug is durable and won’t unravel easily.
Continue attaching the fabric strips until you’ve covered the entire rug base, working your way towards the opposite corner or edge. Once all the fabric strips are in place, it’s time to move on to creating different designs and patterns with your rug.
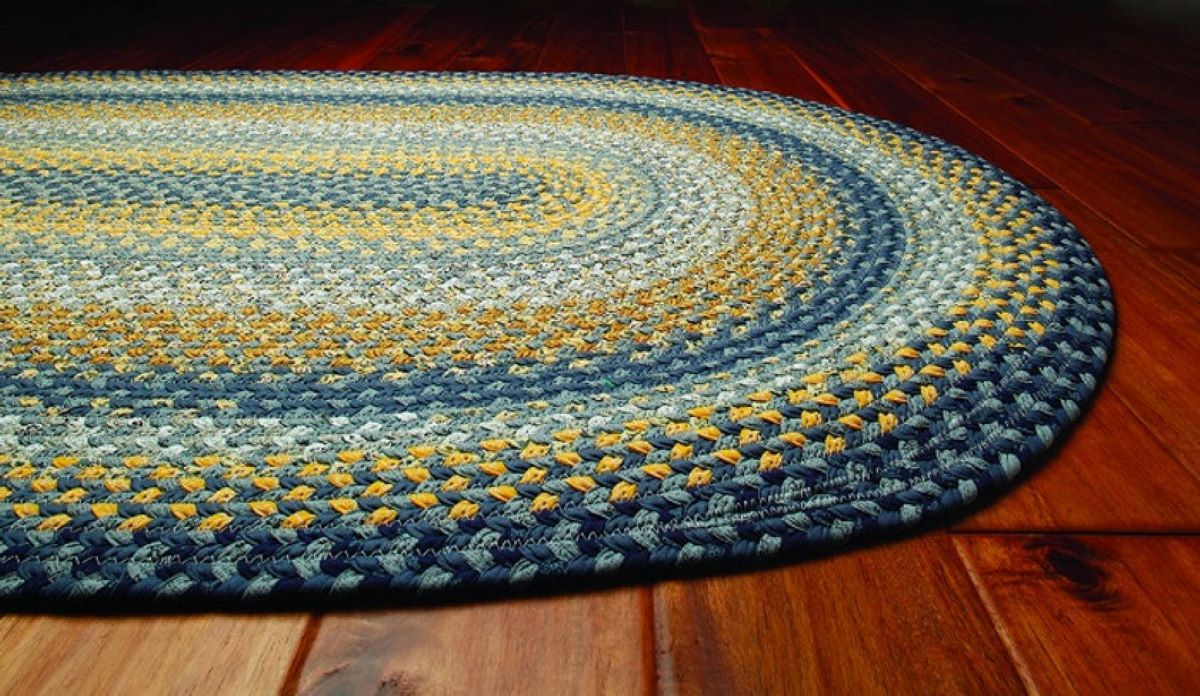
Creating Different Designs and Patterns
Now that you have attached the fabric strips to your rug base, it’s time to get creative and start creating different designs and patterns. This step allows you to personalize your rug and add visual interest to your finished piece. Here are some ideas to spark your imagination:
- Striped patterns: Arrange fabric strips in alternating colors to create classic and bold striped patterns. You can vary the width of the strips for a more dynamic look.
- Checkerboard effect: Alternate fabric strips of two contrasting colors to achieve a checkerboard effect. This pattern can add a playful touch to your rug.
- Geometric designs: Experiment with different shapes and arrangements. Try forming triangles, diamonds, or hexagons using fabric strips of different colors.
- Ombre effect: Gradually transition from one color to another by using fabric strips in shades that gradually blend into each other. This technique can create a stunning ombre effect on your rug.
- Mix and match: Combine different patterns, colors, and textures to create an eclectic and unique rug design. Don’t be afraid to experiment and let your creativity guide you.
As you work on your design, step back and take a look at your rug from a distance to ensure that the patterns and colors are balanced and visually appealing. Don’t hesitate to make adjustments as needed.
Remember, the beauty of making a rug with old clothes is that you have the freedom to create a design that reflects your individual style and preferences. Enjoy the process of experimenting with different designs and patterns to make your rug truly one-of-a-kind.
Once you’re satisfied with the design, it’s time to secure the fabric strips in place.
Securing the Fabric Strips in Place
Now that you have created your desired designs and patterns with the fabric strips on your rug base, it’s important to secure them in place to ensure the longevity and durability of your rug. Follow these steps to secure the fabric strips:
- Apply fabric glue: Lift each fabric strip slightly and apply fabric glue underneath where it intersects with the rug base. This will help hold the fabric strips in place and prevent them from shifting or coming loose.
- Press down firmly: After applying the fabric glue, press down on the fabric strip firmly to ensure that it adheres well to the rug base. This will help create a strong bond between the fabric strip and the base.
- Repeat for all fabric strips: Continue applying fabric glue and pressing down firmly for each fabric strip on your rug. Take your time and be thorough to ensure that all strips are secured.
- Allow the glue to dry: Give the fabric glue enough time to dry completely before moving or using your rug. Follow the manufacturer’s instructions for the recommended drying time.
Securing the fabric strips with glue will help prevent them from unraveling or shifting over time. It’s important to be patient and make sure the glue is applied evenly to provide a strong hold.
If you prefer a more secure option, you can also sew the fabric strips to the rug base using a needle and thread or a sewing machine. This method is especially recommended for larger rugs or for those who want a more permanent attachment.
Once the fabric strips are securely in place, you’re almost done! It’s time to add some finishing touches to your upcycled rug.
Adding Finishing Touches to Your Rug
With the fabric strips secured to your rug base, it’s time to add some finishing touches to complete your upcycled rug. These final steps will help enhance the overall appearance and ensure that your rug is ready to be enjoyed. Here’s what you can do:
- Trim any excess fabric: Use fabric scissors to carefully trim any excess fabric strips that extend beyond the edges of your rug. This will give your rug a clean and polished look.
- Inspect for loose ends: Check your rug for any loose fabric ends that may be sticking out. Use fabric glue or needle and thread to secure them down and prevent unraveling.
- Add decorative elements: Consider adding decorative elements to further enhance your rug. This could include attaching buttons, beads, or ribbon to create unique accents or patterns.
- Clean and groom your rug: Give your newly created rug a final clean and groom. Use a vacuum cleaner or a soft-bristle brush to remove any dust or debris, and fluff up the fabric strips for a plush appearance.
By paying attention to these finishing touches, you will ensure that your upcycled rug appears neat, professional, and ready for use. Take the time to thoroughly examine your rug and make any necessary adjustments or additions.
Remember, adding finishing touches is an opportunity to unleash your creativity and make your rug truly personalized. Don’t be afraid to experiment with different embellishments or techniques that align with your preferences and style.
Once you’re satisfied with the final look of your rug, it’s time to place it in its designated space and enjoy the fruits of your labor.
Caring for Your Upcycled Rug
Now that your upcycled rug is complete and ready to be enjoyed, it’s important to know how to properly care for it to ensure its longevity and maintain its beauty. Here are some tips to help you keep your rug in top condition:
- Regular cleaning: Vacuum your rug regularly to remove dirt, dust, and debris. This will help keep the fabric strips clean and prevent them from becoming matted or worn.
- Spot cleaning: Attend to any spills or stains promptly by gently blotting the affected area with a clean cloth or paper towel. Avoid rubbing, as this can spread the stain. Use a mild detergent or fabric cleaner if necessary, following the manufacturer’s instructions.
- Avoid excessive moisture: While spot cleaning is necessary, it’s important to avoid saturating your rug with excessive moisture. Too much water can cause the rug base to weaken or the fabric strips to lose their shape.
- Sunlight exposure: Avoid placing your rug in direct sunlight for prolonged periods as it can cause fading. If your rug is in an area with significant sunlight, consider using curtains or blinds to protect it.
- Rotate periodically: To ensure even wear, rotate your rug periodically, especially if it’s placed in a high-traffic area. This will help distribute the weight and prevent one side from wearing out faster than the others.
- Professional cleaning: Every once in a while, consider having your rug professionally cleaned. They have the expertise and equipment to thoroughly clean and maintain the rug without causing any damage.
By following these care tips, you can extend the lifespan of your upcycled rug and keep it looking its best for years to come. Remember that each rug will have its own unique maintenance needs based on the materials used, so be mindful of any specific care instructions.
With proper care, your upcycled rug can continue to add warmth, charm, and a touch of eco-friendly style to your space.