
Materials Needed
Building a reverse osmosis water filter at home is surprisingly simple and requires only a few key components. Here are the materials you will need to get started:
- Reverse osmosis filter membrane
- Filter housing
- Filter cartridge(s)
- Water supply tubing
- Drain tubing
- Water pressure gauge
- Fittings and connectors
- Wrench or pliers
- Bucket or container to collect filtered water
These materials are readily available at most home improvement stores, and you can even find them online. It’s important to choose high-quality components to ensure the efficiency and longevity of your reverse osmosis water filter system.
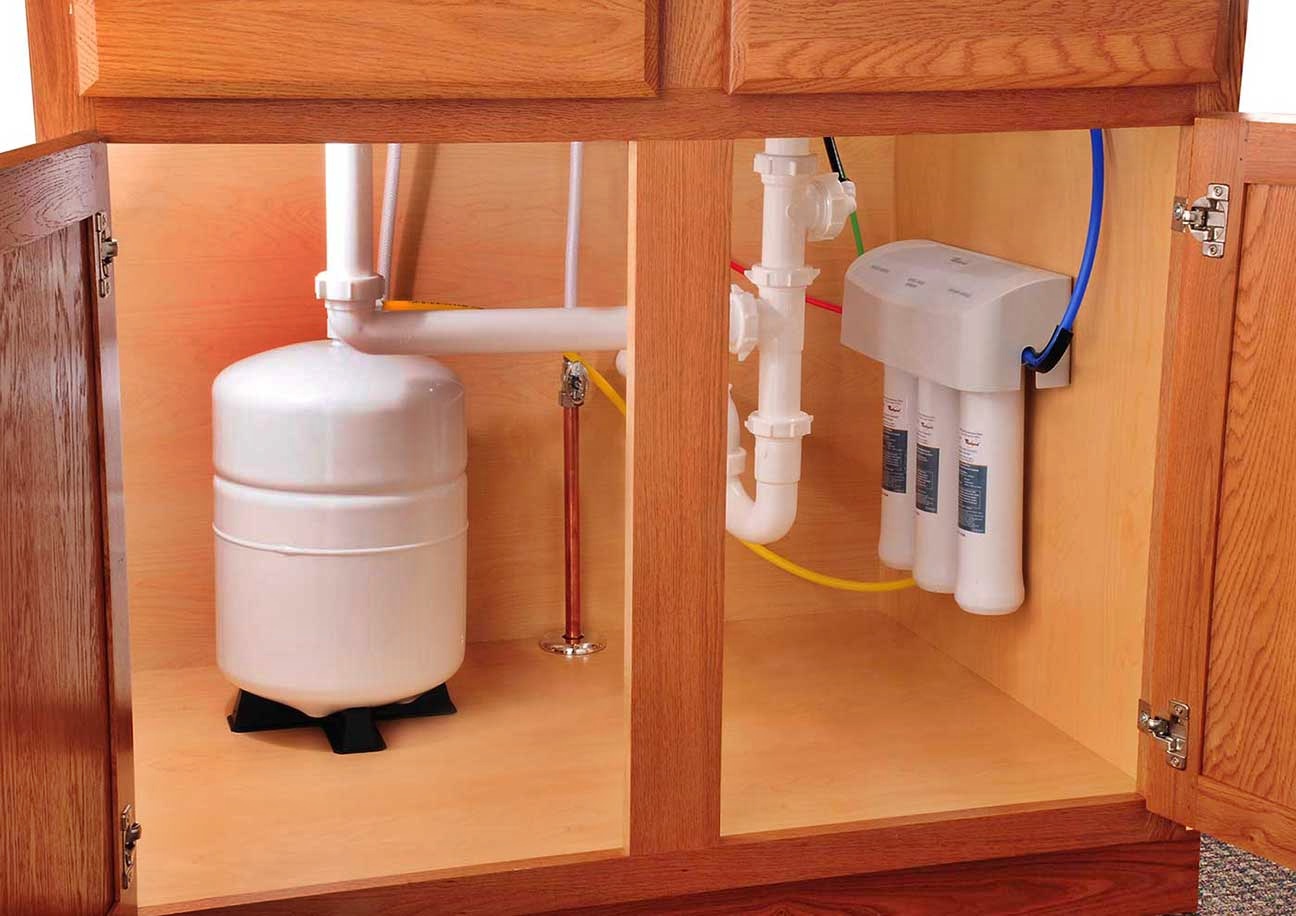
The reverse osmosis filter membrane is the heart of the system and is responsible for removing impurities and contaminants from the water. Look for a membrane that is compatible with your water source and meets your filtration needs. The filter housing holds the membrane and cartridge(s) in place and provides a secure connection. Make sure the housing is durable and easy to install and maintain.
The filter cartridge(s) work in conjunction with the membrane to eliminate sediment, chlorine, and other undesirable substances. Depending on your water quality, you may need multiple cartridges for optimal filtration. The water supply tubing connects the filter system to your water source, while the drain tubing safely carries away the wastewater.
A water pressure gauge is essential for monitoring the pressure throughout the system. This will help you troubleshoot any potential issues and maintain the proper functioning of your filter. Additionally, you will need various fittings and connectors to ensure a secure and leak-free installation.
Finally, a wrench or pliers will come in handy for tightening and adjusting the connections as needed. And don’t forget to have a bucket or container to collect the filtered water. This way, you can easily access the purified water for drinking, cooking, or other applications.
By gathering these materials, you’ll have everything you need to start building your own reverse osmosis water filter system. Once assembled, you can enjoy clean and refreshing water right in the comfort of your home.
Step 1: Assemble the Filter Components
Now that you have all the necessary materials, it’s time to start assembling the filter components. Follow these steps to ensure a successful installation:
- Prepare the filter housing: Start by removing the filter housing cover and placing the reverse osmosis filter membrane inside. Ensure that the membrane is properly aligned and seated securely.
- Insert the filter cartridge(s): If you are using multiple filter cartridges, carefully insert each one into its designated slot within the filter housing. Make sure they are firmly in place.
- Tighten the filter housing: Using a wrench or pliers, tighten the filter housing to create a secure seal. Be careful not to overtighten, as this could damage the housing.
- Attach the water supply tubing: Take one end of the water supply tubing and connect it to the inlet of the filter housing. Use fittings and connectors as necessary to ensure a tight and leak-free connection.
- Connect the drain tubing: Attach the drain tubing to the outlet of the filter housing. Like with the water supply tubing, use fittings and connectors to create a secure connection.
- Install the water pressure gauge: If your filter system includes a water pressure gauge, mount it in a convenient location. Make sure it’s easily visible and accessible for monitoring purposes.
- Check all connections: Once everything is in place, go through each connection and ensure they are properly tightened. This will prevent any potential leaks and ensure the efficiency of the filter system.
By following these steps, you will have successfully assembled the filter components of your reverse osmosis water filter. This is a crucial step in creating a reliable and effective system for purifying your water. Once completed, you can move on to the next steps of connecting the water supply and adjusting the water pressure.
Step 2: Preparing the Filter Membrane
After assembling the filter components, it’s important to properly prepare the reverse osmosis filter membrane before connecting it to the water supply. Follow these steps for a smooth installation:
- Flush the membrane: Before using the filter membrane, it’s recommended to flush out any impurities that may be present. Fill a container with clean water and submerge the membrane for about 30 minutes. This will help remove any manufacturing residues and prepare the membrane for optimal filtration.
- Install the membrane: Once the flushing process is complete, carefully place the filter membrane into the designated slot in the filter housing. Ensure that it is properly aligned and positioned.
- Secure the membrane: Close the filter housing cover and tighten it with a wrench or pliers. This will ensure that the membrane is securely held in place during operation.
- Double-check the connections: Take a moment to inspect all the connections for the filter housing, ensuring that they are still tight and leak-free. This step will help prevent any potential issues during the subsequent steps of the installation process.
By properly preparing the filter membrane in these steps, you will ensure its efficiency and effectiveness in removing impurities from your water. This will result in cleaner and better-tasting water for your everyday use.
Step 3: Connecting the Water Supply
Once the filter components are assembled and the filter membrane is prepared, it’s time to connect the water supply to your reverse osmosis system. Follow these steps to ensure a proper connection:
- Locate the water supply: Identify the main water supply line where you will be connecting the reverse osmosis system. Ensure that the water supply is turned off before proceeding.
- Cut the water supply tubing: Measure and cut a section of the water supply tubing that will reach from the main water supply to the inlet of the filter housing. Use a sharp utility knife to make a clean and straight cut.
- Connect the water supply tubing: Attach one end of the cut water supply tubing to the inlet of the filter housing. Use fittings and connectors to create a secure and leak-free connection. Tighten the fittings with a wrench or pliers as needed.
- Locate the water shutoff valve: Determine the location of the water shutoff valve, which controls the water flow to the reverse osmosis system. This valve should be readily accessible for maintenance and emergencies.
- Turn on the water supply: Once the water supply tubing is securely connected, slowly turn on the water supply valve. This will allow water to flow into the reverse osmosis system.
- Check for leaks: Inspect all the connections for any signs of leaks. If you notice any leaks, tighten the fittings or connections as necessary. It’s important to address any leaks before proceeding to prevent water damage and ensure the proper functioning of the system.
By following these steps, you will successfully connect the water supply to your reverse osmosis system. This step is crucial in ensuring that water can flow into the system for filtration and purification purposes.
Step 4: Installing the Drain Line
Installing the drain line is an essential step in setting up your reverse osmosis water filter system. Follow these steps to ensure a proper installation:
- Locate the drain outlet: Identify the drain outlet or sink where the system’s wastewater will be directed. The drain outlet should be conveniently located and easily accessible.
- Cut the drain tubing: Measure and cut a section of the drain tubing that will reach from the outlet of the filter housing to the drain outlet. Use a sharp utility knife to make a clean and straight cut.
- Connect the drain tubing: Attach one end of the drain tubing to the outlet of the filter housing. Use fittings and connectors to create a secure and leak-free connection. Tighten the fittings with a wrench or pliers as needed.
- Route the drain tubing: Carefully route the drain tubing to the drain outlet or sink. Avoid any kinks or sharp bends that might restrict the flow of wastewater. Secure the tubing in place using clips or brackets, if needed.
- Check for leaks: Inspect all the connections and joints for signs of leaks. If you notice any leaks, tighten the fittings or connections as necessary. It’s important to address any leaks to prevent water damage and ensure the proper functioning of the system.
- Test the drain line: Once the drain line is installed, turn on the water supply and allow the system to operate for a few minutes. Check that wastewater is flowing freely through the drain line and into the drain outlet or sink.
By following these steps, you will successfully install the drain line for your reverse osmosis water filter system. The drain line plays a vital role in safely disposing of the wastewater that is generated during the filtration process.
Step 5: Adjusting the Water Pressure
Adjusting the water pressure is an important step in optimizing the performance of your reverse osmosis water filter system. Follow these steps to ensure the water pressure is set correctly:
- Locate the water pressure gauge: Identify the water pressure gauge that is installed as part of your reverse osmosis system. The gauge is typically located near the filter housing or on the system’s control panel.
- Check the recommended water pressure: Refer to the manufacturer’s guidelines or product manual to determine the recommended water pressure for your specific system. This information will help you understand the desired range for optimal performance.
- Adjust the water pressure regulator: If the water pressure is too high, it may put excessive strain on the system. In this case, locate the water pressure regulator, usually found near the main water supply line or on the system’s control panel. Adjust the regulator to reduce the water pressure to the desired level. Use caution and make incremental adjustments to avoid damaging the system or causing water leaks.
- Monitor the water pressure: After making adjustments to the water pressure regulator, monitor the pressure gauge to ensure the system is operating within the recommended range. The pressure should be stable and consistent during operation.
- Make additional adjustments if necessary: If the water pressure is too low, it may affect the efficiency and performance of the reverse osmosis system. In this case, adjust the water pressure regulator gradually until the desired pressure is achieved.
- Check for leaks and system stability: Once the water pressure is adjusted, carefully inspect all connections and joints for any signs of leaks. Test the stability of the system by running the water supply and observing the flow and performance of the filter.
By following these steps, you will successfully adjust the water pressure for your reverse osmosis water filter system. Proper water pressure ensures efficient filtration and optimal performance of the system.
Step 6: Maintaining and Cleaning the Filter
Maintaining and cleaning the filter is essential to ensure the longevity and efficiency of your reverse osmosis water filter system. Follow these steps to properly maintain and clean the filter:
- Regularly replace filter cartridges: Over time, filter cartridges become saturated with contaminants and lose their effectiveness. Refer to the manufacturer’s recommendations to determine the frequency of replacing the filter cartridges. Typically, this is done every 6-12 months.
- Flush the filter: Occasionally, it is recommended to flush the filter system to remove any buildup or sediment. Follow the manufacturer’s instructions to perform a system flush, ensuring that the water flows freely through the system and out of the drain line.
- Clean the filter housing: When replacing the filter cartridges, take the opportunity to clean the filter housing. Remove any debris or residue that may have accumulated inside the housing. Use a mild detergent and warm water to clean the housing, rinse thoroughly, and allow it to dry before installing the new cartridges.
- Monitor water quality: Regularly test the quality of the filtered water to ensure that the system is functioning correctly. Many hardware stores sell water testing kits that can assess the water’s pH level and identify any impurities or contaminants.
- Check for system leaks: Inspect all connections and joints for any signs of leaks. Address any leaks immediately by tightening fittings or replacing damaged components. Leaks can affect the efficiency of the system and may lead to water damage if left unattended.
- Follow maintenance guidelines: Refer to the manufacturer’s instructions for specific maintenance guidelines for your reverse osmosis system. These guidelines may include additional steps or recommendations to keep the system in optimal condition.
By following these steps and regularly maintaining and cleaning the filter, you will ensure the longevity and consistent performance of your reverse osmosis water filter system. Maintaining a clean and well-functioning filter is crucial in providing clean and purified drinking water for you and your family.
Step 7: Testing the Filtered Water
Testing the filtered water is an important step in ensuring the effectiveness of your reverse osmosis water filter system. Follow these steps to properly test the quality of the filtered water:
- Collect a sample of filtered water: Use a clean and sterile container to collect a sample of the filtered water from your reverse osmosis system. Fill the container completely to get an accurate representation of the water quality.
- Use a water testing kit: Purchase a reliable water testing kit from a reputable supplier or hardware store. These kits typically include test strips or vials that can detect various impurities and contaminants in the water.
- Follow the testing kit instructions: Carefully read and follow the instructions provided with the water testing kit. This will help you properly perform the tests and interpret the results accurately.
- Test for specific impurities: Different water testing kits may focus on specific impurities or contaminants. Some common tests include measuring pH levels, detecting chlorine, heavy metals, or bacteria. Choose the appropriate tests based on your water quality concerns.
- Interpret the test results: Once you have completed the testing, compare the results with the recommended safe levels for each tested parameter. This will give you an indication of the quality and effectiveness of your reverse osmosis system.
- Take necessary action: If the test results indicate any issues or exceed the recommended safe levels, take the necessary action to address the problem. This may involve contacting a water treatment professional or replacing specific components in your system.
By following these steps and regularly testing the quality of your filtered water, you can ensure that your reverse osmosis water filter system is effectively removing impurities and providing clean drinking water. Regular testing will give you peace of mind and help you maintain a healthy water supply for you and your family.
Step 8: Troubleshooting and Tips
Even with proper installation and maintenance, issues may arise with your reverse osmosis water filter system. Follow these troubleshooting tips to address common problems and ensure the optimal performance of your system:
- Low water flow: If you experience low water flow from your reverse osmosis system, check for any clogs or obstructions in the tubing or filters. Replace clogged filters and ensure the tubing is properly connected and not kinked.
- Unusual taste or odor: If your filtered water has an unusual taste or odor, it may indicate a need to replace the filter cartridge. Check the manufacturer’s recommendations for the appropriate timing of filter replacements and make sure the system is properly flushed before using the fresh cartridge.
- Leaking connections: If you notice any leaks in the connections of your system, check for loose fittings or damaged O-rings. Tighten the fittings as necessary or replace damaged components to resolve the leaks.
- High water waste: Reverse osmosis systems generate wastewater as part of the filtration process. However, if you notice an excessive amount of water waste, it may indicate a problem with the system. Consider adjusting the water pressure or consult a professional for further assistance.
- Regular maintenance: Perform regular maintenance tasks as recommended by the manufacturer. This includes replacing filter cartridges, cleaning the system, and testing the water quality periodically.
- Proper disposal of wastewater: Ensure that the wastewater from your system is being disposed of appropriately. Follow local regulations regarding the disposal of wastewater to minimize any environmental impact.
- Regular system checks: Periodically inspect the system for any signs of wear or damage. Check the filter housing, tubing, and connections for any leaks or deterioration. Address any issues promptly to prevent further damage and maintain system efficiency.
Following these troubleshooting tips and implementing proper maintenance practices will help address common issues with your reverse osmosis water filter system. It’s important to stay proactive and address any problems as they arise to ensure the longevity and performance of your system.