
Materials Needed
In order to create a pipe shelf, you will need to gather a few essential materials. Here is a list of what you will need:
- Pipes and fittings: Select the desired size and length of pipes, along with appropriate fittings to connect them.
- Wooden boards: Choose sturdy and durable boards for the shelves. The size and thickness can be customized to fit your preference.
- Wall anchors: These will help secure the shelf to the wall and provide stability.
- Screws: Select screws that are compatible with the dimensions of your pipes and fittings.
- Drill and drill bits: A drill will be necessary for creating holes, attaching screws, and mounting the shelf on the wall.
- Measuring tape: Use a measuring tape to ensure accurate measurements for the shelf dimensions.
- Screwdriver or wrench: You will need a tool to tighten the fittings securely.
- Level: A level will be helpful for ensuring that your shelf is straight and level when mounted.
- Safety equipment: Don’t forget to use safety goggles and gloves to protect yourself during the construction process.
Remember, these materials may vary depending on the specifics of your project. It’s always a good idea to gather all the necessary supplies before starting, to ensure a smooth and efficient assembly process.
Step 1: Measure and Plan
Before diving into the construction of your pipe shelf, you’ll need to take accurate measurements and plan out the design. This step is crucial to ensure that your shelf fits perfectly in the desired space and meets your functional and aesthetic requirements. Here’s how to get started:
- Measure the space: Use a measuring tape to determine the dimensions of the area where you plan to install the shelf. Consider the width, height, and depth of the space to determine the appropriate size for your shelf.
- Design the layout: Decide on the configuration and arrangement of your pipe shelf. This includes the number of shelves, the spacing between them, and the overall design aesthetic. Sketch out your ideas or use a design software to visualize the final look.
- Consider weight capacity: Take into account the items you plan to place on the shelf and ensure that the materials chosen can support the weight. If you anticipate heavier items, you may need to use thicker boards or additional support brackets.
- Allocate space for pipes: Calculate the space required for the pipes and fittings within the overall shelf design. This will help determine the length and width of the wooden boards you need to purchase.
- Double-check measurements: Once you have finalized your design and dimensions, double-check all the measurements to ensure accuracy. This will help prevent any issues during the construction process.
By taking the time to measure and plan your pipe shelf, you will have a solid foundation for the rest of the construction process. This step will help you avoid mistakes and ensure that your final product fits seamlessly into your space. Now that you have your measurements and a plan in place, you’re ready to proceed to the next step: gathering your supplies.
Step 2: Gather Your Supplies
With your measurements and plan in hand, it’s time to gather all the necessary supplies for your pipe shelf project. By having everything ready ahead of time, you can streamline the construction process and avoid unnecessary delays. Here’s a list of the supplies you’ll need:
- Pipes and fittings: Based on your design and measurements, select the appropriate size and length of pipes, along with the necessary fittings to connect them. Consider the aesthetic appeal and durability of the materials you choose.
- Wooden boards: Choose sturdy and visually appealing boards for your shelves. Consider the desired length, width, and thickness based on your design plan. You can opt for reclaimed wood for a rustic look or go with a smooth finish for a more modern aesthetic.
- Wall anchors: Select durable wall anchors that can support the weight of your shelf. Make sure they are compatible with the type of wall you are mounting the shelf on.
- Screws: Choose screws that are the correct size and length for connecting the pipes and fittings, as well as attaching the wooden boards to the frame.
- Drill and drill bits: A drill will be essential for creating holes in the pipes and boards, as well as for mounting the shelf on the wall. Make sure you have the appropriate drill bits for the material you are working with.
- Measuring tape: Keep a measuring tape handy to ensure accurate measurements during the assembly process.
- Screwdriver or wrench: You’ll need a screwdriver or wrench to tighten the fittings securely.
- Level: A level will aid in ensuring that your shelf is straight and level once it is mounted on the wall.
- Safety equipment: Prioritize safety by wearing goggles and gloves to protect yourself during the construction process.
Double-check that you have all the necessary supplies before beginning the construction to avoid unnecessary trips to the hardware store. By having everything on hand, you’ll be ready to move on to the next step: preparing the pipes.
Step 3: Prepare the Pipes
Now that you have gathered all the necessary supplies, it’s time to prepare the pipes for your pipe shelf. Properly preparing the pipes will ensure a smooth and secure assembly process. Here’s what you need to do:
- Clean the pipes: Use a cleaning solution or degreaser to remove any dirt, grease, or residue from the pipes. This will help the paint or finish adhere properly.
- Apply a protective finish: If you want to add a protective coating or paint to the pipes, now is the time to do so. This can help prevent rust or corrosion and also add a decorative touch to your shelf. Allow sufficient drying time as per the instructions on the chosen finish.
- Measure and mark: Take accurate measurements and mark the spots where you will attach the fittings and shelves. This will help ensure proper alignment and spacing when assembling the shelf.
- Thread the fittings: Carefully thread the fittings onto the pipes using a wrench or pipe threader, making sure they are tightened securely. This will create the frame of your pipe shelf.
- Check for stability: Before moving on to the next step, check the stability of the pipe frame. Make any necessary adjustments to ensure all the pipes and fittings are aligned correctly.
Properly preparing the pipes is crucial for the overall stability and functionality of your pipe shelf. By cleaning, applying a protective finish, and ensuring proper alignment, you can ensure that your shelf will not only look great but also stand the test of time. Once the pipes are prepared, you are now ready to move on to the construction of the shelf frame in step 4.
Step 4: Assemble the Shelf Frame
With the pipes prepared, it’s time to assemble the frame of your pipe shelf. This step will involve connecting the pipes and fittings to create a sturdy and functional structure that will support the weight of your shelves. Follow these steps to assemble the shelf frame:
- Arrange the pipes: Lay out the pipes and fittings according to your design plan. Make sure you have all the necessary components ready.
- Connect the pipes: Begin by connecting the pipes and fittings together, following the marked spots from the previous step. Use a wrench or pipe threader to tighten the connections securely.
- Check for stability: As you connect the pipes, periodically check the stability of the frame. Ensure that all the pipes are aligned correctly and tightened properly to prevent wobbling or instability.
- Double-check measurements: Once the frame is fully assembled, double-check the measurements to ensure that it matches your original plan. Make any necessary adjustments before proceeding.
- Inspect the frame: Take a few moments to inspect the frame for any issues or weak points. Reinforce any loose connections and ensure that the frame is sturdy and level.
By carefully assembling the shelf frame, you are laying the foundation for the rest of the construction process. Take your time to ensure that the pipes and fittings are securely connected and that the frame is stable. Once the shelf frame is solid and sturdy, you are ready to move on to the next step: attaching the shelf boards.
Step 5: Attach the Shelf Boards
Now that the frame of your pipe shelf is assembled, it’s time to attach the shelf boards. This step will bring your project to life by adding the functional and decorative elements to your shelves. Follow these steps to securely attach the shelf boards:
- Measure and mark: Measure and mark the desired placement of the shelves on the frame. Ensure that the measurements are accurate and aligned with your initial plan.
- Pre-drill holes: Use a drill with an appropriate drill bit to pre-drill holes into the shelf boards. This will prevent the wood from splitting when you attach the screws.
- Align the boards: Place the shelf boards onto the frame, aligning them with the marked spots. Make sure they are positioned evenly and level.
- Secure with screws: Using the pre-drilled holes as a guide, attach the shelf boards to the frame using screws. Make sure to drive the screws in securely, but be cautious not to overtighten and risk damaging the wood.
- Check for stability: After each shelf board is attached, check the stability of the shelves. Gently shake the shelf to ensure there is no wobbling or movement. If necessary, make adjustments and tighten screws as needed.
By carefully attaching the shelf boards, you are completing the structure of your pipe shelf and creating functional space for displaying or storing items. Take your time to ensure that the shelves are level and securely attached to the frame. Once all the shelf boards are in place, you are ready to proceed to the next step: mounting the shelf on the wall.
Step 6: Mount the Shelf on the Wall
Now that your pipe shelf frame is complete with the attached shelf boards, it’s time to mount it on the wall. This step will ensure that your shelf is securely fastened and properly aligned with your desired display or storage area. Follow these steps to mount your pipe shelf:
- Choose the placement: Select the desired location for your shelf on the wall. Consider the height and position for easy access and visual appeal.
- Mark the wall: Use a pencil or marker to mark the spots where the wall anchors will be placed. Ensure that the marks are aligned with the mounting holes on the shelf frame.
- Install wall anchors: Depending on the type of wall you’re working with, install the appropriate wall anchors at the marked spots. This will provide stability and reliable support for your shelf.
- Align the frame: Carefully align the mounting holes of the shelf frame with the wall anchors.
- Secure the shelf: Insert screws through the mounting holes and into the wall anchors, using a drill or screwdriver. Ensure that the screws are tightened securely, but be cautious not to overtighten and damage the wall or frame.
- Check for stability: Give the shelf a gentle shake to test its stability. Ensure that it is securely mounted and there is no excessive movement.
By mounting your pipe shelf on the wall, you are ensuring that it remains firmly in place and can withstand the weight of the items you plan to display or store. Take your time to align the frame properly and secure the shelf using the appropriate hardware. Once the shelf is mounted, you can move on to the final step: adding the finishing touches.
Step 7: Finishing Touches
Congratulations! You have successfully constructed and mounted your pipe shelf. Now it’s time to add the finishing touches to enhance its appearance and functionality. These final steps will give your shelf a polished and personalized look. Here’s what you can do:
- Sand and smooth: If needed, use sandpaper to smooth any rough edges or surfaces of the wooden boards. This will ensure a clean and polished look.
- Apply a protective finish: Consider adding a protective finish to the wooden boards to protect them from wear and tear. Choose a finish that matches your desired aesthetic, whether it’s a clear coat, stain, or paint. Allow sufficient drying time as per the instructions on the chosen finish.
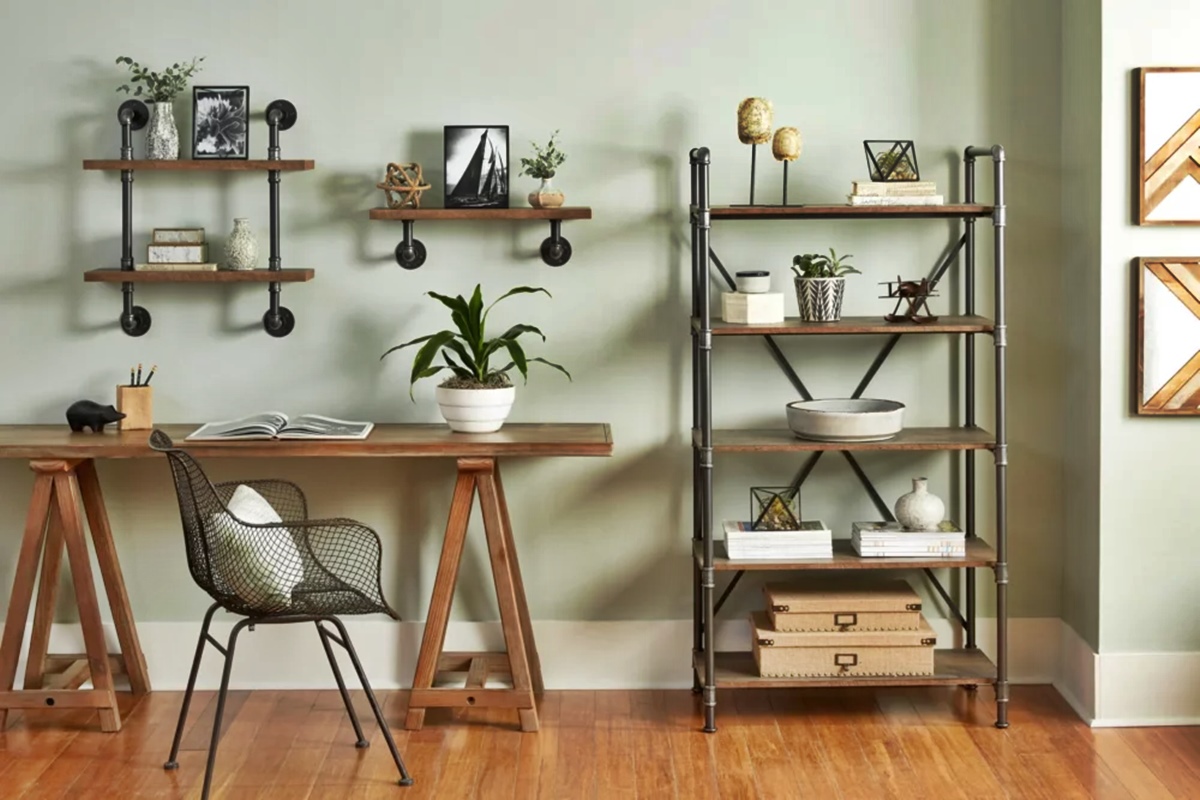
- Add decorative elements: Personalize your shelf by adding decorative elements such as plants, framed photos, or decorative items that reflect your style and complement the overall design.
- Organize and style: Arrange your items on the shelf in an organized and visually appealing manner. Consider using different heights, textures, and colors to create an eye-catching display.
- Step back and admire: Take a step back and appreciate the result of your hard work. Stand back and make any minor adjustments if necessary to ensure the shelf is level and visually appealing.
By adding these finishing touches, you can elevate the look and functionality of your pipe shelf. Take the time to ensure that the wooden boards are smooth and protected, and that the items on the shelf are arranged in an aesthetically pleasing manner. Now that you’ve completed all the steps, you can enjoy your beautifully constructed and customized pipe shelf!