
Materials Needed
Creating a photo projection necklace requires a few basic materials. Here are the items you will need for this project:
- Shrink film sheets
- Printer or permanent markers
- Scissors or craft knife
- Hole punch or needle
- Necklace chain
- Jump rings
- Jewelry pliers
- Clear sealant (mod podge, varnish, etc.)
Shrink film sheets are a key component for this project as they allow the photo to shrink down during the creation process. You can find shrink film sheets at most craft stores or order them online. As for the printer, it is needed if you choose to print your photo onto the shrink film directly. Alternatively, you can use permanent markers to manually draw your desired image on the shrink film. Scissors or a craft knife will be used to cut out the photo pendant shape, while a hole punch or needle will create a hole for attaching the pendant to the necklace chain. Speaking of the chain, choose one that matches your style and preference. Jump rings and jewelry pliers will be used to connect the pendant to the chain securely. Lastly, a clear sealant is needed to protect the photo pendant and give it a finished look. Mod podge or varnish are common choices for sealing the pendant, but you can use any clear sealant that is suitable for your selected materials.
Step 1: Choose a Photo
The first step in creating a photo projection necklace is selecting the perfect image. This could be a cherished photograph, a meaningful symbol, or even a beautiful piece of artwork. Consider the theme or message you want to convey with your necklace and choose a photo that aligns with that vision.
It’s important to ensure that the photo you choose has a clear and distinct subject. This will make the projection more defined and visually appealing. Avoid selecting photos with busy backgrounds or excessive detail, as they may not translate well in the shrink film process.
Additionally, consider the size and shape of the pendant you want to create. If you have a specific pendant shape in mind, choose a photo that can be easily cropped or resized to fit that shape.
Remember, this necklace is a reflection of your personal style and taste. Don’t be afraid to get creative and choose a photo that holds special meaning or evokes certain emotions. Whether it’s a picture of a loved one, a favorite vacation spot, or a quote that inspires you, the choice is yours.
Once you have chosen the perfect photo, you are ready to move on to the next step: resizing and editing the photo to prepare it for the shrink film transfer process.
Step 2: Resize and Edit the Photo
After selecting your desired photo, the next step in creating a photo projection necklace is to resize and edit the image to ensure it fits the pendant size and looks its best when projected.
Start by determining the dimensions of the pendant you want to create. Measure the length and width, keeping in mind any specific shape requirements you have in mind (such as a circle or heart shape). Once you have the dimensions, use photo editing software or an online image editor to resize the photo accordingly.
When resizing the photo, make sure to maintain its aspect ratio to avoid distorting the image. You can do this by adjusting the width or height while leaving the other dimension locked.
Additionally, consider making any necessary edits to enhance the photo’s appearance. You can adjust the brightness, contrast, or saturation levels to make it more vibrant and visually appealing. Feel free to experiment and get creative with the editing tools to achieve the desired effect.
To add a further personal touch, you can also apply filters or add text to the photo, depending on your preference and the message you want to convey.
Once you are satisfied with the resized and edited photo, save it in a high-quality format for printing or transfer onto the shrink film, which will be done in the next step.
Step 3: Transfer the Photo onto the Shrink Film
In this step, you will transfer your resized and edited photo onto the shrink film. The shrink film will act as the base material for your pendant, allowing the image to shrink and become more vibrant during the heating process.
Start by printing your photo onto the shrink film using a regular inkjet printer. Make sure to follow the film manufacturer’s instructions for printing on their specific product. Alternatively, if you don’t have access to a printer, you can use permanent markers to hand-draw your image directly onto the film. This method may require more precision and attention to detail.
Once the photo is transferred onto the shrink film, carefully cut it out using scissors or a craft knife. Pay attention to the shape and size that you want for your pendant and trim the film accordingly.
It’s important to note that the image will shrink significantly during the heating process, so keep this in mind when cutting out the photo. Take into account that the finished pendant will be approximately 40-50% smaller than the original size of the film.
After cutting out the photo, you may want to use a hole punch or a needle to create a hole at the top of your pendant. This hole will be used to attach the pendant to the necklace chain in later steps. Make sure the hole is large enough to accommodate a jump ring or any other connector you plan to use.
With the photo transferred onto the shrink film and properly cut and prepared, you are now ready to move on to the exciting shrinking process in the next step.
Step 4: Cut and Shrink the Photo
Now that you have your photo transferred onto the shrink film, it’s time to cut out the pendant shape and shrink it down to its final size. This step is where the magic happens, as the photo transforms into a miniature version with vibrant colors and a unique appearance.
Using scissors or a craft knife, carefully cut out the pendant shape following the outline of your photo. Take your time and be precise to ensure a clean and professional-looking result. If you prefer a more intricate design, you can create small details or patterns within the pendant shape as well.
Once the pendant shape is cut out, you are ready to shrink it down. Follow the instructions provided by the shrink film manufacturer for the best results. Typically, you will need to use an oven or heat gun to apply heat to the pendant. As it heats up, the shrink film will curl and then flatten out, eventually reducing in size and becoming thicker.
During the shrinking process, it’s important to keep a close eye on the pendant to prevent any over-shrinking or warping. Follow the recommended temperature and timing guidelines to achieve the desired result. Be aware that the pendant may curl up and twist during shrinking but will eventually flatten out on its own.
Once the pendant has cooled down and is fully shrunk, you will notice that the colors have become more vibrant, and the image has transformed into a small, durable, and unique piece of art. Now, you’re ready to proceed to the next step and turn your shrunk pendant into a beautiful necklace.
Step 5: Create the Necklace Pendant
Now that your shrunk photo pendant is ready, it’s time to turn it into a necklace pendant that you can wear and show off. In this step, you will create the backing and add any additional decorative elements to enhance the pendant’s appearance.
Start by trimming any excess shrink film around the pendant, leaving a small border around the image. This will give the pendant a clean and polished look. Use scissors or a craft knife to carefully trim the edges.
Next, consider adding a backing to your pendant. This can be made from a variety of materials such as felt, cardstock, or another layer of shrink film. Cut out a shape for the backing that is slightly larger than your pendant and align it behind the pendant, ensuring that the image is centered.
You can also add additional decorative elements to personalize your necklace further. This could be attaching small charms, beads, or even painting the backing to complement the colors in your pendant. Get creative and let your imagination guide you.
Once you are satisfied with the pendant and its backing, it’s time to prepare it for attachment to the necklace chain in the next step. Using a hole punch or a needle, create a small hole at the top of the pendant, ensuring it is centered and large enough to pass a jump ring or necklace chain through.
Congratulations! You have now successfully created your necklace pendant. In the next step, we will move on to attaching the pendant to the necklace chain, bringing your photo projection necklace one step closer to completion.
Step 6: Attach the Pendant to the Necklace Chain
In this step, you will attach the pendant to the necklace chain, ensuring that it hangs securely and beautifully. The method you choose will depend on your personal preference and the materials you have available.
Start by opening a jump ring using jewelry pliers. Gently twist the ring open by moving one end away from the other. Avoid pulling the ring apart as this can weaken it. Slide the open jump ring through the hole at the top of the pendant and close it by twisting the ends back together. This will secure the pendant and allow it to hang freely.
If you prefer a different method, you can use a small connector or a bail instead of a jump ring. These findings will provide a more decorative and secure way to attach the pendant to the necklace chain.
Once the pendant is attached to the jump ring or the bail, it’s time to connect it to the necklace chain. Open another jump ring and slip it through the jump ring or bail attached to the pendant. Then, thread the necklace chain through the second jump ring and close it securely.
If you are using a necklace chain with a clasp, ensure that the jump ring or bail is securely closed before attaching the clasp to the chain. If the necklace has no clasp and is a continuous loop, make sure that the jump ring or bail is properly closed to prevent the pendant from slipping off.
Take a moment to check that the pendant hangs properly and is centered on the necklace chain. Adjust the position of the jump rings if needed to achieve the desired alignment.
With the pendant successfully attached, you have now completed the assembly of your photo projection necklace. In the next step, we will test the projection and ensure that your pendant showcases your chosen image beautifully.
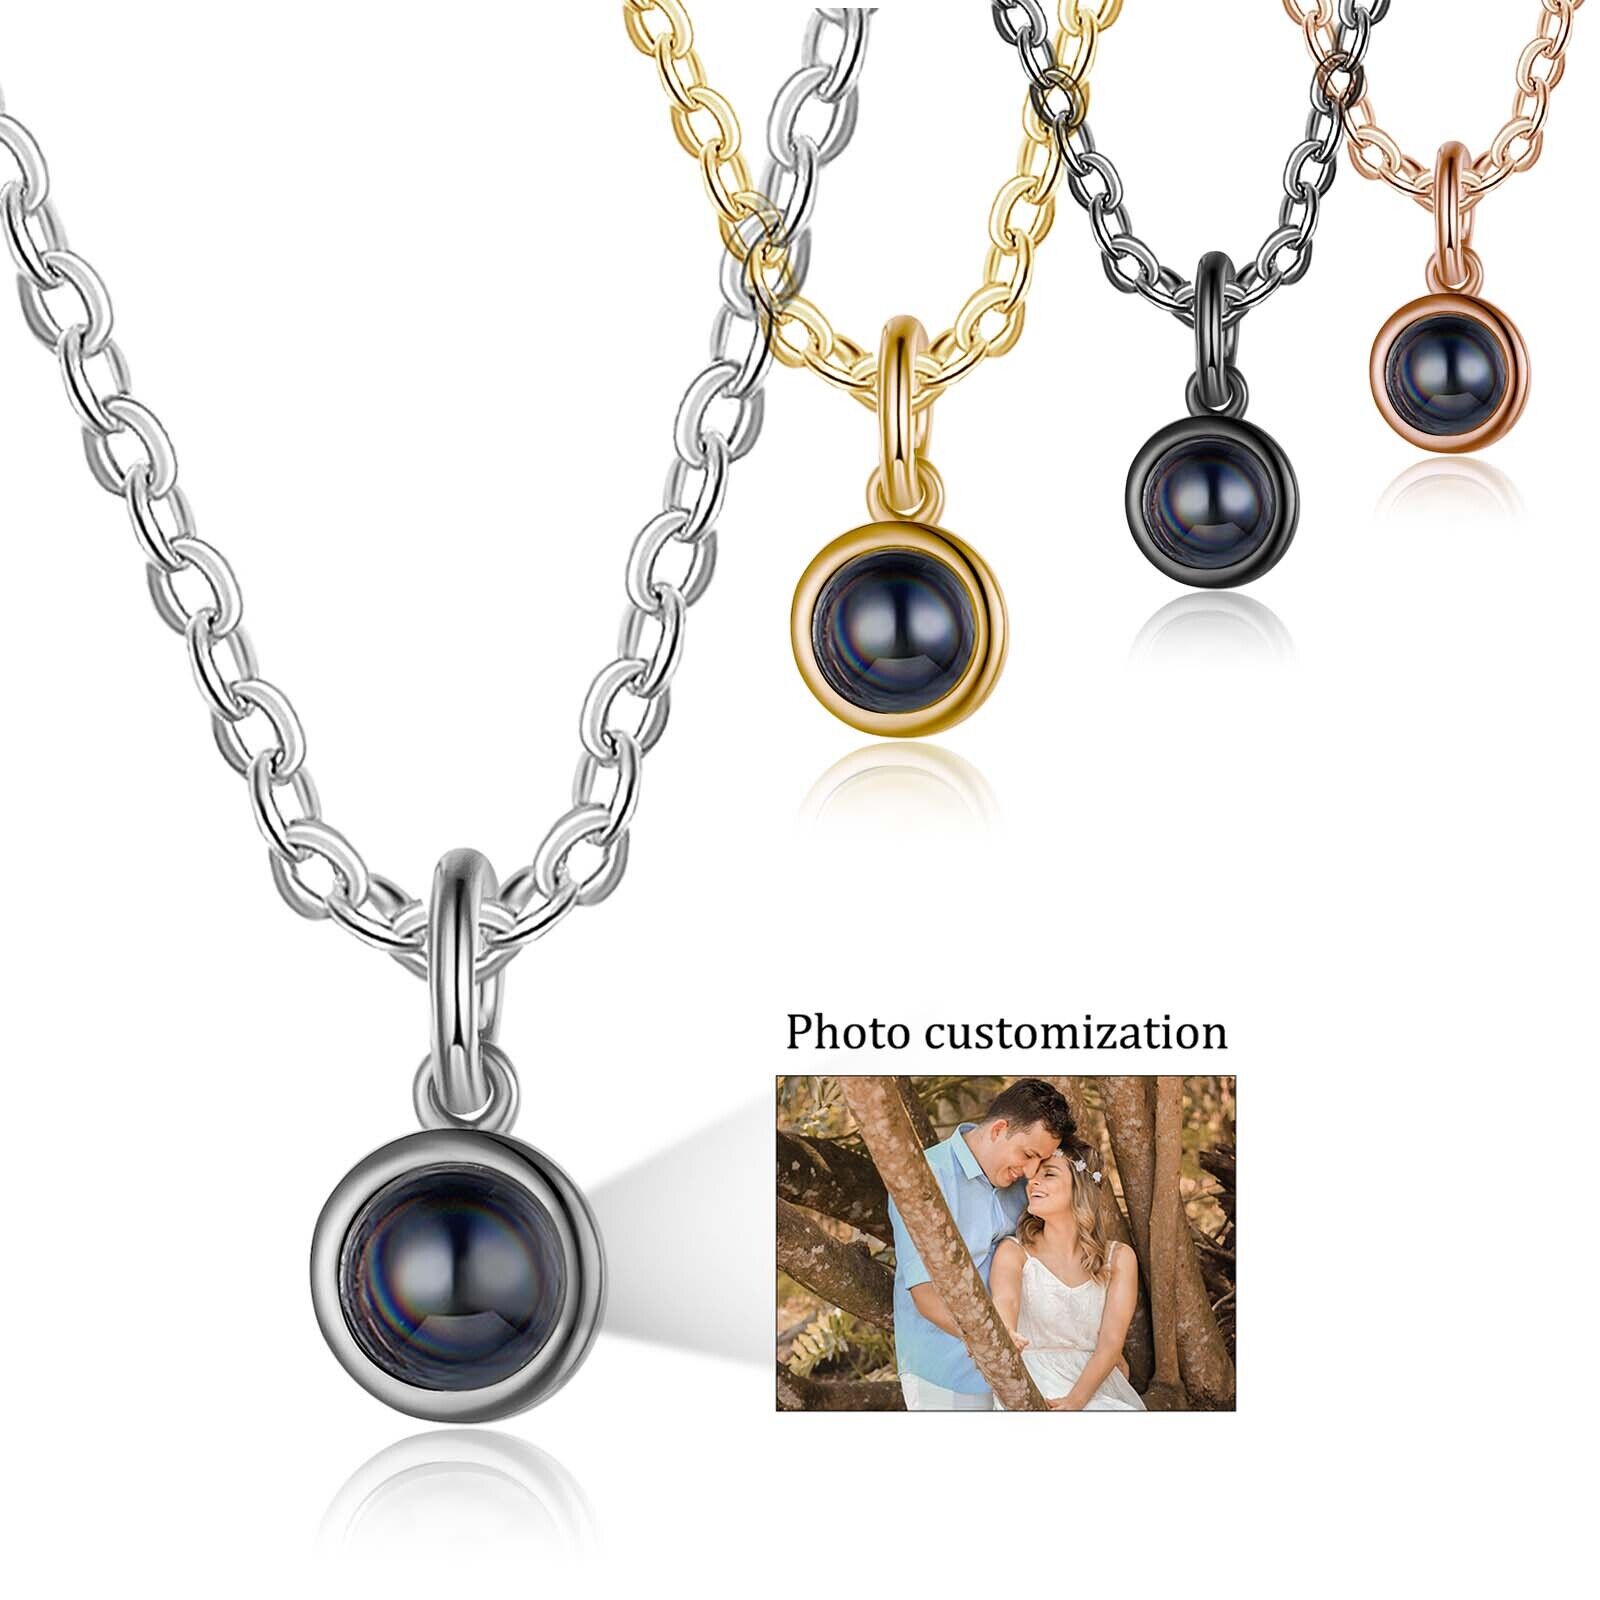
Step 7: Test the Projection
Now that you have completed the necklace assembly, it’s time to test the photo projection and see the magic come to life. This step will ensure that your pendant effectively projects the chosen image when light is shone upon it.
Find a well-lit area or a directed light source, such as a flashlight or smartphone flashlight, to test the projection. Hold the pendant up to the light source and observe the image. You should see a magnified and vibrant projection of the photo onto a nearby surface.
Adjust the distance between the pendant and the surface to find the optimal projection clarity. Experiment by moving closer or further away until you achieve the desired result. It’s important to note that the projection will appear in the opposite orientation, so keep this in mind when selecting and aligning your image.
Take some time to appreciate the beauty of the projection as it reflects your chosen image in a unique and mesmerizing way. This step allows you to ensure that your photo projection necklace captures the essence of your selected photo and creates a visually captivating effect.
If you are not satisfied with the projection results, you can revisit previous steps to make adjustments. This could involve resizing or editing the image for better projection clarity, or even revisiting the cutting and shrinking process if necessary.
Once you are happy with the projection quality, you can proceed to the next step and protect your pendant by sealing it with a clear sealant.
Step 8: Seal the Pendant
After testing the projection and ensuring that you are satisfied with the results, it’s time to seal the pendant to protect it and give it a finished look. Sealing the pendant will help preserve the image and prevent it from fading or scratching over time.
There are various sealants you can use to seal the pendant, such as mod podge, varnish, or clear nail polish. Choose a sealant that is compatible with the materials used in your pendant and suitable for the desired finish.
Start by applying a thin layer of the sealant over the front and back of the pendant. Use a soft brush or a sponge brush to ensure an even and smooth application. Be careful not to leave any streaks or air bubbles.
Allow the first layer to dry completely according to the manufacturer’s instructions. Once dry, apply additional layers, if desired, to ensure a strong protective seal. Make sure each layer is dry before applying the next one.
After the final layer is applied and fully dried, inspect the pendant for any imperfections or rough edges. Use fine-grit sandpaper or a nail file to gently smooth out any rough spots or edges, taking care not to scratch the pendant.
Once you are satisfied with the sealing and the pendant’s appearance, take a moment to admire your work and let the sealant cure fully before proceeding to the next step.
Sealing the pendant will not only protect the image but also enhance its visual appeal, giving it a glossy or matte finish, depending on the sealant used. This step ensures that your photo projection necklace will withstand everyday wear and keep its vibrant projection for a long time to come.
Step 9: Add Extra Touches (Optional)
In this step, you have the opportunity to add extra touches to your photo projection necklace to make it truly unique and personalized. These additional elements can enhance the overall aesthetic appeal of the necklace and add sentimental value.
One option is to incorporate additional charms or beads onto the necklace chain. Select charms that hold special meaning to you or represent aspects of your personality. These can be attached to the chain using jump rings or clasps.
Another idea is to customize the pendant further by adding small decorative items or embellishments. You can use rhinestones, small pearls, or enamel accents to create a more intricate and eye-catching design. Adhere these items onto the pendant using a strong adhesive suitable for the materials involved.
If you want to add a pop of color or a personal touch to the necklace, consider attaching a small pendant or tassel to the jump ring at the bottom of the photo pendant. This will create movement and visual interest, making your necklace even more eye-catching.
Additionally, you can personalize the necklace chain itself by adding letter charms or pendants with initials or meaningful symbols. These can be spaced out along the chain or added near the clasp for a personalized touch.
Remember that these extra touches are entirely optional, and you can choose to keep your necklace simple and understated if you prefer. The goal is to create a necklace that reflects your own individual style and holds sentimental value for you.
Once you have added any desired extra touches, take a moment to examine and adjust the necklace. Ensure that everything is securely attached and balanced, allowing the pendant and any additional elements to hang naturally and comfortably.
With the completion of this step, your photo projection necklace is almost ready to be worn and enjoyed. In the final step, we will discuss how to wear and appreciate your unique creation.
Step 10: Wear and Enjoy!
Congratulations! You have completed all the steps and created your very own photo projection necklace. Now it’s time to wear your masterpiece and enjoy the beauty and personal significance it holds.
Put on your necklace and adjust the length of the chain to your desired position by using the clasp or adjusting the continuous loop. Ensure that the pendant hangs at a comfortable and flattering length.
Take a moment to appreciate the unique qualities of your necklace. Notice how the pendant projects your chosen image, allowing it to come to life with every beam of light. The vibrant colors and intricate details are sure to catch the eye of anyone who sees it.
Your photo projection necklace is not only a beautiful piece of jewelry but also a sentimental reminder of a special moment, loved ones, or personal inspiration. Let it spark conversations and share the story behind its creation.
Remember to care for your necklace by avoiding excessive exposure to water, chemicals, or harsh handling. When not wearing it, store your necklace in a safe place to protect its delicate components.
Lastly, keep in mind that you can always create more photo projection necklaces as gifts for friends and family. It’s a creative and thoughtful way to share memories and make meaningful connections.
Wear your photo projection necklace with pride, and bask in the joy and admiration it brings. Your unique creation is a testament to your creativity, and it is sure to be a cherished accessory for years to come.