
Materials Needed
When finding yourself out in the wild without access to clean water, knowing how to create a natural water filter can be a lifesaver. With just a few simple materials, you can transform murky or contaminated water into a safe and drinkable form. Here are the essential materials you’ll need:
- A container: Start by finding a container to hold the water. This can be a plastic bottle, a large shell, or even a hollowed-out piece of bamboo.
- Rocks or pebbles: These will act as the first layer of filtration, helping to remove larger debris and sediment from the water.
- Sand: The next layer will consist of sand, which will further filter the water and remove smaller particles.
- Activated charcoal: Charcoal is highly effective at absorbing impurities and odors, making it an excellent addition to your filter.
- Grass or moss: This layer will provide additional filtration and help to remove any remaining impurities.
- A cloth or coffee filter: Finally, you’ll need a fabric or coffee filter to act as the last line of defense, preventing any last bits of debris from entering your drinking water.
These materials are relatively easy to find in outdoor environments, and some can even be improvised from natural resources. It’s important to note that while this filter can greatly improve the quality of water, it may not eliminate all harmful bacteria or viruses. If you’re unsure about the safety of a water source, it’s always best to boil the water before drinking or use additional purification methods.
Finding a Water Source
In survival situations, finding a reliable water source is crucial for your well-being. Here are some tips for locating water sources in the wild:
- Observe your surroundings: Look for signs of natural water sources such as streams, rivers, or lakes. Keep an eye out for lush vegetation, as it often indicates the presence of water nearby.
- Follow animal trails: Animals require water to survive, so following trails or tracks can lead you to a water source.
- Listen for the sound of running water: If you hear the sound of running water, it’s a good indication that there’s a water source nearby.
- Look for low-lying areas: Water tends to flow downwards, so valleys, depressions, or areas with a lower elevation are more likely to have water.
- Consider digging for water: In some cases, you may need to dig a hole in a dry riverbed or near vegetation to find groundwater.
Once you’ve located a water source, be sure to assess its quality. Look for signs of contamination or pollution, such as strange smells, discoloration, or dead animals nearby. If the water appears unsafe, it’s best to find an alternative source or take additional measures to purify the water before consumption.
Remember, water is essential for survival, so it’s crucial to prioritize finding a reliable source early on. By using your resourcefulness and following these tips, you’ll increase your chances of locating a safe and reliable water source in the wild.
Collecting Water
After identifying a water source, the next step is to collect water in a safe and efficient manner. Here are some guidelines to follow:
- Use a clean container: Ensure that the container you use to collect water is clean and free from any contaminants. If necessary, sanitize the container by boiling it or rinsing it with clean water.
- Avoid stagnant water: Whenever possible, collect water from flowing sources such as rivers or streams. Stagnant water is more likely to contain harmful bacteria and parasites.
- Keep your hands clean: Before collecting water, wash your hands thoroughly with soap or use hand sanitizer to prevent introducing any additional contaminants.
- Collect rainwater: If it’s raining, try to collect rainwater using a tarp or any other suitable materials. Rainwater is generally considered safe to drink without additional filtration.
- Fill the container without stirring up sediment: When collecting water from a natural source, be careful not to stir up any sediment at the bottom. Allow the water to settle before collecting it to minimize the amount of debris in the container.
It’s important to note that even water from seemingly clean sources may contain microscopic pathogens that can cause illness. To ensure your safety, it’s best to filter and purify the water before consumption.
By following these guidelines, you’ll be able to collect water effectively and minimize the risk of contamination, ensuring a safer drinking source during your time in the wild.
Preparing the Filter
Before assembling your natural water filter, it’s essential to take some preparatory steps to optimize its effectiveness. Here’s what you need to do:
- Gather and clean the materials: Ensure that all the materials mentioned earlier, such as rocks or pebbles, sand, activated charcoal, grass or moss, and cloth or coffee filter, are clean and free from any contaminants.
- Crush charcoal into small pieces: If you’re using activated charcoal, crush it into small pieces using a mortar and pestle or any other suitable method. This will increase the surface area and enhance its filtering capabilities.
- Soak the charcoal: Once crushed, soak the charcoal in clean water for a few minutes. This will help to remove any impurities that may be present.
- Prepare the container: If the container you’re using doesn’t have a lid, cover it with a cloth or use a rubber band to secure the filter materials in place. This will prevent any debris from entering the water during the filtration process.
- Set up a collection container: Place another clean container beneath the filter to collect the filtered water. This will ensure that the filtered water is separated from the unfiltered water.
By taking these preparatory steps, you’ll be ready to assemble your natural water filter and start purifying the collected water. It’s important to remember that the effectiveness of the filter will depend on the quality of the materials and the accuracy of the layering process.
Now that your materials are ready, it’s time to proceed with layering the filter to create the desired level of filtration.
Layering the Filter
Proper layering of the natural water filter is crucial to ensure effective filtration and purification of the collected water. Follow these steps to layer the filter properly:
- Start with a layer of rocks or pebbles: Place a layer of clean rocks or pebbles at the bottom of the container. This layer will act as a preliminary filter, preventing larger debris from reaching the subsequent layers.
- Add a layer of sand: On top of the rocks or pebbles, add a layer of clean sand. The sand will act as a secondary filter, removing smaller particles and sediments from the water.
- Place the activated charcoal layer: Spread a layer of the soaked activated charcoal evenly on top of the sand. The activated charcoal will help absorb impurities, odors, and some chemicals present in the water.
- Add a layer of grass or moss: Place a layer of clean grass or moss on top of the activated charcoal. This layer will provide additional filtration and help remove any remaining contaminants from the water.
- Finish with a cloth or coffee filter: Finally, cover the grass or moss layer with a cloth or coffee filter. This layer will act as the final barrier, preventing any debris or sediment from entering the filtered water.
Make sure each layer is evenly spread and covers the entire surface area of the container. This will ensure that the collected water undergoes proper filtration as it passes through each layer of the filter.
The effectiveness of the filtering process will depend on the quality of the materials used and the thickness of each layer. Take your time to carefully layer the filter, ensuring that there are no gaps or areas where unfiltered water can bypass the filtration process.
Once the filter is properly layered, it’s time to set up the filter system to start purifying the water.
Setting Up the Filter System
Now that you have your layered filter ready, it’s time to set up the filter system to begin the purification process. Follow these steps to set up the filter system:
- Position the filter container: Place the container with the layered filter in an elevated position, such as on a rock or a sturdy surface. This will allow the filtered water to flow freely into the collection container below.
- Ensure stability: Make sure the filter container is stable and won’t tip over during the filtration process. You can use rocks or surrounding objects to secure its position if needed.
- Position the collection container: Place a clean container beneath the filter container to collect the filtered water. Ensure that the collection container is stable and correctly positioned to collect the filtered water without any spillage.
- Secure the filter system: Use ropes, cords, or any available materials to secure the filter system in place. This will prevent any accidental toppling or shifting during the filtration process.
It’s important to note that the filter system relies on gravity, allowing the water to flow through the layers of the filter naturally. By setting up the system correctly, you ensure a steady and consistent flow of water through the filter, allowing for effective purification.
Make sure to position the filter system in an area where it won’t be disturbed, and avoid touching or interfering with the filter during the filtration process. Any disturbances or disruptions could compromise the filtering efficacy.
With the filter system properly set up, you’re now ready to allow the water to filter through the various layers of the filter.
Allowing the Water to Filter
Once the filter system is set up, it’s time to let the water flow through the layers of the filter for the purification process to take place. Follow these steps to allow the water to filter:
- Pour the collected water into the filter: Carefully pour the collected water into the top of the filter container. Be mindful not to disturb the layers or cause any shift in the filter materials.
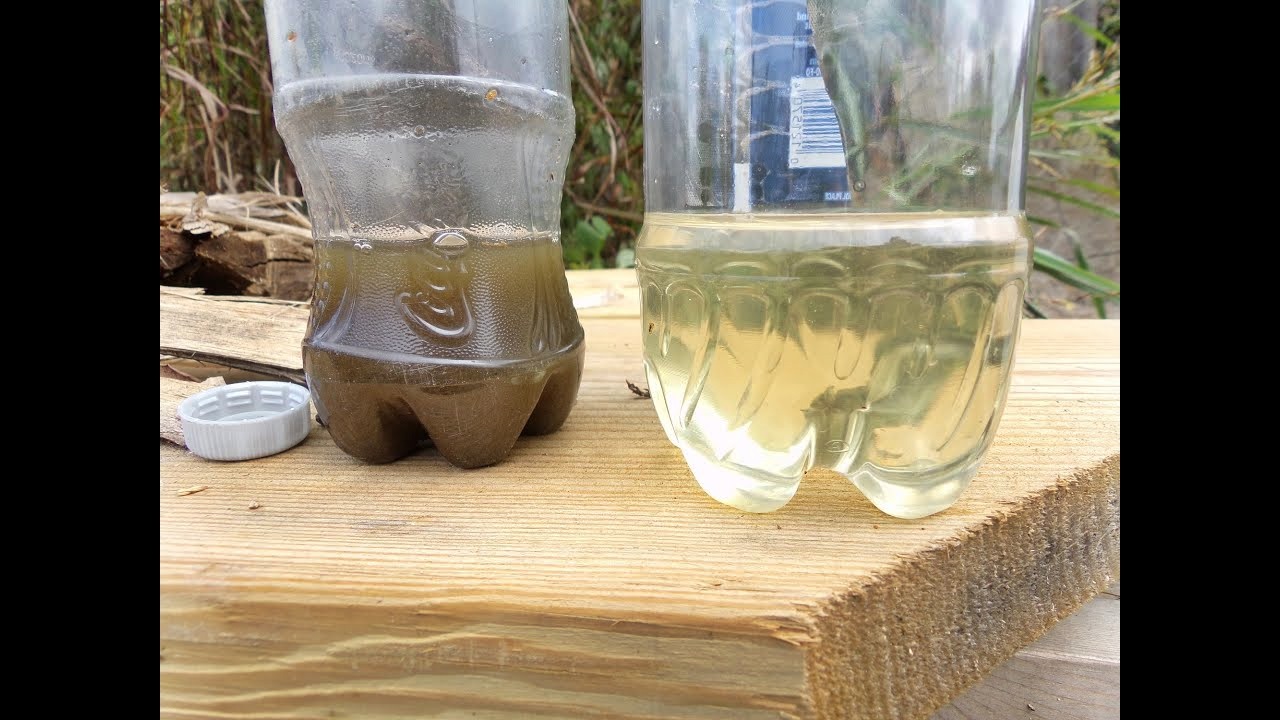
- Monitor the filtration process: Keep a close eye on the filtered water as it passes through the layers. Observe the clarity and color of the water as it drips into the collection container. This will help you estimate the progress of the filtration process.
- Allow sufficient time for filtration: The timing for the water to filter depends on the size of the filter, gravity, and the flow rate of the water. It’s recommended to allow several hours or even overnight for the water to fully filter through the layers. Patience is key for a thorough filtration process.
- Avoid disturbing the filter: During the filtration process, it’s essential not to disturb or touch the filter system. Any disruption can disrupt the flow of water and hinder the effectiveness of the filter layers.
While the natural water filter system is designed to remove impurities and sediment from the water, it’s important to understand that it may not eliminate all bacteria or viruses completely. If you’re unsure about the safety of the water source or if you’re in a high-risk environment, consider using additional purification methods such as boiling the filtered water or using a water purifier or sterilization tablets.
By allowing the water to filter through the layers in a patient and attentive manner, you’re taking a significant step towards obtaining cleaner and safer drinking water in the wild.
Collecting the Filtered Water
After the water has passed through the filtration process, it’s time to collect the filtered water for consumption. Follow these steps to collect the filtered water:
- Check the collection container: Inspect the collection container to ensure it’s clean and free from any contaminants. If needed, sanitize the container before transferring the filtered water.
- Position a clean container: Prepare a clean container to collect the filtered water. This container will be used for immediate consumption or to store the filtered water for later use.
- Carefully transfer the water: Slowly and carefully pour the filtered water from the collection container into the clean container. To avoid any potential contamination, avoid touching the rims or the inside of the containers with your hands.
- Observe the clarity and color: Take a moment to observe the clarity and color of the filtered water. It should appear much clearer and free from visible sediment or debris compared to the unfiltered water.
- Secure the container: Seal the container tightly to ensure that the filtered water remains clean and free from any potential contaminants. If storing the water for later use, label the container with the date of filtration.
It’s important to note that the shelf life of the filtered water may vary depending on factors such as temperature and storage conditions. If in doubt, it’s best to consume the filtered water within a reasonable timeframe or use additional purification methods such as boiling or using water purification tablets.
By carefully collecting the filtered water, you can rest assured knowing that you have a cleaner and safer water source for hydration and other essential needs while in the wild.
Maintaining the Filter
After using the natural water filter, it’s important to properly maintain it to ensure its longevity and continued effectiveness. Follow these maintenance tips for your filter:
- Clean the filter materials: Regularly clean the rocks or pebbles, sand, activated charcoal, grass or moss, and the cloth or coffee filter. Remove any debris, sediment, or clogs that may have accumulated during the filtration process.
- Replace worn-out materials: Over time, the filter materials may become less effective or worn out. Replace any materials that are no longer performing optimally to maintain the filter’s efficiency.
- Inspect for damage: Regularly inspect the filter container and the filter system for any signs of damage or wear. Repair or replace any damaged parts to ensure the integrity and functionality of the filter.
- Store the filter properly: If you plan to store the filter for future use, make sure it is clean and completely dry before packing it away. Store it in a dry and cool place to prevent the growth of mold or bacteria.
- Perform routine maintenance checks: Regularly check the filter system, including the container, layers, and any attachment points or ropes. Catching any issues early on will help prevent potential failures during the filtration process.
It’s crucial to note that the natural water filter is not a permanent solution for water purification. Depending on usage and environmental factors, the filter may become less effective over time. It’s always a good idea to have backup purification methods, such as boiling or using water purification tablets, especially in situations where water quality is questionable.
By maintaining and caring for your filter, you can rely on its functionality whenever you need access to clean and drinkable water in the wild.