
Materials Needed
Before you embark on creating your own drawer knife block, make sure you have the following materials ready:
- Drawer: Choose a sturdy and spacious drawer that will comfortably accommodate your knife collection.
- Wood: Opt for a durable hardwood, such as oak or maple, which can withstand the weight and constant use of the knives.
- Measuring Tape: This will help you accurately determine the dimensions of the drawer and slots.
- Saw: A table saw or a hand saw will be necessary for cutting the wood to the desired size and shape.
- Sandpaper: Use sandpaper with varying grits (from coarse to fine) to smooth out any rough edges and ensure a polished finish.
- Wood Glue: A strong wood glue will be needed to secure the pieces together.
- Clamps: These will help hold the glued pieces in place while the adhesive sets.
- Finish: Choose a food-safe finish, such as mineral oil or beeswax, to protect the wood and enhance its natural beauty.
- Knife Slots Template: You can either create your own knife slots template or purchase one online to ensure consistent and accurate slot sizes.
These are the basic materials you will need to get started on your drawer knife block project. Gathering all the necessary materials beforehand will save you time and allow you to proceed smoothly through the remaining steps.
Step 1: Measure the Drawer
The first step in creating your drawer knife block is to accurately measure the dimensions of your drawer. This will ensure that the knife block fits perfectly and maximizes the use of space. Follow these steps:
- Empty the drawer: Remove all items from the drawer so you can take precise measurements.
- Measure the length, width, and depth of the drawer: Use a measuring tape to determine the exact dimensions of the drawer. Measure from the inner edges of the drawer to account for any handles or obstructions.
- Note down the measurements: Write down the measurements for reference when cutting the wood for the knife block.
It’s important to measure the drawer accurately to ensure the proper fit of the knife block. Taking accurate measurements will also help you determine how many knife slots can be accommodated in the block.
Keep in mind that the depth of the drawer is crucial when figuring out the size of the knife slots. You want to make sure the knives fit securely in the slots without sticking out too much, as this could pose a safety hazard.
Once you have measured the drawer, you can proceed to the next step of selecting the appropriate knife slots for your knife block.
Step 2: Select the Knife Slots
Choosing the right knife slots for your drawer knife block is essential to ensure that your knives are securely held in place. Follow these steps to select the appropriate knife slots:
- Consider the number and type of knives: Assess your knife collection and determine how many slots you will need. Take into account different knife sizes and types, such as chef’s knives, paring knives, and bread knives.
- Measure the width and thickness of the knives: Take precise measurements of the widest and thickest knives in your collection. These measurements will help determine the minimum width and depth of each slot.
- Allow for additional space: Add a small margin to the knife slot measurements to ensure the knives slide in and out smoothly without being too tight.
- Decide on the slot placement: Depending on the size and layout of your drawer, you can arrange the slots in a single row or multiple rows. Consider the overall aesthetics and functionality of the knife block.
Remember that it’s important to select knife slots that provide a snug fit for your knives. If the slots are too loose, the knives may wobble and become damaged. Conversely, if the slots are too tight, it can be difficult to remove the knives safely.
By carefully considering the number and type of knives, as well as their width and thickness, you can select the most suitable knife slots for your drawer knife block. Once you have decided on the knife slots, you can move on to the next step of cutting the slots in the wood.
Step 3: Cut the Slots
Now that you have chosen the knife slots for your drawer knife block, it’s time to cut the slots into the wooden block. Follow these steps to cut the slots:
- Secure the wood: Place the wood on a stable work surface and secure it with clamps to prevent it from shifting during cutting.
- Mark the slot positions: Use a pencil or a marking tool to indicate the positions of the knife slots on the wood. Make sure to leave enough space between each slot for easy insertion and removal of the knives.
- Set up the saw: Install a narrow blade or a dado blade on your table saw, with a width slightly larger than the thickness of the knives you measured in the previous step.
- Cut the slots: Carefully guide the wood through the saw, following the marked lines for each slot. Take your time to ensure precision and maintain a consistent depth for all slots.
- Test the fit: After cutting all the slots, test the fit of your knives in the slots. The knives should slide in and out smoothly without excessive play or resistance.
Pay close attention to safety precautions while operating the saw, such as wearing safety goggles and using a push stick to keep your fingers away from the blade. Remember to follow the manufacturer’s instructions for your specific saw model.
With the slots cut, you have successfully created the compartments for your knives. The next step is to sand and finish the wooden block to give it a polished and attractive appearance.
Step 4: Sand and Finish the Block
After cutting the slots in the wooden block, it’s time to sand and finish the block to ensure a smooth and visually appealing surface. Follow these steps to sand and finish the block:
- Sand the block: Start by using coarse-grit sandpaper to remove any rough edges or imperfections on the surface of the wooden block. Gradually move to finer-grit sandpaper to achieve a smoother finish.
- Round the edges: Use sandpaper or a sanding block to gently round the edges and corners of the block. This will not only enhance the look of the block but also prevent any sharp edges that might cause injury.
- Clean the block: Wipe away any dust or debris from the sanding process with a clean cloth or tack cloth. Ensure that the block is clean and free of any particles before applying the finish.
- Apply the finish: Choose a food-safe finish, such as mineral oil or beeswax, to treat the wooden block. Apply the finish evenly across the entire surface of the block, following the manufacturer’s instructions.
- Allow for drying: Let the finish dry completely as per the recommended drying time in the instructions. This will ensure that the finish properly seals the wood and enhances its natural beauty.
Sanding and finishing the block not only improve its appearance but also protect the wood from moisture and provide a smooth surface for easy cleaning. The finish will also highlight the natural grain and color of the wood, adding a touch of elegance to your drawer knife block.
With the block sanded and finished, you are ready to move on to the next step of installing the block in the drawer.
Step 5: Install the Block in the Drawer
Now that you have sanded and finished the wooden block, it’s time to install it in your drawer to create the perfect storage solution for your knives. Follow these steps to install the block:
- Clear the drawer space: Remove any existing items or organizers from the drawer to create ample space for the knife block.
- Position the block: Place the wooden block in the desired location within the drawer. Ensure it is centered and fits snugly without any wobbling.
- Secure the block: Use wood screws or adhesive to secure the block in place. If using screws, pre-drill pilot holes to prevent the wood from splitting. If using adhesive, apply a strong wood adhesive evenly on the bottom of the block to ensure a secure hold.
- Allow for drying: If you used wood screws, allow time for the adhesive to dry and bond the block securely to the drawer. Follow the adhesive manufacturer’s instructions for the recommended drying time.
By installing the block in the drawer, you create a dedicated space for your knives, keeping them organized and easily accessible while also freeing up countertop or wall space in your kitchen.
Before moving on to the next step, ensure that the block is securely attached to the drawer and does not move or shift when opening or closing it.
Now that the block is installed, you can proceed to the next step of arranging your knives in the block.
Step 6: Arrange Knives in the Block
With the knife block securely installed in the drawer, it’s time to arrange your knives in the block. Follow these steps to efficiently organize your knife collection:
- Select the knives to be stored: Choose the knives that you use most frequently or those that you want to have easy access to. Consider the size and shape of each knife when arranging them.
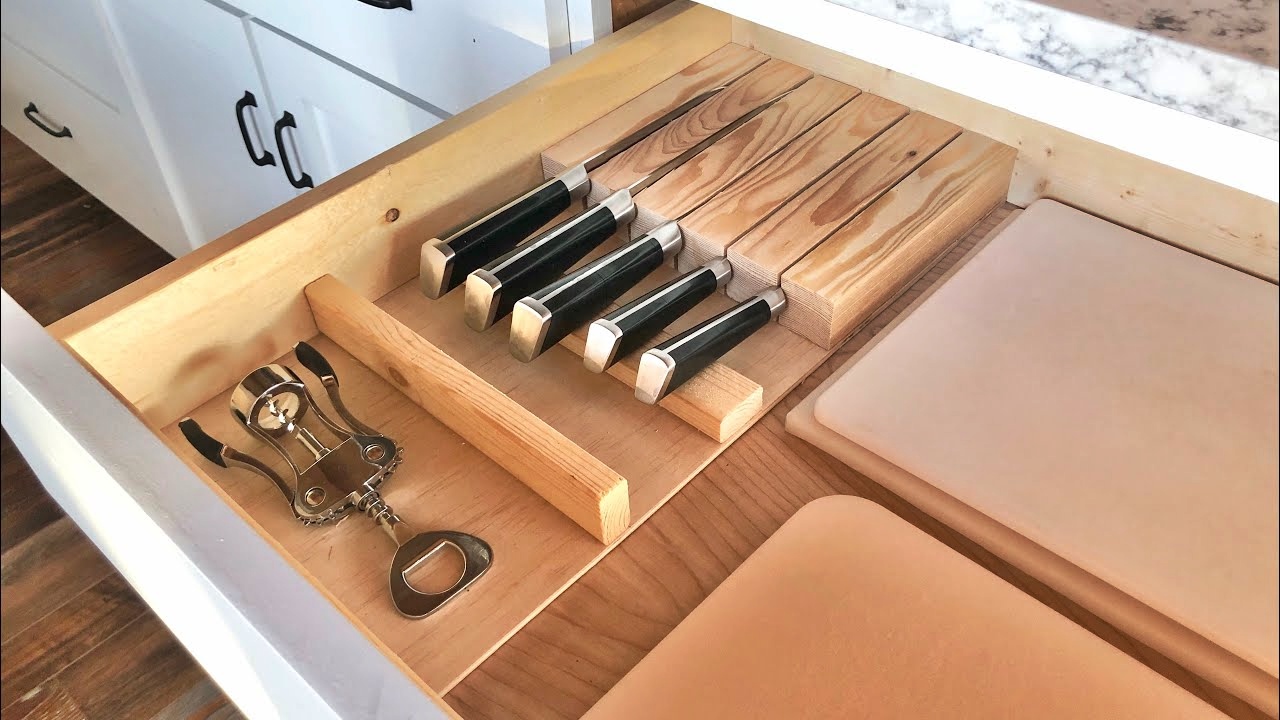
- Place the knives in the slots: Carefully insert each knife into its designated slot in the block. Ensure that the blades are facing down and the handles are securely resting in the slots.
- Arrange the knives strategically: Organize the knives based on size, type, or frequency of use, whichever works best for you. This will make it easier to locate the desired knife quickly while maintaining an organized and visually appealing arrangement.
- Fill the slots evenly: If you have multiple rows of knife slots, try to distribute the knives evenly across the block. This will help balance the weight and prevent the block from tipping or being top-heavy.
By arranging your knives in the block, you not only optimize the use of space but also protect the blades from potential damage and keep them within easy reach. This efficient organization will enhance your culinary experience and streamline your meal preparation process.
Take a moment to step back and admire your organized knife collection. With the knives arranged in the block, you’re ready to move on to the next step of securing the block in place.
Step 7: Secure the Block in Place
Securing the knife block in place ensures that it remains stable and prevents any movement or shifting during use. Follow these steps to securely hold the block in place:
- Check the stability: Before securing the block, make sure it is centered and level within the drawer. Ensure there is no wobbling or tilting.
- Choose the securing method: Depending on your preference and the materials available, you can choose from different securing methods, such as adhesive, Velcro strips, or additional screws.
- Adhesive method: If you prefer an adhesive method, apply a strong adhesive along the base of the block where it makes contact with the drawer. Press firmly to ensure a strong bond and leave it to dry according to the adhesive’s instructions.
- Velcro strips method: Alternatively, you can use Velcro strips. Attach one side of the Velcro to the bottom of the block and the other side to the drawer. Press the block firmly onto the Velcro to secure it in place.
- Additional screws method: If you want extra stability, you can add screws through the base of the block into the drawer. Pre-drill pilot holes to prevent splitting and use screws that are appropriate for the thickness of the wood.
Whichever method you choose, make sure the block is securely fastened and does not move when opening and closing the drawer. The goal is to provide a solid and stable foundation for your knife block.
Now that the block is securely held in place, you can proceed to the final step of enjoying your new drawer knife block and easily accessing your knives whenever you need them.
Step 8: Enjoy Your New Drawer Knife Block!
Congratulations! You have successfully completed the steps to create and install your very own drawer knife block. Now it’s time to enjoy the convenience, organization, and accessibility it brings to your kitchen. Here are some tips to fully enjoy your new drawer knife block:
- Maintain cleanliness: Regularly clean the knife block and the knives themselves to ensure optimal hygiene. Remove any food particles or debris from the slots in the block and wipe down the knives before placing them back.
- Handle with care: When inserting or removing knives from the block, handle them with caution to prevent any accidents or injuries. Hold the handle firmly and avoid touching the blade edges.
- Keep knives dry: Make sure your knives are completely dry before placing them in the block. This will help prevent rusting and maintain the sharpness of the blades.
- Reorganize as needed: Over time, you may acquire new knives or change your knife preferences. Don’t hesitate to reorganize the block to accommodate any additions or modifications to your knife collection.
- Share the knowledge: If you’re proud of your craftsmanship, share your experience and knowledge with friends and family. They may be inspired to create their own drawer knife blocks or seek your advice on kitchen organization.
Your new drawer knife block not only enhances the functionality of your kitchen but also adds a touch of elegance. It keeps your knives safely tucked away while showcasing them in a visually appealing manner.
With your knives easily accessible and organized, you’ll be able to prepare meals with efficiency and precision. Enjoy the convenience of having the right knife at your fingertips, making cooking a more enjoyable experience.
Take a step back and admire your newly created drawer knife block. Appreciate the craftsmanship and the sense of accomplishment that comes from completing a DIY project that enhances your kitchen space.
Now, it’s time to appreciate your new drawer knife block and delight in the ease and efficiency it brings to your culinary adventures. Happy cooking!