
Materials Needed
Before you embark on creating your own bath caddy, it’s important to gather all the materials you will need. Here is a list to help you get started:
- Wood: Choose a sturdy wooden board that is at least 1 inch thick.
- Measuring Tape: Use a measuring tape to accurately measure the dimensions of your bathtub.
- Saw: You will need a saw to cut the wooden board to the desired length.
- Sandpaper: Select sandpaper with different grits to smoothen the edges and surfaces of the wood.
- Drill: A drill will be necessary to create holes for the handles.
- Handles: Choose handles that are comfortable to hold and complement the aesthetic of your bath caddy.
- Stain or Paint: Decide whether you want to stain the wood for a natural look or paint it to match your bathroom decor.
- Protective Finish: Apply a protective finish, such as polyurethane, to seal and safeguard the wood from moisture.
- Non-Slip Grips: Add non-slip grips to ensure that the bath caddy stays securely in place on the edges of the bathtub.
- Optional Accessories: Consider adding built-in compartments for holding bath essentials, such as a book or tablet holder, a wine glass holder, or a candle tray.
Once you have gathered all the necessary materials, you can proceed to the next steps and create your very own bath caddy.
Step 1: Measure the Bathtub
Before you can start building your bath caddy, you need to measure the dimensions of your bathtub. This step ensures that your bath caddy will fit perfectly on the edges of your tub.
Grab a measuring tape and carefully measure the width of your bathtub. Take note of the widest part of the tub where you intend to place the bath caddy. Measure the length of the tub as well, from one end to the other, to determine the appropriate size for your caddy.
When measuring, keep in mind the space you want the caddy to occupy. Some people prefer a snug fit, while others want a little extra space for their bath essentials. It’s entirely up to you and your personal preferences.
Make sure to write down the measurements in a safe place or take a picture with your phone. This way, you can refer back to the measurements during the construction process.
Remember, accuracy is crucial in this step. Taking precise measurements will ensure that your bath caddy fits securely and functions properly.
After measuring the dimensions of your bathtub, you can move on to the next step: choosing the wood for your bath caddy.
Step 2: Choose the Wood
Choosing the right type of wood for your bath caddy is essential to ensure its durability and aesthetic appeal. There are several options available, each with its own unique characteristics and benefits.
When selecting the wood, consider its resistance to moisture and water damage. It’s important to choose a wood type that can withstand the humid environment of your bathroom.
Teak and cedar are popular choices for bath caddies due to their natural resistance to water. Both types of wood have natural oils and properties that make them highly resistant to rot and decay.
If you prefer a more budget-friendly option, pine or oak can also be suitable choices. However, keep in mind that these woods may require extra protection, such as regular sealing or varnishing, to prevent water damage.
Additionally, consider the aesthetics of the wood. Look for a wood species with a pleasing grain pattern and color that complements your bathroom decor. You can choose to match the wood with existing furniture or go for a contrasting look.
Another factor to consider is the thickness of the wood. A thicker board will provide more stability and strength for your bath caddy.
Once you have decided on the type of wood that suits your preferences and needs, you can proceed to the next step: cutting the wood to size.
Step 3: Cut the Wood to Size
Now that you have chosen the wood for your bath caddy, it’s time to cut it to the appropriate size. Cutting the wood accurately will ensure that your caddy fits perfectly on the edges of your bathtub.
Start by using a measuring tape to mark the desired length and width of your bath caddy on the wooden board. Double-check the measurements to ensure accuracy, and use a straight edge or ruler to draw clean lines.
Once you have marked the measurements, it’s time to cut the wood. Use a saw that is appropriate for the thickness of the wood. If you have access to a table saw or circular saw, these can provide precise and clean cuts. Alternatively, a hand saw or jigsaw can also get the job done.
When cutting the wood, make sure to follow the marked lines carefully and maintain a steady hand. Take your time to ensure a smooth and even cut. It is always better to cut less than needed initially and then make any necessary adjustments later.
Remember, measure twice and cut once! It’s important to be patient and take the time to get the cutting process right. A well-cut piece of wood will set the foundation for a sturdy and visually appealing bath caddy.
Once you have successfully cut the wood to the desired size, you are ready to move on to the next step: sanding the wood to create a smooth finish.
Step 4: Sand the Wood
After cutting the wood to the desired size, it’s time to smooth out the rough edges and create a polished finish. Sanding the wood will not only make it look more appealing but also ensure a comfortable and safe surface for your bath caddy.
Start by using coarse-grit sandpaper to remove any splinters, rough spots, or imperfections on the wood. Sand in the direction of the grain to avoid causing any scratches or damage. Use gentle, even pressure and continue sanding until the wood feels smooth to the touch.
As you progress, switch to finer-grit sandpaper to achieve a finer finish. This will help eliminate any remaining roughness and create a silky-smooth surface. Pay attention to the corners and edges of the wood, as these areas tend to be more challenging to sand thoroughly.
During the sanding process, periodically run your hand over the wood to check for any rough spots. If you find any, continue sanding until the entire surface is consistently smooth.
Once you are satisfied with the smoothness of the wood, use a damp cloth or tack cloth to remove any dust or debris. This will ensure a clean surface for the next steps of the process.
Sanding is an essential step that not only enhances the appearance of the wood but also prepares it for any staining or painting that you may choose to do in the next steps. Taking the time to properly sand the wood will result in a high-quality bath caddy that is pleasing to both the eye and touch.
With the wood fully sanded, you can now proceed to the next step: making the handles for your bath caddy.
Step 5: Make the Handles
The handles of your bath caddy are not only functional but also contribute to its overall aesthetic. Making your own handles allows you to customize your caddy and add a personal touch. Here’s how you can create the handles for your bath caddy:
First, select the material for your handles. You can choose from various options such as metal, wood, or even repurposed items like drawer pulls or cabinet knobs. Make sure the handles are comfortable to hold and have a design that complements your bath caddy.
Next, determine the desired length of your handles. Measure the width of the bath caddy and decide how far apart you want the handles to be. Remember to leave enough space in the middle for placing items on the caddy.
If you’re using wooden dowels or repurposed items, you may need to cut them to the desired length. Use a saw or a pair of cutters to trim the handles accordingly. Ensure that the handles are of equal length to maintain symmetry.
Once you have the handles at the desired length, you may want to consider sanding the edges or corners for a smoother finish. A gentle sanding or filing will help remove any sharp or rough edges, ensuring a comfortable grip.
If you’re using wooden dowels, you can also round off the ends using sandpaper or a wood file to add a more polished look to the handles.
After making any necessary adjustments or refinements to the handles, place them onto the bath caddy to ensure they fit properly. Make sure the handles are centered and spaced evenly from the edges of the caddy.
If you’re using repurposed items, you may need to attach them to the wood using screws or adhesive. Ensure they are securely fastened to withstand the weight of items placed on the caddy.
With the handles in place, you’re one step closer to completing your bath caddy. The next step is to attach the handles securely to the wood.
Step 6: Attach the Handles to the Wood
Now that you have made the handles for your bath caddy, it’s time to securely attach them to the wood. Properly attaching the handles will ensure that they are stable and can withstand the weight of items placed on the caddy. Follow these steps to attach the handles:
1. Position the handles: Place the handles on the outer edges of the bath caddy where you want them to be. Ensure that they are centered and evenly spaced from the edges. Mark the areas on the wood where the handle screws or bolts will go.
2. Pre-drill holes: Use a drill with a drill bit slightly smaller than the diameter of the screws or bolts you will be using. Carefully drill pilot holes in the marked areas on the wood. This will prevent the wood from splitting when you attach the handles.
3. Attach the handles: Position the handles over the pre-drilled holes and securely fasten them to the wood. If you’re using screws, place them through the holes in the handles and tighten them into the pre-drilled holes. If you’re using bolts, insert them through the holes in the handles and secure them with the appropriate nuts and washers on the underside of the wood.
4. Test the stability: After attaching the handles, give them a gentle tug to ensure they are securely fastened. Make any necessary adjustments to tighten the screws or bolts if needed.
5. Double-check alignment: Take a moment to check the alignment of the handles. Ensure they are straight and level with the surface of the bath caddy. Make any small adjustments if necessary.
By following these steps, you can confidently attach the handles to your bath caddy. With the handles securely in place, you can move on to the next step, which involves staining or painting the wood to enhance its appearance.
Step 7: Stain or Paint the Wood
Now that the handles are securely attached to the wood, it’s time to add a finishing touch to your bath caddy. Staining or painting the wood not only enhances its appearance but also helps protect it from moisture and wear. Follow these steps to stain or paint the wood:
1. Prepare the wood: Before applying any stain or paint, ensure that the wood surface is clean and dry. Use a damp cloth to remove any dust or debris. If necessary, lightly sand the wood to create a smooth surface for better stain or paint adhesion.
2. Choose your stain or paint: Select a stain or paint that suits your desired aesthetic and matches your bathroom decor. Keep in mind the color and finish you want to achieve. If you prefer a natural look, a wood stain will allow the grain to show through. If you want a pop of color, acrylic paint or wood paint can provide a vibrant finish.
3. Apply the stain or paint: Using a brush or a clean cloth, apply the stain or paint evenly over the surface of the wood. Follow the manufacturer’s instructions for the specific stain or paint you’ve chosen. Apply multiple coats if necessary, allowing each coat to dry completely before applying the next one. This will help achieve a more intense color or a smoother finish.
4. Wipe off excess (for stain): If you’re using a wood stain, after applying the stain, let it sit for a few minutes to allow it to penetrate the wood. Then, using a clean cloth, gently wipe off any excess stain. This will help create an even tone and prevent the stain from becoming too dark or uneven.
5. Allow it to dry: Once you have applied the stain or paint, allow the wood to dry completely. Follow the recommended drying time mentioned by the manufacturer. Ensure proper ventilation during the drying process to help the stain or paint cure properly.
6. Optional: Apply a sealant: If you want added protection and durability, consider applying a clear sealant or varnish over the stained or painted surface. This will help safeguard the wood from moisture and daily wear and tear.
By following these steps, you can transform the appearance of your bath caddy and make it visually appealing. After allowing the stain or paint to dry, you can proceed to the next step: applying a protective finish.
Step 8: Apply a Protective Finish
Once you have stained or painted your bath caddy, it’s important to apply a protective finish to ensure its longevity and durability. A protective finish will help shield the wood from moisture, scratches, and everyday wear and tear. Follow these steps to apply a protective finish:
1. Select an appropriate finish: There are various options for protective finishes, such as polyurethane, varnish, or lacquer. Choose a finish that is suitable for your wood type and desired level of sheen. Consider whether you want a glossy or matte finish.
2. Prepare the surface: Before applying the protective finish, ensure that the stained or painted surface is clean and dry. Use a soft cloth or brush to remove any dust or debris that may have settled on the wood.
3. Apply the protective finish: Using a clean brush or cloth, apply the protective finish in smooth, even strokes. Follow the manufacturer’s instructions for the specific finish you’ve chosen. Ensure that the entire surface is covered, including the handles and all sides of the bath caddy. Be careful to avoid drips or pooling of the finish.
4. Allow it to dry: After applying the protective finish, allow it to dry according to the recommended drying time provided by the manufacturer. Ensure that the drying area is well-ventilated to aid in the curing process. Avoid touching or placing items on the bath caddy until the finish is fully dry.
5. Sand between coats (optional): Depending on the specific finish you’ve chosen, you may want to lightly sand the surface between coats. This will help create a smoother finish and improve adhesion for subsequent coats. Follow the manufacturer’s instructions for the appropriate grit of sandpaper and technique to use.
6. Apply additional coats (optional): If desired, apply additional coats of the protective finish to enhance its durability. Follow the recommended drying time between each coat and sand lightly between coats if necessary.
By applying a protective finish, you are taking steps to ensure that your bath caddy remains in excellent condition over time. The next step involves adding non-slip grips to the bottom to prevent any accidents in the bathtub.
Step 9: Add Non-Slip Grips
Adding non-slip grips to your bath caddy is essential for ensuring the safety and stability of your caddy while in use. Non-slip grips prevent the caddy from sliding or moving around on the edges of the bathtub. Here’s how you can add non-slip grips to your bath caddy:
1. Choose the appropriate non-slip grips: There are various non-slip grip options available, such as adhesive strips, suction cups, or rubber pads. Select a type that suits your preference and the surface of your bathtub.
2. Clean the bottom of the bath caddy: Before applying the non-slip grips, ensure that the bottom surface of the caddy is clean and dry. Remove any dust, debris, or residual adhesive from previous steps using a damp cloth or mild cleaning solution.
3. Apply adhesive strips: If you’ve opted for adhesive strips, carefully peel off the backing and apply them to the bottom surface of the bath caddy. Ensure that they are evenly spaced and firmly adhered to the wood. Press down firmly to ensure a secure bond.
4. Attach suction cups: If you’re using suction cups, wet the bottom surface of the cups and press them firmly onto the desired locations on the bottom of the bath caddy. Make sure they are securely attached and provide enough grip to prevent the caddy from sliding.
5. Place rubber pads: Rubber pads are another option for non-slip grips. Simply position them at the corners or along the bottom surface of the caddy to provide stability and prevent any movement. Ensure that they are firmly in place.
6. Test the stability: Once the non-slip grips are in place, give the bath caddy a gentle push or tug to check if it remains secure and stable on the edges of the bathtub. Make any adjustments if needed to ensure optimal grip and stability.
By adding non-slip grips to your bath caddy, you are taking an important step to ensure a safe and enjoyable bathing experience. With the grips in place, you’re ready to move on to the final step: enjoy your beautifully crafted bath caddy!
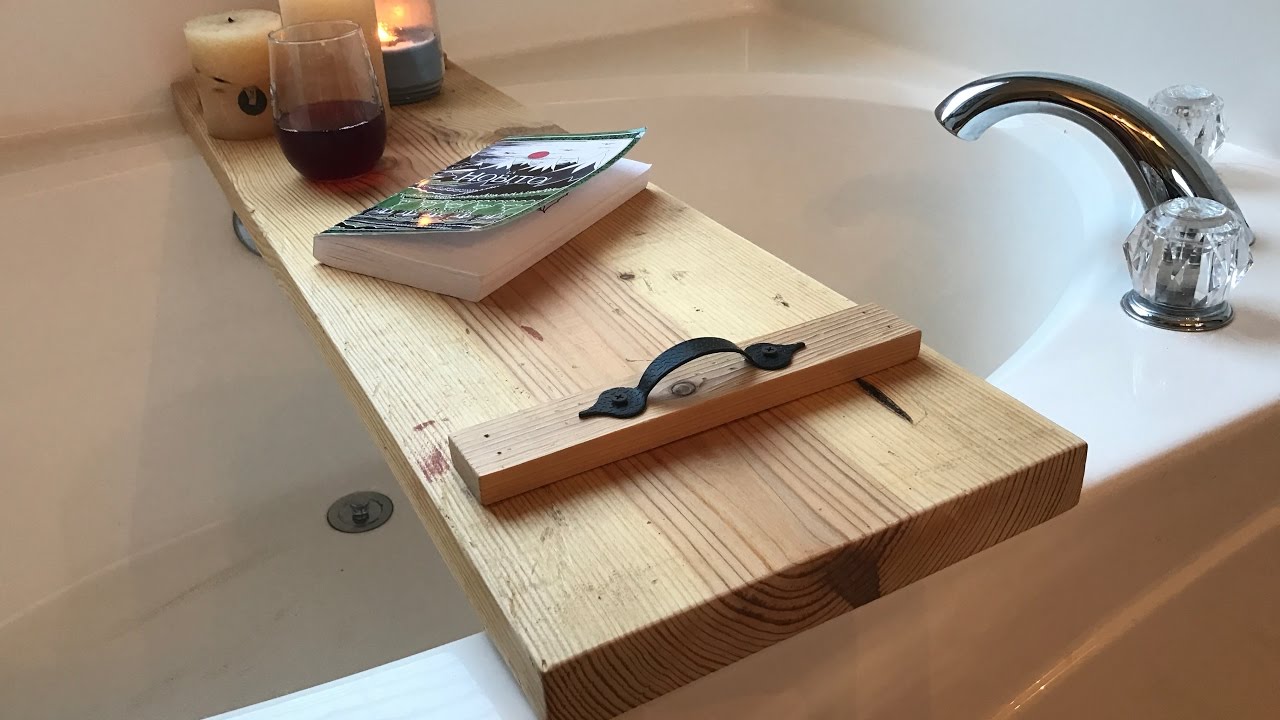
Step 10: Enjoy Your Finished Bath Caddy
Congratulations! You have completed all the steps and now have a beautifully crafted and functional bath caddy. It’s time to sit back, relax, and enjoy the fruits of your labor. Here’s how you can fully enjoy your finished bath caddy:
1. Place it on the bathtub: Carefully place your bath caddy on the edges of your bathtub, ensuring that it is securely resting on the sides. The non-slip grips you added will help keep it in place during your baths.
2. Organize your bath essentials: Arrange your bath essentials such as soaps, shampoos, candles, or a book or tablet holder on the caddy. The built-in compartments, if any, can help keep your items organized and easily accessible while you relax in the tub.
3. Set the mood: Take the opportunity to create a soothing ambiance in your bathroom. Light some candles, play soft music, or dim the lights for a calming and spa-like atmosphere.
4. Enjoy a pampering bath: With your bath caddy, you can now enjoy a luxurious and comfortable bathing experience. Read a book, catch up on your favorite TV show, or simply indulge in a hot, relaxing soak. The caddy provides a convenient surface to keep everything you need within arm’s reach.
5. Maintain the caddy: After each use, wipe down the bath caddy with a clean cloth to remove any moisture or soap residue. This will help keep it in good condition and prevent any unwanted staining or wear.
6. Personalize it: Feel free to add personal touches to your bath caddy. You can decorate it with small plants, decorative stones, or other elements that reflect your unique style and taste.
By following these steps and enjoying your finished bath caddy, you can enhance your bathing routine and create a serene environment for self-care and relaxation.
Now, sit back, unwind, and enjoy the comfort and convenience that your beautifully crafted bath caddy brings to your bathing experience.