
Types of Shower Caddies
When it comes to keeping your shower essentials organized and easily accessible, the right shower caddy can make all the difference. There are several types of shower caddies to choose from, each with its own unique features and benefits. Here are some of the most common types:
- Over-the-Showerhead Caddies: These caddies hang over the showerhead and usually have multiple shelves or compartments to store your toiletries. They are easy to install and remove, making them a popular choice for those who want a versatile option.
- Hanging Caddies: These caddies typically have a hook or loop that allows them to be hung from the shower curtain rod or a shower door handle. They come in various sizes and designs, offering different storage options.
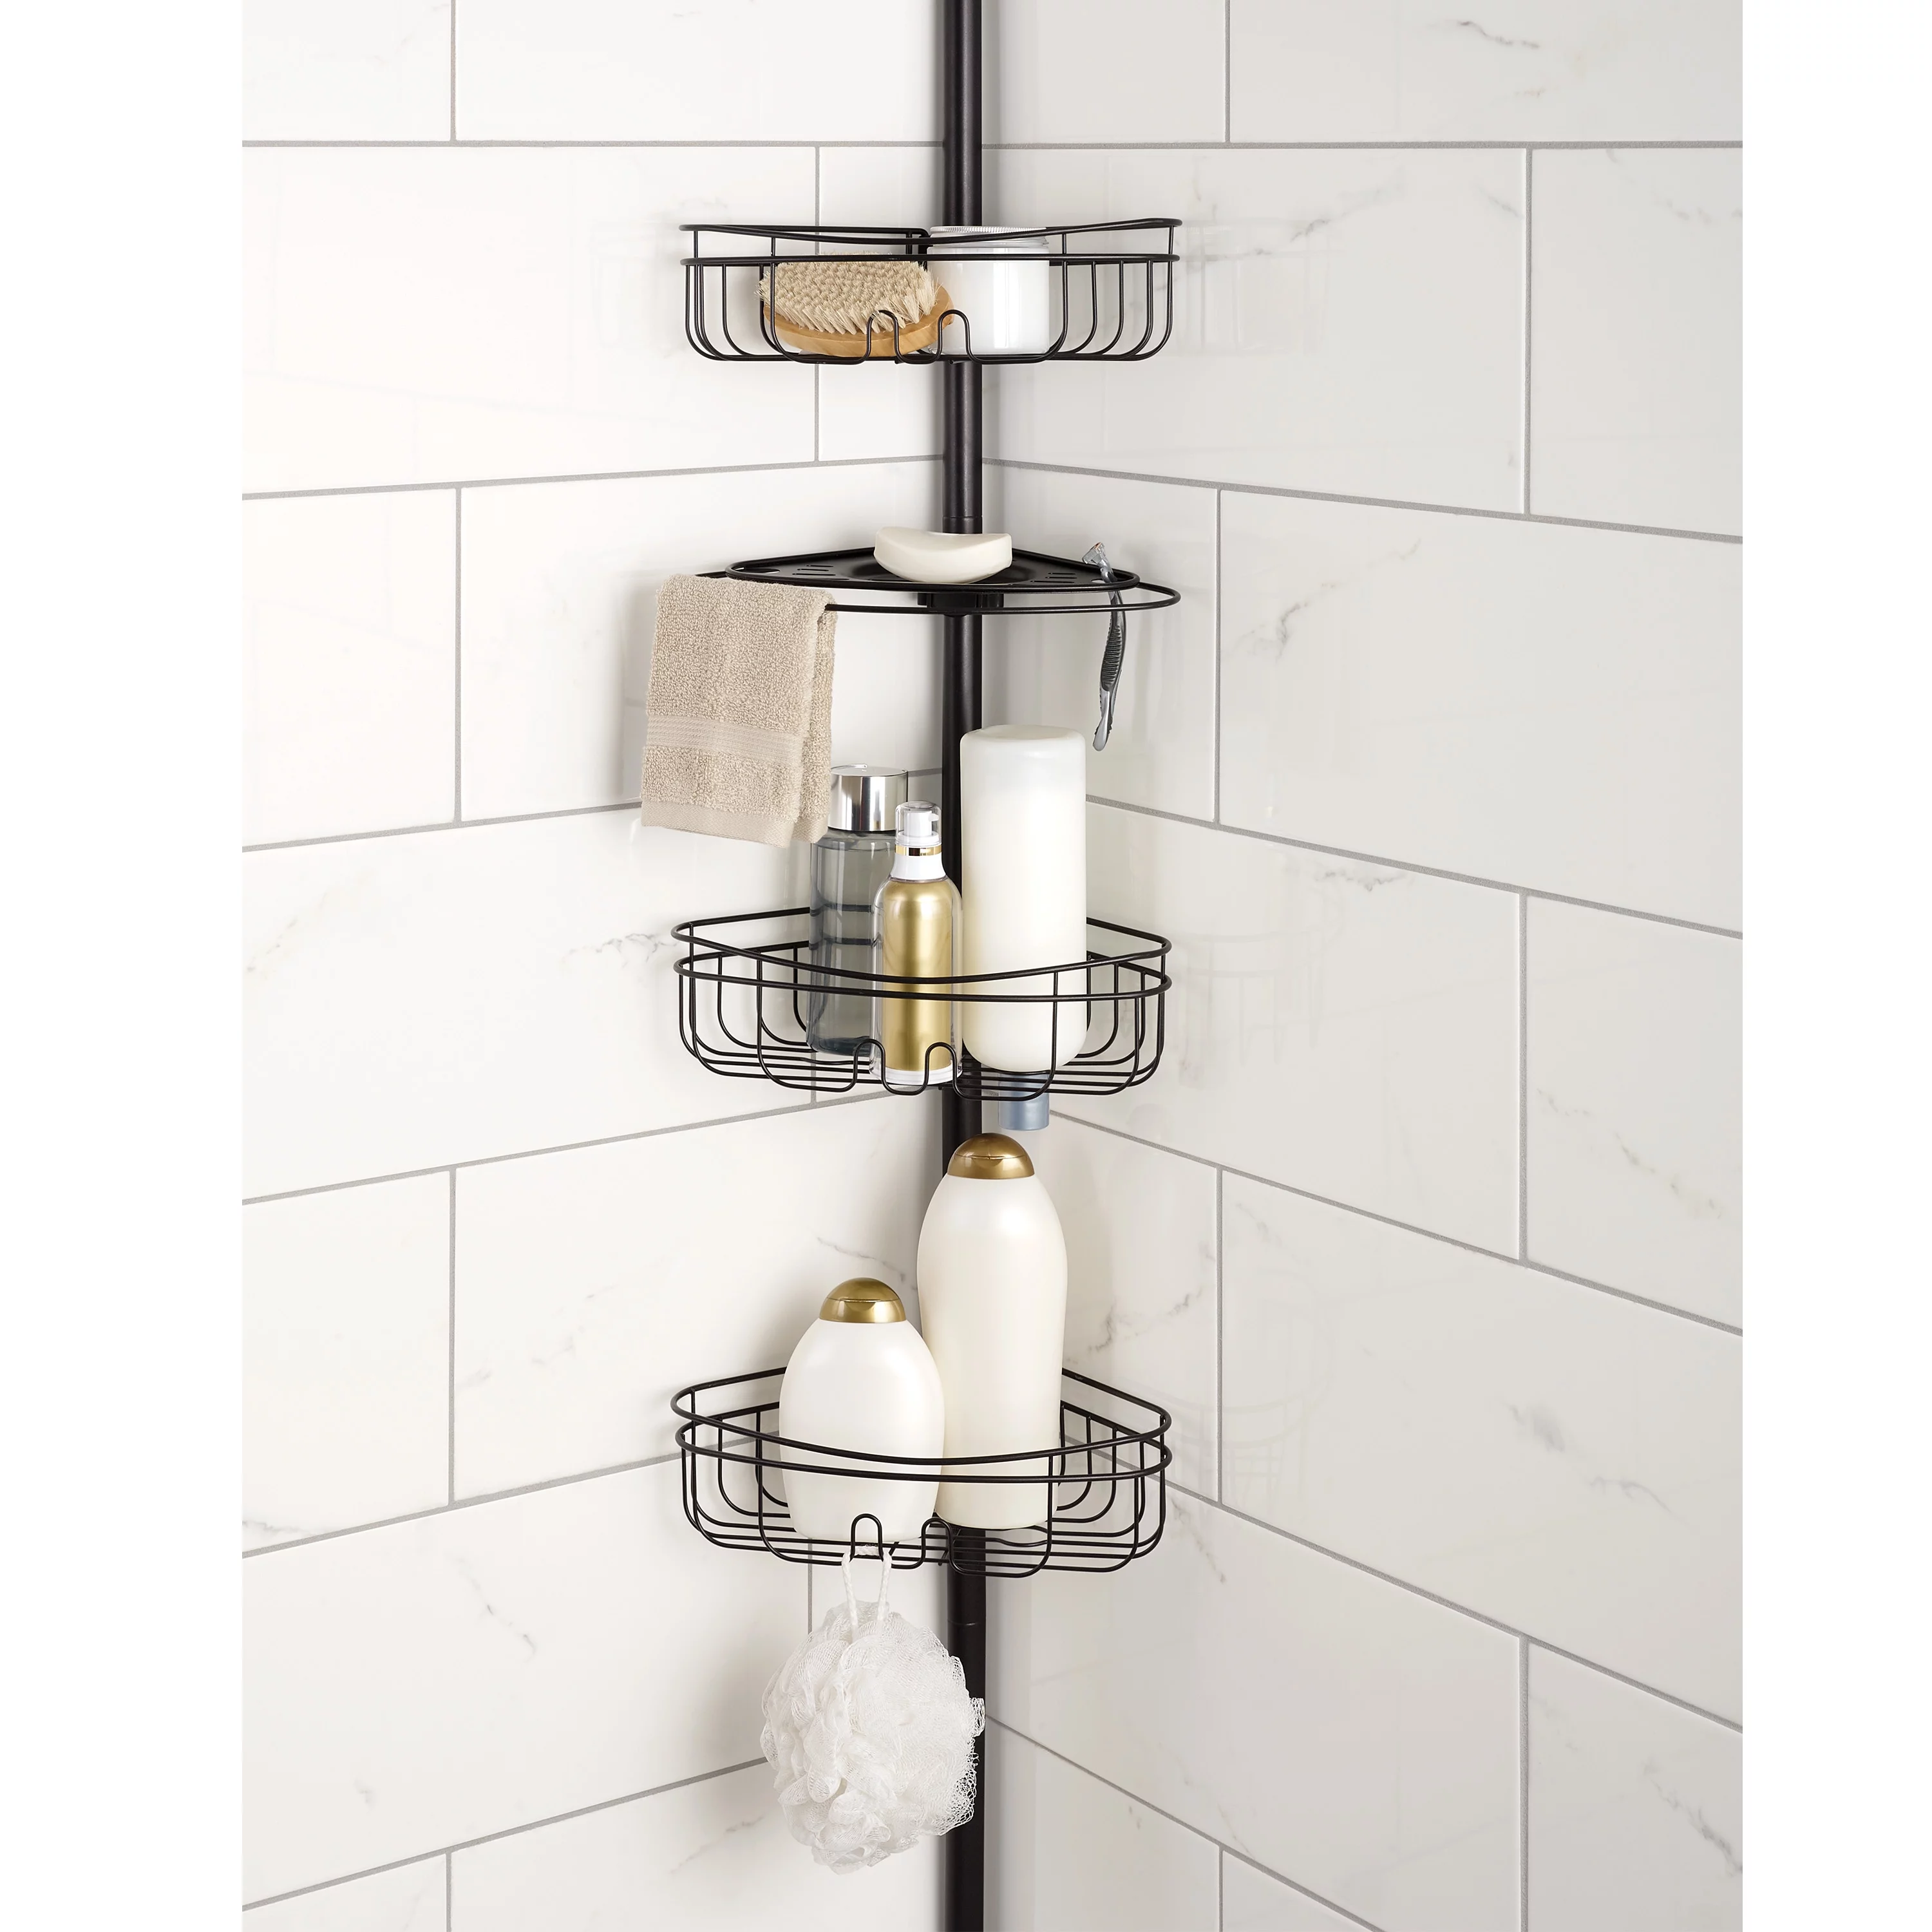
- Tension Pole Caddies: These caddies are designed to fit securely between the floor and ceiling of your shower, eliminating the need for any drilling or mounting. They offer adjustable shelves and are known for their stability.
- Suction Cup Caddies: These caddies come with suction cups that allow you to attach them to the shower wall or tiles. They are easy to install and remove, but their stability can vary depending on the quality of the suction cups and the surface they are attached to.
- Corner Caddies: These caddies are specifically designed to fit in the corners of your shower, maximizing the use of space. They usually have triangular or curved shelves to accommodate different-sized items.
Choosing the right shower caddy for your bathroom depends on your personal preferences, available space, and the type of shower you have. Consider the size of your toiletries, the amount of storage you need, and the overall aesthetics of your bathroom when making your decision. Whether you opt for an over-the-showerhead caddy, a hanging caddy, a tension pole caddy, a suction cup caddy, or a corner caddy, keeping your shower essentials organized and within reach will be a breeze.
Choosing the Right Shower Caddy for Your Bathroom
With so many different types and styles of shower caddies available, finding the right one for your bathroom can be a bit overwhelming. However, by considering a few key factors, you can easily narrow down your options and choose a shower caddy that perfectly suits your needs.
Size: Take into account the available space in your shower and the number of toiletries you need to store. Measure the dimensions of your shower area to ensure that the caddy you choose fits comfortably without obstruction.
Material: Shower caddies come in various materials such as stainless steel, plastic, or aluminum. Each material has its own advantages. Stainless steel caddies are durable and resistant to rust, while plastic caddies are lightweight and easy to clean. Consider the overall aesthetic of your bathroom and choose a material that complements it.
Design: Consider the design and layout of the caddy as well. Look for features such as adjustable shelves, hooks for hanging loofahs or razors, and compartments for different-sized items. A well-designed caddy will help you keep your shower essentials organized and easily accessible.
Installation: Choose a caddy that is easy to install and doesn’t require complex tools or drilling. If you’re renting or want a temporary option, adhesive or suction cup caddies might be a better choice. If you prefer a more stable and permanent solution, tension pole or mounted caddies will be the way to go.
Budget: Consider your budget when choosing a shower caddy. They range in price from affordable options to more high-end models. Evaluate the features that are most important to you and find a balance between quality and price.
Reviews: Before making a purchase, take some time to read reviews from other customers. The experiences and feedback of others can give you valuable insights into the durability, stability, and overall quality of the shower caddy you are considering.
By considering these factors and doing a little bit of research, you can find the perfect shower caddy for your bathroom. Remember to choose one that fits your space, complements your bathroom’s aesthetic, has the right features, and falls within your budget. With the right shower caddy, you can keep your shower essentials organized and add a touch of convenience to your daily routine.
Ensuring a Secure Installation
Once you have chosen the perfect shower caddy for your bathroom, it is crucial to ensure a secure installation. A properly installed shower caddy will not only keep your toiletries organized but also prevent it from falling or slipping during use. Here are some tips to ensure a secure installation:
Follow the Instructions: Read and follow the installation instructions provided by the manufacturer. Different types of shower caddies may have specific instructions for installation, including the use of certain tools or techniques.
Clean and Dry the Surface: Before installing the shower caddy, make sure the mounting surface is clean and dry. Remove any soap scum, residue, or existing adhesive from the wall. A clean surface will help the adhesive or suction cups adhere properly.
Use the Right Tools and Hardware: If your shower caddy requires screws, anchors, or brackets for installation, make sure to use the right tools to secure it properly. Use a drill or screwdriver and follow the recommended guidelines for hardware installation.
Consider the Weight Capacity: Be mindful of the weight capacity of your shower caddy and avoid overloading it with heavy items. Distribute the weight evenly across the shelves or compartments to maintain stability.
Regularly Check and Tighten: Periodically check the tightness of the mounting hardware or suction cups. Over time, these may loosen due to frequent use or changes in temperature. Tighten them if necessary to keep the shower caddy securely in place.
Adjust and Test: Once the shower caddy is installed, adjust the height or position according to your preference. Test its stability by gently pulling or exerting pressure on it. If it feels wobbly or insecure, reevaluate the installation and make any necessary adjustments.
Consider Additional Mounting Options: For added stability, you can explore additional mounting options. Using adhesive hooks or double-sided tape can provide extra support for hanging caddies. Tension pole caddies can be further secured by adjusting the tension mechanism or adding rubber grips to the ends.
By following these tips, you can ensure a secure installation of your shower caddy, giving you peace of mind while using the shower. Remember to review the manufacturer’s instructions, clean and prep the mounting surface, use the correct tools and hardware, and regularly check and tighten the installation. With a properly installed shower caddy, you can enjoy a clutter-free shower experience without any worries.
Cleaning and Maintaining Your Shower Caddy
To keep your shower caddy looking its best and functioning optimally, regular cleaning and maintenance are essential. Here are some tips to help you effectively clean and maintain your shower caddy:
Remove and Clean Regularly: Take your shower caddy out of the shower periodically for a thorough cleaning. This will prevent the buildup of soap scum, mold, and mildew. Follow the manufacturer’s instructions for removing the caddy, as some may have specific detachable components.
Clean with Mild Cleansers: Use a mild cleanser or soap along with warm water to clean the shower caddy. Avoid using harsh chemicals or abrasive cleaners, as these can damage the finish or material of the caddy. A soft brush or cloth can be helpful for scrubbing away any stubborn residue.
Rinse Thoroughly: After cleaning, rinse the shower caddy thoroughly with clean water to remove any remaining cleanser. This will help prevent any residue from building up and ensure that the caddy remains free of any chemicals or soap.
Dry Completely: After rinsing, make sure the shower caddy is completely dry before placing it back in the shower. Moisture can promote the growth of mold and mildew. Use a dry towel or cloth to wipe off any excess water and allow the caddy to air dry fully.
Prevent Rust: If your shower caddy is made of metal, it is important to take steps to prevent rust. Apply a layer of clear nail polish or a rust-resistant coating to any exposed metal parts. Additionally, avoid using metal cleaning tools or abrasive materials that can scratch the surface, making it more prone to rust.
Check for Damage: Regularly inspect your shower caddy for any signs of damage or wear. Look for loose screws or mounting hardware, cracked or broken components, or any other issues that may compromise the stability or functionality of the caddy. Address any issues promptly to prevent further damage.
Organize and Declutter: Keep your shower caddy organized by regularly decluttering its contents. Remove any empty bottles or expired products to free up space and maintain a neat and organized appearance. This will also prevent unnecessary strain on the caddy and help extend its lifespan.
By following these cleaning and maintenance tips, you can keep your shower caddy in great shape for years to come. Regular cleaning will prevent the buildup of grime, mold, and mildew, ensuring that your shower essentials stay clean and hygienic. Additionally, inspecting the caddy for damage and taking preventative measures can help maintain its stability and functionality. With good care, your shower caddy will continue to serve you well and enhance your showering experience.
Using Adhesive Hooks for Added Stability
If you’re looking for an additional layer of stability for your shower caddy, adhesive hooks can be a great solution. Adhesive hooks provide a simple and non-permanent method for securing your caddy to the wall, ensuring that it stays in place during use. Here’s how you can use adhesive hooks to add stability to your shower caddy:
Choose the Right Type of Adhesive Hooks: There are various types of adhesive hooks available on the market, each designed to support different weights. Look for hooks that are specifically designed for use in the bathroom or shower, as they are more likely to be water-resistant and withstand the humid environment. Consider the weight capacity of the hooks and choose ones that can support the weight of your shower caddy.
Prepare the Surface: Before applying the adhesive hooks, make sure the mounting surface is clean and dry. Remove any soap residue or oils from the wall to ensure optimal adhesion. Use a mild cleanser and a soft cloth to clean the area thoroughly, and allow it to dry completely before proceeding.
Position the Hooks: Determine the ideal position for the adhesive hooks based on the placement of your shower caddy. Consider the height and accessibility of the caddy and ensure that it will be easily reachable during your shower. Use a pencil or marker to mark the desired locations for the hooks on the wall.
Apply the Adhesive Hooks: Peel off the backing of the adhesive hooks and firmly press them onto the marked locations on the wall. Make sure to apply even pressure to ensure a good bond. Follow the manufacturer’s instructions for the specific adhesive hooks you are using, as application methods may vary.
Allow for Proper Adhesion: Let the adhesive hooks sit undisturbed for the recommended amount of time to allow for proper adhesion. This will ensure that the hooks are securely attached to the wall. Avoid hanging any weight on the hooks until they are fully cured and ready to bear the load.
Hang and Secure the Caddy: Once the adhesive hooks are securely attached, hang your shower caddy on the hooks and ensure that it is stable. Gently tug on it to make sure it doesn’t move or wobble excessively. Adjust the position of the hooks or the caddy as needed to achieve the desired stability.
Regularly Check and Replace: Periodically check the adhesive hooks to ensure that they are still firmly attached to the wall. Over time, the adhesive may weaken or wear off, especially in a humid environment. If you notice any signs of loosening or instability, replace the adhesive hooks with new ones to maintain the stability of your shower caddy.
By using adhesive hooks, you can add an extra layer of stability to your shower caddy without the need for drilling or permanent fixtures. Keep in mind that the effectiveness of adhesive hooks may vary depending on the surface material and humidity level in your bathroom. Experiment with different brands or models if necessary to find the one that works best for your specific shower conditions. With adhesive hooks, you can enjoy a secure and organized showering experience, knowing that your caddy is staying in place.
Using a Tension Pole Shower Caddy
If you prefer a stable and versatile option for organizing your shower essentials, a tension pole shower caddy can be a great choice. Tension pole caddies are designed to fit securely between the floor and ceiling of your shower, eliminating the need for drilling or mounting. Here’s how you can effectively use a tension pole shower caddy:
Select the Right Tension Pole: Before purchasing a tension pole shower caddy, measure the height of your shower from floor to ceiling. Choose a caddy that has an adjustable height range to ensure a proper fit. Consider the number of shelves and compartments as well, based on the amount of storage space you need.
Assembly and Installation: Follow the manufacturer’s instructions to assemble the tension pole shower caddy. Extend the pole to the maximum height that fits your shower, then twist and lock it in place to secure it between the floor and ceiling. Make sure that the tension is strong enough to hold the caddy in place without causing any damage to the shower walls or ceiling.
Organization and Storage: Once the tension pole is secured, start organizing your shower essentials on the shelves and compartments of the caddy. Separate items according to their respective categories, such as shampoo, conditioner, body wash, and loofahs. Consider the shelf positions and adjust them based on the height of your toiletries for easy access during your shower.
Stability and Balance: To ensure stability, distribute the weight evenly across the shelves of the tension pole caddy. Avoid overloading any single shelf or compartment with heavy items. This will help maintain the balance of the caddy and reduce the risk of it toppling over. Regularly check and adjust the mounted tension pole to ensure that it remains securely in place.
Adjustments and Maintenance: Periodically reevaluate the positioning of your tension pole shower caddy as needed. Adjust the height of the shelves or compartments to accommodate any changes in your shower essentials. Additionally, regularly clean the caddy and remove any excess buildup of soap residue or grime to maintain its appearance and functionality.
Consider Additional Features: Some tension pole shower caddies come with additional features such as hooks or towel bars. These can be used to hang loofahs, razors, or towels, providing easy access and maximizing the use of the caddy. Evaluate your needs and choose a caddy with the features that will enhance your showering experience.
By using a tension pole shower caddy, you can efficiently organize your shower essentials while ensuring stability and ease of access. Enjoy the convenience of having your toiletries readily available within arm’s reach. Remember to assemble and install the tension pole caddy correctly, distribute weight evenly, and perform regular maintenance to keep it in optimal condition. With a tension pole shower caddy, you can transform your shower experience into a clutter-free and enjoyable routine.
Installing a Shower Caddy with Suction Cups
For a quick and easy installation option, a shower caddy with suction cups can be a convenient choice. Suction cup shower caddies provide a non-permanent solution for organizing your shower essentials, without the need for drilling or mounting. Here’s how you can effectively install a shower caddy with suction cups:
Select the Right Shower Caddy: Choose a shower caddy that is specifically designed to be installed with suction cups. Look for a caddy with strong and reliable suction cups that can securely adhere to smooth, non-porous surfaces such as tile or glass. Consider the size and number of shelves or compartments to suit your storage needs.
Prep the Surface: Before installing the shower caddy, prepare the mounting surface by cleaning it thoroughly. Use a mild cleanser and a soft cloth to remove any soap residue or oils from the tiles or glass. Make sure the surface is completely dry before proceeding.
Moisten the Suction Cups: Moisten the suction cups by running them under water or dampening them with a wet cloth. This helps create a better seal and enhances the suction power. Avoid using oils or soapy substances, as these can reduce the effectiveness of the suction cups.
Position the Caddy: Determine the ideal position for the shower caddy on the wall. Consider the height and reachability of the shelves or compartments. Once you have decided on the position, press the suction cups firmly against the wall, ensuring that they are securely attached.
Press and Release: Apply firm pressure to the shower caddy against the wall to create a strong suction. Make sure all the suction cups are fully engaged. Gently tug on the caddy to check its stability. If it moves or feels loose, readjust the suction cups and repeat the process until it is securely in place.
Regular Maintenance: Periodically check the suction cups to ensure they are still securely attached. Suction cups may lose their suction over time due to changes in temperature or humidity. If you notice any signs of loosening or instability, simply moisten the suction cups again and reapply them to restore their adhesion.
Avoid Heavy Weight and Excessive Movement: Keep in mind that suction cup shower caddies are not designed to support heavy items or constant movement. Avoid placing overly heavy bottles or objects on the caddy, as this may cause the suction cups to detach. Use the caddy for lightweight toiletries and minimize excess movement to maintain stability.
Installing a shower caddy with suction cups provides a convenient and versatile way to organize your shower essentials without permanent fixtures. Remember to choose a caddy with reliable suction cups, prepare the mounting surface properly, and apply firm pressure when installing. Regularly check the suction cups for security and adjust them as necessary. With a well-installed suction cup shower caddy, you can enjoy an organized showering experience with easy access to your toiletries.
Reinforcing a Shower Caddy with Zip Ties
If you’re looking for a simple and effective way to reinforce the stability of your shower caddy, using zip ties can be a great solution. Zip ties provide an additional level of security by attaching the shower caddy to the showerhead or other fixtures. Here are the steps to effectively reinforce a shower caddy with zip ties:
Choose the Right Zip Ties: Select zip ties that are strong and durable. Opt for ones that are designed for outdoor or heavy-duty use, as they tend to have a higher tensile strength. Consider the length and width of the ties based on the size and weight of your shower caddy.
Position the Caddy: Determine the ideal position for your shower caddy in relation to the showerhead or other fixtures you plan to secure it to. Make sure the caddy is positioned at a convenient height and location for easy access to your shower essentials.
Attach Zip Ties: Wrap the zip ties around the shower caddy and the selected fixture, such as the showerhead arm or a sturdy pipe, ensuring that they are tightened securely. Use pliers to tighten the zip ties further if needed, to achieve a tight and stable attachment.
Space the Zip Ties Evenly: Depending on the design and structure of your shower caddy, you may need to use multiple zip ties to reinforce its stability. Space the zip ties evenly around the caddy, making sure they are tightened securely and provide balanced support.
Trim Excess Zip Tie Length: Once the zip ties are securely fastened, use a pair of wire cutters or scissors to trim the excess length. Be careful not to damage the caddy or any surrounding fixtures during this process.
Check Stability: Gently test the stability of the shower caddy by applying slight pressure and verifying that it remains firmly attached. Tug on the caddy to ensure it does not move or wobble excessively. If necessary, readjust the zip ties or tighten them further to enhance stability.
Regular Maintenance: Periodically check the zip ties for any signs of wear or loosening. Over time, the zip ties may become worn or loose due to the humid environment of the shower. Replace any damaged or weakened zip ties to maintain the reinforcement of your shower caddy.
Reinforcing your shower caddy with zip ties provides an extra level of stability and security, preventing it from slipping or falling during use. Remember to choose quality zip ties, attach them securely to the shower caddy and a stable fixture, and trim any excess length. Regularly check the integrity of the zip ties to ensure they are providing the necessary reinforcement. With the added support of zip ties, you can enjoy a secure and organized showering experience.
Utilizing Over-the-Door Shower Caddies
When it comes to maximizing storage space and convenience in your bathroom, over-the-door shower caddies offer a practical solution. These caddies are designed to hang over the shower door or bathroom door, providing easy access to your shower essentials without the need for drilling or permanent fixtures. Here’s how you can effectively utilize over-the-door shower caddies:
Select the Right Caddy: Choose an over-the-door shower caddy that is specifically designed for this purpose. Look for one that is made of rust-resistant materials, such as stainless steel or plastic, to ensure durability in the moist bathroom environment. Consider the number of shelves or compartments based on your storage needs.
Fitting the Caddy: Measure the thickness of your shower or bathroom door to ensure that the caddy will fit securely. Most over-the-door caddies come with adjustable hooks or brackets that can accommodate different door thicknesses. Adjust the hooks or brackets to properly fit your door and ensure stability.
Prep the Door: Before hanging the caddy, clean the surface of the door where the hooks or brackets will make contact. Remove any dust, dirt, or residue to ensure a secure fit. Use a mild cleanser and a soft cloth to wipe down the door and dry it thoroughly.
Hang the Caddy: Position the over-the-door caddy on the door, ensuring that the hooks or brackets are securely in place. Hang the caddy over the door, making sure it is level and balanced. Adjust the hooks or brackets as necessary to achieve a stable fit.
Weight Distribution: When placing items in the caddy, distribute the weight evenly across the shelves or compartments. Avoid overloading a single shelf with heavy items, as this can cause the caddy to become unbalanced or put excess strain on the hooks or brackets.
Regular Maintenance: Periodically check the stability of the over-the-door caddy to ensure it remains securely in place. If you notice any signs of wobbling or instability, adjust the hooks or brackets and ensure they are tightened properly. Additionally, clean the caddy regularly to prevent the accumulation of soap residue or grime.
Consider Door Usage: Keep in mind that the over-the-door caddy may impact the opening and closing of the bathroom or shower door. Ensure that the caddy doesn’t interfere with the door’s functionality or cause any inconvenience during use.
By utilizing an over-the-door shower caddy, you can optimize storage space in your bathroom and have easy access to your shower essentials. Choose a caddy that fits securely on your door, clean and prep the door surface, distribute weight evenly, and perform regular maintenance to keep the caddy stable and functional. With an over-the-door caddy, you can keep your shower organized and make the most of your bathroom space.
Hanging Shower Caddies with Command Hooks
When it comes to hanging shower caddies without the need for drilling or causing damage to your walls, Command Hooks offer a simple and effective solution. These adhesive hooks are easy to install and remove, making them a popular choice for organizing your shower essentials. Here’s how you can effectively hang shower caddies with Command Hooks:
Choose the Right Command Hooks: Select Command Hooks that are suitable for use in the bathroom and can support the weight of your shower caddy. Check the weight capacity indicated on the package and choose hooks that can comfortably hold the caddy and its contents.
Prep the Surface: Clean the area of the wall where you plan to attach the Command Hooks. Use rubbing alcohol or a mild cleanser to remove any dirt, oils, or residue. Make sure the surface is completely dry before proceeding.
Position the Hooks: Determine the desired position and height for your shower caddy. Place the Command Hooks on the wall in the desired locations, following the recommendations provided by the manufacturer. Space the hooks evenly and ensure they are level for a balanced caddy.
Attach the Hooks: Remove the backing from the adhesive strip on the Command Hooks and firmly press the hooks against the wall, holding for a few seconds to ensure a strong bond. Follow the instructions provided by the manufacturer for the best adhesion and to ensure proper setup.
Wait for Adhesion: Allow the adhesive to bond with the wall surface. It is crucial to wait the recommended amount of time indicated on the Command Hooks package before adding any weight to the hooks. This will ensure a strong and secure hold.
Hang the Shower Caddy: Once the Command Hooks are securely attached, hang your shower caddy on the hooks. Ensure that the caddy is properly balanced and not overloaded on one side. Gently tug on the caddy to check its stability and adjust the hooks if necessary.
Regular Maintenance: Periodically inspect the Command Hooks to ensure they are securely attached and have not become loose. If you notice any signs of weakening or instability, remove the hooks and replace them with new ones to ensure the safety and security of your shower caddy.
Removing the Hooks: When it’s time to remove the Command Hooks or if you want to reposition them, carefully follow the instructions provided by the manufacturer. Most Command Hooks can be safely removed without leaving any residue or damage on the wall surface.
By using Command Hooks to hang your shower caddy, you can efficiently organize your shower essentials without the need for drilling or hardware. Select the appropriate Command Hooks, clean and prep the wall surface, properly position and attach the hooks, and ensure proper adhesion before hanging your caddy. With Command Hooks, you can enjoy an organized shower experience while maintaining the integrity of your walls.
Other Tips for Preventing Shower Caddy Falls
While selecting the right shower caddy and using various installation methods can help prevent falls, there are additional tips you can follow to further enhance the stability and durability of your shower caddy. Here are some other tips to consider:
Check Wall Surface: Before installing a shower caddy, assess the condition of the wall surface. Ensure that it is smooth and free from cracks or loose tiles. If the wall surface is uneven or damaged, consider repairing it before installing the caddy to ensure a secure attachment.
Adjust Shelf Position: As you use your shower caddy, you may find that certain items are causing it to become unbalanced. To prevent this, adjust the position of the shelves to better distribute the weight and maintain stability. Regularly evaluate the arrangement of your toiletries to ensure the caddy remains balanced.
Use Non-Slip Mats: Place non-slip mats or adhesive strips in your shower to provide additional grip and stability for both your feet and the shower caddy. This can help prevent the caddy from sliding or shifting during use, reducing the risk of falls or accidents.
Avoid Excessive Weight: Be mindful of the weight you place on your shower caddy. Overloading it with heavy bottles or items can strain the caddy and increase the risk of it falling. Consider removing any unnecessary or expired products to minimize the weight and prolong the lifespan of your caddy.
Remove Excess Moisture: Excess moisture in your shower can contribute to the likelihood of your shower caddy falling. Wipe down your caddy and the surrounding area to remove any water or moisture after each use. Keeping the caddy dry will help maintain its stability and prevent slipping.
Regularly Inspect and Clean: Take the time to regularly inspect and clean your shower caddy. Inspecting the caddy for any signs of damage or weakness can help you address issues before they lead to a fall. Cleaning the caddy regularly will prevent the buildup of soap scum or grime, ensuring optimal performance and stability.
Consider Alternative Storage Methods: If your shower caddy continues to pose stability issues, consider alternative storage methods such as wall-mounted shelves, hanging baskets, or corner racks. These options may provide a more secure and stable solution for organizing your shower essentials.
By following these additional tips, you can further reduce the risk of your shower caddy falling and enhance its overall stability. Checking the wall surface, adjusting shelf positions, using non-slip mats, avoiding excessive weight, removing excess moisture, inspecting and cleaning regularly, and considering alternative storage methods can all contribute to a safer and more reliable shower caddy experience.