
Step 1: Gather the necessary tools and materials
Before you begin installing an under sink water filter, it’s important to gather all the necessary tools and materials. Having everything ready will make the installation process much smoother and more efficient. Here’s a list of what you’ll need:
- A new under sink water filter kit: Make sure to choose a filter that suits your needs and matches your plumbing specifications.
- Adjustable wrench: This will be used to tighten and loosen fittings.
- Teflon tape: This will help create a watertight seal between fittings.
- Bucket or container: This will be used to catch any water that may spill during the installation.
- Safety glasses: It’s always a good idea to protect your eyes while working with plumbing materials.
- Towels or rags: These will come in handy for cleaning up spills and for drying your hands throughout the installation.
- Utility knife: You might need this to cut any plastic tubing or to remove any existing plumbing.
- Marker or pen: This will be used to mark the position of the filter bracket.
Ensure that you have all these tools and materials before you proceed with the installation. It’s also a good idea to read the manufacturer’s instructions that come with the filter kit, as they may include specific tools or materials required for that particular model.
Step 2: Shut off the water supply
Before you begin the installation process, it is essential to shut off the water supply to avoid any potential leaks or accidents. Follow these steps to safely shut off the water supply:
- Locate the main water shut-off valve: This valve is usually found near the water meter or where the main water line enters your home. It is typically a lever or a wheel that you can turn to shut off the water.
- Turn off the water supply: Once you have located the main shut-off valve, use a clockwise motion to turn it off. This will stop the flow of water to your entire house.
- Relieve the water pressure: After turning off the main water supply, open a faucet in your home at a lower level to relieve any remaining water pressure. This step is crucial to prevent any accidental leaks during the installation process.
It’s important to note that shutting off the water supply will disrupt the water flow to your entire house. Therefore, it is best to plan the installation during a time when water usage is minimal. Make sure to inform other household members about the water shut-off and consider any alternative water sources for daily needs.
Once the water supply is shut off and the pressure is relieved, you can proceed to the next step of removing the existing plumbing.
Step 3: Remove the existing plumbing
Now that the water supply is shut off, it’s time to remove the existing plumbing in order to make way for the under sink water filter. Follow these steps to remove the old plumbing:
- Place a bucket or container beneath the plumbing: This will catch any water that may be trapped in the pipes when you disconnect them.
- Using an adjustable wrench, loosen the fittings on the existing plumbing: Start with the connections closest to the under sink area and work your way back towards the main water supply.
- Once the fittings are loose, carefully remove the old plumbing: Be cautious of any water that may still be in the pipes. Tilt the pipes to drain any remaining water into the container.
- Inspect the removed plumbing for any damage or wear: If you notice any signs of deterioration, it’s a good idea to replace those parts with new ones.
While removing the existing plumbing, it’s important to be gentle and take your time to avoid causing any damage to the surrounding area. If the connections are particularly stubborn, applying a little WD-40 or a similar lubricant can help loosen them.
Once you have successfully removed the old plumbing, you are ready to move on to the next step of installing the filter bracket.
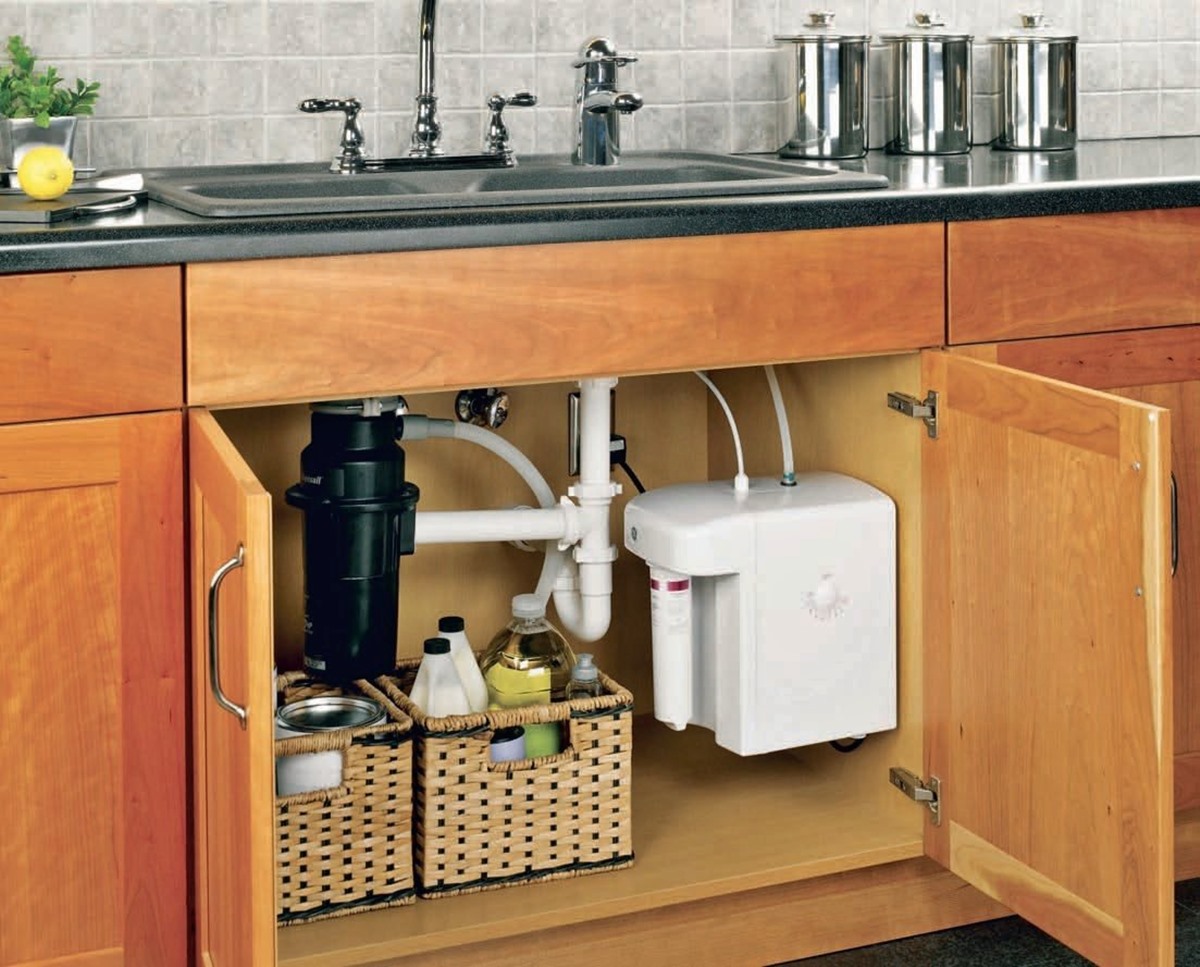
Step 4: Install the filter bracket
With the existing plumbing removed, it’s time to install the filter bracket that will securely hold your under sink water filter in place. Follow these steps to install the filter bracket:
- Position the filter bracket: Determine the optimal location for the filter under your sink, keeping in mind factors such as easy access for maintenance and connection to the water supply.
- Use a marker or pen to mark the mounting holes on the wall or cabinet: Place the filter bracket against the wall or cabinet and mark the spots where you will attach it.
- Securely mount the filter bracket: Use screws or other appropriate hardware to attach the filter bracket to the marked locations.
- Make sure the filter bracket is level and secure: Use a level to ensure the bracket is straight and adjust as needed. A securely mounted bracket is crucial for the stability and proper functioning of the under sink water filter.
It’s important to follow the manufacturer’s instructions for your specific filter bracket, as installation methods may vary. Some brackets may require additional steps or have specific guidelines for mounting.
Once the filter bracket is securely installed, you are ready to move on to the next step of mounting the filter and connecting the fittings.
Step 5: Mount the filter and connect the fittings
With the filter bracket in place, it’s time to mount the under sink water filter and connect the necessary fittings. Follow these steps to complete this installation stage:
- Mount the filter to the bracket: Align the filter with the bracket and securely attach it according to the manufacturer’s instructions. This may involve using screws or other fastening mechanisms.
- Connect the inlet and outlet fittings: Identify the appropriate connections on the filter unit for the water inlet and outlet. Use the provided fittings or adapters to attach the plumbing lines to these connections.
- Ensure a tight and secure fit: Use an adjustable wrench to tighten the fittings, ensuring that they are snug and leak-free. Be careful not to overtighten, as this could damage the filter or fittings.
- Consider using Teflon tape: Applying Teflon tape to the threaded fittings can help create a watertight seal. Wrap the tape in a clockwise direction, making sure not to cover the end of the threads.
Note that the specific instructions for mounting the filter and connecting the fittings may vary depending on the model and manufacturer. Always refer to the supplied installation guide for accurate guidance.
Once the filter is securely mounted and the fittings are properly connected, you are ready to move on to the next step of connecting the filter to the water supply.
Step 6: Connect the filter to the water supply
Now that the under sink water filter is mounted and the fittings are secured, it’s time to connect the filter to the water supply. Follow these steps to ensure a proper connection:
- Identify the water supply line: Locate the water supply line under your sink. This is typically a copper or plastic pipe that delivers water to the faucet.
- Shut off the valves: If your sink has shut-off valves, turn them clockwise to shut off the water flow. If there are no shut-off valves, you may need to shut off the main water supply once again.
- Prepare the supply line for connection: Use an adjustable wrench to disconnect the supply line from the faucet or shut-off valve. Place a bucket or towel beneath to catch any water that may spill.
- Connect the filter to the water supply line: Use the provided fittings or adapters to connect the filter’s inlet to the water supply line. Ensure a tight and secure connection by using an adjustable wrench to tighten the fittings.
- Turn on the water supply: Once the filter is connected, slowly turn on the water supply valves or main water supply to restore the water flow. Check for any leaks or drips around the filter connections.
If you notice any leaks, turn off the water supply immediately and double-check the fittings for proper tightness. Applying a small amount of Teflon tape to the threaded connections can also help create a tight seal and prevent leaks.
Once the filter is successfully connected to the water supply, you are ready to move on to the next step of testing for leaks.
Step 7: Test for leaks
After connecting the under sink water filter to the water supply, it is crucial to test for any potential leaks. Follow these steps to ensure a leak-free installation:
- Inspect the filter connections: Carefully examine all the connections, including the fittings and plumbing lines, for any signs of water seepage or dripping.
- Run water through the filter: Turn on the filtered water faucet or activate the filter system, allowing water to flow through the filter.
- Observe the connections during operation: Keep a close eye on the connections while the water is flowing through the filter. Look for any indication of leaks such as water droplets, dampness, or dripping.
- Check underneath the sink: Look underneath the sink and inspect the area around the filter and plumbing connections. Ensure that there are no pools of water or signs of leaks.
- Maintain pressure for a few minutes: Keep the water flowing through the filter for a few minutes to thoroughly test for any potential leaks. Monitor the connections during this time.
If you notice any leaks during the testing process, it’s important to address them promptly. Check the tightness of the fittings and make any necessary adjustments. Applying additional Teflon tape to the threaded connections can also help create a more secure seal.
Remember, a leak-free installation is crucial for the proper functioning of the under sink water filter and to prevent any damage to your cabinets or surrounding areas.
Once you have successfully tested for leaks and ensured a secure connection, you are ready to move on to the next step of flushing the system and conducting a quality test.
Step 8: Flush the system and run a quality test
After installing a new under sink water filter, it’s important to flush the system and conduct a quality test to ensure that it is functioning properly. This step will help remove any trapped air, debris, or carbon fines from the filter and ensure that you are getting clean and filtered water. Follow these steps to flush the system and run a quality test:
- Close the filtered water faucet: Make sure the faucet connected to the filter is in the closed position.
- Turn on the cold water faucet: Open the cold water faucet at the sink nearest to the filter. Let the water run for several minutes to flush out any air or loose particles from the filter.
- Check for clear and consistent water flow: As you flush the system, observe the water flow. It should become clear and consistent as any air or debris is flushed out. If you notice any discoloration or unusual odor, continue flushing until the water runs clear and odor-free.
- Conduct a taste and odor test: Once the water flow is clear, fill a glass with filtered water and taste it. Ensure there are no strange tastes or odors. Properly filtered water should taste clean and refreshing.
- Check the filter change indicator: If your filter has a built-in change indicator, check if it displays that the filter is ready for use. This indicator helps you keep track of when the filter needs to be replaced.
By flushing the system and conducting a quality test, you can ensure that your under sink water filter is providing clean and refreshing water for your household’s needs. Keep in mind that the flushing time may vary depending on the filter model and manufacturer’s instructions.
Once you have successfully flushed the system and conducted a quality test, you can start enjoying the benefits of clean, filtered water right from your kitchen sink.
Step 9: Enjoy clean and filtered water
Congratulations! You have successfully installed an under sink water filter and completed all the necessary steps. Now, it’s time to sit back, relax, and enjoy the convenience of clean and filtered water right at your fingertips.
With the under sink water filter in place, you can say goodbye to concerns about impurities, contaminants, and unpleasant tastes or odors in your drinking water. Here are a few benefits you can expect to experience:
- Improved water quality: The filter will effectively remove impurities such as sediment, chlorine, and harmful substances, providing you with high-quality and refreshing drinking water.
- Enhanced taste and odor: Say goodbye to unpleasant tastes and odors in your tap water. The filter will eliminate any lingering chlorine taste or other contaminants, leaving you with great-tasting water.
- Convenience: Having filtered water readily available right at your sink eliminates the need for relying on bottled water or using separate filter pitchers. You can quench your thirst or prepare beverages and meals with confidence.
- Cost savings: Investing in an under sink water filter offers long-term cost savings compared to buying bottled water regularly.
Remember that regular maintenance is essential to ensure the continued optimal performance of your under sink water filter. Be sure to follow the manufacturer’s guidelines for replacing filters and conducting routine maintenance checks.
Enjoy the peace of mind that comes with knowing your drinking water is clean, safe, and free from impurities. Cheers to a healthier and more refreshing drinking water experience!