
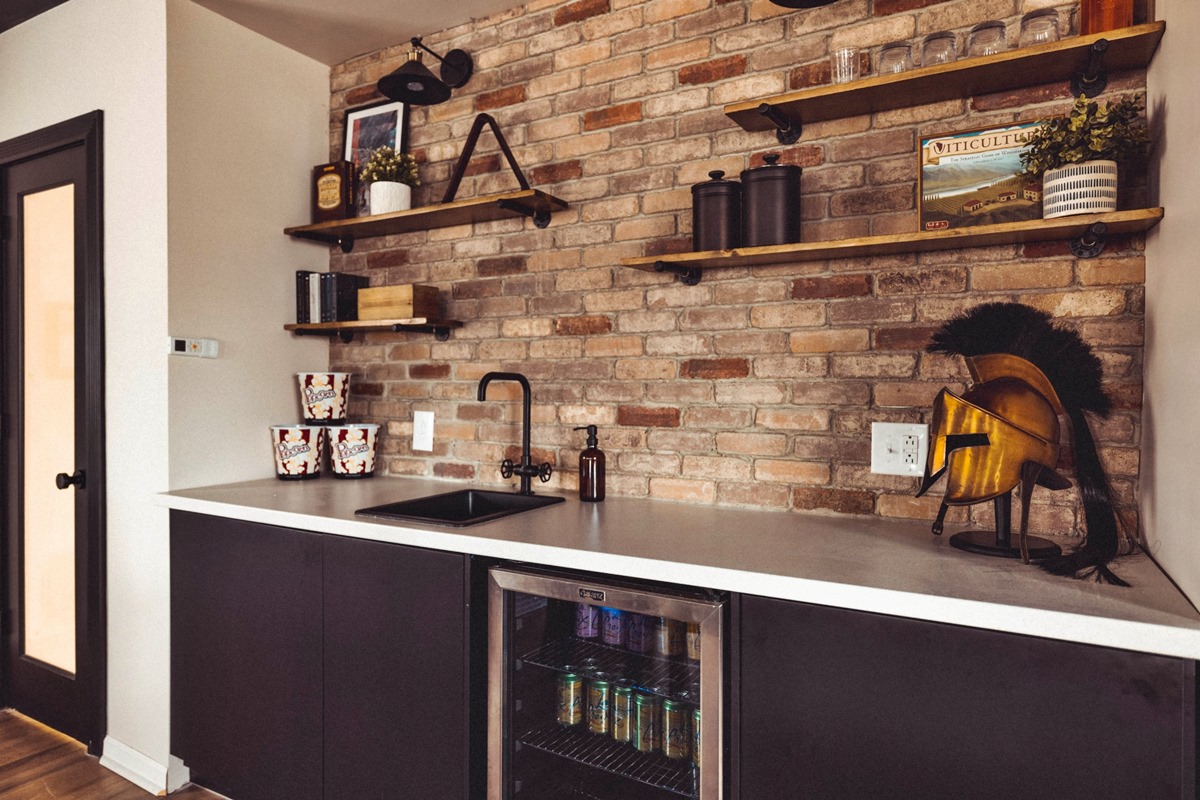
Choose the Right Shelf and Supplies
When it comes to hanging a shelf on a brick wall, choosing the right shelf and supplies is crucial for a successful installation. Here are some tips to help you make the best choices:
1. Consider the Weight and Size: Before selecting a shelf, consider what you plan to display or store on it. Measure the dimensions of the items and estimate their weight. This will help determine the size and weight capacity needed for the shelf. Keep in mind that brick walls are sturdy, but you should still choose a shelf that is proportionate to the size of the wall and capable of holding your items securely.
2. Look for Durability: Opt for shelves made from sturdy materials like wood, metal, or composite materials that can withstand the test of time. Brick walls exert pressure on the shelf, so it’s important to choose one that can handle the load without sagging or bending over time.
3. Select Proper Hardware: In addition to the shelf itself, you’ll need the right hardware to hang it on a brick wall. Look for shelf brackets specifically designed for brick walls, as they will have the necessary strength and stability. You will also need wall anchors and screws that are suitable for your chosen shelf and the weight it will bear. Consult with a hardware expert if you’re unsure about the appropriate hardware for your needs.
4. Consider Aesthetic Appeal: The shelf you choose should not only be functional but also complement the overall style of your space. Consider the color, finish, and design of the shelf to ensure it matches or enhances the existing décor. This will create a cohesive and visually pleasing look.
By carefully selecting the right shelf and supplies, you’ll be well on your way to successfully hanging a shelf on your brick wall. Remember to prioritize durability, weight capacity, and aesthetic appeal for a satisfying end result.
Prepare the Brick Wall
Before you start hanging a shelf on a brick wall, it’s important to properly prepare the surface to ensure a secure and stable installation. Follow these steps to prepare the brick wall:
1. Clean the Brick Surface: Begin by cleaning the brick surface using a mild detergent and water solution. Remove any dust, dirt, or debris that may prevent the shelf brackets from attaching firmly. Scrub the surface gently with a brush or sponge, and rinse thoroughly with clean water. Allow it to dry completely before moving on to the next step.
2. Locate Studs or Solid Areas: Use a stud finder or tap on the wall to locate the solid areas between the bricks. These areas provide additional stability and support for the shelf brackets. Mark the locations of the studs or solid areas on the wall for reference when marking the drill holes.
3. Consider Using a Pilot Hole: If your shelf brackets require pilot holes, use a drill bit that is slightly smaller than the diameter of the wall anchors. Drill pilot holes into the solid areas or studs, following the manufacturer’s instructions. This will make it easier to insert the wall anchors later on.
4. Inspect the Brick Surface: Carefully inspect the brick surface for any cracks, chips, or loose mortar. Repair any damage using an appropriate patching compound or mortar, and allow it to dry completely. A level and even surface will provide better stability for the shelf installation.
5. Protect the Wall Surface: Consider using painter’s tape or adhesive putty to protect the wall surface from scratches or marks while installing the shelf. Apply the tape or putty along the area where the shelf brackets will be placed. This precaution will help preserve the appearance of the wall.
By taking the time to properly prepare the brick wall, you’ll ensure that the shelf installation is secure and long-lasting. Cleaning the surface, locating studs, making pilot holes, repairing any damage, and protecting the wall will contribute to a successful shelf hanging project.
Determine the Height and Placement of the Shelf
Choosing the right height and placement for your shelf is essential to ensure both functionality and aesthetic appeal. Here are some steps to help you determine the ideal height and placement:
1. Consider the Purpose: Think about the intended use of the shelf. Will it primarily be used for storage or display purposes? Consider the items you plan to place on the shelf and their accessibility. For example, if you’re using the shelf to display decorative items, you may want to position it at eye level for maximum visual impact.
2. Measure the Available Space: Take precise measurements of the space where you plan to hang the shelf. Consider the width, height, and depth available. Take into account any obstructions such as windows, doors, or adjacent furniture that might affect the placement of the shelf.
3. Maintain Balance and Symmetry: If you’re hanging multiple shelves, ensure they are evenly spaced to maintain balance and symmetry in the overall design. Take into consideration the size and spacing of the items you plan to place on each shelf to create a visually pleasing arrangement.
4. Consider Eye-Level Placement: Eye-level placement is typically the most convenient for items you frequently use or want to showcase. This height allows for easy access and visibility. However, if you’re using the shelf for decorative purposes, you may want to experiment with different heights to create visual interest.
5. Seek Second Opinions: If you’re uncertain about the height and placement of the shelf, don’t hesitate to seek the opinions of friends or family members. They may offer valuable insights and perspectives that can help you make a decision.
Remember, the height and placement of the shelf should be practical and aesthetically pleasing. By considering the purpose, measuring the available space, maintaining balance, and seeking second opinions, you can determine the ideal height and placement for your shelf.
Mark the Drill Holes on the Wall
Once you have determined the height and placement for your shelf, the next step is to mark the drill holes on the wall. Properly marking the drill holes will ensure accurate placement and a secure installation. Follow these steps to mark the drill holes on the wall:
1. Position the Shelf Brackets: Place the shelf brackets against the wall at the desired height and spacing. Ensure that they are level and aligned correctly. Use a pencil to mark the top and bottom holes of each bracket on the wall. Make sure to mark both the left and right sides of the brackets.
2. Mark the Center Line: Use a measuring tape or a level to draw a centerline between the top and bottom marks of the shelf brackets. This line will guide you in positioning the brackets and ensure that they are straight and aligned.
3. Check for Level: Double-check the levelness of the shelf brackets before proceeding. If they are not level, adjust their position and re-mark the drill holes accordingly. A level shelf is essential for both functionality and aesthetics.
4. Measure the Spacing: If you’re installing multiple brackets, measure and mark the spacing between them. Use a measuring tape or ruler to ensure equal distances between each bracket. This will maintain balance and stability once the shelf is installed.
5. Review the Markings: Take a step back and review the marked drill hole locations and the centerline. Confirm that they are accurately placed and aligned with your initial measurements and plans. Make any necessary adjustments at this point.
6. Consider Extra Drill Holes: If your shelf brackets require additional support or if you’re installing a heavier shelf, you may need to mark drill holes in the solid areas or studs that you located earlier. Consult the instructions provided with your shelf brackets to determine the appropriate positioning for these extra drill holes.
By carefully marking the drill holes on the wall, you’ll ensure a precise and secure installation. Double-checking the levelness, measuring the spacing, and reviewing the markings will contribute to a successful shelf hanging project.
Drill the Holes in the Brick Wall
Once you have marked the drill holes on the wall, it’s time to drill them to prepare for the installation of the shelf brackets. Follow these steps to drill the holes in the brick wall:
1. Put on Protective Gear: Before you start drilling, wear safety goggles to protect your eyes from any debris or dust that may be produced during the drilling process. Also, consider wearing ear protection if the noise level is high.
2. Choose the Right Drill Bit: Select a masonry drill bit that matches the diameter of the wall anchors you’ll be using. Masonry drill bits are designed to penetrate through tough materials like brick. Ensure that the drill bit is securely inserted into the drill.
3. Start Drilling: Position the drill bit at a 90-degree angle to the wall, aligning it with the marked drill hole. Apply gentle pressure and start drilling at a low speed. Use a slow and steady motion to allow the drill bit to gradually penetrate the brick surface.
4. Use Proper Technique: While drilling, maintain a firm grip on the drill and apply consistent pressure. Avoid excessive force, as it may damage the brick or cause the drill bit to overheat. Once the drill bit reaches the desired depth, pause to clear any accumulated dust or debris from the hole.
5. Repeat for Each Drill Hole: Move to the next marked hole and repeat the drilling process. Take your time and ensure that each hole is drilled to the appropriate depth. Remember to clear any debris from each hole before moving on to the next one.
6. Check Alignment and Depth: As you drill each hole, periodically check their alignment and depth. Use a level or measuring tape to confirm that they are positioned correctly and at the right depth. Adjust if necessary to ensure proper fit for the wall anchors and shelf brackets.
By following these steps, you can drill the necessary holes in the brick wall with precision and care. Remember to wear protective gear, choose the right drill bit, employ proper drilling technique, and check alignment and depth throughout the process.
Insert Wall Anchors into the Holes
Once you have drilled the holes in the brick wall, the next step is to insert wall anchors. Wall anchors provide added support and stability for the shelf brackets. Follow these steps to properly insert wall anchors into the holes:
1. Clean the Holes: Before inserting the wall anchors, ensure that the holes are clean and free of debris. Use a brush or a blast of compressed air to remove any dust or debris that may have accumulated during the drilling process.
2. Select the Right Wall Anchors: Choose wall anchors that are appropriate for the weight capacity of your shelf and compatible with the size of the drilled holes. Plastic or metal anchors are commonly used for brick walls. Follow the manufacturer’s instructions to determine the correct size and type of wall anchors for your specific project.
3. Insert the Anchors: Insert the wall anchors into the drilled holes. Gently tap them into place with a hammer, ensuring that they are flush with the surface of the wall. It’s important to use a gentle and controlled force to avoid damaging the anchors or the brick.
4. Check for a Secure Fit: Once the wall anchors are inserted, ensure that they fit snugly in the holes. Test their stability by giving them a gentle tug. If they move or feel loose, remove them and try a larger size or a different type of anchor. It’s important for the wall anchors to provide a secure and stable foundation for the shelf brackets.
5. Apply Epoxy or Adhesive (Optional): For additional reinforcement, consider applying epoxy or construction adhesive to the drilled holes before inserting the wall anchors. This can help create a stronger bond between the anchors and the brick wall. Follow the manufacturer’s instructions for proper application and drying time.
Inserting wall anchors into the holes is a critical step in hanging a shelf on a brick wall. By cleaning the holes, selecting the right anchors, inserting them securely, and optionally using epoxy or adhesive, you’ll ensure a reliable and sturdy foundation for the shelf brackets.
Attach the Shelf Brackets to the Wall Anchors
After inserting the wall anchors into the drilled holes, it’s time to attach the shelf brackets to the wall. Properly securing the brackets will ensure the stability and support of the shelf. Follow these steps to attach the shelf brackets to the wall anchors:
1. Position the Shelf Brackets: Align the shelf brackets with the inserted wall anchors. Ensure that the brackets are level and in the desired position. Double-check their alignment against the centerline and mark if necessary.
2. Attach the Brackets: Using a screwdriver or drill, insert screws provided with the shelf brackets through the bracket holes and into the wall anchors. Carefully tighten the screws, but avoid overtightening, as it may damage the bracket or wall. Repeat this step for all the brackets, ensuring that they are securely attached.
3. Use Washers (If Required): Some shelf brackets may require the use of washers between the screws and the bracket. Check the manufacturer’s instructions to determine if washers are needed for added stability. If so, place the washers between the screws and the bracket before tightening.
4. Confirm Stability: Once all the shelf brackets are attached, check the stability of the installation. Give the brackets a gentle shake to ensure they are securely fastened to the wall anchors. If any brackets feel loose or unstable, double-check the attachment and tighten the screws further if needed.
5. Adjust Bracket Position (If Necessary): If you find that the brackets are not aligned properly or do not match your desired placement, you may need to remove them and adjust their position. Fill the previous holes with an appropriate filler, allow it to dry, and then repeat the steps to attach the brackets in the new position.
By following these steps, you will successfully attach the shelf brackets to the wall anchors. Positioning the brackets correctly, securely attaching them with screws, confirming stability, and adjusting the bracket position if necessary, will ensure a strong and reliable base for your shelf.
Attach the Shelf to the Brackets
Now that the shelf brackets are securely attached to the wall, it’s time to attach the shelf itself. Follow these steps to properly connect the shelf to the brackets:
1. Align the Shelf: Position the shelf on top of the brackets, ensuring that it is centered and level. Take your time to align it properly for a neat and cohesive look.
2. Locate Pre-Drilled Holes: Some shelves come with pre-drilled holes that align with the brackets. If your shelf has these holes, align them with the corresponding holes on the brackets. This will provide extra stability and prevent the shelf from sliding or shifting.
3. Insert Screws or Bolts: If your shelf doesn’t have pre-drilled holes, use screws or bolts that are appropriate for the material of your shelf (such as wood screws for a wooden shelf). Insert screws or bolts through the holes on the brackets, and into the shelf. Use the appropriate screwdriver or wrench to tighten them securely.
4. Test for Stability: Once the shelf is attached to the brackets, check for stability. Give the shelf a gentle push and make sure it remains firmly in place. If there is any wobbling or instability, recheck the attachment points and tighten the screws or bolts as needed.
5. Follow Manufacturer’s Instructions: Always refer to the manufacturer’s instructions and recommendations for attaching the shelf to the brackets. They may provide specific guidelines or additional steps for a secure installation based on the type and material of the shelf.
6. Consider Additional Support: If your shelf is particularly heavy or will carry a significant amount of weight, you may want to consider adding extra support. This could include additional brackets or support brackets placed underneath the shelf for added stability.
By carefully aligning the shelf, using the appropriate screws or bolts, testing for stability, and following the manufacturer’s instructions, you can securely attach the shelf to the brackets. This step brings your shelf hanging project one step closer to completion.
Check the Shelf for Stability
Once you have attached the shelf to the brackets, it’s crucial to check its stability to ensure it can safely support the weight of your items. Follow these steps to check the shelf for stability:
1. Apply Weight: Begin by placing lightweight items on the shelf, gradually increasing the weight. This will help you assess the shelf’s stability and ensure it can handle the load without sagging or wobbling. Pay attention to any signs of instability or movement.
2. Test for Wobbling: Give the shelf a gentle shake to check for any wobbling or movement. If the shelf wobbles or feels unstable, determine the cause. It could be due to an incorrect installation of the brackets, loose screws, or an uneven weight distribution.
3. Inspect Attachment Points: Examine the attachment points where the shelf brackets are connected to the wall and the shelf itself. Check for any signs of loosening, damage, or shifting. Tighten screws or bolts if necessary to secure the brackets and ensure a stable connection.
4. Evaluate Weight Capacity: Review the weight capacity specified by the manufacturer for both the shelf and the brackets. Ensure that the weight you plan to place on the shelf does not exceed these limits. Overloading the shelf can compromise its stability and safety.
5. Check for Sagging: Observe the shelf for any signs of sagging or bending under the weight. If you notice significant sagging, consider redistributing the weight or reinforcing the shelf with additional support, such as extra brackets or support beams.
6. Reassess and Make Adjustments: If you encounter any issues with stability, address them promptly. This may involve rechecking the levelness of the shelf, tightening screws or bolts, redistributing weight, or seeking professional assistance if needed.
By thoroughly checking the shelf for stability, you can ensure that it is secure, reliable, and capable of supporting the weight of your items. Regularly evaluate the shelf’s stability over time, especially if you make any changes to the weight or distribution of items on the shelf.
Decorate and Organize the Shelf
Now that you have successfully installed and verified the stability of your shelf, it’s time to unleash your creativity and utilize the space for decoration and organization. Follow these tips to decorate and organize your shelf:
1. Create a Theme: Consider a specific theme or style for your shelf display. This could be based on the room’s overall decor, your personal interests, or the items you plan to showcase. A cohesive theme will give your shelf a sense of purpose and visual appeal.
2. Choose Decorative Pieces: Select decorative items such as figurines, photo frames, vases, or plants to personalize your shelf. Combine different textures, heights, and colors to add visual interest and create a balanced display.
3. Use Organizers and Containers: Utilize baskets, bins, or small boxes to group and organize smaller items on the shelf. This will help maintain a neat and clutter-free appearance while maximizing the storage potential of the space.
4. Consider Balance and Symmetry: Arrange items in a way that creates a sense of balance and symmetry on the shelf. Place similar items opposite each other or use a central focal point to anchor the arrangement. Experiment with different configurations until you achieve a visually pleasing display.
5. Incorporate Books or Magazines: If you have ample space on the shelf, consider arranging books or magazines vertically or horizontally for an added touch of sophistication. You can also intersperse these items with your decorative pieces to create a well-rounded look.
6. Refresh and Rotate: Don’t be afraid to switch up the items on your shelf from time to time. Periodically refresh the display by adding new items or rearranging the existing ones. This will keep your shelf visually stimulating and prevent monotony.
7. Avoid Clutter: While it’s great to showcase your favorite items, be mindful of overcrowding the shelf. Leave some breathing room between items to maintain a clean and organized appearance. Remember, less can be more when it comes to shelf decor.
By taking these decorating and organizing tips into consideration, you can transform your shelf into a visually appealing focal point in your space. Let your creativity shine through and make the shelf a reflection of your personal style and interests.