
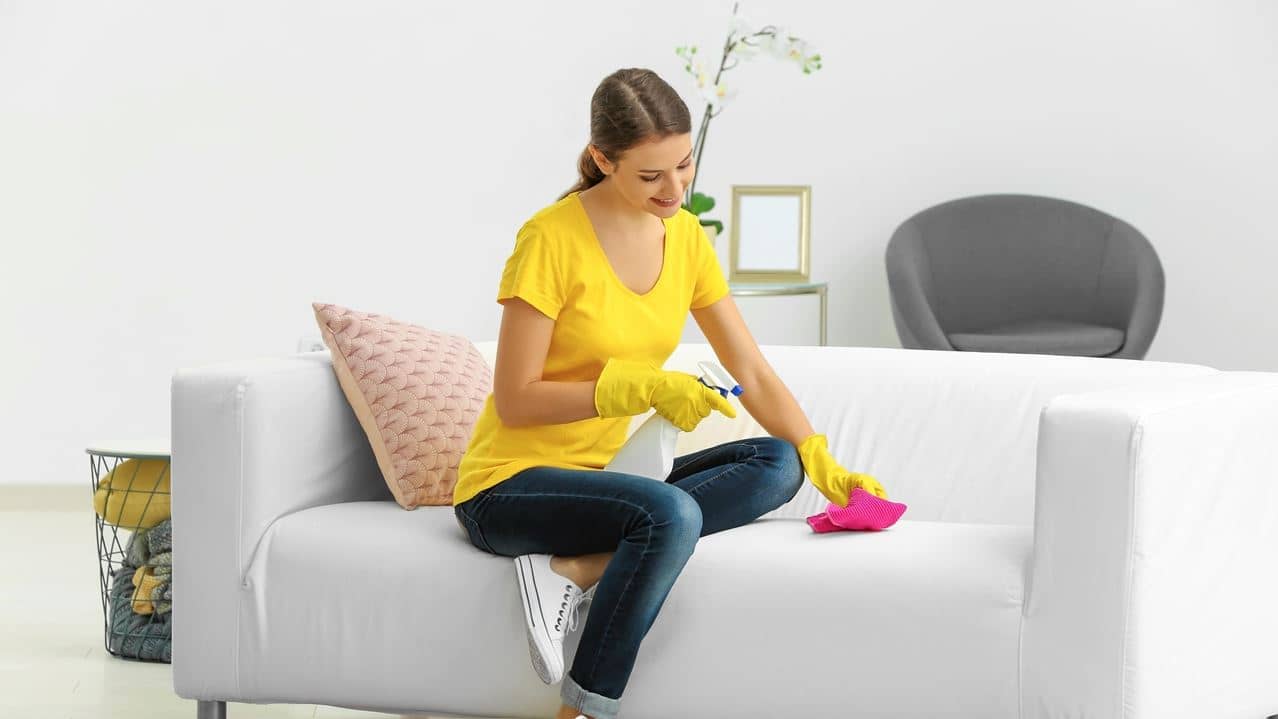
Gather the necessary supplies
Dealing with a Sharpie stain on your sofa can be frustrating, but with the right supplies and techniques, you can effectively remove the stain and restore your sofa to its former glory. Before you begin the stain removal process, make sure to gather all the necessary supplies.
Here’s a list of items you’ll need:
- A clean cloth or sponge
- Rubbing alcohol
- Water
- Fabric cleaner or upholstery shampoo
- Non-acetone nail polish remover (optional)
The first item you’ll need is a clean cloth or sponge. This will be used to blot and treat the stain. It’s important to use a clean cloth or sponge to avoid further spreading the ink.
Next, you’ll need rubbing alcohol. Look for a bottle of isopropyl alcohol with a concentration of at least 70%. Rubbing alcohol is effective at breaking down the ink and removing the stain.
Water is another essential supply you’ll need. This will be used for rinsing the area after treating the stain. It’s important to rinse away any residue to prevent potential damage to your sofa.
If the stain is stubborn or has set into the fabric, you may need to use a fabric cleaner or upholstery shampoo. Look for a product specifically designed for your sofa’s material to ensure safe and effective stain removal.
Lastly, if you’ve tried other methods without success, you can try using a non-acetone nail polish remover. This should be used as a last resort, as it can potentially damage certain upholstery materials. Make sure to test it on a small, hidden area of your sofa first.
By gathering these necessary supplies before you start the stain removal process, you’ll be prepared to tackle the Sharpie stain head-on and increase your chances of successfully removing it.
Blot the stain as soon as possible
When you discover a Sharpie stain on your sofa, it’s crucial to act quickly and blot the stain as soon as possible. The longer the ink sits on the fabric, the more challenging it will be to remove.
Here’s what you need to do:
- Take a clean cloth or sponge and gently blot the stain. Avoid rubbing it, as this can spread and deepen the stain.
- Continue blotting until you’ve absorbed as much ink as possible. You’ll notice the cloth or sponge absorbing the ink from the fabric.
- Remember to work from the outer edges of the stain towards the center. Blotting in this manner helps prevent the stain from spreading further.
By blotting the stain immediately, you’ll remove a significant amount of ink before it has a chance to set into the fabric. This initial blotting step is essential for a successful stain removal process.
Keep in mind that blotting may not completely remove the stain, especially if the Sharpie ink is deeply embedded in the fibers of the sofa. However, it is an essential first step that prepares the stain for further treatment.
If you act promptly and follow the correct blotting technique, you’ll have a better chance of removing the Sharpie stain from your sofa and minimizing any permanent damage to your upholstery.
Test a small, hidden area of the sofa
Before you begin treating the Sharpie stain on your sofa, it’s crucial to test any cleaning solution on a small, hidden area of the fabric. This will ensure that the cleaning solution doesn’t cause any unwanted damage or discoloration to your sofa.
Here’s what you need to do:
- Select an inconspicuous area of the sofa, such as the back or an area that is normally covered by cushions.
- Apply a small amount of the cleaning solution you plan to use onto a clean cloth or sponge.
- Dab the cloth or sponge onto the test area and gently rub it in a circular motion.
- Check the fabric for any adverse reactions, such as discoloration, fading, or damage.
- Observe the test area for a few minutes to ensure there are no negative side effects.
If there are no adverse reactions, it’s safe to proceed with treating the Sharpie stain on your sofa.
Testing a small, hidden area is essential because different upholstery materials have unique properties and may react differently to cleaning solutions. By conducting this test, you can avoid accidentally causing further damage to your sofa while trying to remove the stain.
If you notice any discoloration or damage during the testing process, it’s best to consult a professional upholstery cleaner. They have the knowledge and expertise to handle delicate fabrics and can recommend the most appropriate course of action to restore your sofa.
Remember, an ounce of prevention is worth a pound of cure. Taking the time to test a small, hidden area of your sofa before treating the stain can save you from potential headaches and ensure the longevity of your upholstery.
Apply rubbing alcohol to a clean cloth or sponge
Rubbing alcohol can be highly effective in removing a Sharpie stain from your sofa. It works by breaking down the ink and loosening its grip on the fabric. To begin the stain removal process using rubbing alcohol, follow these steps:
- Take a clean cloth or sponge and dampen it with rubbing alcohol. It’s important to use a clean cloth or sponge to avoid adding any additional dirt or stains to the fabric.
- Gently blot the stained area with the cloth or sponge. Avoid rubbing, as this can spread the ink and further embed it into the fabric.
- Continue blotting until you notice the cloth or sponge absorbing the ink. You may see the stain start to lighten as the rubbing alcohol works its magic.
- Make sure to work from the outer edges of the stain towards the center. This helps prevent the ink from spreading further.
By applying rubbing alcohol to a clean cloth or sponge, you’re providing a powerful yet gentle solution to combat the Sharpie stain on your sofa. The alcohol breaks down the ink, making it easier to remove.
Be cautious when using rubbing alcohol, as it may cause color fading or discoloration on certain upholstery materials. To minimize the risk of damage, always test a small, hidden area of the fabric before applying rubbing alcohol to the stained area. If there are no adverse effects, you can proceed with confidence.
If the rubbing alcohol doesn’t completely remove the stain or if the fabric is sensitive to alcohol, consider trying an alternative method or consulting a professional upholstery cleaner.
Remember, patience and gentle blotting go a long way when using rubbing alcohol to remove a Sharpie stain from your sofa. With the right technique and a bit of persistence, you can successfully eliminate the ink and restore your sofa to its former beauty.
Blot the stain with the rubbing alcohol
Once you have applied rubbing alcohol to a clean cloth or sponge, it’s time to tackle the Sharpie stain on your sofa. The next step is to blot the stain with the rubbing alcohol, using a careful and methodical approach:
- Take the cloth or sponge dampened with rubbing alcohol and gently blot the stained area. Blotting involves pressing the cloth or sponge onto the stain and then lifting it up, rather than rubbing or scrubbing.
- Continue blotting, working from the outer edges of the stain towards the center. This helps prevent the ink from spreading further into the fabric.
- As you blot, you may notice the cloth or sponge absorbing the ink. This is a positive sign that the rubbing alcohol is breaking down the stain.
- Avoid excessive pressure while blotting, as it may push the ink deeper into the fabric. Instead, use a gentle, dabbing motion.
Blotting the stain with rubbing alcohol allows the alcohol to penetrate the fabric and dissolve the Sharpie ink. By employing this technique, you can effectively lift the stain from the sofa fibers.
It’s important to note that depending on the severity and age of the stain, multiple rounds of blotting may be necessary. Keep at it, and be patient. After each round, assess the stain’s progress and continue until you are satisfied with the results.
Remember to periodically switch to a clean portion of the cloth or sponge to avoid redepositing ink onto the fabric. This helps maintain the effectiveness of the rubbing alcohol throughout the stain removal process.
If the rubbing alcohol does not completely remove the stain, do not worry. There are alternative methods and products that can be used to further treat the remaining ink. We will explore these options in the following sections.
By blotting the stain with rubbing alcohol, you are taking a proactive step towards eliminating the Sharpie stain and restoring your sofa to its pristine condition. Maintain a steady hand and a gentle touch, and you’ll be on your way to success.
Continue blotting until the stain is removed
Removing a Sharpie stain from your sofa can require persistence and patience. The key is to continue blotting until the stain is completely removed. Here’s what you need to know to successfully eliminate the stain:
- As you blot the stain with the rubbing alcohol, closely monitor the progress. You might notice the stain starting to fade or lighten with each round of blotting.
- Be prepared for the possibility that the stain may not be completely removed with just one round of blotting. It may take multiple attempts to fully eliminate the ink.
- Continue blotting, using the rubbing alcohol and a clean cloth or sponge, until the stain is no longer visible or significantly reduced. This may require gentle and repeated blotting.
- If the cloth or sponge becomes soaked or saturated, switch to a fresh one to maintain maximum effectiveness.
- Remember to work from the outer edges of the stain towards the center, blotting in a controlled and methodical manner. This prevents the ink from spreading and minimizes the risk of creating a larger mess.
- Regularly check the progress by pausing and examining the stain. Use natural or artificial light to get a clear view of the sofa fabric.
It’s essential to be persistent in your efforts and not become discouraged if the stain doesn’t disappear immediately. The time it takes to remove the stain can vary depending on factors such as the type of fabric, the age of the stain, and how deeply the ink has penetrated the fibers.
If, after repeated attempts, the stain persists or shows little improvement, consider trying alternative methods or seeking professional help. Upholstery cleaning experts have specialized techniques and products at their disposal to tackle stubborn stains.
Remember, the key to successful stain removal is perseverance. The more diligent you are in blotting the stain with rubbing alcohol, the better your chances of completely eliminating the Sharpie ink and restoring the appearance of your sofa.
Rinse the area with water
After successfully removing the Sharpie stain from your sofa using rubbing alcohol, it’s important to rinse the area to remove any residue and ensure the fabric is clean. Rinsing with water is a crucial step in the stain removal process. Follow these steps to effectively rinse the area:
- Prepare a clean bowl or bucket with warm water. The water should be lukewarm, not too hot or cold.
- Dip a clean cloth or sponge into the water and wring out any excess moisture. You want the cloth or sponge to be damp, not dripping wet.
- Gently blot the previously treated area with the damp cloth or sponge. This will help remove any remaining ink or cleaning solution from the fabric.
- Continue blotting until you have thoroughly rinsed the area. Make sure to cover the entire treated surface, ensuring that no residue is left behind.
- Ensure that you are using a clean section of the cloth or sponge as you go to prevent reapplying any ink or residue back onto the fabric.
Rinsing the area with water serves two important purposes. First, it helps remove any traces of the rubbing alcohol or cleaning solution that you used to treat the stain. This prevents any potential damage or discoloration to the fabric from the residue left behind.
Secondly, water helps to freshen up the fabric and restore its natural texture. The rinsing process removes any remaining ink particles and leaves the fabric feeling clean and revitalized.
Once you have completed the rinsing process, it’s important to blot dry the area to remove excess moisture. This can be done using a clean, dry cloth or towel. Apply gentle pressure to absorb the water without rubbing or scrubbing the fabric, which can potentially damage it.
By thoroughly rinsing the area with water, you are ensuring the removal of any leftover residue and providing an added level of cleanliness to your sofa. This step is essential in completing the stain removal process and restoring your sofa to its pristine condition.
Blot dry with a clean cloth
Once you have rinsed the area with water, it’s important to blot dry the fabric to remove any remaining moisture. This step is crucial for preventing water spots and ensuring that the fabric dries evenly. Follow these steps to effectively blot dry the area:
- Take a clean, dry cloth or towel and gently press it onto the damp fabric. Avoid rubbing or scrubbing as this can potentially damage or distort the fibers of the sofa.
- Apply light pressure and pat the fabric in a blotting motion. This helps absorb the moisture without causing any friction or friction-related damage to the upholstery.
- Continue blotting until you have removed as much moisture as possible. If the cloth becomes saturated, switch to a fresh, dry cloth to ensure efficient drying.
- Pay special attention to any creases or seams in the fabric, as these areas tend to retain more moisture. Blotting them thoroughly helps prevent mildew or water damage.
It’s essential to ensure that the fabric is completely dry before using or sitting on the sofa again. Excess moisture left in the upholstery can lead to mold or mildew growth, which can be difficult to remove and cause additional damage.
Avoid using heat sources, such as hairdryers or heaters, to speed up the drying process. High heat can cause the fabric to shrink or warp, resulting in permanent damage. Allowing the fabric to air dry naturally is the safest and most effective method.
By blotting dry the area with a clean cloth, you are taking the necessary steps to ensure that the fabric dries evenly and free from any moisture. This final step in the stain removal process helps protect the integrity of your sofa and maintain its appearance for years to come.
Use a fabric cleaner or upholstery shampoo
If the Sharpie stain on your sofa persists or if you’re dealing with a stubborn or set-in stain, using a fabric cleaner or upholstery shampoo can be an effective next step. These specialized cleaning products are designed to target tough stains and lift them from the fabric fibers. Follow these steps to use a fabric cleaner or upholstery shampoo:
- Check the label of the fabric cleaner or upholstery shampoo to ensure it is suitable for your sofa’s material. Different types of fabrics require specific cleaning products.
- Read the instructions provided by the manufacturer of the fabric cleaner or upholstery shampoo. These instructions will guide you on how much product to use and how to apply it to the stain.
- Apply a small amount of the fabric cleaner or upholstery shampoo to a clean cloth or sponge. Gently work the cleaner into the stained area in a circular motion.
- Allow the fabric cleaner or upholstery shampoo to sit on the stain for the recommended amount of time, as indicated on the product label.
- After the allotted time, use a clean cloth or sponge dampened with water to wipe away the cleaner and the loosened stain. Blot gently to avoid spreading the stain.
- Rinse the area with clean water to remove any leftover residue, and blot dry with a clean cloth.
Fabric cleaners and upholstery shampoos are specially formulated to target a variety of stains, including ink. They can be effective in breaking down the Sharpie stain and removing it from the fabric.
Remember to always test the fabric cleaner or upholstery shampoo on a small, hidden area of your sofa first to ensure it doesn’t cause any adverse reactions or discoloration. If there are no issues, you can proceed with confidence.
If the stain persists after using a fabric cleaner or upholstery shampoo, consider repeating the process or seeking professional assistance. Upholstery cleaning experts have specialized tools and techniques to tackle stubborn stains effectively.
By using a fabric cleaner or upholstery shampoo, you are employing a targeted approach to tackle the Sharpie stain on your sofa. With proper application and adherence to instructions, you can increase your chances of successfully removing the stain and restoring your sofa to its original condition.
Apply the fabric cleaner to the stain
If you’re dealing with a persistent Sharpie stain on your sofa, using a fabric cleaner can be an effective way to break down the ink and lift it from the fabric fibers. Follow these steps to apply the fabric cleaner to the stain:
- Ensure that you have chosen a fabric cleaner that is safe for your sofa’s material. Different types of fabrics require specific cleaning solutions, so check the label to verify compatibility.
- Read the instructions provided by the manufacturer of the fabric cleaner. These instructions will guide you on the appropriate amount to use and how to apply it.
- Take a clean cloth or sponge and pour a small amount of the fabric cleaner onto it. Make sure not to oversaturate the cloth or sponge.
- Gently dab the cloth or sponge onto the Sharpie stain, working from the outer edges towards the center. Avoid rubbing or scrubbing, as this can spread the stain or damage the fabric.
- Allow the fabric cleaner to sit on the stain for the recommended amount of time, as indicated on the product label. This allows the cleaner to penetrate the ink and break down the pigment.
- After the allotted time, use a clean cloth or sponge dampened with water to blot the treated area. This helps to remove the fabric cleaner as well as any loosened ink particles.
Applying a fabric cleaner directly to the Sharpie stain allows the cleaning solution to target the ink and break it down effectively. The cleaner works by dissolving the ink and loosening its grip on the fabric fibers.
Remember to follow any specific instructions provided by the manufacturer to ensure the best results. Additionally, test the fabric cleaner on a small, hidden area of your sofa before applying it to the stain to check for any adverse reactions or color fading.
If the stain persists or is particularly stubborn, repeating the process might be necessary. Be patient and persistent, as some stains may require multiple treatments to achieve complete removal.
By applying a fabric cleaner to the Sharpie stain, you’re taking a proactive step to break down the ink and eliminate it from the fabric. With proper application and a bit of patience, you can significantly improve the appearance of your sofa.
Scrub the stain gently with a clean cloth or sponge
If the Sharpie stain on your sofa persists even after applying a fabric cleaner, it may be necessary to gently scrub the stain to further loosen and lift the ink. Follow these steps for gentle scrubbing:
- Ensure you have a clean cloth or sponge that is suitable for the fabric of your sofa. Avoid using abrasive materials that may cause damage.
- Dampen the cloth or sponge with clean water. Make sure it is not too wet, as excessive moisture can potentially spread the stain or damage the fabric.
- Gently scrub the stain using light pressure and a circular motion. Focus on the affected area, working from the outer edges toward the center.
- Be mindful of the fabric’s sensitivity and avoid aggressive scrubbing. The goal is to loosen the ink without causing any additional damage.
- Regularly rinse the cloth or sponge with clean water to remove any accumulated ink and prevent reapplying it to the fabric.
- Continue scrubbing until you see a significant improvement in the stain or until the ink is lifted from the fabric.
Scrubbing the stain gently can help further break down the ink and remove it from the fabric. However, it’s important to use caution and avoid excessive force to prevent damaging the upholstery.
If the stain persists even after gentle scrubbing, consider seeking professional assistance. Upholstery cleaning experts have specialized tools and techniques that can effectively tackle stubborn stains without harming the fabric.
Remember, different fabrics have varying levels of sensitivity, so it’s important to test the scrubbing method on a small, inconspicuous area before applying it to the stain. If there are no adverse effects, you can proceed with scrubbing.
By gently scrubbing the stain with a clean cloth or sponge, you are taking further action to loosen and lift the Sharpie ink from the fabric. With patience and proper technique, you can increase your chances of successfully removing the stain and restoring your sofa’s appearance.
Rinse the area with water
After gently scrubbing the stain on your sofa, it’s important to rinse the area with water to remove any leftover residue and ensure the fabric is clean. Here’s how you can effectively rinse the area:
- Prepare a bowl or bucket of clean water at room temperature. Ensure that the water is neither too hot nor too cold.
- Take a clean cloth or sponge and dip it into the water. Wring out any excess moisture so that the cloth or sponge is slightly damp.
- Gently blot or wipe the treated area with the damp cloth or sponge. This will help rinse away any remaining cleaning solution and residue from the fabric.
- Continue rinsing until you are confident that the area is thoroughly cleaned and any residual cleaning product has been removed. Pay extra attention to the previously treated stain.
Rinsing the area with water is essential because it helps remove any remnants of the cleaning solution or residue from the fabric fibers. By rinsing, you ensure that no potentially harmful chemicals or detergents are left behind that could cause long-term damage or discoloration.
Throughout the rinsing process, it’s important to use gentle and controlled motions to avoid spreading the stain or causing any unnecessary friction on the fabric. Blotting or light wiping is recommended to prevent any damage to the upholstery.
After rinsing, it’s crucial to blot the area dry with a clean, absorbent cloth or towel to remove excess moisture and prevent water spots from forming. Be careful not to rub or scrub the fabric, as this may cause the fibers to tangle or distort.
Remember to fully air dry the area before using or sitting on the sofa again. Adequate drying time prevents any potential mold or mildew growth and maintains the integrity of the fabric.
By thoroughly rinsing the area with water, you complete the stain removal process and provide a final step in ensuring that the fabric is clean and residue-free. This helps restore your sofa to its original appearance and safeguards its longevity.
Blot dry with a clean cloth
After rinsing the treated area of your sofa, it’s important to blot dry with a clean cloth to remove any remaining moisture. This step ensures that the fabric dries evenly and prevents water spots or potential damage. Follow these steps for effective blot drying:
- Choose a clean, absorbent cloth or towel that is suitable for the fabric of your sofa. Make sure it is free of any dirt or debris that could transfer onto the fabric.
- Place the cloth or towel on the damp area and gently press down to absorb the moisture. Avoid rubbing or scrubbing, as this can potentially damage the fabric or cause it to pill.
- Continue blotting with the cloth, moving to a dry portion of the cloth as it becomes damp. Repeat this process until the fabric feels mostly dry to the touch.
- Pay special attention to any seams or creases in the fabric, as these areas may retain more moisture. Ensure they are thoroughly dried to prevent mildew or water damage.
When blot drying, it’s important to use a gentle touch to prevent any unnecessary friction or stretching of the fabric. The goal is to absorb and remove the moisture without causing any damage or distortion to the upholstery.
Avoid using heat sources like hair dryers or heaters to speed up the drying process. High heat can potentially shrink or warp the fabric, resulting in permanent damage. Instead, allow the fabric to air dry naturally by providing adequate ventilation in the room.
By blot drying with a clean cloth, you ensure that the treated area is thoroughly dried and ready for use. Proper blot drying prevents any potential water spots or damage that could result from leaving moisture on the fabric.
Take your time and ensure that the fabric is completely dry before using or sitting on the sofa again. This ensures the longevity and appearance of your furniture for years to come.
Repeat the process if necessary
Removing a Sharpie stain from your sofa can sometimes require persistence and multiple attempts. If the stain remains after the initial treatment, don’t be discouraged. You can repeat the stain removal process to further improve the results. Follow these steps:
- Assess the treated area to determine if the stain has been fully removed or if there is still some ink residue left behind.
- If the stain is still visible or hasn’t completely faded, you can repeat the same stain removal method that you previously used. Follow the instructions and steps carefully.
- Continue with additional rounds of the stain removal process until you see a significant improvement or until the stain is completely eliminated.
- After each repetition, assess the stain again to see if further treatment is required. Be patient, as some stubborn stains may take multiple attempts to fully remove.
There are several factors that can influence the success of removing a Sharpie stain, such as the fabric type, the age of the stain, and the intensity of the ink. Persistent stains may require additional time and effort to achieve desired results.
If the stain is not responding to repeated attempts or if you’re uncertain about the best course of action, it’s recommended to consult a professional upholstery cleaner. They have the expertise and specialized tools to effectively treat stubborn stains and ensure the preservation of your sofa’s fabric.
Remember to be cautious and avoid excessive force or aggressive scrubbing during each repetition. Always test any cleaning solutions or methods on a small, inconspicuous area of the fabric before applying them to the stain.
By being persistent and repeating the stain removal process if necessary, you can increase the chances of successfully eliminating the Sharpie stain and restoring your sofa’s appearance to its original condition.
Try using a non-acetone nail polish remover
If the Sharpie stain on your sofa persists after attempting other methods, you may consider using a non-acetone nail polish remover as a last resort. Non-acetone nail polish removers are milder and may be effective in breaking down the ink. Follow these steps if you decide to try this method:
- Make sure you have a non-acetone nail polish remover that does not contain acetone as an ingredient. Acetone can be harsh and potentially damage certain upholstery materials.
- Test the non-acetone nail polish remover on a small, hidden area of your sofa to check for any adverse reactions such as discoloration or damage to the fabric.
- If there are no negative reactions, apply a small amount of the non-acetone nail polish remover to a clean cloth or sponge.
- Gently blot the stained area with the cloth or sponge, working from the outer edges of the stain towards the center.
- Continue blotting until you see the ink transferring onto the cloth or sponge. Avoid excessive rubbing or scrubbing, as this may cause spreading or damage to the fabric.
- Rinse the treated area with water to remove any residue from the nail polish remover, and blot dry with a clean cloth.
It’s important to note that using a non-acetone nail polish remover should be a last resort. While it may be effective in removing the Sharpie stain, it can also have risks associated with it. The success of this method depends on the type of fabric, the age of the stain, and other factors.
Always exercise caution when using any chemical on your sofa. If you are uncertain about the fabric’s reaction or if the stain persists, it’s best to consult a professional upholstery cleaner. They have the expertise to handle stubborn stains and can provide the most suitable and safest solution for your specific situation.
Remember to use the non-acetone nail polish remover sparingly and only on the affected area. Thoroughly rinse the area and blot dry after application to prevent any potential damage or residue left behind.
By trying a non-acetone nail polish remover as a last resort, you are exploring an alternative option that may effectively remove the Sharpie stain. Exercise caution, and consider seeking professional assistance if necessary to ensure the safety and integrity of your sofa.
Apply the non-acetone nail polish remover to a clean cloth or sponge
If traditional stain removal methods have not successfully eliminated the Sharpie stain from your sofa, an alternative option to consider is using a non-acetone nail polish remover. While this method should be approached with caution, it can be effective in breaking down the ink. Follow these steps to apply the non-acetone nail polish remover:
- Ensure you have a non-acetone nail polish remover. Check the label to verify that it does not contain acetone, as this harsh chemical can damage certain upholstery materials.
- If possible, test the non-acetone nail polish remover on a small, inconspicuous area of your sofa. This test will help you determine if the remover will cause any adverse reactions or discoloration on the fabric.
- Once you are confident in the compatibility of the nail polish remover, apply a small amount to a clean cloth or sponge.
- Gently blot the stained area with the cloth or sponge, starting from the outer edges of the stain and working your way toward the center.
- Avoid excessive rubbing or scrubbing, as this can potentially spread the stain or damage the fabric.
- Continue blotting until you notice the ink transferring onto the cloth or sponge. Be patient and persistent, as it may take multiple attempts to fully remove the stain.
- After treating the stain, rinse the area with water to remove any residue from the nail polish remover.
- Blot dry the area with a clean cloth to remove excess moisture.
- Inspect the treated area to determine if the stain has been successfully removed or if further treatment is necessary.
It’s crucial to exercise caution when using a non-acetone nail polish remover. While it can be effective in breaking down the Sharpie ink, it’s important to test it first and closely monitor any reactions on the fabric. Some upholstery materials may be more sensitive to certain chemicals, so it’s essential to verify compatibility beforehand.
If you are uncertain about using a non-acetone nail polish remover or if the stain persists, seeking professional help from an upholstery cleaner is recommended. They possess the expertise and knowledge to handle a wide range of stains and can provide the best solution for your specific situation.
By applying a non-acetone nail polish remover to a clean cloth or sponge, you are exploring an alternative method to remove the Sharpie stain. Proceed with caution, take necessary precautions, and ensure compatibility with your sofa’s fabric to achieve the best possible outcome.
Blot the stain with the nail polish remover
If traditional stain removal methods have proven ineffective, using a non-acetone nail polish remover can be an alternative approach to removing a stubborn Sharpie stain from your sofa. Follow these steps to effectively blot the stain with the nail polish remover:
- Pour a small amount of the non-acetone nail polish remover onto a clean cloth or sponge. Ensure that the cloth or sponge is not saturated, but damp enough to effectively treat the stain.
- Gently blot the stained area with the cloth or sponge, starting from the outer edges and working your way toward the center. Avoid rubbing or scrubbing vigorously, as this may spread the stain or damage the fabric.
- Continue blotting until you see the ink transferring onto the cloth or sponge. It may take multiple rounds of blotting to effectively break down the Sharpie stain.
- Monitor the progress of the stain removal as you blot. You should notice the stain gradually fading and being lifted from the fabric.
- Switch to clean sections of the cloth or sponge as needed to prevent reapplying the ink onto the fabric.
- If necessary, apply a little more nail polish remover to the cloth or sponge and continue blotting until the desired results are achieved.
- Once the stain has significantly lightened or disappeared, rinse the area with water to remove any remaining nail polish remover residue.
- Blot the rinsed area with a clean cloth to dry and remove any excess moisture.
- Inspect the treated area to ensure that the stain has been successfully removed or significantly reduced.
Blotting the stain with a non-acetone nail polish remover can be an effective method to break down the ink and lift it from the fabric. It is important to be patient and persistent throughout the process, as stubborn stains may require multiple attempts to fully remove.
Remember to test a small, inconspicuous area of your sofa first to ensure compatibility and minimize the risk of any adverse reactions. Additionally, ventilate the room while using the nail polish remover to avoid overwhelming fumes.
If the stain persists or if you are uncertain about using the nail polish remover on your sofa, consult a professional upholstery cleaner. They have the expertise and specialized tools to handle various types of stains and fabrics, ensuring the best possible outcome.
By carefully blotting the stain with a non-acetone nail polish remover, you are taking a proactive step towards removing the Sharpie stain and restoring the appearance of your sofa. With patience and diligence, you can improve the chances of successfully eliminating the stain.
Rinse the area with water
After applying the non-acetone nail polish remover, it is important to rinse the treated area with water to remove any residue and ensure the fabric is clean. Following these steps will help you effectively rinse the area:
- Prepare a bowl or bucket of clean water at room temperature. It should not be too hot or too cold.
- Take a clean cloth or sponge and dip it into the water. Wring out any excess moisture so that the cloth or sponge is slightly damp.
- Gently blot or wipe the area that was treated with the non-acetone nail polish remover. This will help remove any residue from the remover as well as any loosened ink.
- Continue rinsing until you are confident that the area is thoroughly cleaned and any remnants of the nail polish remover are removed.
- Pay extra attention to the previously treated stain, ensuring that the water removes any remaining residue.
Rinsing the area with water is essential to remove any residue left behind by the non-acetone nail polish remover. It helps to ensure that no cleaning solution or ink molecules are left on the fabric, which could potentially cause damage or discoloration over time.
While rinsing, it is important to use gentle and controlled motions to avoid spreading the stain or causing any unnecessary friction on the fabric. Lightly blot or wipe the area to remove the residue effectively.
After rinsing, blot the area dry with a clean cloth or allow it to air dry naturally. Ensure that it is fully dry before using or sitting on the sofa again to prevent any potential damage or additional staining.
By thoroughly rinsing the treated area with water, you complete the stain removal process and remove any residue or cleaning solution from the fabric. This final step ensures that your sofa is left clean and ready to be enjoyed.
Blot dry with a clean cloth
Once you have rinsed the treated area of your sofa with water, it’s essential to blot dry with a clean cloth to remove any remaining moisture. This step is crucial in preventing water spots and ensuring that the fabric dries evenly. Follow these steps for effective blot drying:
- Select a clean, dry cloth or towel that is suitable for the fabric of your sofa. Ensure that it is free of lint or any potential contaminants that could transfer onto the fabric.
- Place the cloth or towel over the damp area and gently press down. Absorb the moisture without rubbing or scrubbing, as this can potentially damage the fabric or cause it to lose its shape.
- Continue blotting with the cloth, moving to a dry portion of the cloth as it becomes damp. Repeat this process until the fabric feels mostly dry to the touch.
- Pay special attention to any seams or creases in the fabric, as they may retain more moisture. Ensure that they are thoroughly dried to prevent any mold or water damage.
When blotting the fabric, it’s important to be gentle and avoid applying excessive force. The aim is to absorb and remove the moisture without causing any damage or distortion to the upholstery.
Avoid using heat sources such as hair dryers or heaters to speed up the drying process. High heat can potentially shrink or warp the fabric, leading to permanent damage. Instead, allow the fabric to air dry naturally in a well-ventilated area.
By blotting dry the area with a clean cloth, you ensure that the treated area is thoroughly dried, minimizing the risk of water spots or damage from excess moisture. Proper blot drying allows the fabric to retain its texture and appearance.
Take your time during this step, ensuring that the fabric is completely dry before using or sitting on the sofa again. This will help maintain the longevity and visual appeal of your furniture.
Consult a professional upholstery cleaner if necessary
If you have exhausted your efforts and the Sharpie stain on your sofa persists, it may be time to seek the expertise of a professional upholstery cleaner. These professionals possess the knowledge, experience, and specialized tools to effectively handle stubborn stains and restore the appearance of your sofa. Here’s why you should consider consulting a professional:
- Expertise: Professional upholstery cleaners have in-depth knowledge of different types of fabrics and stains. They understand the unique requirements of each material and can apply the most appropriate techniques and cleaning agents to tackle stubborn stains like Sharpie ink.
- Specialized equipment: Professional upholstery cleaners are equipped with specialized tools and equipment to safely and effectively clean your sofa. These tools are designed to reach deep within the fabric fibers and extract tough stains, leaving your sofa looking refreshed.
- Preservation of fabric: Improper cleaning techniques or the use of harsh chemicals can cause irreversible damage to your sofa’s fabric. Professional cleaners have the expertise to choose the most suitable cleaning methods that will effectively remove the stain without compromising the integrity of the fabric.
- Customized solutions: Every stain and fabric is unique, requiring a tailored approach. Professional cleaners will assess the stain, identify the best course of action, and provide a customized solution to treat the Sharpie stain on your sofa.
- Peace of mind: By entrusting the stain removal process to professionals, you can have peace of mind knowing that your sofa is in capable hands. They will handle the stain with care and provide the best possible outcome, ensuring your satisfaction.
It’s important to note that professional upholstery cleaning services come at a cost. However, the investment is worthwhile considering the knowledge, expertise, and specialized equipment they bring to the table. Additionally, the results achieved by professionals often surpass what can be accomplished through DIY methods.
If the Sharpie stain remains despite your best efforts or if you are uncertain about handling the stain yourself, consulting a professional upholstery cleaner is recommended. They will assess the stain, provide an expert opinion, and offer solutions that are safe for your specific fabric.
By engaging the services of a professional upholstery cleaner, you can increase your chances of successfully removing the Sharpie stain and restoring your sofa to its original condition, all while avoiding potential damage or further complications.