
Gather the necessary supplies
Removing nail polish stains from a rug may seem like a daunting task, but with the right supplies, you can tackle the job effectively. Before you start, make sure you have the following items on hand:
- Acetone-free nail polish remover
- Clean white cloths or paper towels
- Cotton balls or swabs
- Mild dishwashing detergent
- Lukewarm water
- A small bowl
- Soft-bristled brush or toothbrush
- Vacuum cleaner
The key to successfully removing nail polish from a rug is to act swiftly and use gentle methods to avoid causing further damage. Acetone-free nail polish remover is preferable as it is less likely to strip the color or damage the fibers of the rug. Clean white cloths or paper towels are essential for blotting the stain, while cotton balls or swabs can be used for more precise application of the nail polish remover.
You will also need mild dishwashing detergent and lukewarm water to clean the rug after removing the stain. The small bowl will come in handy for mixing the detergent solution. A soft-bristled brush or toothbrush can be used to gently scrub the rug without causing any abrasion. Finally, a vacuum cleaner will be needed to restore the texture and appearance of the rug once it is dry.
By having these supplies readily available, you can begin the process of removing nail polish from your rug with confidence. Remember, the sooner you address the stain, the easier it will be to remove.
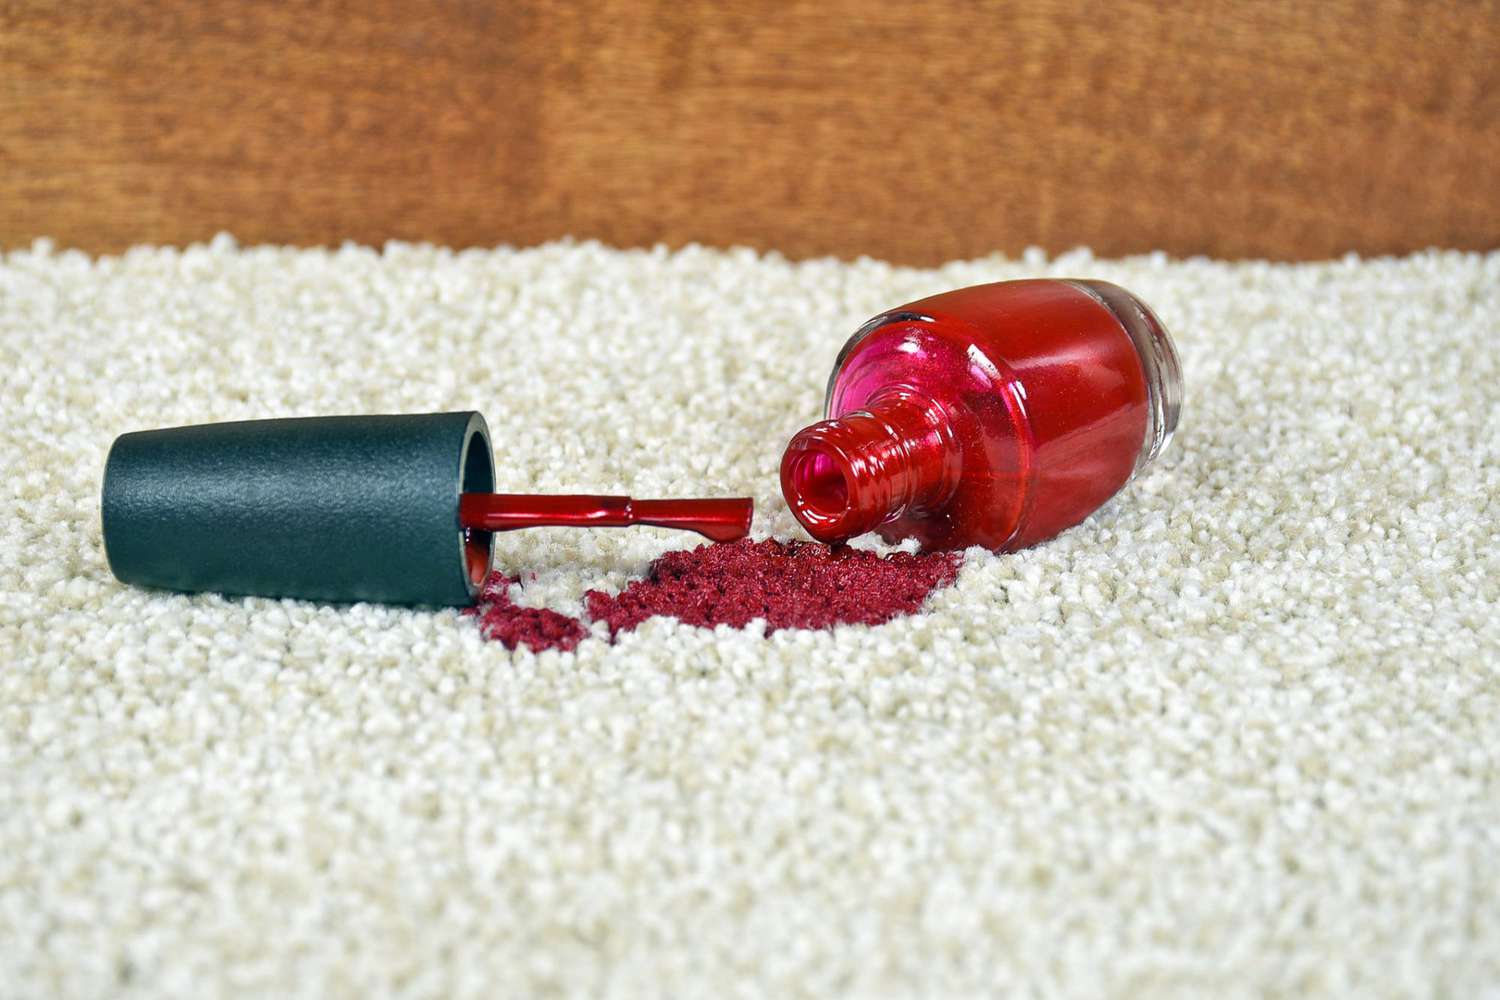
Blot the nail polish stain
As soon as you notice a nail polish stain on your rug, it’s important to act quickly to prevent it from setting in. Here’s how to effectively blot the stain:
- Start by taking a clean white cloth or paper towel and gently blotting the stain. Avoid rubbing or scrubbing, as this can spread the nail polish and make the stain worse.
- If the stain is still wet, continue blotting to remove as much of the nail polish as possible. Be careful not to push the stain deeper into the fibers of the rug.
- If the stain has dried, carefully scrape off any excess nail polish using a blunt knife or spoon. Be gentle to avoid damaging the rug.
It’s important to remember not to use colored or patterned cloths, as the dye or print may transfer to the rug. Stick to clean white cloths or paper towels to ensure you’re only removing the nail polish.
While blotting, make sure to work from the outside of the stain towards the center. This helps prevent the stain from spreading. Additionally, it’s crucial to use a dabbing motion instead of rubbing, as rubbing can push the stain deeper into the rug fibers and make it more difficult to remove.
If the stain persists after blotting, do not panic. We will move on to the next step to effectively treat the nail polish stain on your rug.
Avoid rubbing or spreading the stain
When it comes to removing a nail polish stain from your rug, it’s crucial to avoid rubbing or spreading the stain. Here’s why and how to prevent further damage:
Rubbing the stain can cause the nail polish to penetrate deeper into the rug fibers, making it more difficult to remove. It can also spread the stain, resulting in a larger and more noticeable area of discoloration. To prevent these unwanted consequences, follow these steps:
- As mentioned earlier, always blot the stain instead of rubbing it. Use a clean white cloth or paper towel to gently press down on the stain and lift it off the rug’s surface.
- When blotting, remember to work from the outside of the stain towards the center. This helps contain the stain and prevent it from spreading further.
- If you accidentally smear the stain while blotting, pause and switch to a clean section of the cloth or paper towel. This helps avoid transferring the nail polish back onto the rug.
It’s crucial to be patient and cautious throughout the process. Rushing or applying excessive force can cause the stain to worsen and become harder to remove. By gently blotting the stain and being mindful of spreading, you’ll have a better chance of successfully treating the nail polish stain on your rug.
If the stain persists or if it has already been spread, don’t worry. We will move on to the next step to effectively treat the stain and restore your rug to its original state.
Test a small area of the rug
Before proceeding with any stain removal method, it is essential to test a small, inconspicuous area of the rug to ensure that it can withstand the cleaning process. Here’s why and how to perform the test:
Testing a small area of the rug helps to prevent any potential damage or discoloration that may occur from the cleaning solution. Follow these steps to perform the test:
- Select a small, hidden area of the rug, such as a corner or the underside, to test the cleaning solution. This allows you to assess the rug’s reaction to the product without compromising its visible surface.
- Dampen a clean white cloth or paper towel with water, then apply a small amount of the cleaning solution to the cloth.
- Gently blot the test area with the dampened cloth, being careful not to oversaturate the rug.
- After a few minutes, check the tested area for any adverse reactions, such as color bleeding or fiber damage. If there are no negative effects, proceed with the stain removal process.
Performing a test ensures that the cleaning solution is safe to use on the entire rug. It also gives you the opportunity to make adjustments or choose an alternative method if the test area reacts negatively.
Remember, different rugs may react differently to cleaning solutions, so it’s essential to perform this step even if you have used the same cleaning method on other rugs in the past.
Once you have successfully tested a small area of the rug and determined that it can withstand the cleaning process, you are ready to move forward with treating the nail polish stain.
Treat the stain with nail polish remover
Once you have tested a small area of the rug and confirmed that it can withstand the cleaning process, you can proceed to treat the nail polish stain using nail polish remover. Follow these steps to effectively remove the stain:
- Start by dampening a clean white cloth or paper towel with acetone-free nail polish remover.
- Gently blot the stained area with the dampened cloth. Be careful not to rub or scrub the stain, as this can cause it to spread or penetrate deeper into the rug fibers.
- Continue blotting until you see the nail polish transferring onto the cloth. This may take several attempts, especially for stubborn or old stains.
- If the stain remains, try applying a small amount of nail polish remover directly to the stain. Use a clean cotton ball or swab to carefully dab the remover onto the affected area.
- Allow the nail polish remover to sit on the stain for a few minutes, giving it time to break down the polish.
- Gently blot the stain again with a clean cloth or paper towel to lift off the dissolved nail polish.
Remember to work from the outside of the stain towards the center to prevent the polish from spreading. Additionally, avoid using excessive amounts of nail polish remover, as it can potentially damage the rug’s fibers.
If the nail polish remover does not fully remove the stain, repeat the process as necessary. For old or stubborn stains, you may need to apply the nail polish remover multiple times, being patient and persistent in your efforts.
After successfully treating the nail polish stain, proceed to the next step to ensure the rug is thoroughly cleaned and restored.
Blot the stain with a clean cloth
Once you have treated the nail polish stain with nail polish remover, it’s important to proceed with blotting the stain using a clean cloth. This step helps remove any remaining residue and ensures the stain is lifted from the rug. Follow these guidelines to effectively blot the stain:
- Take a clean white cloth or paper towel and blot the treated area of the rug. Gently press down on the stain, allowing the cloth to absorb any leftover nail polish remover and dissolved stain.
- Continue blotting until you no longer see any transfer of color from the stain to the cloth. It may take a few rounds of blotting to fully remove the residue.
- As you blot, periodically switch to a clean section of the cloth or paper towel to avoid spreading the stain or residue back onto the rug.
Remember to use a dabbing motion rather than rubbing, as rubbing can cause the stain to spread and penetrate deeper into the rug fibers. By gently blotting, you are ensuring that the stain is lifted without causing any additional damage or discoloration to the rug.
If there is still some residue remaining after blotting, you can repeat the nail polish remover treatment process and then proceed with blotting again. Be patient and persistent, as it may take a few tries to fully eliminate the stain.
By diligently blotting the stain with a clean cloth, you are taking the necessary steps to restore the appearance of your rug. Now, let’s move on to the next steps to ensure the rug is thoroughly cleaned and ready for use.
Repeat the process if necessary
If the nail polish stain on your rug persists after the initial treatment and blotting, don’t fret. It may take a few rounds of the stain removal process to completely eliminate the stain. Here’s what you can do if the stain remains:
- Reapply the acetone-free nail polish remover to a clean white cloth or paper towel.
- Gently blot the remaining stain, working from the outside towards the center. Avoid rubbing or scrubbing, as this can spread the stain or damage the rug fibers.
- Continue blotting until the stain visibly lightens or is completely lifted from the rug. It may take several attempts to achieve the desired result.
- After each round of blotting, assess if the stain has significantly improved. If there is still some residue remaining, repeat the process.
If the nail polish stain is particularly stubborn, you can try applying a small amount of the nail polish remover directly to the stain and gently dabbing it with a clean cotton ball or swab. Allow the remover to sit for a few minutes before blotting with a cloth or paper towel.
Remember to be patient and persistent throughout the process. Nail polish stains can be challenging to remove, especially if they are old or deeply embedded in the rug fibers. Multiple rounds of treatment and blotting may be necessary to fully eliminate the stain.
Once the stain is satisfactorily removed, proceed to the next steps to ensure the rug is thoroughly cleaned and ready for use.
Clean the rug with mild detergent
After successfully removing the nail polish stain from your rug, it’s important to clean the rug using a mild detergent solution. This step will help remove any lingering residue and freshen up the rug’s appearance. Here’s how to effectively clean the rug:
- Prepare a solution of mild dishwashing detergent and lukewarm water. Mix a few drops of detergent in a small bowl filled with water.
- Gently dip a clean white cloth or sponge into the detergent solution, then wring it out to remove excess moisture.
- Using the damp cloth or sponge, lightly dab and clean the entire surface of the rug. Work in small sections, applying gentle pressure to remove any remaining residue and dirt.
- Be careful not to oversaturate the rug with the detergent solution. Excessive moisture can lead to mold or mildew growth, and it can also damage the rug’s fibers.
- Once you have cleaned the entire rug, rinse the cloth or sponge with clean water and gently go over the rug again to remove any soapy residue.
When cleaning the rug, it’s important to avoid scrubbing or vigorous rubbing, as it can damage the rug’s fibers. Instead, focus on gentle dabbing and wiping motions to effectively lift any remaining residue.
After cleaning, allow the rug to air dry in a well-ventilated area. Avoid exposing it to direct sunlight or heat sources, as this can cause the rug to fade or shrink.
Cleaning the rug with a mild detergent will not only remove any remaining traces of the nail polish stain but also leave the rug looking fresh and revitalized.
Once the rug is completely dry, proceed to the next step to ensure its texture and appearance are fully restored.
Rinse the rug thoroughly
After cleaning the rug with mild detergent, it’s important to rinse it thoroughly to remove any trace of soap residue. This step ensures that the rug is left clean and free of any potential irritants. Here’s how to effectively rinse the rug:
- Fill a bucket or basin with clean, lukewarm water.
- Dip a clean white cloth or sponge into the water, then wring it out to remove excess moisture.
- Gently go over the entire surface of the rug, using the damp cloth or sponge to rinse away any remaining detergent.
- Repeat the rinsing process as necessary to ensure that all soap residue is thoroughly removed.
- Be diligent in your rinsing, paying attention to any areas that may have received more detergent during the cleaning process.
While rinsing, it ‘s important to avoid oversaturating the rug with water. Excessive moisture can lead to mold or mildew growth, as well as potential damage to the rug’s fibers.
Allow the rug to air dry completely in a well-ventilated area, out of direct sunlight or heat sources. This will help preserve the rug’s color and prevent any potential shrinking or warping.
Rinsing the rug thoroughly after cleaning ensures that any remaining detergent is removed, leaving the rug fresh, clean, and ready for use.
Once the rug is fully dry, the final step is to restore its texture and appearance through vacuuming.
Allow the rug to air dry
After rinsing the rug, it’s important to allow it to air dry completely. Air drying helps prevent damage to the rug fibers and ensures that it regains its original texture and appearance. Here’s what you should do:
- Find a well-ventilated area in your home where you can lay the rug flat. Make sure there is no direct sunlight or heat sources that could potentially damage the rug.
- Gently place the rug on a clean surface, such as a clean towel or a drying rack. Be mindful not to fold or crease the rug during this process.
- Keep the rug away from high foot traffic areas or any furniture until it is completely dry. This will help prevent any potential damage or soiling while it dries.
- Allow the rug to air dry naturally. Depending on the size of the rug and the humidity in the environment, it may take several hours or even a few days for it to fully dry.
- Periodically check the rug to assess its dryness. You can do this by gently touching the fibers; they should feel dry and cool to the touch.
It’s important to be patient during the drying process and avoid using any artificial heat sources like hair dryers or heaters. Direct heat can cause the rug to shrink or lose its shape.
Once the rug is completely dry, you can restore its texture and appearance through vacuuming, which helps fluff up the fibers and remove any residual dirt or debris.
By allowing the rug to air dry thoroughly, you ensure that it is ready to be placed back in its designated area, looking clean, fresh, and beautiful once again.
Vacuum the rug to restore its texture and appearance
After the rug has fully air dried, the final step to restore its texture and appearance is to vacuum it. Vacuuming helps remove any remaining dirt, dust, or debris that may have accumulated during the cleaning and drying process. Here’s how you can effectively vacuum the rug:
- Ensure that the rug is completely dry and free of any moisture. Vacuuming a damp or wet rug can lead to the spread of mold or mildew.
- Adjust the height of your vacuum cleaner to the appropriate setting for the rug’s pile or thickness. This will ensure optimal cleaning and prevent any potential damage to the rug fibers.
- Start by vacuuming the surface of the rug in one direction, working systematically from one edge to the other. Use slow, deliberate strokes to allow the vacuum to effectively pick up any dirt or debris.
- Pay extra attention to high-traffic areas or areas that were previously stained. Repeat the vacuuming process in these areas if necessary.
- If your rug has fringes or tassels, avoid using the beater bar or brush attachment of the vacuum on them. Instead, gently vacuum them with a handheld attachment or brush to prevent any damage.
- For rugs with a deeper pile, you may need to use the vacuum cleaner’s attachment with a rotating brush to effectively clean the fibers.
Vacuuming the rug helps restore its texture by fluffing up the fibers and removing any lingering dirt or debris. It also helps improve the rug’s appearance, leaving it looking fresh and well-maintained.
Regular vacuuming, even when the rug isn’t stained, is an important part of maintaining its cleanliness and prolonging its lifespan. Aim to vacuum your rug at least once a week, or more frequently if it is located in a high-traffic area.
By following these vacuuming techniques, your rug will not only regain its original texture and appearance but also remain in good condition for years to come.