
Possible Reasons for a Not Spinning Vacuum Brush
If you’ve noticed that your vacuum brush isn’t spinning, don’t worry – there are several common reasons for this issue. By identifying the root cause, you can quickly resolve the problem and get your vacuum back to its cleaning glory. Here are some possible reasons to consider:
- Clogs or Debris: One of the most common reasons for a non-spinning vacuum brush is the presence of clogs or debris. Check the brush head and any connecting hoses for any blockages that may be obstructing the brush’s movement.
- Inspect the Belt: A worn-out or broken belt can prevent the vacuum brush from spinning. Take a look at the belt that connects the brush to the motor and check for any signs of damage or looseness. If necessary, replace the belt with a new one.
- Test the Motor: A faulty motor could also be the culprit behind the non-spinning brush. Listen for any unusual sounds coming from the motor or test its functionality by toggling the power switch. If the motor is not working properly, it may need to be repaired or replaced.
- Examine the Brush Roller: Inspect the brush roller itself for any obstructions or tangles. Hair, thread, and other debris can get wrapped around the brush, preventing it from spinning freely. Use scissors or a cleaning tool to remove any entangled material.
- Replace or Clean the Brush Roll Bearings: Over time, the bearings supporting the brush roller can become dirty or worn-out, resulting in a non-spinning brush. Clean the bearings with a brush and some mild detergent or consider replacing them if necessary.
- Adjust the Brush Height: Check if the brush height is set correctly for the type of surface you’re vacuuming. If the brush is set too high or too low, it may not make proper contact with the floor, leading to a non-spinning brush.
- Look for Problems in the Brush Drive Motor: Some vacuum models have a separate motor specifically for driving the brush. Check for any issues with the brush drive motor, such as loose connections or faulty wiring. If necessary, consult the user manual or contact a professional for further assistance.
- Replace or Repair the Vacuum Brush: If all else fails, it may be time to consider replacing or repairing the entire vacuum brush. Consult the manufacturer’s guidelines or reach out to a professional technician to determine the best course of action.
By investigating these possible reasons and taking appropriate action, you should be able to resolve the issue of a not spinning vacuum brush. Remember to always prioritize safety and consult the user manual or seek professional help if needed. Happy vacuuming!
Step 1: Check for Clogs or Debris
When your vacuum brush is not spinning, the first step you should take is to check for any clogs or debris that might be obstructing its movement. Over time, dust, hair, and other particles can accumulate in the brush head or the connecting hoses, causing a blockage that prevents the brush from rotating properly. Here’s what you need to do:
- Inspect the Brush Head: Begin by examining the brush head, which is located at the bottom of your vacuum cleaner. Look for any visible signs of debris such as tangled hair, string, or pet fur. Use your hands or a pair of tweezers to carefully remove any clogs or obstructions, being mindful not to damage the brush bristles.
- Check the Connecting Hoses: Next, inspect the connecting hoses between the brush head and the main vacuum unit. Detach the hoses and visually inspect them for any blockages. Use a long, flexible object like a broom handle or a coat hanger to gently push through the hoses and remove any lodged debris.
- Clear the Dust Canister or Bag: If your vacuum cleaner has a dust canister or bag, ensure that it is not full or clogged. If necessary, empty the canister or replace the bag according to the manufacturer’s instructions. A full dust canister or bag can impede the airflow, leading to poor brush performance.
- Clean or Replace Filters: Check if your vacuum has any filters that may be clogged with dirt and dust. Consult the user manual to locate the filters and follow the instructions for cleaning or replacing them. Clean filters maintain proper air circulation, which is essential for optimal brush rotation.
- Test the Brush Rotation: After clearing any clogs or debris, reconnect the brush head and turn on the vacuum cleaner. Observe if the brush starts spinning properly. Conduct a brief test by moving the vacuum cleaner across a small area to ensure that the brush is rotating effectively.
Remember, clogs and debris are common culprits when it comes to a non-spinning vacuum brush. Taking a few minutes to check for and remove any obstructions can often restore the brush’s proper functioning. In the following steps, we will explore other potential causes and solutions for a not spinning vacuum brush, so let’s move on to the next step!
Step 2: Inspect the Belt
If you’ve checked for clogs or debris and your vacuum brush is still not spinning, the next step is to inspect the belt. The belt plays a crucial role in connecting the brush to the motor and enabling it to rotate. Over time, the belt can become worn out, loose, or even snapped, causing the brush to stop spinning. Here’s what you need to do:
- Locate the Belt: Refer to your vacuum cleaner’s user manual to identify the location of the belt. In most cases, it will be located near the brush head or underneath the vacuum cleaner.
- Examine the Belt: Once you’ve located the belt, visually inspect it for any signs of damage, such as fraying, stretching, or breakage. A worn-out or broken belt will need to be replaced with a new one to restore the brush’s rotation.
- Check the Belt Tension: A loose belt can also cause the brush to stop spinning. Carefully test the tension of the belt by pressing down on it with your finger. It should feel taut, not loose. If the belt is loose, it can usually be adjusted by repositioning it or tightening a tension adjustment mechanism, as specified in the user manual.
- Replace the Belt: If you notice any signs of damage or if the belt is significantly stretched or broken, it’s time to replace it. Consult the user manual or contact the manufacturer to find the right replacement belt for your specific vacuum model. Follow the manufacturer’s instructions for removing the old belt and installing the new one.
- Test the Brush Rotation: After replacing the belt, reassemble the vacuum cleaner and turn it on. Observe if the brush now spins properly. Run a quick test by vacuuming a small area to ensure that the brush is rotating smoothly.
Inspecting and replacing a worn-out or broken belt can often resolve the issue of a not spinning vacuum brush. If the belt is intact but the brush still doesn’t rotate, continue to the next step for further troubleshooting. We’ll explore additional potential causes and solutions to get your vacuum brush back in action!
Step 3: Test the Motor
If you’ve checked for clogs, debris, and inspected the belt without success, it’s time to focus on the motor of your vacuum cleaner. A faulty motor can cause the vacuum brush to stop spinning. To determine if the motor is the cause, follow these steps:
- Listen for Unusual Sounds: Turn on your vacuum cleaner and listen for any unusual sounds coming from the motor. Squeaking, grinding, or buzzing noises could indicate a problem. If you hear any abnormal sounds, it’s likely that the motor needs attention.
- Check Power and Connections: Ensure that your vacuum cleaner is properly plugged in and that the power source is functioning. Examine the power cord for any visible damage. Additionally, check the connections between the power cord, switch, and motor. Loose or faulty connections can disrupt the motor’s operation.
- Test Motor Functionality: Toggle the power switch on and off a few times to test the functionality of the motor. If the motor fails to start, or if it starts but quickly stops, there may be an issue with the motor itself.
- Consult the User Manual: Review the user manual provided with your vacuum cleaner. It will often contain troubleshooting tips specific to your model. Look for guidance on how to test and troubleshoot motor-related issues.
- Seek Professional Help: If you suspect that the motor is faulty and you’re unsure how to proceed, it’s best to consult a professional technician or contact the manufacturer’s customer support team for assistance. They can assess the motor and provide recommendations for repair or replacement.
Testing the motor is an essential step in troubleshooting a not spinning vacuum brush. Identifying a faulty motor will help you determine the next course of action, whether it’s repairing the motor or exploring other potential causes. Let’s move on to the next step and continue our troubleshooting process!
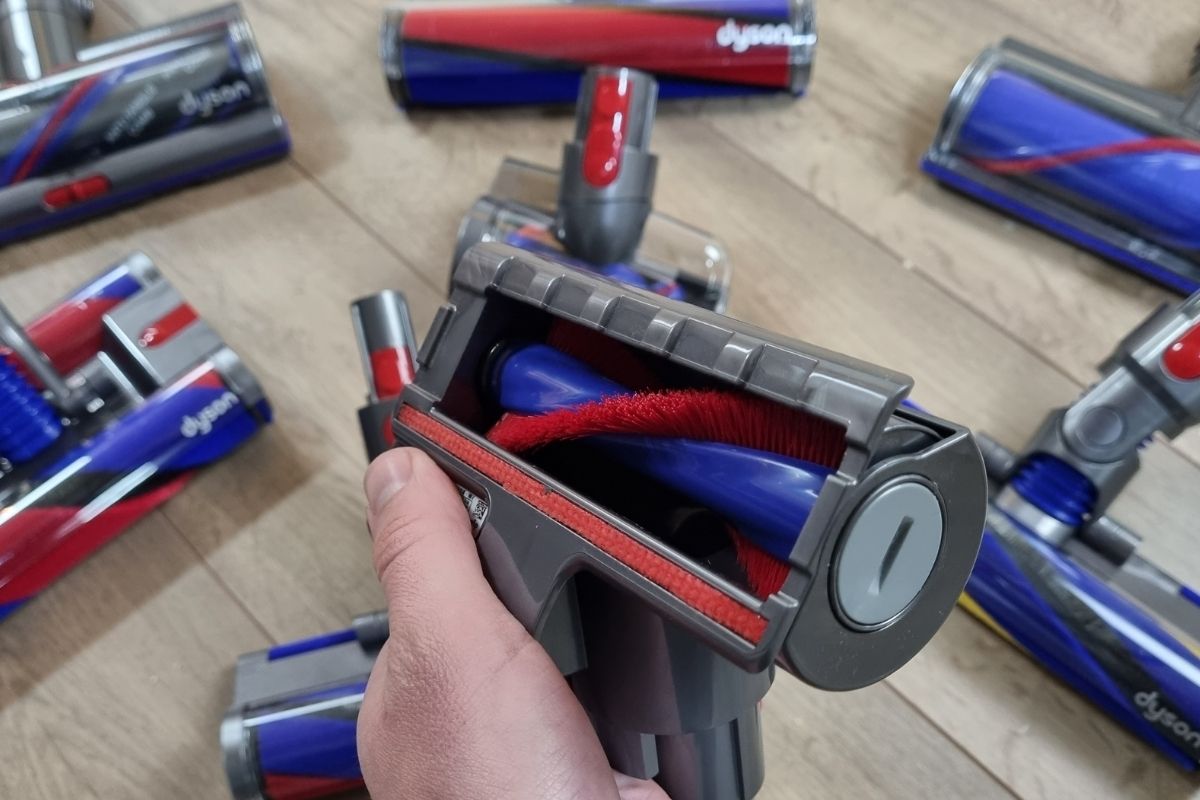
Step 4: Examine the Brush Roller
If your vacuum brush is still not spinning, even after checking for clogs, inspecting the belt, and testing the motor, it’s time to focus on the brush roller itself. The brush roller, also known as the beater bar, is responsible for agitating and sweeping up dirt and debris. Over time, it can get tangled with hair, thread, or other obstructions, causing it to stop spinning. Here’s what you need to do:
- Locate the Brush Roller: Refer to your vacuum cleaner’s user manual to locate the brush roller. It is typically found underneath the vacuum cleaner, attached to the brush head.
- Inspect for Tangled Debris: Carefully examine the brush roller for any tangled debris, such as hair or thread. It’s common for these substances to get caught around the brush roller, inhibiting its rotation. Use a pair of scissors or a cleaning tool to carefully remove any entangled material, being cautious not to damage the bristles.
- Clean the Brush Roller: If the brush roller is dirty or caked with debris, it may not spin properly. Remove the brush roller from the vacuum cleaner according to the instructions in the user manual. Clean it thoroughly with a cloth or brush, removing any built-up dirt or grime. Ensure that all areas of the brush roller are clean before reassembling it.
- Inspect the Roller Bearings: While examining the brush roller, also check the roller bearings. Over time, these bearings can become dirty or worn-out, resulting in a non-spinning brush roller. Clean the bearings with a brush and some mild detergent. If the bearings are damaged or not functioning properly, they may need to be replaced.
- Reassemble and Test: Once the brush roller and bearings are clean and free from debris, reassemble the vacuum cleaner according to the user manual’s instructions. Turn on the vacuum and observe if the brush roller now spins properly. Test it by vacuuming a small area to ensure that it is rotating effectively.
Examining and cleaning the brush roller can often resolve the issue of a not spinning vacuum brush. However, if the brush roller still fails to rotate, do not worry. We will continue troubleshooting in the next step to uncover any additional potential causes and solutions. Let’s dive in and get your vacuum brush back to its spinning action!
Step 5: Replace or Clean the Brush Roll Bearings
If you’ve examined the brush roller and determined that the roller bearings are causing your vacuum brush to not spin properly, it’s time to take action. The roller bearings support the brush roller and play a critical role in its smooth rotation. Over time, these bearings can become dirty, worn-out, or damaged, leading to a non-spinning brush. Here’s what you need to do:
- Identify the Roller Bearings: Consult your vacuum cleaner’s user manual to locate the roller bearings. They are typically situated on both ends of the brush roller and may be covered by plastic caps or clips.
- Inspect the Bearings: Carefully examine the roller bearings for any signs of dirt, debris, or damage. Clean out any visible dirt or debris using a small brush and a mild detergent solution. Avoid using excessive force that could cause damage to the bearings.
- Check for Wear and Tear: Look for any signs of wear and tear on the roller bearings. Worn-out bearings may appear loose, making it difficult for the brush roller to rotate properly. Additionally, damaged bearings may have visible cracks or irregularities. If you notice any significant damage or wear, it is recommended to replace the bearings.
- Clean and Lubricate the Bearings: If the roller bearings are dirty but not damaged, clean them thoroughly using a soft cloth or brush. Remove any dirt or debris that may hinder their smooth function. Once cleaned, apply a small amount of lubricant suitable for your vacuum cleaner’s bearings to ensure smooth rotation.
- Replace the Bearings: If the roller bearings are worn-out or damaged beyond repair, they should be replaced. Refer to the user manual or contact the manufacturer to obtain the correct replacement bearings for your vacuum model. Follow the instructions provided to remove the old bearings and install the new ones correctly.
- Test the Brush Rotation: After cleaning or replacing the roller bearings, reassemble the vacuum cleaner according to the user manual’s instructions. Turn on the vacuum and observe if the brush roller now spins smoothly. Test it by vacuuming a small area to ensure that it rotates effectively without any issues.
By replacing or cleaning the brush roll bearings, you can address one of the potential causes of a not spinning vacuum brush. However, if the brush still doesn’t spin properly, continue to the next step for further troubleshooting. We will explore additional potential causes and solutions to help get your vacuum brush back in action!
Step 6: Adjust the Brush Height
If your vacuum brush is still not spinning, it’s time to check if the brush height is correctly adjusted. Setting the right brush height is crucial for optimal cleaning performance. If the brush is too high or too low, it may not make proper contact with the floor, resulting in a non-spinning brush. Follow these steps to adjust the brush height:
- Refer to the User Manual: Consult your vacuum cleaner’s user manual to locate the brush height adjustment feature. Different models have different mechanisms for adjusting the brush height, so it’s essential to refer to the manufacturer’s guidelines.
- Identify the Brush Height Adjustment: Once you have located the brush height adjustment feature, familiarize yourself with how it works. It may involve levers, buttons, or knobs that allow you to raise or lower the brush.
- Assess the Surface and Floor Type: Consider the type of surface you are vacuuming, whether it’s a carpet, hardwood floor, or a combination of both. Refer to the user manual to determine the recommended brush height setting for each surface type.
- Adjust the Brush Height: Based on the surface type, adjust the brush height accordingly. If you’re vacuuming a carpet, the brush should make gentle contact with the fibers but not be too low, causing excessive friction. For hard floors, adjust the brush to a higher setting to prevent scratching the surface.
- Test the Brush Rotation: After adjusting the brush height, turn on the vacuum cleaner and observe if the brush now spins properly. Test it by vacuuming a small area of the floor surface to ensure that it rotates smoothly and makes proper contact.
Adjusting the brush height is a simple yet crucial step in troubleshooting a not spinning vacuum brush. By ensuring that the brush is set at the appropriate height for the floor surface, you can optimize its performance and prevent any issues. If the brush still doesn’t spin correctly, let’s move on to the next step and explore further potential causes and solutions.
Step 7: Look for Problems in the Brush Drive Motor
If you’ve tried adjusting the brush height and your vacuum brush is still not spinning, it’s time to focus on the brush drive motor. Some vacuum models have a separate motor dedicated solely to driving the brush. A malfunctioning brush drive motor can prevent the brush from spinning properly. Follow these steps to identify and address any problems with the brush drive motor:
- Locate the Brush Drive Motor: Consult your vacuum cleaner’s user manual to determine the location of the brush drive motor. Typically, it is located near the brush head or within the brush assembly.
- Check for Loose Connections: Inspect the connections between the brush drive motor, the power supply, and any control switches. Loose or faulty connections can disrupt the motor’s operation. Ensure all connections are secure and tighten any loose screws or connections as necessary.
- Inspect for Faulty Wiring: Examine the wiring leading to the brush drive motor for any signs of damage, such as frayed or exposed wires. Damaged wiring can cause the motor to malfunction. If you identify any damaged wiring, it may need to be repaired or replaced by a professional technician.
- Test the Motor Functionality: Toggle the power switch for the brush drive motor and listen for any sounds or vibrations. If the motor does not start or emits unusual noises, it may be indicative of a problem. In such cases, it is best to seek assistance from a professional technician or contact the manufacturer for further guidance.
- Consult the User Manual: Review the user manual provided with your vacuum cleaner for specific troubleshooting instructions related to the brush drive motor. The manual may contain guidelines on how to test, repair, or replace the motor or recommend authorized service centers for assistance.
If you suspect there are problems with the brush drive motor and you’re unsure how to proceed, it’s best to consult a professional technician or contact the manufacturer’s customer support team for assistance. They have the expertise to diagnose and address motor-related issues effectively. Let’s move on to the next step for further troubleshooting if needed. We are determined to help you get your vacuum brush spinning again!
Step 8: Replace or Repair the Vacuum Brush
If none of the previous troubleshooting steps have resolved the issue of your vacuum brush not spinning, it may be time to consider replacing or repairing the entire brush assembly. Over time, brushes can wear out or sustain damage that hinders their rotation. Here’s what you need to do:
- Assess the Condition of the Brush: Inspect the brush thoroughly for any signs of wear, damage, or breakage. Examine the bristles, brush roll, and any other components. If there are visible signs of damage, such as frayed bristles or a cracked brush roll, the brush may need to be replaced.
- Order a Replacement Brush: Consult the user manual or contact the manufacturer to determine the correct replacement brush for your specific vacuum model. Order a new brush from an authorized dealer or the manufacturer’s website to ensure compatibility and optimal performance.
- Replace the Brush: Once you receive the replacement brush, follow the instructions provided with the new brush or refer to the user manual for proper installation. Disconnect the old brush assembly and install the new one according to the manufacturer’s guidelines.
- Consider Professional Repair: If your vacuum cleaner is still under warranty or if you’re uncomfortable replacing the brush yourself, consider taking it to an authorized service center for professional repair. They can assess the issue and determine the best course of action, whether it’s repairing the existing brush or suggesting a replacement.
- Test the New Brush: After installing the new brush or getting it repaired, turn on the vacuum cleaner and observe if the brush now spins properly. Run a quick test by vacuuming a small area to ensure that the brush is rotating smoothly and effectively.
Replacing or repairing the vacuum brush can be the solution when all other troubleshooting steps have failed. By ensuring that the brush assembly is in good condition, you can restore the proper functioning of the brush and get your vacuum cleaner back to its optimal performance. If the brush still doesn’t spin after replacement or repair, it may be best to consult a professional technician or contact the manufacturer for further assistance. We hope this guide has helped you in resolving the issue with your vacuum brush!