
Why Do You Need to Dry Your Outdoor Rug?
Drying your outdoor rug is essential for maintaining its longevity and preserving its quality. Outdoor rugs are constantly exposed to the elements, including rain, humidity, and moisture. If not properly dried, these rugs can develop mold, mildew, and even start to rot. It’s important to dry your outdoor rug to prevent these issues and ensure that it remains in good condition for years to come.
One of the main reasons to dry your outdoor rug is to prevent the growth of mold and mildew. When water gets trapped in the fibers of the rug and is left to sit for an extended period, mold and mildew can start to form. Not only does this give your rug an unpleasant odor, but it can also pose health risks, especially for those with allergies or respiratory issues. By drying your rug thoroughly, you eliminate the ideal breeding ground for mold and mildew, keeping your rug fresh and clean.
Another reason to dry your outdoor rug is to prevent rotting. Outdoor rugs are often made from materials such as polypropylene or natural fibers like bamboo or jute. These materials can break down if constantly exposed to moisture without proper drying. Rotting can weaken the fibers, leading to tears, holes, and overall deterioration. By drying your rug, you help to maintain its structural integrity and extend its lifespan.
Additionally, drying your outdoor rug is important for aesthetics. Wet rugs can appear dull, dirty, and unattractive. They can also attract more dirt, making it harder to clean later on. By properly drying your rug, you restore its vibrant colors and maintain its overall appearance, enhancing the visual appeal of your outdoor space.
Overall, drying your outdoor rug is crucial for both practical and aesthetic reasons. It prevents the growth of mold and mildew, prevents rotting, and ensures that your rug remains visually appealing. By following the proper steps to dry your rug, you can protect your investment and enjoy a clean and vibrant outdoor area.
Step 1: Remove the Rug from the Outdoor Area
The first step in drying your outdoor rug is to carefully remove it from the outdoor area where it is located. This can be done by rolling or folding the rug, depending on its size and weight. Make sure to wear gloves to protect your hands and to avoid getting dirt or debris on yourself.
Before removing the rug, take a moment to inspect the area where it was placed. Look for any loose dirt, leaves, or debris and remove them using a broom or a brush. This will prevent the rug from picking up additional dirt or getting damaged when you handle it.
Once the area is clear, start to roll or fold the rug, starting from one end and working your way towards the other. You can also ask for assistance if the rug is heavy or difficult to handle on your own.
If the rug is wet, handle it with care to avoid water dripping onto yourself or the surroundings. Wet rugs can be heavy and more challenging to manipulate, so take your time and be cautious while removing it.
For larger rugs that cannot be easily rolled or folded, you may need to enlist the help of a friend or family member to lift and carry the rug away from the outdoor area. Always remember to communicate and coordinate your movements to ensure a safe and efficient process.
Once the rug is successfully removed, set it aside in a clean and dry area, away from direct sunlight and moisture. This will allow for proper drying without the risk of the rug being exposed to further elements that could impede the drying process.
By carefully and gently removing the rug from the outdoor area, you set the stage for the subsequent steps in the drying process. Handling the rug with care helps to prevent any additional damage and ensures a smooth transition to the next phase of the drying process.
Step 2: Shake Out the Rug to Remove Loose Debris
After removing the rug from the outdoor area, the next step in the drying process is to shake out the rug to remove any loose debris. Over time, outdoor rugs can accumulate dirt, leaves, small stones, and other debris, which can get trapped in the fibers. By shaking out the rug, you effectively dislodge and remove this unwanted debris, ensuring a clean and dry surface.
To shake out the rug, find a suitable area outdoors where you can safely handle the rug without causing any damage to nearby objects or surfaces. It’s best to choose a location with ample space, such as a driveway or an open grassy area.
Hold on to one end of the rug and vigorously shake it up and down. You can also opt to shake it from side to side to ensure that all areas of the rug are cleared of debris. Repeat the shaking motion several times, allowing the loose dirt and debris to fall off the rug.
As you shake the rug, you may also notice loose fibers or threads. While it’s normal for some fibers to loosen during this process, avoid pulling or tugging on them excessively, as this could cause damage to the rug. Instead, focus on shaking out the rug gently and letting gravity do its work.
If the rug is particularly large or heavy, you may need assistance from another person to ensure a thorough shaking. This can be especially helpful in ensuring that all corners and edges are properly shaken out.
Once you’re satisfied with the shaking process, take a moment to inspect the rug for any remaining debris. If you spot any stubborn dirt or small particles, you can use a soft-bristle brush or a broom to gently sweep them off the surface of the rug.
Shaking out the rug to remove loose debris is an important step in preparing it for drying. By eliminating unwanted dirt and debris, you create a clean foundation for the subsequent drying methods, ensuring that the rug dries evenly and thoroughly.
Step 3: Prepare a Clean and Dry Area for Drying the Rug
Once you have shaken out the rug to remove loose debris, the next step in the drying process is to prepare a clean and dry area for the rug to dry properly. This ensures that the rug does not come into contact with any dirt, moisture, or other elements that could hinder the drying process.
Choose a location that is well-ventilated and away from direct sunlight. Direct sunlight can cause the rug’s colors to fade or bleach, so it’s best to find a shaded area where the rug can dry naturally without being exposed to harsh sunlight.
Ensure that the area is clean and free from any dirt, leaves, or other debris that could transfer onto the rug. Sweep or brush the ground if necessary to remove any loose particles. A clean surface will help prevent dirt from sticking to the wet rug and make the drying process more effective.
It’s essential that the area is also dry. If the ground or surface is wet, it can prolong the drying time and even cause moisture to seep back into the rug, leading to mold or mildew growth. If needed, wait for the ground to dry or consider using a moisture-absorbent material, such as a tarp or dry towels, to create a dry base for the rug.
If the weather is not suitable for outdoor drying or if you don’t have access to an outdoor space, you can alternatively use a well-ventilated indoor area. Just make sure the room has good air circulation to aid in the drying process and that you protect the floor or surface underneath the rug to prevent any moisture transfer.
Keep in mind that the size and material of the rug will determine the amount of space needed. Allow ample room for the rug to lay flat without touching surrounding objects or surfaces. This will ensure proper airflow and promote efficient drying.
By preparing a clean and dry area for the rug to dry, you create an optimal environment for the next steps in the drying process. A suitable drying location plays a vital role in preventing potential damage and allowing the rug to dry thoroughly and effectively.
Step 4: Lay the Rug Flat on the Ground
After preparing a clean and dry area, the next step in the drying process is to lay the rug flat on the ground. This allows for proper airflow around the entire rug, facilitating faster and more thorough drying.
Gently place the rug on the ground, making sure it is fully extended and not folded or creased. Smooth out any wrinkles or creases by gently pressing down on the rug with your hands. This helps to ensure that the rug is laid flat and even, allowing for uniform drying.
If the rug is particularly large or heavy, you may need assistance from another person to lay it out flat. Working together, carefully position the rug to avoid any unnecessary stretching or dragging, which could potentially damage the fibers.
Take a moment to ensure that the rug is centered and aligned properly within the drying area. This helps to maintain its shape and prevent any distortion during the drying process.
It’s important to note that if you are drying the rug outdoors, be mindful of any environmental factors that could affect it, such as windy conditions. If necessary, use small weights, such as rocks or bricks, to secure the corners or edges of the rug and prevent it from being blown away.
Depending on the material and thickness of the rug, it may take some time for it to dry completely. Be patient and avoid walking or placing heavy objects on the rug while it is drying, as this can hinder the drying process and potentially damage the fibers.
By laying the rug flat on the ground, you create an optimal position for it to dry evenly and efficiently. This allows for proper airflow around the entire rug, promoting thorough drying and ensuring that it regains its original shape and quality.
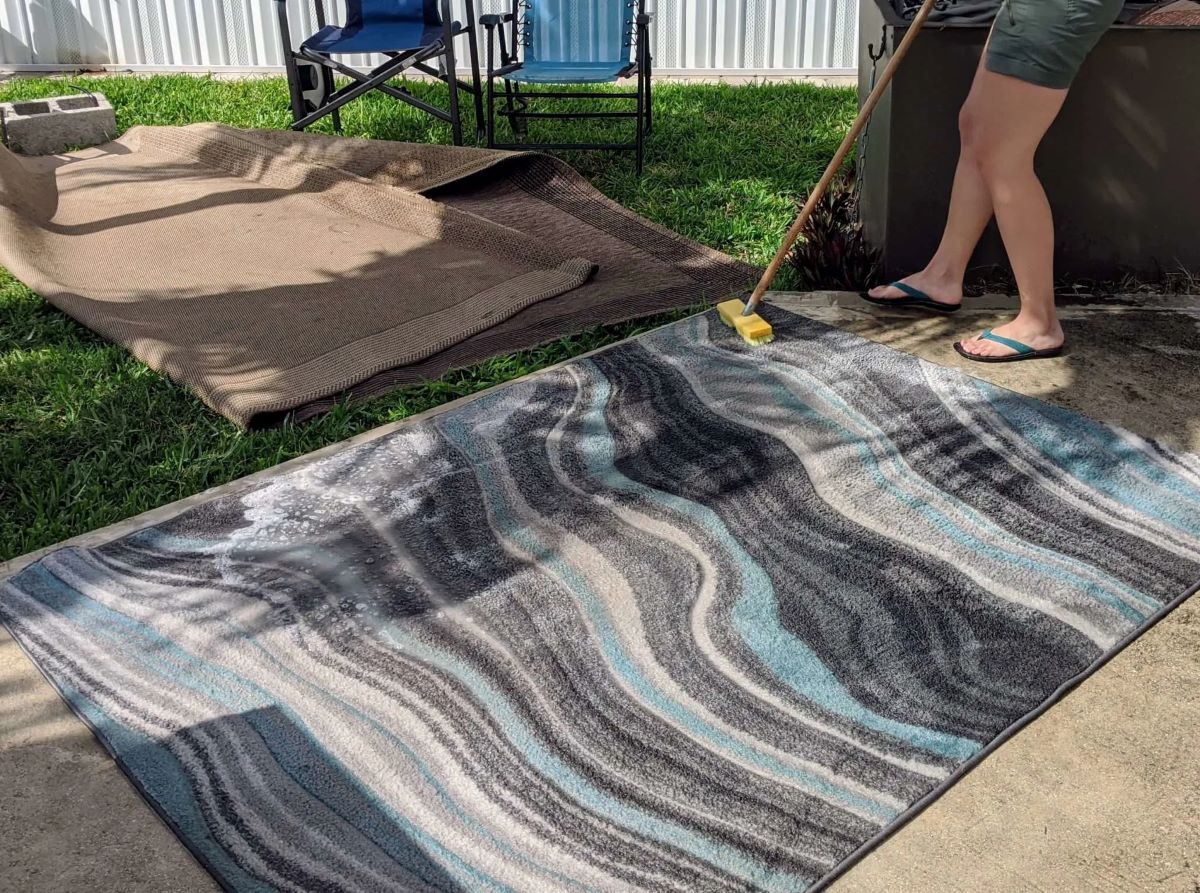
Step 5: Use a Broom or Brush to Remove Any Remaining Debris
After the rug has been laid flat on the ground and has started to dry, the next step in the drying process is to use a broom or brush to remove any remaining debris. Even after shaking out the rug, there may still be small particles or dirt trapped within the fibers.
Take a soft-bristle broom or brush and gently sweep it across the surface of the rug. Start from one end and work your way towards the other, using long, sweeping motions. This helps to dislodge any remaining debris that may have been missed during the initial shaking process.
Pay extra attention to areas with heavier foot traffic or spots that may have accumulated more dirt. Use light pressure and brush in different directions to ensure that you cover the entire surface of the rug.
If you notice any stubborn or embedded debris, you can use a brush with slightly stiffer bristles to gently agitate the fibers and loosen the dirt. Be careful not to apply too much pressure or scrub vigorously, as this could damage the rug’s fibers.
While you brush the rug, periodically check the bristles or the bottom of the broom for any dirt or debris that may have been picked up. This will prevent any transferred dirt from being reintroduced onto the rug’s surface.
If the rug is made of a delicate or sensitive material, such as natural fibers like silk or wool, it’s important to choose a brush or broom that is specifically designed for those materials. Avoid using abrasive tools or brushes with rough bristles that could potentially damage the rug.
By using a broom or brush to remove any remaining debris, you ensure that the rug is as clean as possible before it finishes drying. This step not only contributes to the rug’s appearance but also helps to prevent dirt from settling back into the fibers once the rug is fully dry.
Step 6: Allow the Rug to Air Dry Completely
After removing any remaining debris, the next step in the drying process is to allow the rug to air dry completely. Air drying is the most natural method for drying the rug and helps to maintain its integrity and quality.
Ensure that the rug is placed in a well-ventilated area with good air circulation. This allows for proper evaporation of moisture and helps prevent the growth of mold or mildew.
Depending on the weather conditions and the material of the rug, the drying process may take several hours to a few days. Be patient and avoid rushing the process by applying heat sources or using fans, as this can potentially damage the rug’s fibers.
During the drying period, periodically check the rug to assess its progress. Feel the fibers to determine if the rug is still damp or if it has fully dried. It’s essential to ensure that both the top and bottom surfaces of the rug are completely dry.
If you live in a humid environment, the drying process may be longer. In such cases, you may consider using a dehumidifier or placing silica gel packets near the rug to absorb excess moisture and expedite the drying process.
It’s important to note that flipping the rug over halfway through the drying process can help ensure that both sides are drying evenly. This is especially true for thicker rugs or those made of denser materials.
Avoid stepping or placing heavy objects on the rug while it is drying, as this can disrupt the airflow and potentially cause damage to the fibers. Instead, allow the rug to dry undisturbed to achieve the best results.
By allowing the rug to air dry completely, you ensure that it retains its quality and avoids any potential damage that can occur from improper drying methods. Patience and proper airflow are key to achieving a thorough and successful drying process.
Step 7: Flip the Rug Over to Ensure Both Sides are Dry
Once the rug has been air drying for a sufficient amount of time, the next step is to flip it over to ensure that both sides are completely dry. This step is crucial to prevent any moisture or dampness from being trapped within the rug, which could lead to mold or mildew growth.
Carefully lift one end of the rug and gently flip it over, ensuring that it lands flat and even on the ground. Take care not to fold or crease the rug during this process, as this can cause permanent damage to the fibers.
Inspect the underside of the rug to check for any signs of moisture or dampness. If the rug still feels damp, continue the drying process until both sides are completely dry.
Flipping the rug allows better airflow and ensures that both sides receive equal exposure to air and sunlight (if drying outdoors). This helps to expedite the drying process and minimize the risk of any lingering moisture within the rug.
If you notice any areas that are still damp or slightly moist, you can gently pat them dry with a clean towel. Avoid using excessive force or rubbing the rug vigorously, as this can damage the fibers.
After flipping the rug, monitor its drying progress by checking the overall texture and feel. Both sides should feel dry to the touch, without any signs of dampness or moisture.
If you are drying the rug indoors, ensure that there is adequate ventilation in the room to facilitate proper drying. Opening windows or using fans to improve air circulation can also help speed up the drying process.
Keep in mind that the drying time may vary depending on factors such as the material, thickness, and size of the rug, as well as environmental conditions. It’s important to exercise patience and allow enough time for both sides to dry completely before proceeding to the next step.
By flipping the rug over to ensure both sides are dry, you eliminate any potential moisture that could lead to mold or mildew formation. This step contributes to the overall success of the drying process and helps maintain the rug’s cleanliness and longevity.
Step 8: Store the Rug Properly to Prevent Future Damage
After the outdoor rug has been completely dried, the final step is to store it properly to prevent any future damage or deterioration. Proper storage ensures that the rug remains in good condition during off-seasons or when not in use.
Before storing the rug, make sure it is thoroughly cleaned. Vacuum both sides of the rug to remove any loose dirt or debris that may have accumulated during the drying process.
Rolling the rug is the recommended method for storing it, as it helps maintain its shape and minimizes the risk of creases or wrinkles. Start by folding one end of the rug towards the center, then roll it tightly from one end to the other.
While rolling, be mindful of any fringe or decorative edges. If the rug has fringe, loosely fold it over the rug before rolling to protect it from tangling or getting damaged.
Once the rug is rolled, secure it with straps, bungee cords, or ropes to keep it tightly bound. This prevents the rug from unraveling and helps maintain its compactness during storage.
Choose an appropriate storage location for the rug. Avoid areas prone to high humidity, moisture, or extreme temperature changes, as these conditions can promote mold or mildew growth. Opt for a dry and well-ventilated space, such as a closet, basement, or storage shed.
If possible, elevate the rolled rug by placing it on a shelf or pallet to further protect it from potential floor moisture or pests.
Label the storage container or bag with the rug’s description and any other relevant information to easily identify it in the future. This is particularly helpful if you have multiple rugs or if you rotate them during different seasons.
Check on the stored rug periodically to ensure it remains in good condition. If you notice any signs of moisture, mold, or pests, take appropriate measures to address the issue immediately.
By storing the rug properly, you safeguard it from potential damage, ensuring its longevity and preserving its quality for future use.