
Importance of Fuel Injection Cleaning
Fuel injection cleaning is a crucial maintenance task that often goes overlooked by vehicle owners. Over time, the fuel injectors in your vehicle can become clogged with residue and deposits, affecting their performance and compromising your vehicle’s efficiency. This buildup can lead to a variety of issues, including decreased fuel economy, rough idle, engine misfires, and reduced power.
Regular fuel injection cleaning is necessary to keep your engine running smoothly and efficiently. By removing the accumulated deposits, it helps to restore the proper spray pattern of the fuel injectors. This, in turn, ensures optimal fuel atomization and combustion, leading to improved engine performance and fuel efficiency.
One of the main benefits of fuel injection cleaning is increased fuel economy. When the fuel injectors are clean, they can deliver the precise amount of fuel required by the engine, reducing wasted fuel and improving overall mileage. This not only saves you money at the pump but also helps to reduce vehicle emissions, making it an environmentally friendly practice.
In addition to fuel efficiency, fuel injection cleaning also helps to maintain the overall health of your engine. Clogged injectors can cause fuel to be delivered unevenly, resulting in an imbalance of the air-fuel mixture. This can lead to engine misfires and increased exhaust emissions. By cleaning the fuel injectors regularly, you can prevent these issues and ensure that your engine operates at its optimal level.
Furthermore, fuel injection cleaning can help extend the lifespan of your vehicle’s engine. When the injectors are clogged, the engine has to work harder to compensate for the reduced fuel flow. This additional strain on the engine components can lead to premature wear and tear. By cleaning the fuel injectors regularly, you can reduce the risk of costly repairs and keep your engine running smoothly for longer.
Overall, fuel injection cleaning is a vital maintenance task that should not be overlooked. It improves fuel economy, enhances engine performance, reduces exhaust emissions, and prolongs the life of your vehicle’s engine. By incorporating fuel injection cleaning into your regular maintenance routine, you can ensure that your vehicle operates at its best and enjoy a smoother and more efficient driving experience.
Signs That Your Fuel Injectors Need Cleaning
Keeping an eye out for certain signs can help you determine when your vehicle’s fuel injectors may need cleaning. Recognizing these indicators early on can prevent further damage to your engine and ensure optimal performance. Here are some common signs that your fuel injectors may need cleaning:
- Poor Fuel Economy: If you notice a sudden decrease in fuel efficiency, where your vehicle is using more fuel than usual for the same distance traveled, it could be a sign of dirty fuel injectors. Clogged injectors hinder proper fuel atomization, causing the engine to burn more fuel than necessary. Cleaning the injectors can restore optimal fuel flow and help improve fuel economy.
- Stalling and Rough Idle: When fuel injectors are clogged, they may not be able to provide the precise amount of fuel needed for idling or low-speed driving. This can result in a rough idle or even stalling of the engine. If you experience such issues, it’s recommended to have your fuel injectors cleaned to restore smooth and stable idle.
- Lack of Power or Acceleration: Dirty fuel injectors can disrupt the proper fuel-air mixture required for engine combustion. This can lead to a loss of power or reduced acceleration. If you find that your vehicle has become sluggish or struggles to gain speed, it may be a sign that the fuel injectors need to be cleaned.
- Misfires and Engine Hesitation: Clogged fuel injectors can cause irregular fuel spray patterns, leading to misfires or hesitation in the engine’s performance. You may notice a jerking or sputtering sensation when accelerating, indicating that the fuel injectors are not delivering fuel evenly. Cleaning the injectors can help address these issues and restore smooth engine operation.
- Increased Exhaust Emissions: Dirty fuel injectors can result in incomplete combustion, leading to increased emissions of harmful gases. If you notice excessive smoke, a strong odor from the exhaust, or failed emissions tests, it could be an indicator that your fuel injectors need cleaning.
Remember, these signs may also indicate other issues with your vehicle, so it’s best to have a professional mechanic diagnose the problem accurately. Regular maintenance, including fuel injector cleaning, can help prevent these issues from occurring and keep your engine running efficiently and smoothly.
Gathering the Necessary Tools and Supplies
Before you begin the fuel injection cleaning process, it’s important to gather all the required tools and supplies. Having everything on hand will ensure a smooth and efficient cleaning process. Here’s a list of items you’ll need:
- Fuel Injector Cleaning Solution: Purchase a high-quality fuel injector cleaning solution that is appropriate for your vehicle. You can find these solutions at automotive supply stores or online. Make sure to choose a product that is compatible with your fuel system and follow the manufacturer’s instructions for usage.
- Safety Gear: It’s important to prioritize your safety during the cleaning process. Wear protective gloves and safety glasses to shield yourself from any potential contact with cleaning solvents or fuel.
- Fuel Pressure Gauge: To accurately measure the pressure in your fuel system, you’ll need a fuel pressure gauge. This tool allows you to monitor the fuel pressure before and after cleaning the injectors to ensure optimal performance.
- Socket and Wrench Set: Depending on your vehicle’s make and model, you may need specific socket and wrench sizes to remove the fuel injectors. Check your vehicle’s manual or speak with a mechanic to determine the appropriate tools required.
- Cleaning Kit Accessories: If you choose to use a fuel injection cleaning kit, it may come with additional accessories such as hoses, adapters, and connectors. Ensure that you have all the necessary components specific to the kit you are using.
- Clean Rags or Towels: Keep some clean rags or towels nearby to wipe away any excess fuel or cleaning solution during the cleaning process. Having these on hand will help maintain a clean and organized work area.
- Container for Fuel Disposal: Since you will be dealing with fuel and cleaning solvents, it’s important to have a container specifically designated for fuel disposal. This will ensure proper handling and prevent any environmental hazards.
- Shop Manual or Online Resources: Familiarize yourself with the specific fuel injection system in your vehicle. Refer to your vehicle’s shop manual or utilize reputable online resources for step-by-step instructions and any additional tools or supplies that may be required.
By gathering these necessary tools and supplies before starting the fuel injection cleaning process, you’ll be well-prepared and able to complete the task efficiently and effectively.
Step-by-step Guide to Fuel Injection Cleaning
Cleaning your fuel injectors is a relatively straightforward process that can be done at home with the right tools and knowledge. Follow this step-by-step guide to ensure a successful fuel injection cleaning:
- Read the Instructions: Begin by thoroughly reading the instructions provided with your chosen fuel injection cleaner. Different products may have slightly different procedures, so it’s important to understand the specific guidelines.
- Prepare the Vehicle: Park your vehicle in a well-ventilated area and engage the parking brake. Open the hood and locate the fuel rail and injectors. Disconnect the negative terminal of the battery to prevent any electrical mishaps.
- Relieve Fuel Pressure: Before removing the fuel injectors, it’s crucial to relieve the fuel pressure in the system. Locate the fuel pump relay or fuse in the engine compartment, and remove it to stop the fuel pump from running. Start the engine and let it idle until it stalls, indicating that the fuel pressure has been released.
- Remove the Fuel Injectors: Using the appropriate socket or wrench, carefully remove the fuel rail along with the fuel injectors from the engine. Take note of the injector placement to ensure correct reinstallation later. Place the injectors in a clean and secure location.
- Clean the Injectors Manually: If you choose to clean the injectors manually, inspect them for any visible dirt or deposits. Use a clean rag or a soft brush along with a suitable solvent to gently clean the injectors, ensuring that no debris remains. Pay attention to the injector tip and any filter screens that may be present.
- Use a Fuel Injector Cleaning Kit: Alternatively, you can utilize a fuel injector cleaning kit. Follow the specific instructions provided with the kit to attach the necessary hoses and connectors between the injectors and the cleaning solution container. Activate the cleaning process as instructed, allowing the cleaner to flow through the injectors and dissolve any deposits.
- Reinstall the Fuel Injectors: After cleaning, carefully place the fuel injectors back into their original positions on the fuel rail. Ensure that all connectors and seals are properly aligned and secured. Reattach the fuel rail to the engine, being cautious not to overtighten the bolts.
- Test the Vehicle’s Performance: Reconnect the negative terminal of the battery and start the engine. Allow it to idle for several minutes, monitoring for any irregularities. Take the vehicle for a test drive to evaluate its performance, paying attention to acceleration, idle smoothness, and fuel efficiency.
- Maintenance and Future Cleaning: Regular maintenance is key to keeping your fuel injectors clean. Refer to your vehicle’s recommended maintenance schedule and consider incorporating fuel injection cleaning as part of your routine maintenance. Regular cleaning can prevent major buildup and ensure optimal performance.
Following these step-by-step guidelines will help you effectively clean your fuel injectors, leading to improved engine performance and fuel efficiency.
Preparing the Vehicle for Fuel Injection Cleaning
Before you can begin the fuel injection cleaning process, it’s important to properly prepare your vehicle. Taking the necessary precautions will ensure a safe and efficient cleaning experience. Here are the steps to prepare your vehicle for fuel injection cleaning:
- Choose a Well-Ventilated Area: Select a location with proper ventilation to carry out the cleaning process. If possible, work outdoors or in a well-ventilated garage to minimize the inhalation of fumes and prevent the buildup of potentially harmful gases.
- Engage the Parking Brake: Ensure that your vehicle is parked on a level surface and engage the parking brake. This will prevent any unexpected movement while you are working on the fuel system.
- Open the Hood: Lift the hood of your vehicle and secure it in place with the hood prop rod. This will provide easy access to the engine compartment and fuel injection system.
- Locate the Fuel Rail and Injectors: Familiarize yourself with the location of the fuel rail and fuel injectors in your engine compartment. Refer to your vehicle’s manual or online resources if you’re unsure of their exact location.
- Disconnect the Battery: To prevent any electrical mishaps during the cleaning process, disconnect the negative terminal of the vehicle’s battery. This will ensure that there is no power running through the system while you are working on the fuel injectors.
- Relieve Fuel Pressure: It’s important to relieve the fuel pressure in the fuel system before removing the injectors. Locate the fuel pump relay or fuse in the engine compartment and remove it to stop the fuel pump from running. This will help prevent any fuel spray or leaks while you are working on the injectors.
- Take Safety Precautions: Prioritize your safety during the fuel injection cleaning process. Wear protective gloves and safety glasses to protect yourself from any potential contact with cleaning solvents or fuel. Avoid smoking, open flames, or sparks in the vicinity to prevent any fire hazards.
By following these preparation steps, you can ensure a safe and efficient fuel injection cleaning process. Taking the time to properly prepare your vehicle will help you achieve better results and minimize any potential risks or accidents.
Removing the Fuel Injectors
Removing the fuel injectors from your vehicle’s engine is a vital step in the fuel injection cleaning process. Careful handling and proper removal techniques will ensure that the injectors are cleaned effectively. Follow these steps to safely remove the fuel injectors:
- Ensure Preparation: Before proceeding with removal, make sure you have taken all the necessary safety precautions, such as wearing gloves and safety glasses. Confirm that the vehicle’s engine is cool and the fuel pressure has been relieved as discussed in the previous section.
- Locate the Fuel Rail: Identify the fuel rail, which is a metal pipe or rail-like structure that connects the injectors to the fuel supply. It is typically secured to the engine with bolts or brackets. Refer to your vehicle’s manual or online resources for the exact location of the fuel rail in your specific vehicle model.
- Disconnect the Fuel Lines: With the help of a wrench or socket, carefully loosen and remove the bolts or brackets securing the fuel rail to the engine. As you remove the bolts, be cautious of any small washers or spacers that may also be present. Gently lift the fuel rail to expose the fuel injectors.
- Disconnect Injector Electrical Connectors: Each fuel injector is connected to the vehicle’s electrical system through an electrical connector. Locate these connectors and carefully detach them by pressing the release tab or gently pulling them apart. Take precautions not to damage the connectors or wiring.
- Remove the Fuel Injectors: Once the electrical connectors are detached, you can proceed to remove the fuel injectors. Grasp each injector firmly and gently twist and pull it upward to detach it from the fuel rail. Be careful not to pull or yank on the injectors excessively, as this may cause damage.
- Note the Injector Placement: As you remove each fuel injector, keep track of their placement and order. This will ensure correct reinstallation later. You can use a marker or label each injector with a number or label to avoid confusion.
- Store the Injectors Properly: After removal, place the fuel injectors in a clean and secure location. It is important to protect them from any contamination or damage. If needed, you can cover them with a clean cloth or place them in a sealable bag to keep them safe until you are ready to clean or reinstall them.
By following these steps and handling the fuel injectors with care, you can safely and effectively remove them from your vehicle’s engine. Take your time and be attentive to avoid any mishaps or damage during the removal process.
Cleaning the Injectors Manually
If you prefer a hands-on approach, you can choose to clean the fuel injectors manually. This method allows you to inspect and clean each injector individually to ensure optimal performance. Follow these steps to clean the fuel injectors manually:
- Inspect the Injectors: Before cleaning, carefully examine each injector for visible dirt, deposits, or clogs. Pay close attention to the injector tip and any filter screens present. If you notice any significant buildup or blockage, manual cleaning is necessary.
- Prepare a Cleaning Solution: Use a suitable cleaning solvent, such as a fuel system cleaner or injector cleaner, following the manufacturer’s instructions. Dilute the cleaning solution if necessary, but be cautious not to exceed the recommended concentration. You can use a small container or a clean fuel injector cleaning kit for this purpose.
- Gently Clean the Injectors: Dip a clean, lint-free cloth or soft brush into the cleaning solution. Gently wipe the exterior of each fuel injector to remove any dirt or grime. Ensure that the solution does not come into contact with any electrical connectors or wiring.
- Focus on the Injector Tip: The injector tip is a critical part that requires special attention. Use a clean, lint-free cloth or a soft brush dipped in the cleaning solution to gently clean the injector tip. It’s important to remove any buildup or residue from the tip for optimal fuel atomization.
- Clean any Filter Screens: Some fuel injectors may have filter screens to prevent larger particles from entering. If your injectors have these screens, inspect them carefully. If they are clogged or dirty, use a small brush or compressed air to clean them. Be gentle to avoid damaging the screens.
- Repeat the Cleaning Process if Necessary: If the injectors are heavily clogged, you may need to repeat the cleaning process multiple times to ensure thorough cleaning. Take your time and be patient to achieve the best results.
- Inspect and Dry the Injectors: After cleaning, inspect each injector again to ensure they are free from debris or cleaning solution. Allow the injectors to air dry completely before reinstalling them. Avoid using compressed air to dry the injectors, as it may force debris into the internal components.
By following these steps, you can manually clean the fuel injectors, removing any deposits or clogs that may hinder their performance. Take your time and handle the injectors gently to avoid any damage during the cleaning process.
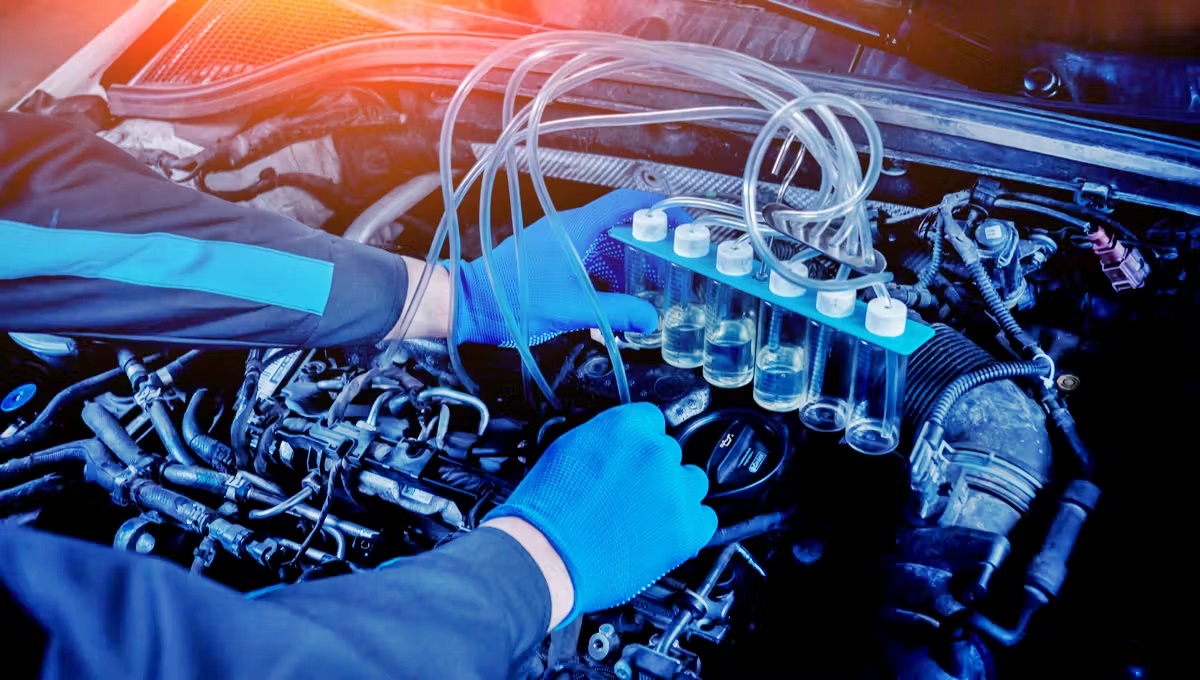
Using a Fuel Injector Cleaning Kit
If you prefer a more systematic approach to cleaning your fuel injectors, utilizing a fuel injector cleaning kit can be an effective solution. These kits are designed to provide a thorough cleaning process that targets deposits and restores optimal performance. Follow these steps to use a fuel injector cleaning kit:
- Read the Instructions: Begin by thoroughly reading the instructions provided with the fuel injector cleaning kit. Different kits may have specific requirements, so it’s essential to understand the process and any precautions.
- Prepare the Cleaning Solution: The kit usually includes a specialized cleaning solution. Mix the cleaning solution as instructed, ensuring that you follow the recommended dilution ratio for optimal effectiveness.
- Set Up the Kit: The kit may come with additional accessories such as hoses, adapters, and connectors. Install the required components, referring to the instructions provided. Connect the cleaning solution container to the appropriate injector ports or fittings using the provided hoses and connectors.
- Start the Cleaning Process: With the connections properly set up, start the engine as directed by the instructions. This will allow the cleaning solution to flow through the fuel injectors and clean the internal components. It’s important to follow the recommended engine speed, flow rate, and duration specified by the kit manufacturer for optimal results.
- Monitor the Process: While the cleaning process is running, observe the flow of the cleaning solution and check for any leaks or irregularities. Ensure that the solution is flowing smoothly through all the injectors.
- Complete the Cleaning Process: Once the recommended cleaning time or flow rate has been reached, stop the engine and disconnect the cleaning solution container. Allow the residual cleaning solution to drain out completely before removing any connections.
- Inspect the Injectors: After completing the cleaning process, inspect each fuel injector for any remaining deposits or blockages. If necessary, use a clean cloth or a soft brush to remove any remaining residue. Ensure that the injectors are clean and free of any obstructions.
- Store or Dispose of the Kit: Carefully clean and dry all the components of the cleaning kit. Store them in a safe and dry place for future use. If the kit is for single-use only, dispose of it properly, following local regulations and guidelines.
By following these steps and utilizing a fuel injector cleaning kit, you can effectively clean your fuel injectors and restore their optimal performance. Always refer to the instructions provided with the kit for the most accurate and reliable cleaning process.
Reinstalling the Fuel Injectors
Once you have successfully cleaned the fuel injectors, it’s time to reinstall them back into the engine. Proper reinstallation is essential to ensure the injectors function optimally and maintain a secure connection. Follow these steps to reinstall the fuel injectors:
- Inspect and Clean the O-Rings: Before reinstalling the fuel injectors, carefully examine the O-rings located at the top of each injector. Ensure that they are in good condition, free from cracks or damage. Clean the O-rings and the injector seats with a lint-free cloth or a soft brush to remove any debris.
- Align the Injectors: Take note of the placement of the fuel injectors during the removal process. Ensure that they are aligned correctly, matching the fuel rail ports or openings. This will help maintain the proper fuel flow and prevent any leaks.
- Insert the Injectors: Insert each fuel injector into its respective fuel rail port or opening with a gentle twisting and pushing motion. Ensure that each injector is fully seated in its position, but avoid forcing or pushing them too hard. The O-rings should provide a secure seal to prevent any fuel leakage.
- Reconnect the Electrical Connectors: Once the injectors are in place, reconnect the electrical connectors to each injector. Ensure a secure and proper connection by pressing the connectors together until you hear a click. Take care not to bend or damage any pins or connectors during this step.
- Secure the Fuel Rail: Align the fuel rail with the engine and reinstall the bolts or brackets to secure it in place. Tighten the bolts or brackets to the manufacturer’s recommended torque specifications, being careful not to over-tighten. This will ensure a proper and secure fit for the fuel rail and injectors.
- Confirm Proper Installation: Double-check that all the injectors are securely in place and that the fuel rail is properly aligned and fastened. Ensure that there are no loose connections or misalignments that could cause fuel leakage or other issues.
- Reconnect the Battery: Reconnect the negative terminal of the vehicle’s battery, ensuring a secure connection. This will restore power to the fuel injector system.
- Start the Engine: With everything reinstalled and connected, start the engine and let it idle for a few minutes. Observe the engine for any irregularities, such as leaks, vibrations, or misfires. If everything appears normal, proceed to the next step.
- Monitor Performance: Take your vehicle for a test drive to assess the performance of the fuel injectors. Pay attention to acceleration response, idle smoothness, and overall engine performance. If you notice any persistent issues, consult a professional mechanic for further inspection and troubleshooting.
By following these steps and ensuring proper installation, you can reinstall the fuel injectors securely, allowing them to function optimally and contribute to the efficient operation of your vehicle’s engine.
Testing the Vehicle’s Performance
After completing the fuel injection cleaning and reinstalling the fuel injectors, it’s important to test the performance of your vehicle. This will help you determine if the cleaning process was successful and if the fuel injectors are functioning optimally. Follow these steps to test the vehicle’s performance:
- Start the Engine: Start the engine and let it idle for a few minutes to ensure it is running smoothly. Observe the engine for any signs of hesitation, misfires, or rough idling. This will help you identify any immediate issues.
- Monitor Acceleration: Take the vehicle for a test drive and pay close attention to the acceleration response. Smooth and consistent acceleration is an indication that the fuel injectors are working properly. If you notice any hesitation, delays, or stumbling during acceleration, it may indicate an issue with the injectors.
- Check Idle Stability: While at a stop, observe the idle stability of the engine. It should run consistently and smoothly without any significant fluctuations or roughness. If you notice rough idling, surges, or stalling, it could be a sign of a problem with the fuel injectors.
- Assess Fuel Efficiency: Keep track of your vehicle’s fuel efficiency after the fuel injection cleaning. Monitor the number of miles driven per gallon of fuel and compare it to your previous results. Improved fuel efficiency indicates that the fuel injectors are delivering the optimal fuel-air mixture, resulting in better mileage.
- Listen for Unusual Noises: Pay attention to any unusual noises coming from the engine during acceleration or idle. A noticeable increase in noise or the sound of a misfire could be an indication of improper fuel injection or other fuel system issues.
- Observe Exhaust Emissions: Take note of the exhaust emissions while the engine is running. If you notice excessive smoke, a strong odor, or black sooty residue, it could be a sign of inadequate fuel combustion or an issue with the fuel injectors. Clean injectors should result in cleaner and less polluting exhaust emissions.
- Seek Professional Inspection if Needed: If you encounter persistent issues, such as rough idling, poor acceleration, or decreased fuel efficiency, it’s advisable to seek the assistance of a professional mechanic. They can perform a thorough assessment of the fuel injection system and diagnose any underlying problems that may require further attention.
By testing the vehicle’s performance after fuel injection cleaning, you can ensure that the cleaning process was successful and the fuel injectors are functioning optimally. Regular monitoring of your vehicle’s performance will help you identify any potential issues early on and maintain the efficiency and reliability of your vehicle.
Tips and Precautions for Fuel Injection Cleaning
Performing fuel injection cleaning requires attention to detail and adherence to certain precautions to ensure a safe and effective process. Here are some helpful tips and precautions to keep in mind:
- Follow Manufacturer’s Guidelines: Always refer to the vehicle’s manufacturer guidelines and instructions when performing fuel injection cleaning. This will ensure that you use the appropriate cleaning solutions, tools, and methods specifically recommended for your vehicle.
- Choose High-Quality Cleaning Solutions: Use reputable and high-quality fuel injector cleaning solutions that are compatible with your vehicle’s fuel system. Inferior or incorrect cleaning solutions may cause damage to the fuel injectors or other components of the fuel system.
- Wear Appropriate Safety Gear: Prioritize your safety by wearing gloves and safety glasses throughout the cleaning process. Cleaning solvents and fuel can be hazardous substances that may cause skin irritation or eye injury if they come into contact.
- Work in a Well-Ventilated Area: Perform fuel injection cleaning in a well-ventilated area to prevent the buildup of potentially harmful fumes. Ensure there is enough air circulation to minimize the inhalation of cleaning solvents or fuel vapors.
- Relieve Fuel Pressure: Before removing the fuel injectors, relieve the fuel pressure in the system to prevent fuel spray or leaks. Always follow the recommended procedures for relieving fuel pressure, such as removing the fuel pump relay or fuse.
- Handle Fuel and Cleaning Solvents with Care: Fuel and cleaning solvents are flammable substances. Keep them away from open flames, sparks, or sources of ignition. Dispose of unused fuel and cleaning solvents properly according to local regulations.
- Avoid Over-Tightening Components: When reinstalling the fuel injectors and securing the fuel rail, be cautious not to over-tighten the bolts or brackets. Over-tightening may damage the injectors, O-rings, or fuel rail. Refer to the manufacturer’s torque specifications for proper tightening.
- Monitor for Leaks: After reinstalling the fuel injectors, carefully inspect for any fuel leaks or signs of fuel seepage. Perform a visual check and observe for any fuel smells or wet spots around the injectors or fuel rail.
- Create a Maintenance Schedule: Regular fuel injection cleaning is essential to maintain optimal performance. Incorporate fuel injection cleaning into your vehicle’s maintenance schedule at recommended intervals to prevent excessive buildup and ensure long-term efficiency.
- Consult a Professional if Needed: If you are uncertain or uncomfortable performing fuel injection cleaning yourself, it’s best to seek the assistance of a qualified mechanic. They have the experience and knowledge to perform the cleaning process correctly and address any underlying fuel system issues.
By following these tips and taking the necessary precautions, you can safely and effectively perform fuel injection cleaning, maintaining the efficiency and longevity of your vehicle’s fuel system.
When to Seek Professional Help
While fuel injection cleaning can often be performed as a DIY task, there are certain situations where it is best to seek professional help. Here are some scenarios in which it is recommended to consult a professional mechanic:
- Complex Fuel Injection System: If your vehicle has a complex or advanced fuel injection system, such as direct fuel injection or multiple fuel injectors per cylinder, it may require specialized knowledge and equipment. A professional mechanic will have the expertise to handle these systems properly.
- Persistent Issues: If you have attempted fuel injection cleaning but are still experiencing persistent issues such as rough idling, misfires, or decreased fuel efficiency, it indicates a deeper underlying problem. A professional mechanic can diagnose and address these issues effectively to restore your vehicle’s performance.
- No Access to Tools or Equipment: Fuel injection cleaning often requires specific tools and equipment, such as a fuel pressure gauge, specialized cleaning solutions, or diagnostic scanners. If you do not have access to these tools or are unfamiliar with their usage, it is advisable to seek professional assistance.
- Lack of Experience or Confidence: Performing fuel injection cleaning requires a certain level of knowledge, experience, and confidence. If you are unsure about the process, the components involved, or feel uncomfortable working on your vehicle’s fuel system, it is best to entrust the task to a professional mechanic.
- Under Warranty: If your vehicle is still under warranty, it is crucial to follow the recommended maintenance procedures outlined by the manufacturer. In many cases, performing fuel injection cleaning yourself may void the warranty. Having a professional mechanic perform the task ensures compliance with warranty requirements.
- Other Fuel System Issues: Fuel injection cleaning may not solve all fuel system problems. If you suspect other issues, such as a malfunctioning fuel pump, a clogged fuel filter, or a faulty fuel pressure regulator, a professional mechanic can perform a comprehensive fuel system inspection and address all potential issues.
- Time and Convenience: Fuel injection cleaning can be a time-consuming process and may require multiple attempts or follow-up procedures. If you have limited time, or if you find it more convenient to have a professional handle the task, delegating it to a mechanic can save you time and effort.
When faced with any of these scenarios, it is wise to consult a professional mechanic who has the expertise and resources to properly diagnose and address fuel system issues. They can ensure that your vehicle receives the necessary maintenance and repairs to optimize its performance.