
Materials Needed
Creating an infinity mirror is a fascinating DIY project that requires a few essential materials. Gather the following items before getting started:
- Mirror – You will need two mirrors for this project. One will serve as the regular mirror, while the other will be the two-way mirror.
- Frame – Choose a frame that suits the size and style you desire for your infinity mirror.
- LED Strip Lights – These lights will be the key component in creating the illusion of depth in the mirror.
- Power Supply – Make sure you have a suitable power supply that matches the voltage requirements of the LED strip lights.
- Reflective Window Tint Film – This film will be used on the regular mirror to transform it into a two-way mirror.
- Electrical Wires – You will need wires to connect the LED strip lights to the power supply.
- Electrical Tape – This will be useful for securing the electrical connections and preventing any mishaps.
- Screws and Mounts – Use these to attach the two mirrors to the frame and mount the completed infinity mirror on a wall or surface.
- Tools – To complete the project, you will need a few tools such as a screwdriver, wire cutters, a ruler or measuring tape, and a level to ensure proper alignment.
Ensure that all the materials you gather are of high quality to achieve the best results. It’s a good idea to double-check the dimensions of the frame, mirrors, and LED strip lights to ensure they fit together perfectly.
Now that you have all the necessary materials, let’s move on to the step-by-step process of creating your very own infinity mirror.
Step 1: Gathering the Components
To begin creating your infinity mirror, the first step is to gather all the necessary components. Having everything prepared and within reach will make the process smoother. Here’s what you need to do:
1.1 Choose the Mirrors: Select two mirrors for your project. One will serve as the regular mirror, and the other will be the two-way mirror. Ensure that both mirrors are the same size and in good condition.
1.2 Find the Frame: Select a frame that suits the size and style you desire for your infinity mirror. Consider the overall aesthetic and ensure that the frame is sturdy enough to hold the mirrors.
1.3 Purchase LED Strip Lights: LED strip lights will create the mesmerizing infinity effect. Choose a high-quality LED strip that has adhesive backing for easy installation. Take note of the length needed based on your mirror size.
1.4 Obtain a Power Supply: Ensure you have a suitable power supply for the LED strip lights. This should match the voltage requirements of the lights and provide a stable power source.
1.5 Get Reflective Window Tint Film: This film will be applied to the regular mirror, transforming it into a two-way mirror. Make sure to purchase a film specifically designed for this purpose.
1.6 Gather Electrical Wires: You will need wires to connect the LED strip lights to the power supply. Opt for wires that are long enough to reach from the power supply to the lights inside the frame.
1.7 Get Electrical Tape: Have electrical tape on hand to secure the connections between the wires and prevent any accidental short circuits.
1.8 Purchase Screws and Mounts: You will need screws and mounts to attach the mirrors to the frame and to mount the completed infinity mirror on a wall or surface. Choose screws and mounts that are strong enough to hold the weight of the mirrors.
1.9 Gather Tools: Make sure you have the necessary tools, such as a screwdriver, wire cutters, a ruler or measuring tape, and a level. These tools will help with the installation and alignment of the components.
By gathering all the components required for your infinity mirror, you are ready to move on to the next steps of the project. Having everything prepared will make the subsequent processes smoother and more efficient.
Step 2: Preparing the Frame
Once you have gathered all the necessary components, it’s time to prepare the frame for your infinity mirror. This step involves ensuring the frame is ready to accommodate the mirrors and the LED strip lights. Here’s what you need to do:
2.1 Clean the Frame: Start by thoroughly cleaning the frame to remove any dirt, dust, or debris. Use a soft cloth or brush and a mild cleaning solution to ensure a clean surface.
2.2 Measure and Mark: Measure the dimensions of the interior of the frame to determine where the mirrors and LED strip lights will be placed. Use a ruler or measuring tape to achieve accurate measurements.
2.3 Cut Openings: Based on the measurements, carefully cut openings in the back of the frame to accommodate the placement of the mirrors and the LED strip lights. Ensure that the openings are the appropriate size and shape.
2.4 Sand and Seal: If necessary, sand the edges of the frame openings to smooth them out. This will prevent any potential scratches or damage to the mirrors. Additionally, apply a sealant or paint to the inside of the frame to protect it from moisture.
2.5 Apply Adhesive: Apply adhesive to the interior edges of the frame openings. This will help secure the mirrors in place and prevent any movement or vibration that could impact the infinity effect.
2.6 Place the Mirrors: Carefully place the regular mirror in the frame, ensuring it aligns with the opening. Then, position the two-way mirror on top, aligning it perfectly with the regular mirror. Press gently to ensure a secure fit.
2.7 Secure the Mirrors: Use screws or clips to secure the mirrors to the frame. Make sure the mirrors are tightly fixed and do not move or shift within the frame.
2.8 Check Stability: Once everything is in place, check the stability of the frame and mirrors. Gently shake the frame to ensure there is no movement or wobbling. Adjust and tighten any screws if necessary.
2.9 Clean the Mirrors: Before proceeding to the next steps, carefully clean the mirrors to remove any fingerprints, smudges, or marks. Use a microfiber cloth and glass cleaner to achieve a crystal-clear surface.
By properly preparing the frame, you ensure a solid foundation for your infinity mirror. Take your time with this step to ensure accurate measurements and a secure fit for the mirrors. Once the frame is ready, you can move on to the exciting steps of cutting the mirror, adding the LED strip lights, and creating the mesmerizing infinity effect.
Step 3: Cutting the Mirror
Once the frame is prepared, the next step in creating your infinity mirror is to cut the mirror to fit the frame and create the desired effect. Careful handling and precision are crucial in this step. Here’s how you can cut the mirror:
3.1 Measure and Mark: Measure the dimensions of the frame’s opening where the mirror will be placed. Use a ruler or measuring tape to ensure accurate measurements. Mark the measurements on the mirror, making sure to leave a small margin for adjustment.
3.2 Protect the Mirror: Before cutting, make sure to protect the mirror’s surface from scratches. Apply masking tape to both sides of the cutting line to act as a cushion and prevent any potential damage.
3.3 Score the Mirror: Using a glass cutter or a diamond-tipped scoring tool, score along the marked cutting line. Apply steady pressure and make a continuous, straight line. Ensure that the score line is deep enough for a clean break.
3.4 Support and Break: Carefully position the scored mirror on a solid surface with the score line facing up. Hold the mirror firmly and apply even pressure on both sides of the score line. The mirror should break cleanly along the score line.
3.5 Refine the Edges: After breaking the mirror, the cut edges may be sharp. Use a glass file or sandpaper to carefully smooth and refine the edges. Take your time to achieve clean and safe edges.
3.6 Test the Fit: Once the mirror is cut and the edges are refined, test the fit by placing the mirror into the frame’s opening. Ensure that the mirror fits securely and does not overlap or extend beyond the frame.
3.7 Clean the Mirror: Before proceeding to the next steps, thoroughly clean both sides of the mirror to remove any debris or fingerprints. Use a glass cleaner and a lint-free cloth for a spotless finish.
Remember, cutting a mirror requires precision and caution. Take your time and follow safety guidelines when handling glass. If you are uncomfortable with cutting the mirror yourself, consider seeking professional assistance to ensure accurate measurements and a clean cut.
Step 4: Adding LED Strip Lights
The addition of LED strip lights is a key element in creating the mesmerizing infinity effect in your mirror. This step involves carefully attaching and positioning the lights within the frame. Follow these steps to add the LED strip lights to your infinity mirror:
4.1 Plan the Placement: Decide where you want to position the LED strip lights within the frame. It is commonly done along the inner edges of the frame to create a continuous and evenly distributed light source.
4.2 Measure and Cut: Measure the length needed for the LED strip lights based on the dimensions of your mirror. Most LED strips can be cut at specific intervals marked on the strip. Use scissors or wire cutters to trim the strip to the desired length.
4.3 Adhere the LED Strip: Peel off the backing tape from the LED strip and carefully adhere it along the planned position inside the frame. Press firmly to ensure the strip sticks securely. Take care to follow the natural contour of the frame to maintain a smooth appearance.
4.4 Connect the Power Supply: Locate the wires at the end of the LED strip lights. Connect these wires to the appropriate terminals on the power supply. Follow the manufacturer’s instructions to ensure the correct connections. Use electrical tape to secure and insulate the connections.
4.5 Test the Lights: Plug in the power supply and test the LED strip lights to make sure they illuminate properly. Ensure that all LEDs are working and that the lighting effect matches your desired outcome. If there are any issues, double-check the connections and troubleshoot as necessary.
4.6 Secure the Wires: Use small adhesive clips or cable ties to secure the wires along the inside of the frame. This will keep them neat and prevent any accidental tugging or disconnection.
4.7 Conceal the Wires: If desired, you can conceal the wires further by using wire channels or covers that match the frame’s color and design. This will give your infinity mirror a polished and professional appearance.
4.8 Check the Lighting Effect: Before proceeding to the next steps, stand back and evaluate the lighting effect of your infinity mirror. Make any necessary adjustments to the placement or positioning of the LED strip lights to ensure an even and bright illumination.
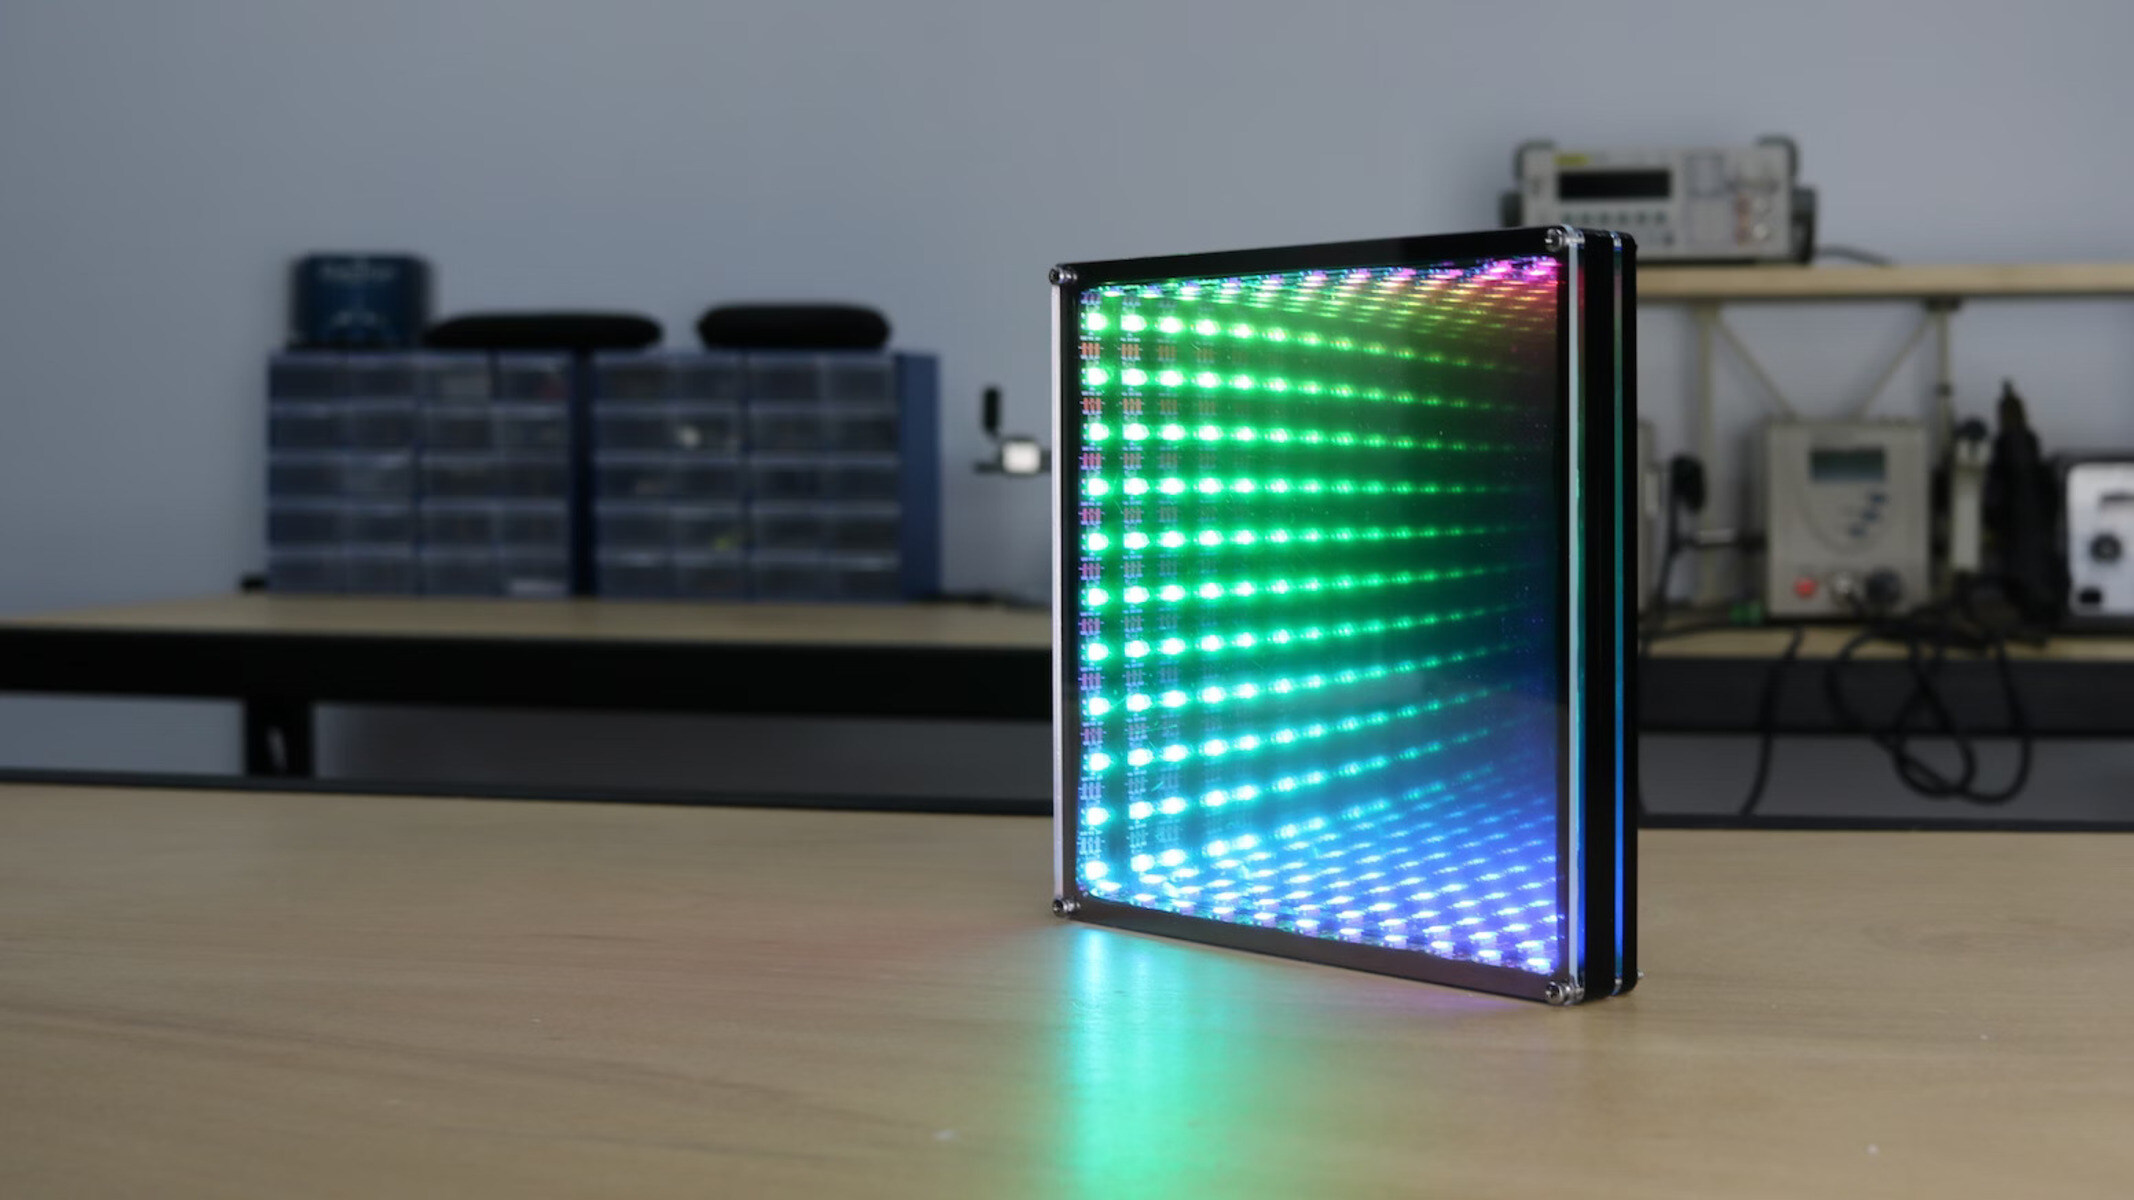
By successfully adding the LED strip lights, you are now one step closer to experiencing the enchanting allure of your finished infinity mirror. The lights will enhance the illusion of depth and create the mesmerizing infinity effect that will captivate anyone who sees it.
Step 5: Attaching the Two-Way Mirror
The two-way mirror is a crucial component in creating the illusion of an infinite reflection in your infinity mirror. In this step, you will learn how to properly attach the two-way mirror onto the frame. Follow these steps to ensure a secure and seamless attachment:
5.1 Clean the Two-Way Mirror: Before attaching the two-way mirror, ensure that it is clean and free from any smudges or fingerprints. Use a microfiber cloth and a mild glass cleaner to achieve a clear and pristine surface.
5.2 Apply Reflective Window Tint Film: To transform the regular mirror into a two-way mirror, apply a reflective window tint film to the backside of the mirror. Ensure that the film covers the entire surface evenly and smoothly.
5.3 Peel Off the Backing: Peel off the backing film from the adhesive side of the reflective window tint film. Avoid touching the adhesive surface with your fingers to prevent any unwanted marks or smudges.
5.4 Align and Attach: Carefully align the two-way mirror with the regular mirror, ensuring that it fits perfectly within the frame’s opening. Slowly lower the two-way mirror onto the regular mirror, pressing gently to ensure it adheres securely.
5.5 Smooth Out Air Bubbles: Use a soft cloth or squeegee to smooth out any air bubbles or wrinkles that may have formed during the attachment process. Start from the center and move outward to ensure a smooth and even surface.
5.6 Remove Excess Film: Trim any excess reflective window tint film using a sharp utility knife or scissors. Be careful not to scratch the mirror surface while cutting. Neatly trim the film along the edges of the mirror for a clean and professional look.
5.7 Inspect the Attachment: Once the two-way mirror is attached, inspect it from different angles and lighting conditions to ensure a seamless and invisible transition between the regular mirror and the two-way mirror. Make any adjustments if necessary.
5.8 Clean the Two-Way Mirror: Finally, clean the front surface of the two-way mirror using a microfiber cloth and a mild glass cleaner. Ensure that it is free from any smudges or marks that could obstruct the reflection.
By carefully attaching the two-way mirror, you have transformed your regular mirror into a captivating infinity mirror. The reflective window tint film allows light to pass through from the LED strip lights while reflecting back the infinite repetition, creating a mesmerizing visual effect.
Step 6: Wiring the LED Lights
Wiring the LED lights is an essential step in ensuring that your infinity mirror functions properly. In this step, you will learn how to connect and wire the LED strip lights to the power supply. Follow these steps to ensure a safe and efficient wiring process:
6.1 Safety First: Before handling any electrical components, ensure that the power supply is disconnected and turned off. This will prevent any accidental shocks or damage during the wiring process.
6.2 Identify the Wires: Identify the wires on both the LED strip lights and the power supply. Typically, you will have a positive wire (marked with “+”) and a negative wire (marked with “-“).
6.3 Strip the Wires: Use wire strippers to carefully remove the insulation from the ends of the LED strip lights and the power supply wires. Ensure that you strip off a sufficient length of insulation to make secure connections.
6.4 Connect the Wires: Connect the positive wire from the LED strip lights to the positive (+) terminal on the power supply. Connect the negative wire from the LED strip lights to the negative (-) terminal on the power supply. Ensure that the connections are secure and properly aligned.
6.5 Insulate the Connections: Once the wires are connected, use electrical tape or heat shrink tubing to insulate and protect the wire connections. This will prevent any accidental contact between the wires and ensure a safe and reliable connection.
6.6 Secure the Wires: Use adhesive clips or cable ties to secure and organize the wires along the inside of the frame. This will prevent any loose or hanging wires that could interfere with the operation of the infinity mirror.
6.7 Check the Connections: After wiring is complete, double-check all the connections to ensure they are secure and properly aligned. Make any necessary adjustments to ensure a reliable and functioning electrical system.
6.8 Reconnect and Test: Once the wiring is complete and everything is secure, reconnect the power supply and test the LED strip lights. Ensure that they illuminate properly and that the lighting effect meets your expectations.
6.9 Conceal the Wiring: If desired, you can conceal the wiring further by using wire channels or covers that match the frame’s color and design. This will give your infinity mirror a clean and polished appearance.
By properly wiring the LED lights, you ensure a functional and visually stunning infinity mirror. Take your time during the wiring process to ensure proper connections and secure insulation. Once completed, you will be one step closer to witnessing the captivating illusion of an infinite reflection in your mirror.
Step 7: Mounting the Frame
Mounting the frame is the final step in bringing your infinity mirror project to completion. Properly securing the frame will ensure that your mirror is stable and positioned for optimal viewing. Follow these steps to mount your infinity mirror:
7.1 Select the Mounting Location: Decide where you want to mount your infinity mirror. Choose a location that enhances the visual impact and is easily visible to viewers.
7.2 Prepare the Mounting Surface: Clean the mounting surface and ensure it is smooth and free of any debris. If necessary, use a level to ensure a straight and even installation.
7.3 Mark the Mounting Points: Hold the frame against the wall or surface in the desired position. Use a pencil or marker to mark the locations where the frame will be mounted.
7.4 Drill Pilot Holes: With the markings as guides, drill pilot holes at the marked mounting points. The size of the pilot holes should match the screws or mounts you will be using to secure the frame.
7.5 Attach the Mounting Hardware: Depending on the weight and size of your frame, choose the appropriate mounting hardware, such as screws, anchors, or brackets. Attach the hardware to the frame using a screwdriver or a drill.
7.6 Lift and Align: Lift the frame and align it with the pilot holes. Make sure the frame is level and properly positioned. Slowly lower the frame onto the mounting hardware, ensuring a secure fit.
7.7 Tighten the Screws: Using a screwdriver or drill, tighten the screws securely, but avoid overtightening, as this can damage the frame or wall surface.
7.8 Check Stability: Once the mirror is mounted, check its stability. Gently shake the mirror to ensure there is no movement or wobble. Make any necessary adjustments or tightening to ensure a secure installation.
7.9 Step Back and Enjoy: Finally, step back and admire your beautiful, mounted infinity mirror. Take a moment to appreciate the stunning reflection and the mesmerizing illusion it creates.
By properly mounting your infinity mirror, you ensure its stability and position it for optimal viewing. Carefully follow the steps to ensure a secure and level installation. Step back and enjoy the captivating beauty of your finished infinity mirror.
Step 8: Testing and Troubleshooting
After completing the installation of your infinity mirror, it’s essential to thoroughly test its functionality and address any issues that may arise. This step will ensure that your mirror is working correctly and delivers the desired mesmerizing effect. Follow these guidelines for testing and troubleshooting:
8.1 Power Up: Connect the power supply to a suitable electrical outlet and turn it on. Ensure that the LED strip lights illuminate without any flickering or dimming.
8.2 Check the Reflection: Stand in front of the mirror and observe the infinite reflection. Verify that the reflection appears clear, distortion-free, and that the LED lights are evenly distributed and create a captivating illusion of depth.
8.3 Evaluate the Lighting: Assess the overall lighting effect. Ensure that the LED lights are adequately bright and produce the desired ambiance. Adjust the lighting if needed by adding or removing LED strip lights or changing their orientation.
8.4 Inspect the Frame: Examine the frame and the mounting hardware for any signs of instability or loose connections. Ensure that the frame is securely mounted to the wall or surface and that it remains level and steady.
8.5 Address Any Issues: If you encounter any problems during testing, start by checking the connections between the LED strip lights and power supply. Make sure they are secure and properly aligned. If the issue persists, consult the troubleshooting guide provided by the manufacturer or seek professional assistance.
8.6 Adjust the Lighting: If you feel that the lighting effect needs improvement, consider adjusting the placement or brightness of the LED strip lights. Experiment with different positions, angles, or lighting configurations to achieve your desired effect.
8.7 Make Final Touches: Take the opportunity to make any final adjustments or touches to enhance the overall appearance of your infinity mirror. This may include cleaning the mirror surface, refining the frame edges, or adding decorative elements to further enhance the visual appeal.
8.8 Repeat the Testing: After making any adjustments or resolving issues, go through the testing process once again to ensure that all aspects of your infinity mirror are functioning as intended.
8.9 Seek Professional Help: If you encounter persistent issues or challenges that you are unable to resolve on your own, do not hesitate to seek assistance from a professional in mirror installation or electronic systems.
By thoroughly testing and troubleshooting your infinity mirror, you can ensure that it functions flawlessly and delivers the mesmerizing effect you desire. Enjoy the enchantment of your completed mirror and revel in the infinite beauty it presents.
Step 9: Final Touches and Adjustments
As you approach the final stages of your infinity mirror project, it’s time to add those finishing touches and make any necessary adjustments to perfect the overall look and functionality. Follow these steps to give your mirror the final enhancements it needs:
9.1 Clean the Mirror: Take a moment to clean both sides of the mirror using a microfiber cloth and a glass cleaner. Ensure that the mirror surface is free from any smudges, fingerprints, or dirt, allowing for a pristine reflection.
9.2 Refine the Frame Edges: If needed, use sandpaper or a glass file to smooth out any rough edges or imperfections in the frame. This will create a clean and polished aesthetic for your infinity mirror.
9.3 Add Decorative Elements: If desired, consider adding decorative elements to enhance the visual impact of your infinity mirror. This could include placing LED fairy lights around the frame, attaching decorative trims, or incorporating other embellishments to personalise the mirror according to your style and taste.
9.4 Reassess the Lighting: Step back and evaluate the lighting effect of your infinity mirror. Make any necessary adjustments to the position or brightness of the LED strip lights to achieve the desired ambiance and optimal visual impact.
9.5 Test the Reflection: Carefully observe the reflection in your mirror from various angles and distances. Ensure that the infinite reflection is clear, mesmerizing, and creates a sense of depth, immersing viewers in its captivating allure.
9.6 Secure Loose Components: Check for any loose screws, mounts, or wiring within the frame. Tighten any loose components to ensure a stable and secure construction. This will prevent any potential damage or disruption to the functionality of the mirror.
9.7 Seek Feedback: Invite others to view and provide feedback on your infinity mirror. Their input may offer valuable insights or suggestions for improvement that you may have overlooked.
9.8 Fine-Tune as Necessary: Take note of any feedback received and address any suggestions or concerns. Make the necessary adjustments and refinements to achieve the best possible version of your infinity mirror.
9.9 Enjoy Your Creation: Bask in the satisfaction of completing your infinity mirror project. Share its mesmerizing beauty with family and friends, and relish the unique ambiance it brings to any space.
By focusing on these final touches and adjustments, you can elevate your infinity mirror to its full potential. Take your time to refine the details, and appreciate the extraordinary creation you have brought to life.