
Why Clean Your Dyson Vacuum Brush?
Keeping your Dyson vacuum brush clean is essential for maintaining its performance and efficiency. Over time, the brush roll of your vacuum can become clogged with hair, dust, and debris, which can hinder its ability to effectively pick up dirt from your floors. Regularly cleaning the brush roll and the rest of your vacuum can help ensure that it continues to work at its best.
Here are some key reasons why you should prioritize cleaning your Dyson vacuum brush:
1. Optimal Suction Power: When the brush roll is clean and free from obstructions, it can efficiently agitate and lift the dirt and debris from your floors. A dirty brush roll can reduce the suction power of your vacuum, resulting in less effective cleaning.
2. Longer Lifespan: Regular maintenance, including cleaning the brush roll, can extend the lifespan of your Dyson vacuum. Removing accumulated hair and debris prevents strain on the motor and other components, reducing the risk of damage and prolonging the overall durability of your machine.
3. Prevention of Clogs: Hair, threads, and other debris can easily wrap around the brush roll and get tangled, leading to clogs in the brush housing and hose. Regularly cleaning the brush roll helps prevent these clogs and ensures smooth suction, preventing any damage to your vacuum.
4. Efficient Cleaning: A clean brush roll allows your vacuum to glide smoothly across different surfaces, resulting in more thorough cleaning. It enhances the brush’s ability to agitate and loosen dirt, making it easier for the vacuum to suction it up effectively.
5. Improved Air Quality: Dust, allergens, and other particles can accumulate on the brush roll and in the vacuum’s filters. Cleaning the brush roll and maintaining the filters help to prevent these contaminants from being released back into the air, ultimately improving indoor air quality.
Regularly cleaning your Dyson vacuum brush is a simple and effective way to ensure proper performance and to prolong the life of your machine. By following the recommended cleaning steps, you can enjoy a cleaner home and an efficient vacuuming experience every time.
Tools You Will Need
Before you begin the process of cleaning your Dyson vacuum brush, gather the following tools to ensure a thorough and efficient cleaning:
1. Tweezers: You will need tweezers to carefully remove any tangled hair or debris from the brush roll. Tweezers with pointed tips can provide better precision in removing stubborn particles.
2. Scissors: A pair of scissors will come in handy for cutting off any hair or fibers that are tightly wrapped around the brush roll. Make sure the scissors have sharp blades for an easier and safer cutting process.
3. Comb: A fine-toothed comb is useful for untangling hair that may be wrapped around the brush bristles. This will help in removing hair that is not easily accessible with tweezers.
4. Toothbrush: A soft-bristle toothbrush can be used for cleaning the brush roll and other hard-to-reach areas of your vacuum. It will help remove any stuck-on debris or dirt from the brush roll and housing.
5. Bowl of warm soapy water: Prepare a bowl with warm water and a gentle dish soap. This will be used to clean the brush roll and any removable parts of your vacuum.
6. Clean cloth or towel: Have a clean cloth or towel on hand to dry the brush roll and other components after cleaning. It is important to ensure that all parts are completely dry before reassembling your vacuum.
7. Optional: Vacuum attachments: Depending on the model of your Dyson vacuum, you may have various attachments that can be helpful for cleaning hard-to-reach places. These attachments could include crevice tools or small brush attachments specifically designed for cleaning the brush roll.
By having these tools ready, you will be well-prepared to clean your Dyson vacuum brush thoroughly and efficiently. With the right tools in hand, the cleaning process will be easier and more effective, ensuring optimal performance of your vacuum.
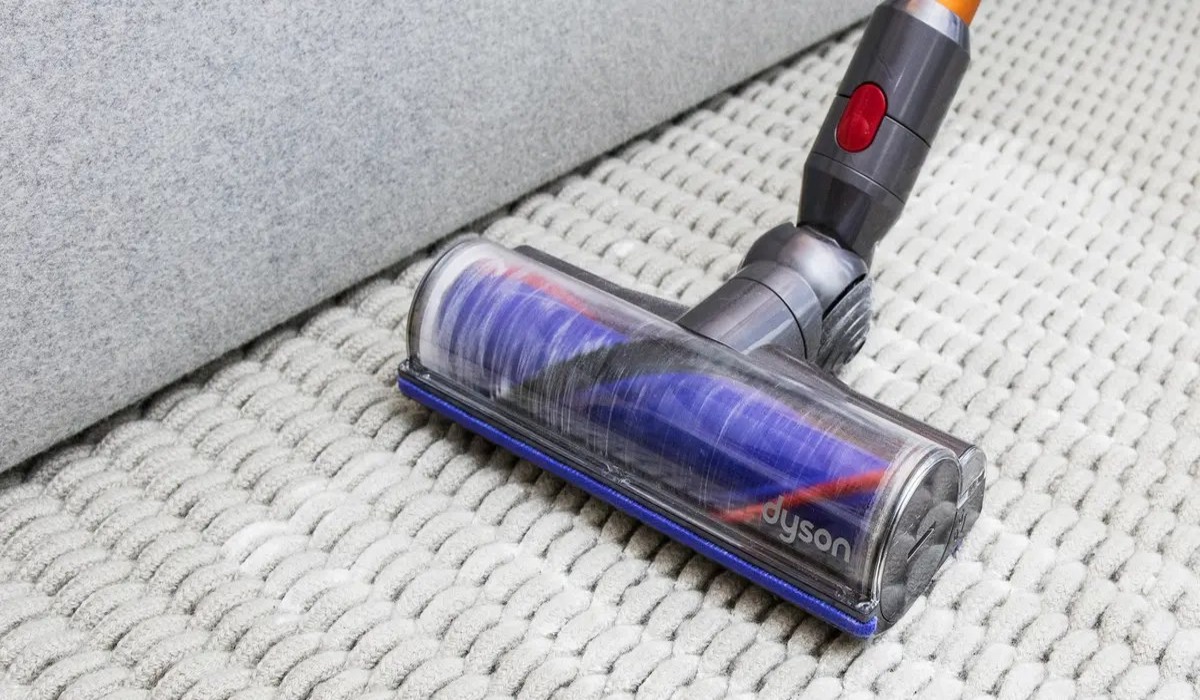
Step 1: Remove the Brush Roll
The first step in cleaning your Dyson vacuum brush is to remove the brush roll. Follow these instructions to safely detach the brush roll:
1. Unplug your vacuum: Before starting any maintenance or cleaning, ensure that your Dyson vacuum is unplugged from the power source to avoid any accidents.
2. Access the brush roll: Depending on your Dyson model, you may need to remove the floorhead or the cover to access the brush roll. Refer to your vacuum’s user manual for specific instructions on how to access the brush roll.
3. Release the brush roll: Look for the brush roll release button or latch near the brush housing. Press or slide the release mechanism to release the brush roll from its locked position. This will allow you to remove the brush roll from the vacuum.
4. Remove the brush roll: Gently pull the brush roll out of the vacuum. Be careful not to force it or damage any delicate parts. If necessary, refer to your user manual for additional guidance on removing the brush roll.
5. Inspect the brush roll: Take a moment to inspect the brush roll for any visible debris, tangled hair, or damage. This will help you identify the areas that need cleaning and any potential issues that may require further attention.
Once you have successfully removed the brush roll, you are ready to proceed with the next steps of cleaning. By following this initial step, you can easily access and clean the brush roll thoroughly, ensuring the optimal performance of your Dyson vacuum.
Step 2: Remove Hair and Debris
After removing the brush roll from your Dyson vacuum, it’s time to remove any hair, dust, and debris that may be tangled around the bristles. Follow these steps to effectively remove hair and debris:
1. Inspect the brush roll: Take a closer look at the brush roll and identify areas where hair and debris are most concentrated. Pay attention to the bristles and the ends of the brush roll where buildup is common.
2. Use tweezers: With the help of tweezers, carefully remove any visible clumps of hair or debris that are wrapped around the bristles. Gently pull the hair or debris away from the brush roll, being cautious not to damage the bristles.
3. Check the ends: Pay particular attention to the ends of the brush roll. Hair tends to accumulate and tangle at the ends, making it harder to remove. Use your fingers or the tweezers to untangle and remove as much of the hair as possible.
4. Remove loose debris: Shake the brush roll gently to dislodge any loose debris or dust that may have accumulated inside. Tap it against a hard surface, such as a countertop, to help loosen and dislodge stubborn particles.
5. Inspect for hidden debris: Take a closer look at the brush roll for any hidden debris that may be trapped between the bristles. Use your fingers or a soft cloth to wipe away any remaining debris.
6. Dispose of the collected debris: Dispose of the hair, dust, and debris that you have removed from the brush roll in a trash bin. Be sure to clean your hands thoroughly afterward.
By diligently removing hair and debris from the brush roll, you can improve the performance and efficiency of your Dyson vacuum. This ensures that the bristles are free to agitate and pick up dirt effectively, leading to cleaner floors and a more efficient cleaning experience.
Step 3: Use a Comb to Remove Tangled Hair
In some cases, hair and fibers may become tightly tangled around the bristles of your Dyson vacuum brush. To effectively remove these tangles, you can use a comb. Follow these steps:
1. Select a fine-toothed comb: Choose a comb with fine teeth that can easily fit between the bristles of the brush roll. This will help you gently untangle and remove any hair or fibers that are tightly wrapped around the bristles.
2. Hold the brush roll securely: Hold the brush roll firmly with one hand to stabilize it while using the comb with the other hand. This will prevent any accidental damage to the brush roll or injury to your fingers.
3. Insert the comb: Insert the comb between the bristles of the brush roll, starting from the base of the bristles. Gently push the comb through the tangled hair or fibers, using a back-and-forth motion to loosen the tangles.
4. Slowly untangle the hair: As you move the comb along the bristles, the tangles will start to loosen. Take your time to carefully untangle the hair or fibers and remove them from the brush roll. If necessary, use the tweezers to assist in loosening and removing stubborn tangles.
5. Inspect and repeat if necessary: After combing through the entire brush roll, inspect it for any remaining tangles or debris. If you notice any, repeat the combing process until the brush roll is free from all tangles.
6. Dispose of the collected hair: Discard any hair or fibers that you have removed from the brush roll into a trash bin. It is essential to keep the brush roll free of accumulated hair to maintain optimal performance.
Using a comb to remove tangled hair from your Dyson vacuum brush helps to ensure that the bristles can effectively agitate and clean your floors. By following this step, you can enhance the efficiency of your vacuum and maintain its cleaning power.
Step 4: Clean the Brush Roll with Soap and Water
Once you have removed the hair and debris from your Dyson vacuum brush, it’s time to give it a thorough cleaning using soap and water. Follow these steps to clean the brush roll:
1. Prepare a cleaning solution: Fill a bowl with warm water and add a small amount of mild dish soap. Swirl the water gently to create a soapy mixture.
2. Submerge the brush roll: Place the brush roll into the bowl, ensuring that the bristles are fully submerged in the soapy water. Allow it to soak for a few minutes to loosen any remaining dirt or grime.
3. Gently scrub the brush roll: Use a soft-bristle toothbrush or your fingers to scrub the bristles of the brush roll. Focus on areas where stubborn dirt or debris may still be present. Use gentle pressure to avoid damaging the bristles.
4. Rinse with clean water: Once you’ve thoroughly scrubbed the brush roll, rinse it under clean, running water to remove any soap residue. Ensure that all traces of soap are rinsed away.
5. Shake off excess water: Shake the brush roll gently to remove excess water. You can also use a clean cloth to pat it dry if necessary. Avoid twisting or bending the bristles while drying.
6. Let it air dry: Place the brush roll in a well-ventilated area and allow it to air dry completely. Ensure that the brush roll is completely dry before reassembling it back into your Dyson vacuum.
7. Inspect for cleanliness: Once the brush roll is dry, inspect it for any remaining dirt or debris. If needed, repeat the cleaning process to achieve a thorough and pristine result.
Cleaning the brush roll with soap and water helps remove any dirt, grime, or residue that may have accumulated over time. This ensures that the brush roll functions optimally and maintains its cleaning efficacy. By regularly cleaning the brush roll, you can prolong the lifespan of your Dyson vacuum and maintain its performance.
Step 5: Remove Stuck-on Debris with a Toothbrush
If there are any stubborn or stuck-on debris on your Dyson vacuum brush after the initial cleaning, using a toothbrush can help to remove them effectively. Follow these steps to remove stuck-on debris:
1. Select a soft-bristle toothbrush: Choose a toothbrush with soft bristles that will be gentle on the brush roll. Avoid using a toothbrush with hard bristles as it may damage the bristles or other delicate parts of the brush roll.
2. Hold the brush roll securely: Hold the brush roll firmly in one hand to provide stability while using the toothbrush in the other hand. This will prevent any accidental damage or injury.
3. Gently scrub the debris: Use the toothbrush to gently scrub the bristles of the brush roll, focusing on areas with stubborn or stuck-on debris. Apply gentle pressure and scrub in a back-and-forth motion to dislodge the debris.
4. Pay attention to the ends: Pay close attention to the ends of the brush roll, as debris may accumulate there. Use the toothbrush to carefully clean and remove any debris in these areas.
5. Inspect and repeat if necessary: After scrubbing the brush roll with the toothbrush, inspect it to see if any stuck-on debris remains. If needed, repeat the scrubbing process until the brush roll is free of stubborn debris.
6. Rinse and dry: Rinse the brush roll under clean running water to remove any loosened debris or residue. Shake off excess water and allow the brush roll to air dry completely before reassembling it into your Dyson vacuum.
Using a toothbrush to tackle stuck-on debris ensures that your Dyson vacuum brush is thoroughly cleaned and ready for optimal performance. By following this step, you can remove any lingering debris and maintain the efficiency and effectiveness of your vacuum.
Step 6: Dry and Reassemble the Brush Roll
After cleaning the brush roll of your Dyson vacuum, it is important to ensure it is completely dry before reassembly. Follow these steps to dry and reassemble the brush roll:
1. Shake off excess water: Gently shake the brush roll to remove any excess water. Avoid twisting or bending the bristles as this can cause damage.
2. Pat dry with a clean cloth or towel: Use a clean, dry cloth or towel to gently pat the brush roll and absorb any remaining moisture. This helps to speed up the drying process.
3. Let it air dry: Place the brush roll in a well-ventilated area and allow it to air dry completely. Ensure it is placed in a position where both sides of the brush roll can dry evenly.
4. Ensure it is completely dry: Before reassembling the brush roll, make sure it is completely dry to prevent the growth of mold or mildew. Check the bristles and any other parts for any signs of moisture.
5. Reassemble the brush roll: Once the brush roll is dry, align it properly with the brush housing. Refer to your Dyson vacuum’s user manual for any specific instructions on how to reassemble the brush roll correctly.
6. Secure the brush roll: Follow the instructions provided to securely lock or fasten the brush roll back into place. Ensure it is firmly secured to prevent any accidental dislodging during vacuuming.
7. Test the brush roll: Turn on your Dyson vacuum and run it for a few seconds to ensure that the brush roll is rotating properly. Listen for any unusual noises or vibrations that may indicate a misaligned brush roll.
By thoroughly drying the brush roll and properly reassembling it, you can ensure optimal performance and prolong the life of your Dyson vacuum. Regular maintenance, including proper drying and reassembly, is key to maintaining the functionality of your vacuum and enjoying effective cleaning results.
Step 7: Clean the Brush Housing and Nozzle
In addition to cleaning the brush roll, it is important to clean the brush housing and nozzle of your Dyson vacuum. Follow these steps to effectively clean these areas:
1. Unplug your vacuum: Before cleaning, ensure that your Dyson vacuum is unplugged from the power source to prevent any accidents.
2. Inspect the brush housing and nozzle: Take a close look at the brush housing and nozzle for any visible dirt, debris, or blockages. Use a flashlight if needed to get a better view.
3. Remove visible debris: Use your fingers or a soft brush to remove any loose dirt or debris from the brush housing and nozzle. Be gentle to avoid damaging any delicate parts.
4. Clean with a damp cloth: Dampen a clean cloth with water and gently wipe down the brush housing and nozzle. Pay special attention to hard-to-reach areas and ensure all surfaces are thoroughly cleaned.
5. Check for blockages: Inspect the nozzle for any blockages by looking through it from different angles. If you notice any blockages, carefully remove them using a long object like a straightened paperclip or a specialized tool if available.
6. Rinse if necessary: If there is stubborn dirt or residue on the brush housing and nozzle, you can rinse them under running water. Ensure all parts are completely dry before reassembling.
7. Allow to dry: After cleaning, leave the brush housing and nozzle to air dry completely. Make sure there is no moisture remaining before reassembling your vacuum.
8. Reassemble the brush housing and nozzle: Refer to the user manual for your Dyson vacuum to properly reassemble the brush housing and nozzle. Follow the instructions provided to ensure correct alignment and secure attachment.
By cleaning the brush housing and nozzle, you remove trapped dirt and debris and maintain the suction power of your Dyson vacuum. This step contributes to the overall cleanliness and efficiency of your machine, ensuring it functions at its best.
Step 8: Clean the Vacuum Hose and Attachments
As you continue to clean your Dyson vacuum, it’s important not to overlook the cleaning of the vacuum hose and attachments. Follow these steps to properly clean them:
1. Detach the hose and attachments: Depending on your Dyson model, detach the hose and any attachments from the main body of the vacuum. Refer to the user manual if you are unsure how to detach them properly.
2. Inspect for visible dirt and debris: Examine the hose and attachments for any visible dirt, dust, or debris. Pay attention to crevices, corners, and bristles where dirt tends to accumulate.
3. Remove visible dirt and debris: Use your fingers or a soft brush to remove any loose dirt or debris from the hose and attachments. Gently tap them to dislodge any stuck-on particles.
4. Clean with soapy water: Fill a sink or a basin with warm water and add a small amount of mild dish soap. Submerge the hose and attachments in the soapy water and let them soak for a few minutes.
5. Scrub the surfaces: Use a soft-bristle brush or cloth to scrub the surfaces of the hose and attachments. Pay close attention to areas with accumulated dirt or debris and ensure you clean all visible surfaces thoroughly.
6. Rinse with clean water: Once you have scrubbed the hose and attachments, rinse them under clean running water to remove any soap residue. Ensure that all traces of soap are rinsed away.
7. Shake off excess water and air dry: Shake off excess water from the hose and attachments and lay them flat on a clean towel or hang them up to air dry completely. Make sure there is no moisture left before reattaching them to your vacuum.
8. Reattach the hose and attachments: Once the hose and attachments are dry, reattach them to the main body of your Dyson vacuum. Ensure they are securely attached to maintain optimal performance.
Cleaning the vacuum hose and attachments not only helps to maintain the cleanliness of your Dyson vacuum but also ensures efficient suction power and performance. By following this step, you can enjoy pristine cleaning throughout your home.
Step 9: Clean the Vacuum Filter
A clean and properly functioning vacuum filter is essential for maintaining optimal performance and suction power in your Dyson vacuum. Follow these steps to effectively clean the vacuum filter:
1. Locate the filter: Depending on your Dyson model, the filter may be located either in the dust canister or inside the vacuum body. Refer to your user manual to confirm the location of the filter.
2. Remove the filter: Carefully remove the filter from its housing. Be mindful of any clips or locking mechanisms that may be present to ensure a secure fit.
3. Inspect the filter: Take a close look at the filter for any visible dirt or debris. Check if the filter appears discolored or clogged, as this may indicate it requires cleaning.
4. Tap off loose dirt and debris: Gently tap the filter against a hard surface to knock off any loose dirt or debris. This will help remove any superficial buildup before proceeding with further cleaning.
5. Wash with water: Rinse the filter under cool running water. Use your fingers to gently rub the filter, focusing on areas with noticeable dirt or discoloration. Be careful not to scrub too vigorously, as this may damage the filter.
6. Avoid using soap or cleaning agents: In most cases, water alone is sufficient to clean the vacuum filter. Avoid using soap or cleaning agents unless specifically recommended by the manufacturer.
7. Air dry completely: After rinsing, gently squeeze out excess water from the filter. Place the filter in a well-ventilated area and allow it to air dry completely before reinserting it into your Dyson vacuum. Ensure the filter is completely dry to prevent the growth of mold or mildew.
8. Check for filter replacement: Over time, the filter may become worn out or damaged. If you notice any tears, holes, or a significant decrease in performance after cleaning, consider replacing the filter with a new one.
Regularly cleaning the vacuum filter helps maintain proper airflow and suction power in your Dyson vacuum. By following this step, you can ensure that your vacuum operates at its best and efficiently captures dirt and debris from your floors.
Step 10: Clean the Vacuum Canister or Bag
Cleaning the vacuum canister or bag is an important step in maintaining the overall cleanliness and performance of your Dyson vacuum. Follow these steps to effectively clean the canister or bag:
1. For Bagless Vacuums:
- Empty the canister: Detach the canister from the vacuum and empty its contents into a trash bin. Be mindful of the recommended fill level and dispose of the debris properly.
- Remove the canister components: Take apart the canister, if applicable, by separating the components. Refer to your user manual for instructions specific to your Dyson model.
- Wash with water: Rinse the canister and its components with water. Use a brush or cloth to gently scrub away any visible dirt or residue. Be sure to reach all the nooks and crevices for a thorough clean.
- Air dry completely: After cleaning, leave the canister and its components to air dry completely. Ensure there is no moisture remaining before reassembling them back into your Dyson vacuum.
2. For Bagged Vacuums:
- Remove and replace the bag: If your Dyson vacuum uses a bag, carefully remove the bag and replace it with a new one. Discard the used bag in a trash bin.
- Clean the dust compartment: Use a damp cloth or brush to clean the dust compartment or container. Wipe away any dust or debris that may have accumulated inside.
- Inspect the seals and mechanisms: Check the seals and mechanisms of the bagged vacuum for any signs of wear or damage. If necessary, clean or replace them to maintain proper functionality.
Cleaning the vacuum canister or bag ensures that dirt and debris are effectively captured and stored during the cleaning process. By following this step, you keep your Dyson vacuum working at its best, maintaining its suction power and overall performance.
Tips for Maintaining a Clean Brush and Vacuum
Maintaining a clean brush and vacuum is essential for optimal performance and longevity. Here are some helpful tips to keep your Dyson vacuum in top shape:
1. Regularly clean the brush roll: Make it a habit to clean the brush roll after each use or at least once a month, depending on your vacuum usage. This prevents hair and debris from accumulating and ensures proper bristle function.
2. Remove tangled hair promptly: Check the brush roll and remove any tangled hair or fibers as soon as you notice them. Promptly addressing tangles helps prevent damage to the bristles and keeps your vacuum running smoothly.
3. Vacuum large debris separately: If you’re vacuuming up large debris like paper clips or coins, remove them manually instead of relying on the vacuum to pick them up. This avoids potential damage to the brush roll or other components.
4. Empty the canister or replace bags regularly: Don’t let the canister or bag fill up completely before emptying or replacing them. Regularly emptying the canister or changing the bag prevents loss of suction power and ensures efficient cleaning.
5. Inspect and clean the filters: Check the filters on a regular basis and clean or replace them as needed. Clogged or dirty filters hinder performance and airflow, so keeping them clean is crucial for the vacuum’s efficiency.
6. Clean attachments and accessories: Wipe down and clean the vacuum attachments and accessories regularly. Remove any debris or dust that may have accumulated, ensuring they are free from clogs or obstructions.
7. Store your vacuum properly: When not in use, store your Dyson vacuum in a clean and dry area, preferably in a closet or designated storage space. This protects the vacuum from dust and prevents unnecessary wear and tear.
8. Follow the manufacturer’s guidelines: Refer to your Dyson vacuum’s user manual for specific care instructions and maintenance recommendations. Following the manufacturer’s guidelines ensures you are taking the best care of your vacuum.
9. Perform routine maintenance: Schedule regular maintenance tasks such as checking for damaged cords or hoses, ensuring proper belt tension, and inspecting for any leaks or unusual noises. Address any maintenance issues promptly to prevent further damage.
By following these tips and maintaining a clean brush and vacuum, you can enjoy efficient cleaning performance and maximize the lifespan of your Dyson vacuum. A well-maintained vacuum ensures a cleaner and healthier home environment.