
Assess the Condition of the Rug
Before you start cleaning an old rug, it’s essential to assess its condition. This step is crucial as it will help you determine the appropriate cleaning methods and avoid causing any further damage. Here are some key points to consider when assessing the rug:
1. Stains and spills: Examine the rug for any visible stains or spills. Note their location and severity as some stains may require special treatment or professional intervention.
2. Color fading: Check if the rug’s colors have faded over time. This is a common issue with older rugs due to exposure to sunlight. Faded areas may require additional care during the cleaning process to avoid further color loss.
3. Odor: Sniff the rug to detect any unpleasant odors. This could be an indication of trapped dirt, pet stains, or mold. Understanding the cause of the odor will help you choose the right cleaning approach.
4. Fraying or unraveling edges: Inspect the edges of the rug to see if there is any fraying or unraveling. This is common in older rugs that have undergone wear and tear. If the edges are significantly damaged, it may be necessary to reinforce or repair them before cleaning.
5. Weak or damaged fibers: Look closely at the rug’s fibers for signs of weakness or damage. Check for areas where the fibers are worn or breaking. If the fibers are fragile, you will need to handle the rug with extra care during the cleaning process.
By taking the time to assess the condition of the rug, you can ensure that you use the appropriate cleaning methods and products. This will not only help you effectively clean the rug but also prevent any further damage or deterioration. Keep in mind that some rugs may require professional cleaning if they have extensive damage or delicate fibers that need special attention.
Remove Loose Dirt and Debris
Before delving into a deep cleaning process, it’s important to remove any loose dirt and debris from the rug’s surface. This initial step will ensure that you don’t grind dirt further into the fibers during the cleaning process. Here are some effective methods for removing loose dirt and debris:
1. Shake the rug: If the rug is small enough, take it outside and vigorously shake it to loosen and dislodge any loose dirt and debris. This method works particularly well for rugs with shorter pile heights.
2. Vacuum the rug: For larger rugs or rugs that are difficult to shake, use a vacuum cleaner with a brush attachment to suction away loose dirt. Start by vacuuming the surface gently in the direction of the rug’s nap to prevent damaging the fibers. Be thorough and make sure to capture dirt in crevices and corners.
3. Use a beating tool: For sturdy rugs, consider using a beating tool specifically designed for rug cleaning. Lay the rug flat on a clean surface outdoors and beat it gently with the tool. The beating action will help dislodge embedded dirt and debris.
4. Spot clean stains: If you notice any obvious stains or spills on the rug, address them with a spot cleaning method before proceeding with overall cleaning. Follow appropriate stain removal techniques based on the type of stain and rug material.
Remember to be gentle during the cleaning process to avoid causing any damage to the rug’s fibers. It’s also important to ensure that the cleaning tools and equipment you use are suitable for the rug’s delicate fabric or construction. If you are unsure about the best cleaning method for your specific rug, it’s always a good idea to seek professional advice to avoid any irreversible damage.
By removing loose dirt and debris, you create a clean foundation for the subsequent cleaning steps. This will enhance the effectiveness of the cleaning process and ultimately restore the rug’s appearance and freshness.
Shake or Vacuum the Rug
Once you have removed the loose dirt and debris from the surface of the rug, the next step is to give it a thorough shake or vacuum. This step will further eliminate any remaining dirt particles and help prepare the rug for the deep cleaning process. Here’s how you can effectively shake or vacuum your rug:
1. Shake the rug: If your rug is smaller in size and manageable, take it outdoors and give it a good shake. Find a clean and open area, hold one end of the rug firmly, and vigorously shake it to dislodge any embedded dirt. Repeat this process a few times from different angles to ensure that all areas of the rug are properly shaken.
2. Vacuum the rug: If shaking the rug is not a viable option or if it’s too large, use a vacuum cleaner with a brush attachment. Start by ensuring that the vacuum cleaner is suitable for the rug’s pile and construction. Adjust the vacuum cleaner to a suitable height setting to avoid excessive suction that might damage the rug’s fibers.
3. Vacuum in different directions: Slowly and gently vacuum the rug in horizontal and vertical motions, ensuring that you cover the entire surface. Pay extra attention to high-traffic areas and areas where dirt and debris tend to accumulate, such as near doorways and under furniture. If your rug has fringes, use the vacuum cleaner’s attachment or turn off the rotating brush to prevent damage.
4. Repeat as needed: Depending on the rug’s condition and level of dirt, you may need to repeat the shaking or vacuuming process a few times. This will help ensure that the rug is thoroughly cleaned and ready for the next steps.
By shaking or vacuuming the rug, you remove deeper-seated dirt and allergens, improving the overall cleanliness and freshness of the rug. This step is especially important for older rugs that may have accumulated years’ worth of dust and dirt. Remember to handle the rug gently and avoid any excessive force that might cause damage to the delicate fibers.
Spot Treat Stains
Stains on an old rug can be unsightly and may require special attention before proceeding with the overall cleaning process. Spot treating stains will help to remove or minimize their appearance, restoring the rug’s original beauty. Follow these steps to effectively spot treat stains on your rug:
1. Identify the stain: Take a close look at the stain and try to identify its cause. Common types of stains on rugs include food spills, pet stains, coffee or tea stains, ink stains, and oil-based stains. Different stains may require different treatment methods.
2. Blot the stain: For fresh stains, start by blotting the area with a clean cloth or paper towel. Do not rub the stain, as this may further spread it or push it deeper into the fibers. Blot gently to absorb as much of the liquid as possible.
3. Dilute the stain: If the stain is still visible after blotting, create a simple cleaning solution by mixing mild dish soap or laundry detergent with warm water. Test the solution on a small, inconspicuous area of the rug first to ensure it doesn’t cause any discoloration or damage.
4. Apply the solution: Using a clean cloth or sponge, gently dab the cleaning solution onto the stained area. Avoid soaking the rug; instead, work in small sections and gradually build up the cleaning solution to prevent over-wetting.
5. Blot and rinse: After applying the cleaning solution, blot the stained area with a clean, damp cloth to lift the stain. Rinse the cloth frequently to prevent transferring the stain back onto the rug. Continue blotting until the stain is no longer visible.
6. Dry the area: Once the stain is removed, use a clean towel to blot the area and remove excess moisture. Allow the spot to air dry completely before moving on to the next stage of the cleaning process.
Remember that some stains may require professional assistance or specific stain-removal products. If the stain persists or if you are unsure about how to treat it, it’s best to consult a professional rug cleaner to avoid causing further damage.
By spot treating stains, you can significantly improve the appearance of your old rug. This step allows for a more thorough overall cleaning process and helps restore the rug to its original condition.
Use a Gentle Cleaner or DIY Solution
Once you have spot treated any visible stains on your old rug, the next step is to clean the entire rug using a gentle cleaner or a DIY solution. It’s crucial to choose a cleaning agent that won’t be too harsh on the rug’s delicate fibers. Here are some options to consider:
1. Gentle rug cleaners: Look for rug cleaners specifically designed for delicate rugs. These cleaners are usually pH balanced and free from harsh chemicals that can damage or discolor the fibers. Follow the instructions provided by the manufacturer when using these cleaners.
2. DIY cleaning solution: If you prefer a more natural approach, you can create a DIY cleaning solution using common household items. One popular DIY solution involves mixing equal parts of white vinegar and water. This solution is effective in removing mild stains and odors without causing damage to the rug.
3. Test the cleaning solution: Before applying any cleaning solution to the entire rug, it’s important to test it on a small and inconspicuous area. This test will help you ensure that the solution doesn’t cause any discoloration or damage to the rug. If there are no adverse reactions, you can proceed with the cleaning process.
4. Apply the cleaner: Whether you’re using a gentle rug cleaner or a DIY solution, apply it to the entire rug using a soft brush, sponge, or a clean cloth. Work the cleaner into the fibers in a gentle and circular motion. Avoid excessive scrubbing or agitation, as this can weaken the rug’s fibers.
5. Rinse the rug: After applying the cleaner, thoroughly rinse the rug with clean water. This step is essential to remove any residue and ensure that the cleaner doesn’t remain in the fibers. Rinse until the water runs clear and there are no soapy suds left on the rug.
6. Allow the rug to dry: After rinsing, blot the rug with a clean towel to remove excess water. Then, allow the rug to air dry completely in a well-ventilated area. Avoid exposing the rug to excessive heat or direct sunlight, as this can cause shrinkage or color fading.
Be patient during the drying process, as it may take some time for the rug to fully dry. Once it’s completely dry, you can move on to the next steps to further enhance its appearance and longevity.
Using a gentle cleaner or a DIY solution ensures that your old rug is cleaned effectively without causing any damage. It allows you to maintain the rug’s integrity and prolong its lifespan, so you can continue to enjoy its beauty for years to come.
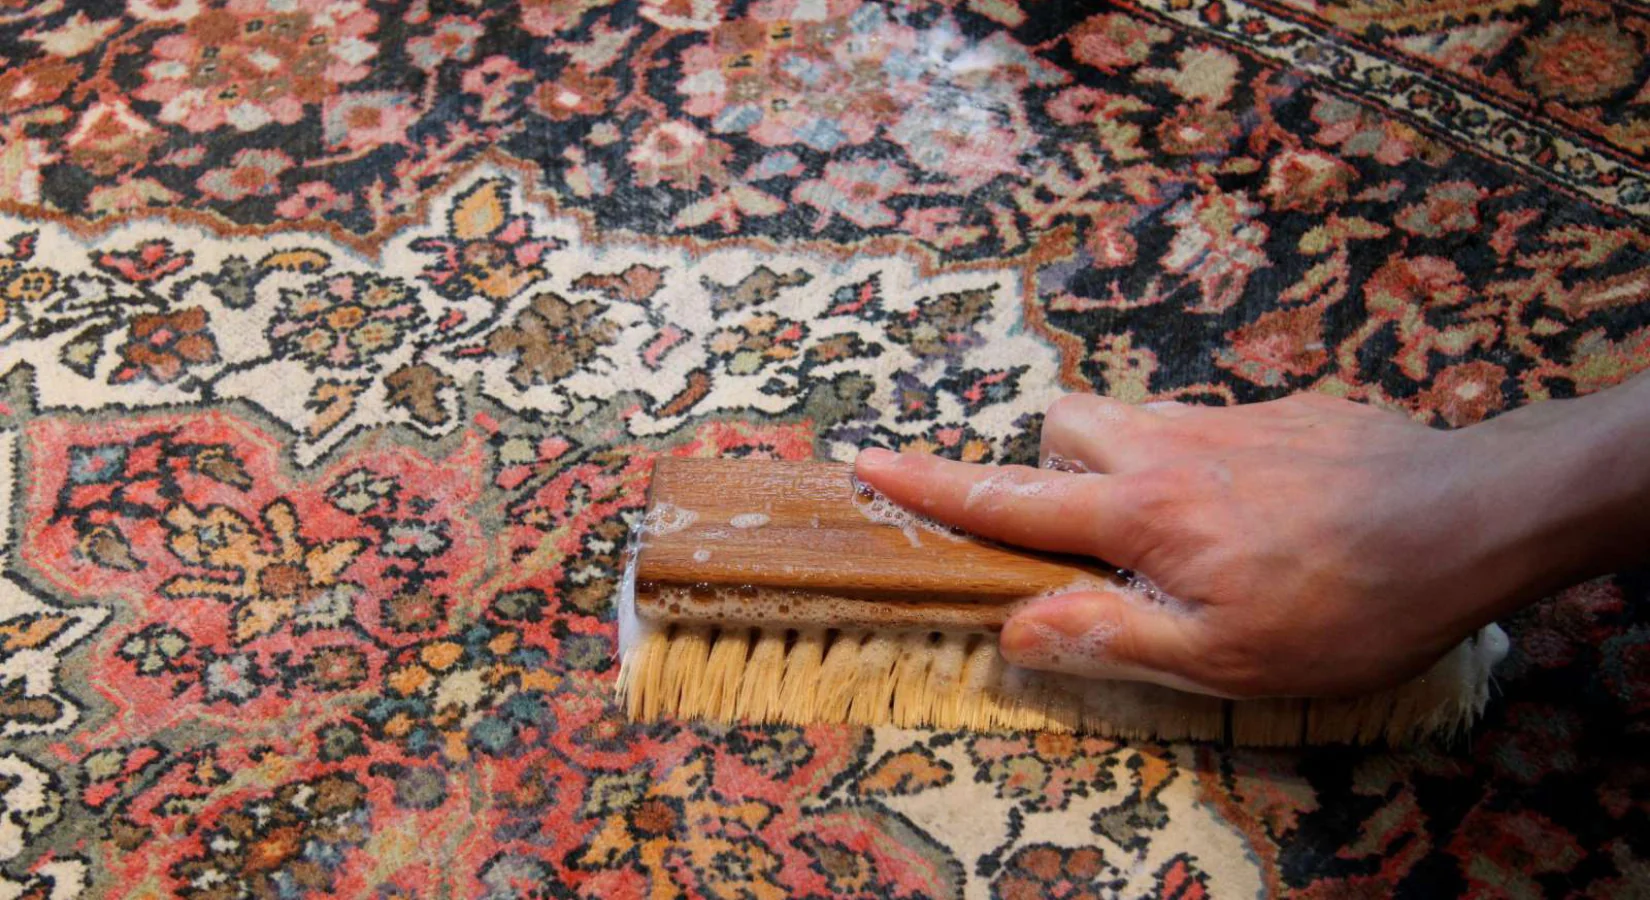
Scrub the Rug with a Soft Brush or Sponge
After applying a gentle cleaner or DIY solution to your old rug, it’s time to scrub the rug to remove any embedded dirt and revive its fibers. This step requires a soft brush or sponge to ensure gentle and effective cleaning. Follow these guidelines to properly scrub your rug:
1. Choose the right brush or sponge: Select a soft-bristled brush or a sponge that is suitable for your rug’s fiber type. Nylon brushes or natural hair brushes are ideal for most rugs. Avoid using stiff brushes or abrasive materials that can damage the rug’s fibers.
2. Test the brush or sponge: Before scrubbing the entire rug, test the brush or sponge on a small, inconspicuous area to ensure that it doesn’t cause any damage or discoloration. Gently scrub a small section and check for any adverse reactions.
3. Begin scrubbing: Starting from one corner or edge of the rug, use gentle circular motions to scrub the rug’s surface. Work in small sections, paying extra attention to high-traffic areas or heavily soiled spots. Gradually move across the entire rug, ensuring thorough coverage.
4. Apply even pressure: Apply even and light pressure while scrubbing, avoiding any excessive force that might damage the rug’s fibers. Be patient and persistent, focusing on areas that require more attention. Take breaks if needed to prevent straining your arm or hand muscles.
5. Rinse the brush or sponge: Regularly rinse the brush or sponge in clean water to remove any dirt or residue that may have accumulated. This will help prevent re-depositing dirt onto the rug’s surface.
6. Change the water if necessary: If the water becomes visibly dirty during the scrubbing process, replace it with clean water. This will ensure that you’re not spreading dirt or residue from one area of the rug to another.
7. Rinse the rug: Once you have finished scrubbing the entire rug, thoroughly rinse it with clean water. Use a clean cloth or sponge to remove any residual cleaning solution. Repeat the rinsing process until the water runs clear and there are no suds left on the rug.
8. Blot excess water: After rinsing, gently blot the rug with a clean towel to remove excess water. Avoid rubbing or wringing the rug, as this can damage the fibers and lead to shrinkage.
By scrubbing the rug with a soft brush or sponge, you effectively lift embedded dirt and rejuvenate the rug’s appearance. This step helps to restore the rug’s texture, making it look fresher and more vibrant. Remember to handle the rug gently and avoid using excessive force to ensure its longevity.
Rinse the Rug Thoroughly
After scrubbing the rug with a soft brush or sponge, it is essential to rinse it thoroughly to remove any remaining cleaner or residue. The rinsing process ensures that no cleaning solution or dirt is left behind, leaving your rug clean and fresh. Follow these steps to properly rinse your old rug:
1. Prepare clean water: Fill a bucket or basin with clean water at room temperature. The amount of water needed depends on the size of your rug. Ensure that there is enough water to fully immerse and rinse the rug.
2. Immerse the rug: Submerge the rug in the water and gently agitate it to allow the water to penetrate the fibers. Alternatively, if the rug is too large to immerse, use a clean sponge or cloth soaked in water to thoroughly wet the surface.
3. Swirl the rug: Swirl the rug around in the water to dislodge any remaining cleaning solution or dirt. Be gentle and avoid aggressive movements that can cause damage to the rug’s fibers. Allow the rug to soak for a few minutes to ensure thorough rinsing.
4. Drain and refill the water: After swirling the rug, drain the dirty water, and refill the bucket or basin with clean water. Repeat this process until the water remains clear after swirling the rug.
5. Gently squeeze the rug: Once the rug is thoroughly rinsed, carefully lift it out of the water and gently squeeze excess water from the fibers. Avoid wringing or twisting the rug, as this can lead to deformation or damage.
6. Blot with a towel: Lay the rug flat on a clean surface and blot it with a dry towel to absorb additional moisture. Repeat this process with a fresh towel if necessary, until the rug is damp but not dripping wet.
7. Hang to air dry: Hang the rug out to dry in a well-ventilated area away from direct sunlight or heat sources. Make sure that both sides of the rug are exposed to air. This will help prevent moisture buildup and ensure even drying.
Properly rinsing the rug is crucial to remove any cleaning solution and residue, preventing potential damage and maintaining its cleanliness. By following these steps, you can ensure that your old rug retains its quality and appearance for years to come.
Remove Excess Water
After rinsing your old rug, it is essential to remove excess water to facilitate the drying process. Excess moisture left in the rug can cause mildew or create long drying times, increasing the risk of damage. Follow these steps to effectively remove excess water from your rug:
1. Lift the rug: Carefully lift the rinsed rug from the water and support it from underneath to prevent strain or tearing. If your rug is too large to lift, you can proceed with removing excess water while it is still on the floor.
2. Squeeze out water: Gently squeeze the rug to remove excess water. Start from one end and work your way to the other, applying even pressure. Avoid twisting or wringing the rug, as this can damage the fibers or cause distortion.
3. Roll the rug: Lay a clean, dry towel on a flat surface and place the rinsed rug on top of it. Starting from one end, roll the rug tightly with the towel inside. This will help absorb and pull out the excess moisture from the fibers.
4. Apply pressure: Once the rug is rolled with the towel, apply gentle pressure by stepping or standing on the rolled rug. This will encourage further absorption of the water from the rug into the towel.
5. Repeat with dry towels: If the initial towel becomes saturated, unroll the rug and replace the wet towel with a dry one. Repeat the rolling and applying pressure process until the towels come out relatively dry.
6. Air dry the rug: After removing excess water with towels, hang the rug or lay it flat in a well-ventilated area to air dry. Ensure that both sides of the rug have exposure to air to encourage even drying. Avoid placing the rug in direct sunlight or near a heat source, as this may cause color fading or shrinkage.
7. Monitor the drying process: Allow the rug to air dry completely before moving it back to its original location. Periodically check the rug during the drying process to ensure there are no signs of dampness or moisture retention, which can lead to mold or mildew growth.
By effectively removing excess water from your old rug, you expedite the drying process and minimize the risk of damage. Proper drying not only restores the rug’s appearance but also ensures its longevity and durability for continued use.
Air Dry the Rug
After removing excess water from your old rug, it is crucial to allow it to air dry completely. Air drying ensures that the rug dries evenly and reduces the risk of mold or mildew growth. Follow these steps to effectively air dry your rug:
1. Find a well-ventilated area: Choose a well-ventilated space for air drying your rug. Ideally, this area should have good airflow and low humidity to promote faster and more efficient drying.
2. Hang the rug: If your rug is small and lightweight, you can hang it on a clothesline or sturdy drying rack. Use clothespins or clamps to secure the rug in place, taking care to distribute its weight evenly to prevent stretching or distortion.
3. Lay the rug flat: If hanging is not an option or your rug is too large, lay it flat on a clean, dry surface. Place it on a non-slip mat or elevated object to allow air to circulate underneath the rug and aid in faster drying.
4. Rotate the rug: During the drying process, periodically rotate the rug to ensure all sides receive equal exposure to air. This helps prevent any potential moisture retention on the bottom side of the rug.
5. Maintain proper airflow: Ensure that there is adequate airflow around and underneath the rug. Open windows or use fans to enhance air circulation in the drying area. This will help speed up the drying process and minimize the risk of musty odors or mold formation.
6. Avoid direct sunlight or heat sources: While it may be tempting to place the rug in direct sunlight or near heaters to expedite drying, it is best to avoid these sources of excessive heat. Direct sunlight can cause fading or discoloration, while heat sources may shrink or damage the rug’s fibers.
7. Be patient: Allow the rug to air dry completely before moving it back to its original location or using it. Depending on the size, material, and environmental conditions, drying may take several hours to a few days. It is crucial to exercise patience throughout the process to ensure a thorough and successful drying outcome.
Remember, proper air drying is crucial for preserving the rug’s integrity and appearance. Rushing the drying process can lead to moisture retention or damage, compromising the lifespan and aesthetic of your old rug. By allowing it to air dry, you ensure that it remains in the best possible condition for years to come.
Brush or Comb the Rug Fibers
After air drying your old rug, it’s time to restore its plushness and bring out its natural beauty by brushing or combing the fibers. This final step helps to fluff up the rug and remove any remaining tangles or flattened areas. Follow these steps to effectively brush or comb your rug fibers:
1. Choose the right tool: Select a soft-bristled brush or a wide-toothed comb suitable for your rug’s fiber type. Avoid using brushes or combs with stiff bristles that can damage or pull on the fibers. Look for a tool specifically designed for rugs or carpets.
2. Start from one end: Begin brushing or combing the rug from one end, working your way to the opposite end. Use gentle, sweeping motions to lift the fibers and restore their natural texture. Pay closer attention to areas that appear flattened or matted.
3. Work in sections: Divide the rug into manageable sections and focus on one section at a time. This approach ensures that you thoroughly brush or comb through the entire rug, giving attention to each area.
4. Be mindful of the rug’s pile direction: Take note of the rug’s pile direction, which is the direction the fibers naturally lie. Brush or comb in the same direction as the pile to achieve consistent results and prevent unnecessary friction or damage.
5. Adjust pressure as needed: Be mindful of the pressure you apply while brushing or combing. Avoid excessive force that may cause the fibers to fray or break. Instead, use gentle and even pressure to fluff up the rug without compromising its structural integrity.
6. Regularly remove loose fibers: During the brushing or combing process, you may notice loose fibers collecting on the tool. Pause periodically to remove these fibers and prevent them from accumulating and dulling the rug’s appearance.
7. Repeat as necessary: Depending on the rug’s condition, you may need to brush or comb it multiple times to achieve the desired fluffiness and overall vibrancy. Take your time and be thorough, ensuring that you cover all areas of the rug.
By brushing or combing the rug fibers, you revive its texture and restore its welcoming appearance. This step also helps to evenly distribute the fibers, making the rug look fuller and more inviting. Be gentle and patient throughout the process to preserve the rug’s integrity and avoid any potential damage.
Treat the Rug with a Protective Spray
After brushing or combing the fibers of your old rug, it’s recommended to treat it with a protective spray to help preserve its condition and prolong its lifespan. A protective spray forms a barrier on the rug, making it more resistant to stains, spills, and dirt. Follow these steps to effectively treat your rug with a protective spray:
1. Choose a suitable protective spray: Look for a rug-specific protective spray that is designed to be safe and effective for the type of rug you have. Read the instructions and ensure that the spray is appropriate for the material and construction of your rug.
2. Test in an inconspicuous area: Before applying the protective spray to the entire rug, perform a patch test in an inconspicuous area. This step ensures that the spray doesn’t cause any discoloration or damage to the rug. Follow the manufacturer’s guidelines for the patch test.
3. Prepare the rug: Make sure the rug is clean, dry, and free from any loose dirt or debris. If needed, gently vacuum or brush the rug to remove any remaining particles before applying the protective spray.
4. Apply the spray evenly: Hold the protective spray bottle according to the manufacturer’s instructions and apply an even coat over the entire rug. Use a steady, sweeping motion and ensure that the spray covers the surface evenly. Avoid oversaturation, as it can lead to a sticky residue.
5. Allow proper drying time: Give the protective spray sufficient time to dry. Follow the manufacturer’s instructions for the recommended drying time. Avoid walking on the rug or placing any furniture or other objects on it until the spray is completely dry.
6. Reapply as necessary: Over time, the effectiveness of the protective spray may diminish. To maintain the rug’s protection, you may need to reapply the spray periodically. Refer to the manufacturer’s recommendations for the suggested frequency of reapplication.
7. Follow care instructions: While a protective spray helps make your rug more resistant to stains and spills, it does not make the rug entirely impervious. Always follow the care instructions for your rug, including proper cleaning and maintenance, to ensure its longevity and continued protection.
By treating your old rug with a protective spray, you add an extra layer of defense against potential stains and spills. This step helps to preserve the rug’s appearance by reducing the likelihood of damage from everyday use. Regularly reapplying the protective spray will ensure ongoing protection and extend the life of your rug.
Consider Professional Cleaning Options
While it is possible to clean your old rug at home, there are instances when professional cleaning may be a more suitable and effective option. Professional rug cleaners have the expertise, specialized equipment, and experience to handle delicate rugs and tackle stubborn stains. Here are some factors to consider when deciding whether to opt for professional cleaning:
1. Rug condition: If your old rug is particularly fragile, valuable, or has extensive damage, it is advisable to seek professional cleaning. Professional cleaners understand the intricacies of different rug materials and can customize their cleaning methods to ensure the best possible outcome without causing further harm.
2. Deep cleaning requirements: While regular maintenance and spot cleaning can help maintain the rug’s cleanliness, deep cleaning is necessary to remove embedded dirt, allergens, and accumulated grime. Professional cleaners have access to powerful tools and techniques to thoroughly clean your rug and rejuvenate its appearance.
3. Time and effort: Cleaning an old rug requires time, effort, and attention to detail. If you have a busy schedule or lack the necessary equipment, professional cleaners can save you time and ensure a thorough, professional-grade cleaning.
4. Persistent stains or odors: Some stains or odors can be stubborn and difficult to remove with home cleaning methods. Professional cleaners have specialized stain removal treatments and techniques to tackle these stubborn stains or eliminate odors more effectively.
5. Restoration and repair services: If your old rug requires repair or restoration due to snags, unraveling edges, or moth damage, professional cleaners often offer additional services to address these issues. They have the expertise to repair and restore the rug, improving its appearance and extending its lifespan.
6. Expert advice and evaluation: Professional rug cleaners can provide valuable advice on rug care, including proper cleaning methods, maintenance, and preservation. They can assess the condition of your rug and offer recommendations for ongoing care to keep it in the best possible condition.
When considering professional cleaning options, research local rug cleaning companies and read customer reviews to ensure you choose a reputable service provider. Look for companies specializing in rug cleaning, as they have the necessary knowledge and equipment specific to rugs.
Whether you choose to clean your old rug at home or opt for professional cleaning, regular maintenance and care are essential to preserve its beauty and longevity. With professional cleaning, you can ensure that your old rug receives the specialized attention and treatment it deserves, ensuring its continued vibrancy for years to come.