
Step 1: Gather the necessary tools and materials
Before you begin changing the Puresource Ultra water filter, make sure you have all the necessary tools and materials. Gathering these items in advance will help streamline the process and ensure a smooth filter change. Here’s what you’ll need:
- A new Puresource Ultra water filter: It’s essential to have a replacement filter on hand before starting the process. Ensure that the filter you purchase is compatible with your specific appliance model.
- A small bucket or towel: This will come in handy to catch any water that might spill during the filter removal process.
- Gloves: It’s always a good idea to wear gloves to protect your hands while handling the water filter.
- A clean cloth: A soft and clean cloth is useful for wiping down the filter housing and other parts of the appliance.
- A water filter wrench: Some models may require a water filter wrench to loosen or remove the old water filter. Check your appliance manual to determine if you need one.
- A sponge or mild detergent: In case the filter housing or other parts are dirty, a sponge and mild detergent can be used to clean them before installing the new filter.
Once you have gathered all these tools and materials, you’ll be well-equipped to begin the process of changing the Puresource Ultra water filter. Having everything ready beforehand will save you time and prevent any unnecessary interruptions during the procedure.
Step 2: Locate the water filter
Locating the water filter is an essential step in changing the Puresource Ultra water filter. The exact location of the filter may vary depending on the model of your appliance. Here are some general guidelines to help you find it:
1. Consult the appliance manual: The first and most reliable source of information is the manual that came with your appliance. Refer to the manual and locate the section that provides details about the water filter and its location. The manual may include diagrams or illustrations that can be helpful in identifying the filter’s position.
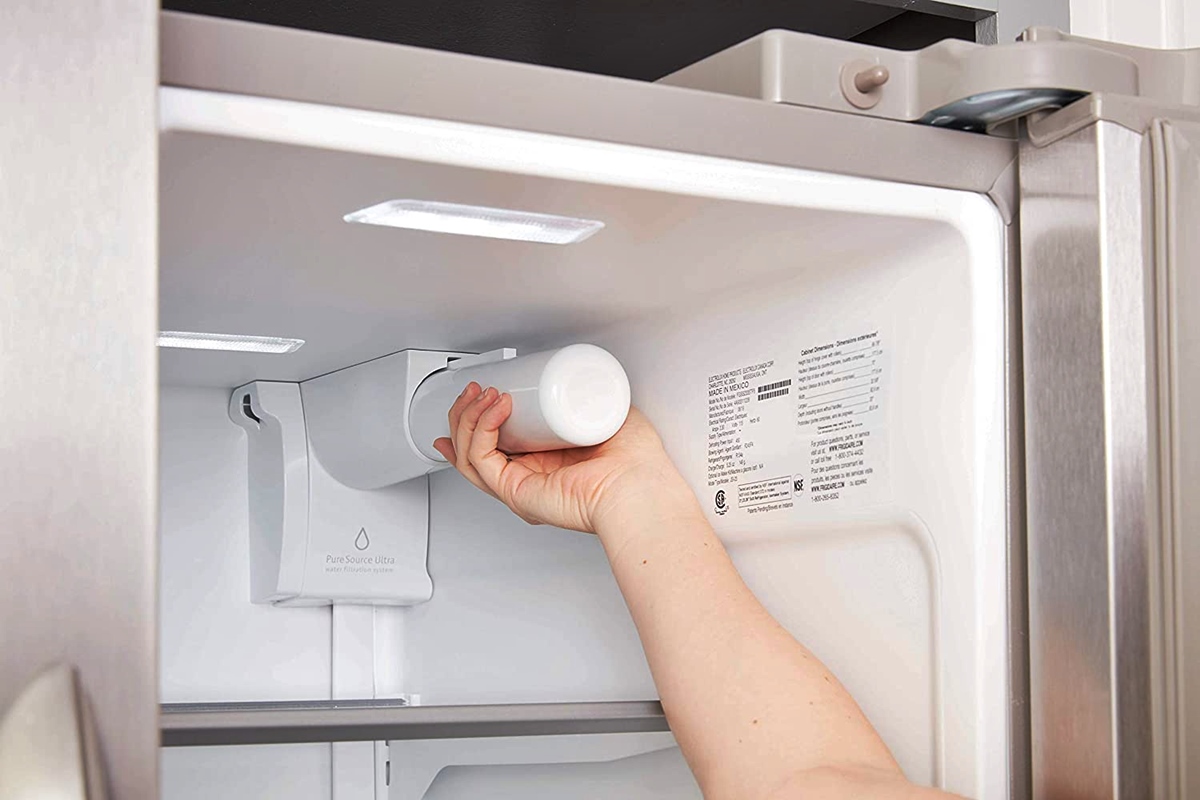
2. Check inside the refrigerator: In most refrigerators, the water filter is located in the upper right-hand corner of the fresh food compartment. Look for a small compartment or a cover panel that can be easily removed. The filter should be visible once the cover is opened.
3. Look for cartridge-type filters: Puresource Ultra water filters typically come in cartridge-type form. The cartridge is cylindrical in shape and usually has a twist or push-to-release mechanism that holds it in place.
4. Consider external filters: Some refrigerator models have their water filters located on the outside. In such cases, you might find the filter attached to the back of the appliance or behind a side panel. Look for a filter housing with a water line connected to it.
Remember, these are general guidelines, and the exact location of the water filter may vary depending on your specific appliance model. If you’re having trouble finding the filter, don’t hesitate to refer to the manual or contact the manufacturer’s customer support for assistance.
By successfully locating the water filter, you’re one step closer to replacing it and ensuring your appliance continues to deliver clean and fresh drinking water.
Step 3: Prepare for the filter change
Before proceeding with the Puresource Ultra water filter change, it’s important to take a few preparatory steps to ensure a smooth and efficient process. By properly preparing for the filter change, you can minimize the risk of spills, leaks, or damage to your appliance. Here’s what you need to do:
1. Turn off the water supply: It’s crucial to shut off the water supply before attempting to remove the old water filter. Look for a shut-off valve or handle near the water line connected to your appliance. Turn it clockwise to shut off the water flow completely. This step will prevent any water from gushing out when you remove the filter.
2. Release pressure from the water line: After turning off the water supply, it’s recommended to release any residual pressure from the water line. To do this, simply dispense some water from the refrigerator’s dispenser or run the water for a few seconds. This will ensure that there is no excessive pressure buildup when you remove the filter.
3. Protect the surrounding area: Place a small bucket or towel beneath the filter to catch any remaining water or drips. This will prevent any potential mess or damage to the flooring or surrounding surfaces during the filter change.
4. Read the appliance manual: Take a moment to review the instructions provided in the appliance manual regarding the specific steps for removing and installing the water filter. Following the manufacturer’s guidelines will ensure that you perform the process correctly and avoid any unnecessary complications.
By taking these preparatory measures, you will create a safe and organized environment for the filter change. It’s essential to follow these steps before proceeding to remove the old water filter and install the new Puresource Ultra filter.
Step 4: Remove the old water filter
With the necessary preparations in place, it’s time to remove the old Puresource Ultra water filter. This step requires attention to detail and careful handling to prevent any damage or spills. Follow these steps to successfully remove the old filter:
1. Open the filter compartment: Depending on your refrigerator model, you may need to remove a cover panel or twist a knob to access the filter compartment. Refer to the appliance manual or examine the filter housing to determine the appropriate method for opening it.
2. Release the old filter: Once the filter compartment is open, carefully grip the old water filter and twist it counterclockwise. Most filter models have a built-in release mechanism that will loosen the filter as you turn it. Continue twisting until the filter is free from the housing.
3. Dispose of the old filter: Place the old filter in a bag or wrap it securely to prevent any water or contaminants from leaking out. Properly dispose of the old filter according to your local regulations or recycling guidelines.
4. Clean the filter housing: Before installing the new filter, take a moment to clean the filter housing. Use a clean cloth dampened with mild detergent to wipe away any debris or residue. This step helps maintain optimal performance and prevents any potential clogs or contaminants from affecting the new filter.
Remember, each refrigerator model may have slight variations in the process of removing the old filter. It’s crucial to refer to the manufacturer’s instructions specific to your appliance to ensure correct handling.
By successfully removing the old water filter, you have completed an important step in the filter replacement process. Now, it’s time to move on to the next step and install the new Puresource Ultra water filter.
Step 5: Install the new water filter
Now that you have successfully removed the old filter, it’s time to install the new Puresource Ultra water filter. Follow these steps to ensure proper installation and optimal functioning:
1. Check the new filter: Before installing the new filter, inspect it for any packaging materials or protective covers. Remove any packaging elements to expose the filter surface and ensure proper water flow.
2. Align and insert the new filter: Look for the arrow or directional indicator on the new filter. This arrow indicates the correct orientation for installation. Align the arrow with the arrow or indicator on the filter housing and insert the new filter into the housing. Firmly push it in until it is snugly in place.
3. Rotate the filter clockwise: Once the new filter is inserted, twist it in a clockwise direction to secure it. The filter will lock into place, indicating that it is properly installed. Ensure that the filter is tightly seated to prevent any leaks.
4. Verify proper installation: Take a moment to double-check that the new filter is securely installed. Gently tug on the filter to ensure it does not move or come loose. This step is crucial for ensuring a proper seal and uninterrupted water flow.
5. Close the filter compartment: If you removed any cover panels or opened a compartment to access the filter, close it securely. Make sure all latches or knobs are properly fastened to prevent any water leaks or damage to the housing.
It’s important to note that the installation process may vary slightly across refrigerator models. Always refer to the manufacturer’s instructions specific to your appliance to get accurate guidance.
With the new Puresource Ultra water filter successfully installed, you are now ready to move on to the next step and reset the filter indicator light for proper filter monitoring.
Step 6: Reset the filter indicator light
After installing the new Puresource Ultra water filter, it’s important to reset the filter indicator light on your refrigerator. This step ensures that you can accurately monitor the lifespan of the filter and replace it when needed. Follow these steps to reset the filter indicator light:
1. Locate the filter reset button: Look for the filter reset button on the control panel of your refrigerator. The position of this button may vary depending on the model of your appliance. Consult the appliance manual if you’re having trouble finding it.
2. Press and hold the reset button: Once you’ve identified the filter reset button, press and hold it for a few seconds. Typically, you will need to hold the button down for approximately 3 to 5 seconds. Make sure to keep your finger on the button throughout this process.
3. Wait for the light to change: While holding the reset button, wait for the indicator light to change. The exact change in the light color or pattern varies depending on the refrigerator model. In most cases, the light will turn off and then come back on or change its color to indicate that the filter reset was successful.
4. Verify the reset: To confirm that the filter indicator light has been reset, check the control panel or display. The light should now reflect that the filter has been replaced and reset. This means that the filter status is back to the initial stage, and you can accurately track the lifespan of the new filter.
If you experience any difficulties or the filter indicator light does not reset, refer to the appliance manual or contact the manufacturer’s customer support for further assistance. It’s important to ensure proper filter monitoring to maintain optimal performance and water quality.
With the filter indicator light successfully reset, you’re now ready to move on to the next step and test the functionality of the newly installed Puresource Ultra water filter.
Step 7: Test the new water filter
With the new Puresource Ultra water filter installed and the filter indicator light reset, it’s important to test the functionality of the filter to ensure that it is working properly. Follow these steps to conduct a test of the new water filter:
1. Turn on the water supply: Start by turning on the water supply to your refrigerator. If you had previously shut off the water supply, ensure that it is now opened fully. This step allows water to flow through the filter and into your appliance.
2. Run water through the dispenser: Dispense water from the refrigerator’s water dispenser. You may need to hold down the dispenser lever for a few seconds to allow any air in the line to be purged. Observe the water flow and check for any unusual odors, colors, or particles. The water should appear clear, taste clean, and be free from impurities.
3. Check for leaks: While running water through the dispenser, carefully inspect the area around the filter housing for any signs of leaks. Look for drips, pooling water, or moisture accumulation. If you notice any leaks, you may need to tighten the filter further or reposition it to create a proper seal. Address any leaks promptly to prevent water damage.
4. Monitor water quality: After running water through the dispenser, continue to monitor the water quality for the next few days. The new filter may take a few cycles to reach its optimal filtration capacity. Pay attention to any changes in taste, odor, or quality of the water. If you notice any abnormalities, it may indicate an issue with the filter or water supply, and it may be necessary to troubleshoot or seek professional assistance.
By conducting a thorough test of the new water filter, you can ensure that it is functioning correctly and providing clean, fresh drinking water. If you encounter any problems or concerns during the testing process, refer to the appliance manual or reach out to the manufacturer’s customer support for guidance.
Once you are satisfied with the performance of the new filter and the quality of the water, it’s crucial to maintain regular filter changes to continue enjoying safe and clean drinking water from your Puresource Ultra water filter.
Step 8: Maintain regular filter changes
To ensure optimal performance and the highest quality of water from your Puresource Ultra water filter, it is essential to maintain regular filter changes. Over time, the filter will become saturated with contaminants and lose its effectiveness. Follow these guidelines to maintain a regular filter replacement schedule:
1. Check the filter lifespan: Consult the appliance manual or the packaging of the Puresource Ultra water filter to determine the recommended lifespan. Filters typically have a lifespan of six months to a year, but this may vary depending on usage and water quality.
2. Set reminders: Create a system to remind yourself when it’s time to change the water filter. You can set reminders on your smartphone, mark a calendar, or use a filter change indicator, if available. Regular filter changes will ensure that you continue to receive clean and safe drinking water.
3. Purchase replacement filters in advance: As the filter nears the end of its lifespan, make sure to have a replacement filter ready for installation. Having a spare filter on hand will prevent any disruptions in your access to filtered water.
4. Follow the manufacturer’s instructions: When it’s time to change the filter, refer to the manufacturer’s instructions specific to your appliance model. Follow the correct steps for removing the old filter and installing the new one. Adhering to the instructions will help maintain the optimal performance of your water filtration system.
5. Properly dispose of the old filter: When removing the old filter, remember to dispose of it in accordance with local waste disposal regulations or recycling guidelines. Many water filter brands offer recycling programs that allow you to return used filters for safe disposal and environmental sustainability.
Maintaining regular filter changes is crucial for ensuring that your Puresource Ultra water filter continues to provide clean and fresh drinking water. By following these guidelines, you can enjoy the benefits of a well-functioning filtration system and peace of mind knowing that you are taking the necessary steps to maintain the quality of your water.