
Gather the necessary tools and materials
Before you begin the process of changing the Pentair water filter, it’s essential to gather all the necessary tools and materials. This will ensure that you have everything you need within reach, making the process smoother and more efficient. Here is a list of items you will need:
- Replacement filter cartridge: Check the model number and specifications of your current filter to ensure that you purchase the correct replacement cartridge. Pentair offers a range of filter cartridges designed to meet various filtration needs, such as sediment, carbon, or specialty filters.
- Adjustable wrench: You will need an adjustable wrench to help you loosen and tighten the filter housing.
- Filter housing wrench: Some Pentair water filter housing units require a specific wrench for easy removal and installation. Check your specific model to determine if you need this tool.
- Teflon tape: Teflon tape is used to create a watertight seal when reassembling the filter housing. It helps to prevent any leaks after the installation.
- Clean cloth or paper towels: You may need to clean the filter housing or any components during the process, so keep some clean cloth or paper towels handy.
- Bucket or container: It’s a good idea to have a bucket or container nearby to catch any water that may spill during the filter change. This will help minimize mess and make cleanup easier.
Once you have gathered all the necessary tools and materials, you are ready to proceed with changing your Pentair water filter. These items will provide you with everything you need to complete the task efficiently and effectively.
Turn off the water supply
Before you begin the process of changing your Pentair water filter, it’s crucial to turn off the water supply to the filtration system. This step is essential to prevent any water leakage or damage during the filter replacement process. Follow the steps below to turn off the water supply:
- Locate the main water shut-off valve: The main water shut-off valve is typically located near the water meter or in the basement of your home. It is usually a round wheel or lever that you can turn to shut off the water supply.
- Turn off the main water shut-off valve: Using a clockwise motion, turn the main water shut-off valve until it is fully closed. This will stop the flow of water into your home’s plumbing system.
- Open a nearby faucet: Once you have closed the main water shut-off valve, open a nearby faucet to release any remaining water pressure in the system. This will help ensure that no water is flowing through the filtration system while you are working on it.
By turning off the water supply, you are preventing any potential water leaks or accidents during the filter replacement process. This step is critical for maintaining a safe and efficient filter change. Once you have completed this step, you can proceed to the next phase with confidence.
Release the pressure in the system
Before you can proceed with changing your Pentair water filter, it’s important to release the pressure in the system. This step is necessary to prevent any potential accidents or injuries during the filter replacement process. Follow the steps below to safely release the pressure:
- Turn off any appliances using water: Before releasing the pressure, make sure to turn off any appliances or faucets that are using water, such as a dishwasher or washing machine. This will ensure that no water flow is occurring in the filtration system.
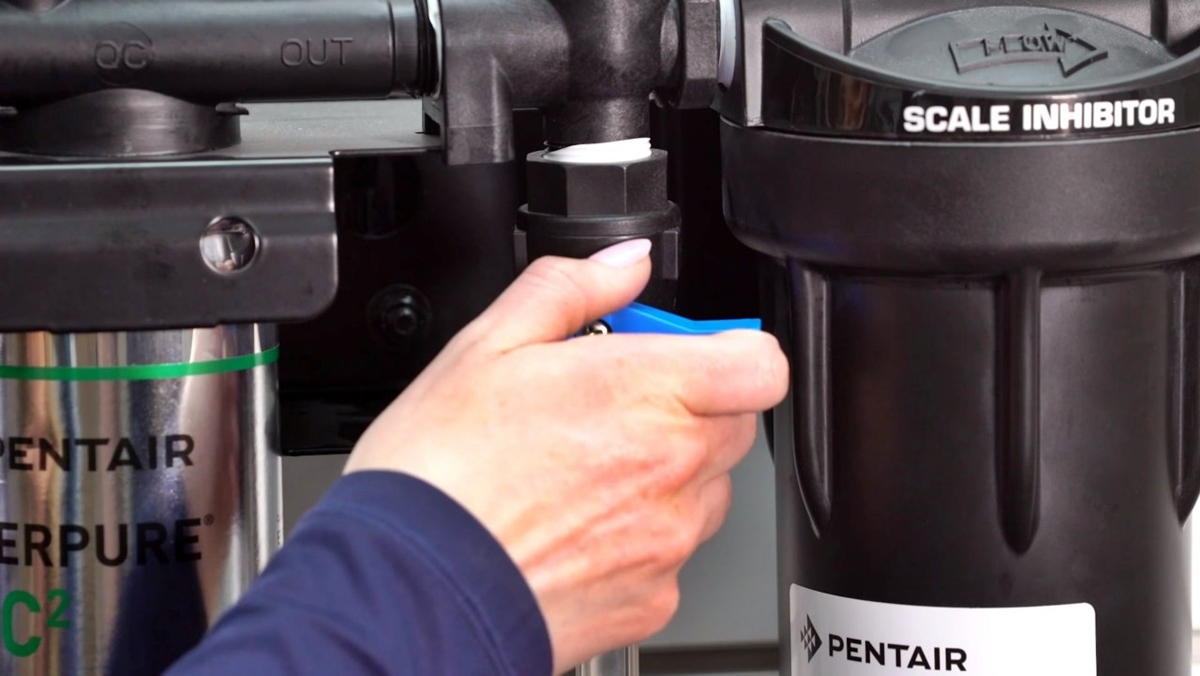
- Locate the pressure release valve: The pressure release valve is typically located near the filter housing or on the main water line leading into the filtration system. It may appear as a small lever or a valve that you can turn.
- Open the pressure release valve: Carefully open the pressure release valve to allow any built-up pressure to escape. Be prepared for a small amount of water or air to be released. You may hear a hissing sound as the pressure is released.
- Wait for complete pressure release: Allow the pressure to fully release from the system before proceeding. This is typically indicated by the absence of any water or air escaping from the pressure release valve.
By releasing the pressure in the system, you are ensuring the safety of your filter replacement process. This step helps to prevent any accidental water leaks or injury that could occur from working with a pressurized system. Once you have confirmed that the pressure has been fully released, you can proceed with confidence to the next step of changing your Pentair water filter.
Remove the filter housing
Once you have turned off the water supply and released the pressure in the system, you can proceed with removing the filter housing. The filter housing contains the filter cartridge and is responsible for holding and securing it in place. Follow the steps below to remove the filter housing:
- Locate the filter housing: The filter housing is typically located at the point where the water enters the filtration system. It may be a transparent or opaque container that is screwed onto the water line.
- Use an adjustable wrench: Use an adjustable wrench to loosen the connections on both ends of the filter housing. Depending on the model, you may need to hold the filter housing in place while loosening the connections.
- Remove the filter housing: Once the connections are loosened, carefully unscrew and remove the filter housing from the water line. Be cautious as some water may still be trapped inside, so have a bucket or container nearby to catch any spills.
- Inspect the O-rings: With the filter housing removed, inspect the O-rings. These rubber rings create a watertight seal and prevent leaks. If the O-rings are worn out or damaged, they should be replaced before reinstalling the filter housing.
By removing the filter housing, you are gaining access to the filter cartridge for replacement. Take care to handle the housing and its components gently to avoid any damage. Once you have successfully removed the filter housing, you can proceed to the next step of the filter replacement process.
Remove and replace the filter cartridge
With the filter housing removed, you can now proceed to remove and replace the filter cartridge. The filter cartridge is the component that filters out impurities from the water as it passes through the system. Follow the steps below to remove and replace the filter cartridge:
- Inspect the old filter cartridge: Take a moment to inspect the old filter cartridge. Look for any signs of discoloration, clogs, or damage. If the filter cartridge appears dirty or damaged, it is time to replace it.
- Unscrew the cartridge housing: Depending on your Pentair model, the filter cartridge may be secured within a separate housing. Use an adjustable wrench or a filter housing wrench to unscrew and remove the cartridge housing.
- Remove the old filter cartridge: Carefully remove the old filter cartridge from the housing. Note its position, orientation, and any arrows indicating the direction of water flow. This will help ensure proper installation of the new cartridge.
- Check the filter housing for debris: While the cartridge housing is open, take a moment to inspect the interior for any debris or sediment. If necessary, clean the housing with a clean cloth or paper towel to remove any buildup.
- Insert the new filter cartridge: Take the new filter cartridge and insert it into the housing, following the proper orientation indicated by arrows or instructions. Ensure a secure fit, but avoid overtightening.
- Screw the cartridge housing back on: Once the new filter cartridge is properly inserted, screw the cartridge housing back onto the filter housing. Use an adjustable wrench or the appropriate tool to tighten it securely.
By properly removing and replacing the filter cartridge, you are maintaining the efficiency of your Pentair water filtration system. Remember to follow any manufacturer instructions for your specific model to ensure a successful installation. With the new filter cartridge in place, you are one step closer to enjoying clean and purified water in your home.
Clean the filter housing
After removing the old filter cartridge, it’s important to take the time to clean the filter housing. Over time, sediment, debris, and other impurities can accumulate inside the housing, which can affect the performance and longevity of your Pentair water filtration system. Follow the steps below to clean the filter housing:
- Inspect the interior of the filter housing: Take a moment to visually inspect the inside of the filter housing. Look for any signs of sediment, debris, or discoloration. If you notice any buildup, cleaning is necessary.
- Remove any loose debris: Using a clean cloth or paper towel, wipe away any loose debris or sediment from the interior of the housing. Be thorough in removing any particles that may have accumulated.
- Clean the housing with mild detergent: Prepare a solution of mild detergent and water. Dampen a clean cloth or sponge with the solution and gently scrub the interior of the filter housing. Pay attention to any hard-to-reach areas or stubborn stains.
- Rinse the housing with clean water: After scrubbing, rinse the filter housing thoroughly with clean water. This will ensure the removal of any remaining detergent or residue from the cleaning process.
- Dry the housing completely: Once rinsed, use a clean cloth or allow the housing to air dry completely before reassembling. Moisture can lead to the growth of mold or mildew, so it’s crucial to ensure the housing is completely dry.
By cleaning the filter housing, you are ensuring the optimal functioning of your Pentair water filtration system. Removing sediment and debris helps maintain the flow rate and efficiency of the system, providing clean and purified water. Once the housing is clean and dry, you can proceed to the next step of the filter replacement process.
Lubricate the o-rings
As you prepare to reassemble the filter housing, it’s important to lubricate the o-rings. The o-rings are rubber rings that create a watertight seal between the filter housing and the filter cartridge, preventing any leaks. Lubricating the o-rings ensures a smooth installation and helps maintain their longevity. Follow the steps below to lubricate the o-rings:
- Inspect the o-rings: Take a moment to inspect the o-rings for any signs of wear, cracks, or damage. If the o-rings are damaged, they should be replaced before lubrication and reassembly.
- Apply a thin layer of lubricant: Using a food-grade silicone lubricant or a lubricant recommended by the manufacturer, apply a thin layer of lubricant to the o-rings. Make sure to cover the entire surface of the rings evenly.
- Spread the lubricant: Gently spread the lubricant over the o-rings using your fingers or a clean cloth. Ensure that the lubricant is evenly distributed to facilitate a smooth and secure seal.
- Remove excess lubricant: After applying the lubricant, check for any excess. Wipe away any excess lubricant to prevent it from interfering with the filter installation or causing contamination in the water.
By lubricating the o-rings, you are ensuring a proper seal and minimizing the risk of leaks during the filter replacement process. The lubricant helps create a smooth surface, making it easier to insert and tighten the filter housing. With the o-rings properly lubricated, you are ready to reassemble the filter housing and complete the filter replacement.
Reassemble the filter housing
With the filter cartridge replaced and the o-rings lubricated, it’s time to reassemble the filter housing. Properly reassembling the housing is crucial to ensure a secure and leak-free connection. Follow the steps below to reassemble the filter housing:
- Align the filter cartridge: Take the new filter cartridge and align it properly within the filter housing. Make sure it fits snugly and is oriented in the correct direction according to any arrows or instructions.
- Place the filter housing back on: Carefully position the filter housing over the filter cartridge and align it with the threaded opening on the filter housing assembly. Ensure that it sits evenly and securely.
- Screw the filter housing back on: Using an adjustable wrench or the appropriate tool, tighten the filter housing onto the assembly. Start by hand-tightening and then use the wrench to give it a final secure turn. Be cautious not to overtighten, as this can damage the housing or o-rings.
- Check for proper alignment and seal: Once the filter housing is tightened, check for proper alignment and a watertight seal. Make sure there are no gaps or leaks between the filter housing and the assembly. If necessary, give it a slight adjustment to ensure a proper seal.
By reassembling the filter housing correctly, you are ensuring the proper function and efficiency of your Pentair water filtration system. Double-check that all connections are secure and properly aligned before proceeding to the next step.
Turn the water supply back on
After successfully reassembling the filter housing, it’s time to turn the water supply back on. This step will restore the water flow to your Pentair water filtration system and allow you to enjoy clean and purified water once again. Follow the steps below to turn the water supply back on:
- Locate the main water shut-off valve: Remember the location of the main water shut-off valve that you turned off earlier. It is typically located near the water meter or in the basement of your home.
- Turn on the main water shut-off valve: Using a counterclockwise motion, turn the main water shut-off valve to reopen the water supply. Gradually open it to prevent any sudden pressure surges in the system.
Once you have turned on the main water shut-off valve, water will begin flowing back into your home’s plumbing system. This indicates that the water supply has been restored to the Pentair water filtration system. Allow a few moments for the system to stabilize and the water to fully reach the filter.
Now that the water supply is back on, you can proceed to the final step of the filter replacement process.
Test the system for any leaks
After completing the installation of the new filter cartridge and turning the water supply back on, it’s crucial to test the system for any potential leaks. This step ensures that the filter replacement process was successful and that the system is functioning properly. Follow the steps below to test the system for leaks:
- Check for visible leaks: Carefully inspect the filter housing and all connections for any signs of water leakage. Look for drips, puddles, or moisture around the housing or along the water lines. If you notice any leaks, tighten the connections or replace any faulty components.
- Observe for abnormal water flow: Keep an eye on the water flow from the faucets connected to the Pentair water filtration system. If you notice a significant decrease or increase in water pressure, it may indicate a problem with the filter installation. Address any abnormal water flow promptly.
- Leave the system running for a few minutes: Allow the water to run through the system for a few minutes to ensure that there are no hidden leaks. Inspect the filter housing and connections again to ensure that everything remains dry and secure.
- Monitor the system over the next few hours: Keep an eye on the system for the next few hours to ensure that there are no delayed leaks or issues. Check the filter housing periodically to verify that it remains dry and tightly sealed.
Testing the system for leaks is a crucial step to guarantee the proper functioning of your Pentair water filtration system. By identifying and addressing any leaks promptly, you can prevent water damage, maintain the efficiency of the system, and enjoy clean and purified water throughout your home.