
Prepare for Changing the Water Filter
Changing the water filter in your LG appliance is an important task to ensure clean and fresh drinking water. Properly preparing for the replacement will make the process go smoothly. Here are the steps to take before changing the water filter:
- Identify the Model Number: Before purchasing a new water filter, it is crucial to know the model number of your LG appliance. This information can usually be found on the inside wall of the refrigerator or in the product manual. Make a note of the model number to ensure you purchase the correct replacement filter.
- Gather Necessary Tools: To change the water filter, you will need a few tools. These may include a pair of pliers or a filter wrench to help with removing the old filter, a clean cloth or towel for wiping any spills or drips, and a container to catch any water that may come out when removing the filter. Having these tools ready will make the task much easier and efficient.
- Turn Off the Water Supply: Before starting the process, it is essential to turn off the water supply to the refrigerator. This can usually be done by locating the water shut-off valve behind or beneath the appliance. Turning off the water supply will prevent any leaks or spills during the filter replacement.
- Read the User Manual: Although the process of changing the water filter is relatively straightforward, it is always a good idea to consult the user manual provided with your LG appliance. The manual will provide specific instructions for your model, ensuring that you perform the replacement correctly.
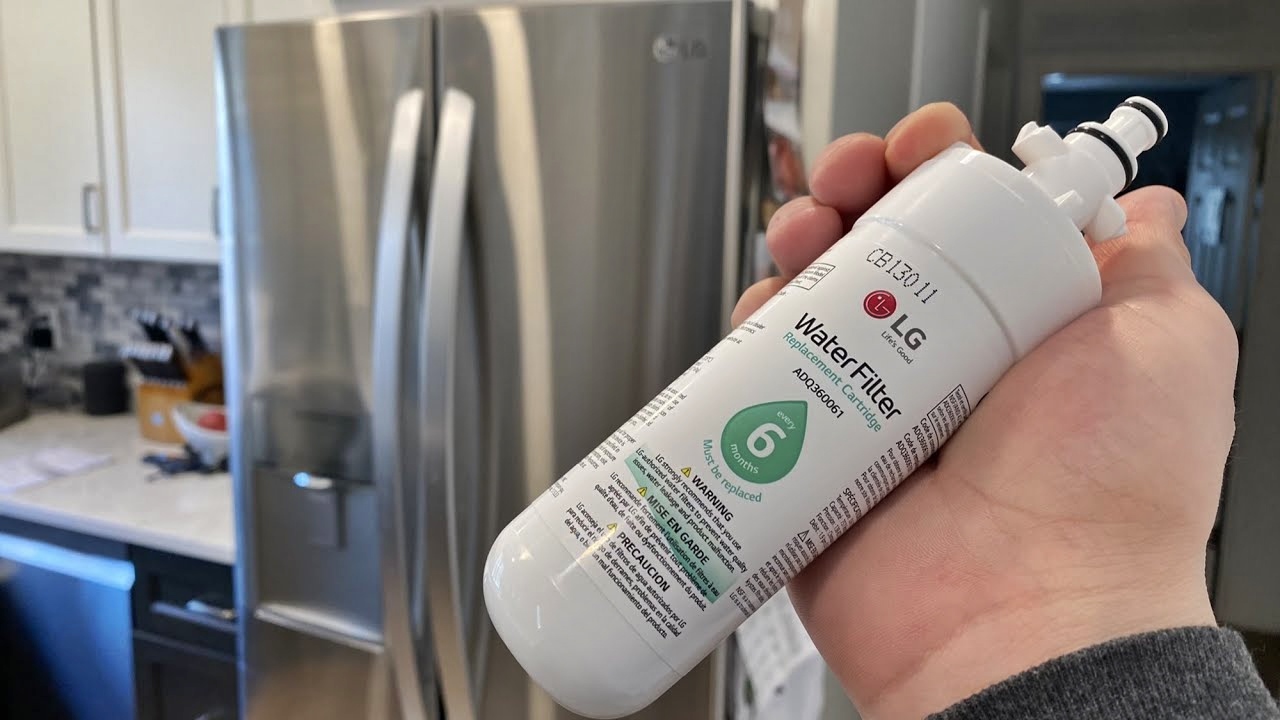
- Purchase a Replacement Filter: Once you have identified the model number and reviewed the user manual, you can purchase the appropriate replacement filter. LG water filters are usually available from authorized retailers or online. Make sure to buy a filter that is compatible with your specific LG appliance model to ensure proper filtration.
By following these steps to prepare for changing the water filter in your LG appliance, you will be ready to undertake the replacement process smoothly and efficiently. Taking the time to gather the necessary tools, turn off the water supply, and familiarize yourself with the user manual will help ensure a successful filter replacement.
Locate the Water Filter in Your LG Appliance
Before changing the water filter in your LG appliance, you need to know its exact location. The placement of the water filter may vary depending on the model and type of LG appliance you own. Here are the general steps to locate the water filter:
- Refer to the User Manual: The user manual provided with your LG appliance is the best resource for finding the location of the water filter. It will provide specific instructions and diagrams to guide you.
- Check the Interior of the Refrigerator: In most LG refrigerators, the water filter is located inside the refrigerator compartment. Look for a compartment or housing that houses the water filter. It is often situated along the back wall, near the top or bottom shelf.
- Inspect the Bottom Grill: For some LG refrigerator models, the water filter can be found behind the bottom grill. The bottom grill is typically located at the front of the refrigerator, near the floor. Gently remove the grill to reveal the filter housing.
- Examine the Back of the Appliance: In some cases, the water filter may be located at the back of the LG appliance. Move the refrigerator away from the wall and check the rear panel for a filter housing. This is more common in certain external water filter systems.
- Look for Filter Indicators: If you are still unsure about the location of the water filter, look for filter indicators on the control panel or display of your LG appliance. These indicators will generally provide information about the status and location of the filter.
It is important to note that the exact location of the water filter may vary depending on the specific model of your LG appliance. Therefore, referring to the user manual is highly recommended to ensure you locate the filter correctly.
By following these steps and carefully examining your LG appliance, you should be able to find the water filter. Once you have located it, you can proceed with the next steps of removing the old filter and installing the new one.
Remove the Old Water Filter
Once you have located the water filter in your LG appliance, it’s time to remove the old filter. This step is crucial to ensure proper functioning of the new filter and maintain the quality of your drinking water. Follow these steps to safely remove the old water filter:
- Turn Off the Water Supply: Before removing the old water filter, make sure to turn off the water supply to your LG appliance. This step will prevent any water leakage or spills during the removal process. Refer to the user manual or follow the instructions provided by the manufacturer to ensure you turn off the water supply correctly.
- Prepare a Container or Towel: Place a container or a clean towel beneath the filter to collect any residual water that may drip during the removal process. This will help prevent any mess or water damage.
- Remove the Filter Cover or Housing: Depending on your LG appliance model, you may need to remove a filter cover or housing before accessing the filter. The cover is typically secured with snaps, clips, or screws. Carefully remove the cover to expose the filter.
- Twist or Pull Out the Filter: To remove the old filter, follow the instructions provided by the manufacturer. In most cases, you need to twist the filter counterclockwise or pull it straight out. Some filters may have a release button or tab that needs to be pressed before removal. Do so gently to avoid damaging the filter or surrounding components.
- Dispose of the Old Filter: Once the old filter is removed, dispose of it properly according to your local regulations. Check with your waste management authority for the correct disposal method. Some filters may be recyclable, so it’s worth exploring recycling options in your area.
By following these steps, you can successfully remove the old water filter from your LG appliance. It’s important to handle the filter with care and dispose of it responsibly to minimize any environmental impact.
Now that the old filter is removed, you are ready to proceed with the installation of the new water filter.
Install the New Water Filter
With the old water filter successfully removed from your LG appliance, it’s time to install the new one. Installing a new water filter is essential to maintain clean and healthy drinking water. Here are the steps to follow when installing the new water filter:
- Prepare the New Filter: Before installing the new filter, make sure to remove any protective packaging or caps. Some filters may require soaking in water for a specific duration, so check the instructions provided by the manufacturer.
- Align the Filter Correctly: Carefully align the new water filter with the filter housing in your LG appliance. Make sure it is oriented correctly and fits snugly. Some filters have arrows or indicators to guide you on proper alignment. Refer to the user manual if you are unsure.
- Insert and Twist the Filter: Insert the new filter into the housing and twist it clockwise until it locks into place. Apply gentle pressure and rotate until you feel it fully engage. This will ensure a secure and leak-free connection.
- Replace the Filter Cover or Housing: If you removed a filter cover or housing earlier, now is the time to replace it. Make sure it is securely fastened to protect the filter and maintain the overall integrity of your LG appliance.
- Turn On the Water Supply: Before testing the water dispenser or ice maker, turn on the water supply to your LG appliance. This step will allow water to flow through the new filter and remove any air pockets. Refer to the user manual or manufacturer’s instructions for specific guidelines.
By carefully following these steps, you can safely and effectively install the new water filter in your LG appliance. It is important to ensure proper alignment and secure fastening of the filter to prevent leaks and maintain optimal filtration.
Now that the new filter is installed, it’s time to reset the water filter indicator light, if applicable, and test the water dispenser and ice maker.
Reset the Water Filter Indicator Light
After installing the new water filter in your LG appliance, it’s important to reset the water filter indicator light. This step ensures that the indicator accurately reflects the filter’s lifespan and reminds you when it’s time for the next replacement. Here’s how to reset the water filter indicator light:
- Refer to the User Manual: The user manual provided with your LG appliance will have specific instructions on resetting the water filter indicator light. Look for the section that covers filter replacement or indicator light resetting.
- Locate the Reset Button: In most LG appliances, there is a reset button specifically for the water filter indicator light. It is often located on the control panel or near the filter housing. Check the user manual for the exact location.
- Press and Hold the Reset Button: Once you have found the reset button, press and hold it for a few seconds. This action will reset the water filter indicator light and prepare it for tracking the lifespan of the new filter.
- Check the Indicator Light: Release the reset button and check if the water filter indicator light has been successfully reset. It should go back to the initial state or display a full filter-life status, indicating that the new filter has been recognized.
- Monitor the Indicator Light: Moving forward, keep an eye on the water filter indicator light to determine when it’s time for the next replacement. Depending on your LG appliance model, the indicator light may change color, flash, or display a specific message when it’s time to replace the water filter.
Resetting the water filter indicator light is an essential step to ensure accurate tracking of the filter lifespan. By following the instructions provided in the user manual and locating the correct reset button, you can easily reset the indicator light and have peace of mind knowing when to change the filter in the future.
With the water filter indicator light reset, it’s time to test the water dispenser and ice maker to ensure everything is functioning correctly.
Test the Water Dispenser and Ice Maker
Once you have installed the new water filter and reset the indicator light, it’s important to test the functionality of your LG appliance’s water dispenser and ice maker. Here are the steps to follow when testing the water dispenser and ice maker:
- Allow the Water to Flow: After installing the new filter, it’s normal for the water dispenser to take a few moments to fill up and remove any air pockets. To ensure proper flow, press and hold the water dispenser lever for a few seconds. Let the water flow into a container until it runs smoothly and is free of any air bubbles or debris.
- Check for Proper Water Pressure: While testing the water dispenser, pay attention to the water pressure. If the water flow is weak or there are any issues with water pressure, it’s possible that there may be a blockage or a problem with the water supply. Refer to the user manual for troubleshooting steps or contact LG customer support for assistance.
- Activate the Ice Maker: If your LG appliance has an ice maker, activate it by gently lifting the ice maker arm or pressing the ice-making button, depending on the model. This action will initiate the ice-making process.
- Monitor Ice Production: Give the ice maker some time to produce ice cubes. The duration may vary depending on the model and settings of your LG appliance. Check periodically to see if ice cubes are being formed and stored in the ice bin. It may take a few hours for the ice maker to reach full production capacity.
- Ensure Proper Operation: While the ice maker is in operation, keep an eye out for any irregularities or issues. Make sure the ice cubes are fully formed and not stuck together. If you notice any problems or abnormal sounds, consult the user manual or contact LG customer support for guidance.
By carefully testing the water dispenser and ice maker, you can ensure that your LG appliance is functioning properly. Monitoring the water flow, checking for correct water pressure, and verifying the ice maker’s operation will help you identify and address any potential issues.
If you encounter any difficulties or concerns during this testing phase, consult the user manual or contact LG customer support for further assistance and troubleshooting.
Maintain the Water Filter for Optimal Performance
Proper maintenance of your LG water filter is essential to ensure optimal performance and longevity. By following these maintenance tips, you can prolong the lifespan of the water filter and maintain the quality of your drinking water:
- Regularly Replace the Filter: Follow the manufacturer’s recommendations and replace the water filter at the suggested interval. This timeframe can vary depending on factors such as filter type, usage, and water quality. Regular replacement will ensure effective filtration and prevent clogs or blockages.
- Flush the Filter: It’s a good practice to flush the water filter before the first use and after replacing it. This will help remove any carbon fines, loose particles, or air that may be present. Simply run a few gallons of water through the dispenser or discard the first few batches of ice to ensure clean and fresh drinking water.
- Keep the Filter Area Clean: Regularly clean the area around the water filter housing to prevent dirt, dust, or debris from accumulating. Use a damp cloth or sponge to wipe away any residue. A clean filter area will help maintain proper filtration and prevent any interference with the filter’s functionality.
- Monitor Water Quality: Pay attention to the taste, odor, and clarity of the water dispensed by your LG appliance. If you notice any changes or abnormalities, it might indicate a need for filter replacement or potential issues with the water supply. Consider testing the water periodically to ensure it meets your quality standards.
- Change the Filter if Necessary: In certain cases, such as after a water contamination event or if your appliance hasn’t been used for an extended period, it’s advisable to replace the water filter even before the recommended interval. This will help ensure the filtration system is working effectively and minimize any health risks associated with compromised water quality.
By following these maintenance tips, you can keep your LG water filter in top condition. Regularly replacing the filter, flushing it before use, keeping the filter area clean, monitoring water quality, and changing the filter when necessary will ensure the best performance and provide you with clean and refreshing water to enjoy.
If you have any concerns or questions about water filter maintenance specific to your LG appliance, consult the user manual or contact LG customer support for further guidance.