
Gather the Necessary Supplies
Before you begin the process of changing the water filter on your LG refrigerator, it is important to gather all the necessary supplies. This will ensure a smooth and efficient filter replacement. Here is a list of the items you will need:
- Replacement water filter: It is crucial to use the correct filter model compatible with your LG refrigerator. Refer to the user manual or the manufacturer’s website to find the appropriate filter.
- Gloves: Wearing gloves will protect your hands from any dirt or contaminants that may be present on the old filter.
- Towel or cloth: Keeping a towel or cloth handy will help you clean up any spills or drips that may occur during the filter replacement process.
- Container or bucket: Place a container or bucket under the filter housing to catch any excess water that may leak out when removing the filter.
- Pen and paper: It can be helpful to jot down the date of filter replacement or set a reminder for the next filter change. This will ensure that you maintain a regular filter replacement schedule.
Having all these supplies on hand will save you time and prevent any interruptions during the filter replacement. Once you have gathered everything, you can proceed to the next step of locating the water filter on your LG refrigerator.
Locate the Water Filter on Your LG Refrigerator
Before you can change the water filter on your LG refrigerator, you need to locate its position. Here is a step-by-step guide to help you find the water filter:
- Refer to the user manual: The user manual that came with your LG refrigerator will provide specific instructions on the location of the water filter. Look for the section that discusses filter replacement or maintenance.
- Check the inside of the refrigerator: Open the refrigerator door and inspect the upper right or left corner. In most LG refrigerator models, the water filter is located inside the top right corner of the refrigerator compartment.
- Look for an indicator or label: LG refrigerators often have a filter indicator or label near the filter housing. This indicator may light up or show a display message when it’s time to replace the water filter. Take note of any indicators present on your refrigerator.
- Use model-specific search: If you are unable to locate the filter using the manual or by visually inspecting the refrigerator, consider using the make and model number to search online. LG’s website or other reputable appliance parts websites may have diagrams or instructions specific to your refrigerator model.
It is important to locate the water filter before proceeding with the replacement to ensure that you are working on the correct part. Once you have successfully found the filter, you can move on to the next step of turning off the ice maker and dispenser.
Turn Off the Ice Maker and Dispenser
In order to safely change the water filter on your LG refrigerator, it is necessary to turn off the ice maker and dispenser. This will help prevent any unwanted leaks or spills during the filter replacement process. Here’s how to do it:
- Locate the ice maker switch: Depending on your LG refrigerator model, the ice maker switch may be located on the control panel inside the refrigerator or on the exterior dispenser panel.
- Switch off the ice maker: Flip the ice maker switch to the “Off” position. This will deactivate the ice making function and prevent the ice dispenser from dispensing any ice.
- Turn off the water dispenser: If your LG refrigerator has a water dispenser, look for a separate switch or button to turn it off. Press or switch it to the “Off” position to stop the flow of water.
- Ensure both switches are deactivated: Double-check that both the ice maker switch and water dispenser switch are turned off. Take a moment to listen for any sounds indicating the ice maker or dispenser is still active.
By turning off the ice maker and dispenser, you minimize the risk of water leakage or accidental dispensing during the water filter replacement process. This precautionary step ensures a safer and cleaner filter replacement experience. Now that these components are switched off, you can proceed to the next step of preparing the refrigerator for filter replacement.
Prepare the Refrigerator for Filter Replacement
Before replacing the water filter on your LG refrigerator, it is important to properly prepare the refrigerator to ensure a smooth and hassle-free process. Follow these steps to prepare your refrigerator:
- Disconnect the refrigerator from the power source: For safety purposes, unplug the refrigerator from the power outlet. This will prevent any electrical accidents while you work on the filter replacement.
- Locate the water shut-off valve: The water shut-off valve is typically located behind or beneath the refrigerator. Turn off the valve by twisting it clockwise until it is fully closed. This step is crucial to stop the flow of water to the refrigerator.
- Empty the water reservoir: Some LG refrigerators have a water reservoir that needs to be emptied. Refer to the user manual to determine if your refrigerator model has a reservoir and how to drain it.
- Take note of the filter’s position: Before removing the old filter, pay attention to its current position. Note the direction in which it is installed and any markings or labels on the filter itself. This will help you correctly install the new filter later.
- Clear any obstructions: Check the area around the filter housing and remove any items that may hinder your access or movement during the replacement process. This ensures that you can easily install the new filter without any hindrances.
By properly preparing your refrigerator for the filter replacement, you create a safer and more efficient environment to work in. Remember to double-check that the refrigerator is unplugged, the water shut-off valve is closed, and any water reservoir is emptied. With these preparations in place, you are now ready to remove the old water filter.
Remove the Old Water Filter
Now that you have prepared your LG refrigerator, it’s time to remove the old water filter. Follow these steps to safely remove the filter:
- Locate the filter housing: The filter housing is the plastic compartment that holds the water filter. It is usually found in the upper right or left corner of the refrigerator compartment.
- Twist the filter counterclockwise: Grasp the filter handle firmly and rotate it counterclockwise. This will unlock the filter and release it from the housing.
- Pull out the old filter: Once the filter is unlocked, gently pull it straight out from the housing. Be prepared for a small amount of water to spill, so keep a towel or cloth nearby to mop up any drips or spills.
- Dispose of the old filter: Place the old filter in a plastic bag or wrap it in newspaper to prevent any water or debris from leaking out. Properly dispose of the old filter according to local regulations.
- Inspect the filter housing: Take a moment to inspect the filter housing for any signs of dirt or debris. Wipe it clean using a damp cloth if necessary.
Removing the old water filter is an important step in the replacement process. Be cautious when twisting and pulling out the filter to avoid any damage to the filter housing or refrigerator. With the old filter safely removed, you can now move on to installing the new water filter.
Install the New Water Filter
Now that you have removed the old water filter from your LG refrigerator, it’s time to install the new filter. Follow these steps to properly install the new water filter:
- Remove the packaging from the new filter: Take the new water filter out of its packaging. Before installation, check for any instructions or labels on the filter, as well as an instruction sheet that may have come with it.
- Check the filter orientation: Take note of any arrows, labels, or markings on the new filter that indicate the correct orientation. Ensure that the filter is facing in the same direction as the old one that was removed.
- Line up the new filter with the housing: Align the new filter with the filter housing, ensuring that it is inserted straight and fully into the housing. Rotate it clockwise and twist until it is securely locked in place.
- Check for any leaks: After installing the new filter, inspect the area around the filter housing for any signs of leaking or dripping. If you notice any leaks, turn off the water supply, remove the filter, and re-install it to ensure a proper seal.
- Run water through the filter: To ensure proper functionality and eliminate any initial debris, run a few cups of water through the dispenser after installing the new filter. This will help flush out any air pockets or particles.
Installing the new water filter correctly is crucial for optimal refrigerator performance and water quality. Follow the manufacturer’s instructions and take care not to force the filter. With the new filter securely in place, it’s time to reset the filter indicator light (if applicable) before turning the ice maker and dispenser back on.
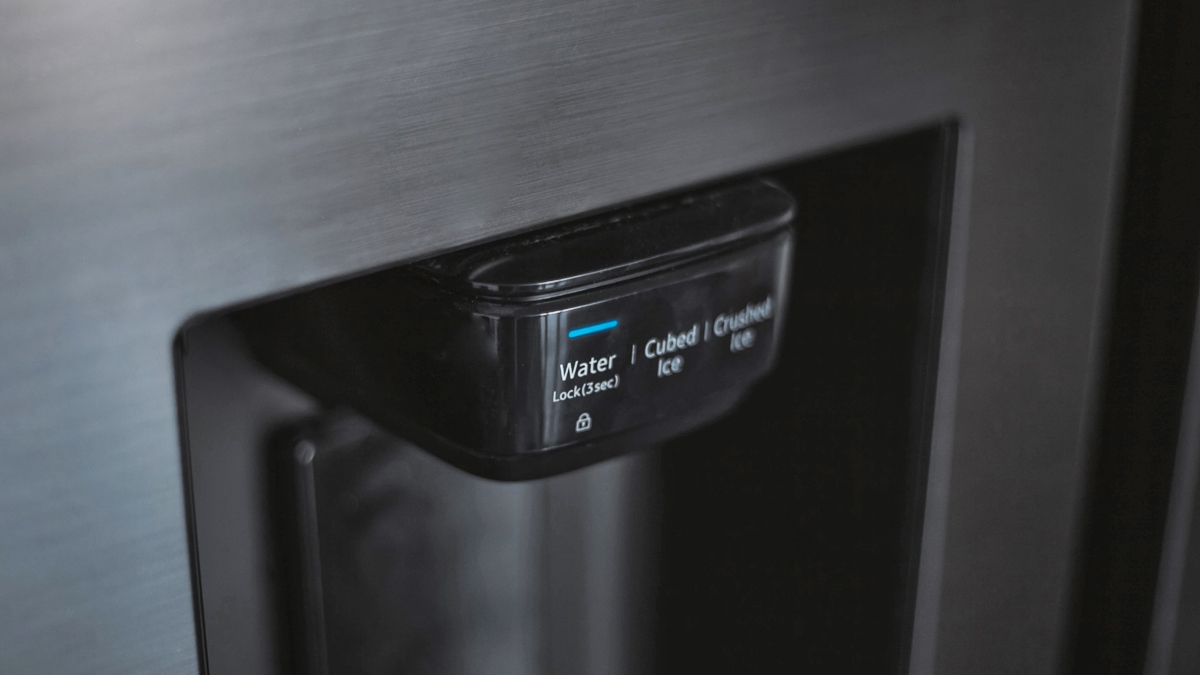
Reset the Filter Indicator Light (if applicable)
If your LG refrigerator has a filter indicator light, it is important to reset it after installing a new water filter. Resetting the indicator light ensures that it accurately reflects the status of the filter and reminds you when it’s time for the next replacement. Follow these steps to reset the filter indicator light:
- Refer to the user manual: The user manual will provide specific instructions on how to reset the filter indicator light for your particular LG refrigerator model. Look for the section that discusses maintenance or filter replacement.
- Locate the reset button: The reset button is typically located near the filter housing or on the refrigerator control panel. It may be labeled as “Filter Reset” or have a similar description.
- Press and hold the reset button: Press and hold the reset button for 3 to 5 seconds using a pen or a small tool. Keep holding the button until you see the filter indicator light either turn off or change to a new color, depending on your refrigerator model.
- Confirm the reset: Once you have held the reset button for the appropriate time, release it and check if the filter indicator light has been reset. It should now reflect that a new filter has been installed and is in good working condition.
- Set a reminder: Take note of the date of the filter replacement or set a reminder for the next filter change. This will ensure that you maintain a regular filter replacement schedule, promoting the longevity of your refrigerator and water quality.
Resetting the filter indicator light is an important step to ensure that you receive accurate notifications for future filter replacements. By following the manufacturer’s instructions and resetting the light accordingly, you can maintain optimal performance and filtration in your LG refrigerator.
Turn On the Ice Maker and Dispenser
After successfully replacing the water filter on your LG refrigerator, it’s time to turn on the ice maker and dispenser. Follow these steps to ensure proper functionality:
- Find the ice maker and dispenser switches: Locate the ice maker and water dispenser switches on your LG refrigerator. These switches may be located on the control panel inside the refrigerator or on the exterior dispenser panel.
- Switch on the ice maker: Flip the ice maker switch to the “On” position. This will activate the ice making function and allow your refrigerator to produce ice cubes again.
- Turn on the water dispenser: If your LG refrigerator has a water dispenser, switch it on by pressing or flipping the designated button or switch to the “On” position. This will enable the flow of water through the dispenser.
- Listen for operation: Once the switches are turned on, listen for any sounds indicating the ice maker and dispenser are functioning correctly. You may hear the ice maker filling with water or the water dispenser motor running.
- Allow time for ice production: It may take some time for the ice maker to produce a fresh batch of ice. Be patient and allow the refrigerator sufficient time to make and dispense ice cubes.
By turning on the ice maker and dispenser, you ensure that both functions are operational after the water filter replacement. This process allows you to enjoy the convenience of ice cubes and chilled water once again. Now that the ice maker and dispenser are activated, it’s important to check for any leaks and ensure proper water flow.
Check for Leaks and Ensure Proper Water Flow
After turning on the ice maker and water dispenser on your LG refrigerator, it’s essential to check for any leaks and ensure proper water flow. Follow these steps to ensure everything is functioning correctly:
- Inspect the filter housing: Carefully examine the area around the filter housing for any signs of leaks or drips. If you notice any water escaping from the filter housing, turn off the water supply, remove the filter, and check for any misalignments or damaged components.
- Examine the water lines: Check the water lines connected to the filter and dispenser for any visible leaks or loose connections. Tighten any loose fittings carefully using a wrench or pliers, if necessary.
- Run a test for water flow: Fill a glass or container with water from the dispenser and check the water flow. The water should come out smoothly and without any sputtering or unusual noises. If the flow is weak or irregular, check for any obstructions or clogged filters.
- Inspect for any drips: After dispensing water, check the dispenser area and underneath the refrigerator for any drips or puddles. If you notice any, it could indicate a leak or a faulty connection. Address these issues promptly to prevent further damage.
- Checking periodically: In the hours following the filter replacement, periodically check for leaks and ensure consistent water flow. This will help identify any potential issues that may have gone unnoticed initially.
Checking for leaks and ensuring proper water flow is crucial to maintain the functionality and integrity of your LG refrigerator’s water system. By addressing any leaks or flow issues promptly, you can prevent water damage, ensure clean water supply, and prolong the lifespan of the appliance. With everything in proper working order, your refrigerator is ready to provide you with refreshing ice and water whenever you need it.
Maintain a Regular Filter Replacement Schedule
To ensure optimal performance and water quality in your LG refrigerator, it’s important to maintain a regular filter replacement schedule. Follow these guidelines to help you stay on track:
- Refer to the manufacturer’s recommendations: LG provides guidelines for filter replacement in their user manual or on their website. Follow their suggested timeline for replacing the water filter in your refrigerator.
- Set reminders: Mark your calendar or set a reminder on your phone or computer to alert you when it’s time for the next filter replacement. Regularly replacing the filter ensures that you continue to enjoy clean and fresh-tasting water.
- Consider usage and water quality: Factors such as the number of occupants in your household and the quality of your water supply can influence how often you need to change the filter. If you have a larger household or notice a decline in water quality, you may need to replace the filter more frequently.
- Observe the filter indicator light (if applicable): Some LG refrigerators have a filter indicator light that illuminates when it’s time to replace the filter. Pay attention to this indicator and replace the filter accordingly.
- Inspect the filter regularly: Periodically check the condition of the filter, even between scheduled replacements. If you notice signs of clogging, discoloration, or a significant decline in water flow, it may be time to replace the filter earlier than expected.
Maintaining a regular filter replacement schedule is fundamental for the optimal performance and longevity of your LG refrigerator. By following the manufacturer’s recommendations, setting reminders, considering usage, and observing the condition of the filter, you can ensure that your refrigerator continues to provide you with clean and refreshing water. Remember, a well-maintained filter is key to enjoying the full benefits of your LG refrigerator’s water filtration system.