
What is a Fuse in String Lights?
A fuse is an essential component in string lights that helps protect the lights from electrical damage. It is a small device that acts as a safety mechanism by breaking the circuit when there is an overload of current. In simple terms, the fuse acts as a barrier that prevents excessive electrical current from flowing through the string lights.
String lights are connected to an electrical system, which delivers power to the bulbs. However, sometimes the amount of electrical current can exceed the safe limit, potentially causing damage to the bulbs and wiring. This could result from a variety of factors such as faulty wiring, surges in the electrical network, or even connecting too many string lights together.
That’s where the fuse comes in. It is designed to interrupt the flow of electricity when the current exceeds a certain level. This protects the lights from overheating, short-circuiting, or any other electrical issues that can arise from excessive current. The fuse acts as a sacrificial element, breaking the circuit and preventing further damage to the rest of the string lights.
Without a fuse, the excessive current could cause the bulbs to burn out or the wiring to melt, creating a potential fire hazard. By cutting off the power supply to the string lights, the fuse plays a crucial role in maintaining the safety and longevity of the lights.
Typically, string lights come with a built-in fuse within the plug or socket. It is a small cylinder-shaped device made of metal and is easily replaceable. If the fuse blows, it is a clear indication that something went wrong with the electrical current, and the fuse needs to be replaced.
Next, we will explore the signs that indicate the need to change the fuse in your string lights.
Signs that the Fuse Needs to be Changed
Knowing when to change the fuse in your string lights is crucial for ensuring their proper functioning and safety. Here are some signs that indicate it’s time to replace the fuse:
1. No power: If your string lights are not lighting up at all, it could be a sign that the fuse has blown. First, check that the lights are properly plugged in and that the outlet is functioning. If everything appears to be in order, try replacing the fuse.
2. Flickering lights: If the lights are flickering or only a few bulbs are working while others are not, it may indicate a blown fuse. Flickering lights can be a result of an inconsistent flow of electrical current, and replacing the fuse should solve the issue.
3. Dim lights: Are your string lights not as bright as they used to be? This could be a sign of a blown fuse. When the fuse is damaged, it can disrupt the proper flow of electricity, causing the lights to appear dim or even entirely lose their brightness.
4. Burnt smell: If you notice a burnt smell coming from your string lights or the plug, it could be a sign of a blown fuse. This suggests that there may have been an electrical overload that caused the fuse to blow. In such cases, it’s important to replace the fuse and address any underlying electrical issues before using the lights again.
5. Visible damage: Inspect the fuse visually to check for any signs of physical damage. If the fuse appears burnt or melted, it is a clear indication that it needs to be replaced. Physical damage to the fuse can occur due to electrical surges, overheating, or other electrical faults.
Remember, if you suspect that the fuse is the cause of the issue, it’s important to replace it with the correct type and rating. Using a fuse with the wrong specifications can lead to further electrical problems or even pose a safety risk.
Now that you know the signs to look out for, let’s move on to the tools and materials you’ll need to change the fuse in your string lights.
Tools and Materials Needed
Before you begin changing the fuse in your string lights, gather the following tools and materials:
- Replacement fuse: Make sure you have the correct replacement fuse for your string lights. Check the specifications of the old fuse or refer to the manufacturer’s instructions to ensure you get the right type and rating.
- Screwdriver: Depending on the design of your string lights, you may need a small screwdriver to open the plug or access the fuse compartment. Keep both flathead and Phillips head screwdrivers handy, as different types of screws may be used.
- Test device: A test device, such as a voltage tester or multi-meter, can help you verify whether the fuse is faulty or if there’s another issue with the electrical connection.
- Protective gloves: It’s always a good idea to wear protective gloves to ensure your safety when dealing with electrical components.
Having these tools and materials ready will make the process of changing the fuse in your string lights much more efficient and ensure that you have everything you need to complete the task properly.
Now that you’re prepared with the necessary tools and materials, let’s dive into the step-by-step guide for changing the fuse in your string lights.
Step-by-Step Guide to Changing the Fuse
Follow these simple steps to change the fuse in your string lights:
- Unplug the lights: Before working on the string lights, always ensure that they are unplugged from the power source. This will prevent any risk of electrical shock.
- Locate the fuse: Depending on the design of your string lights, the fuse may be located in the plug or inside a fuse compartment along the string. Carefully inspect the plug or follow the manufacturer’s instructions to find the fuse.
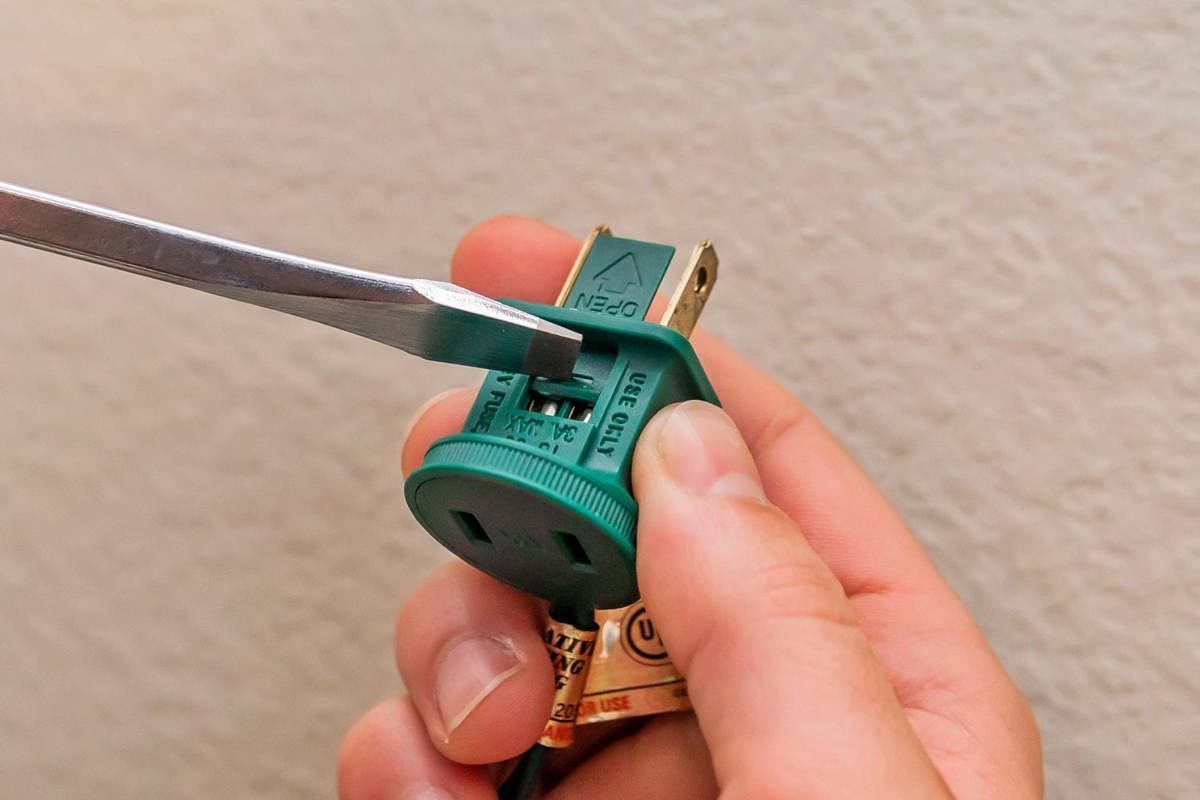
- Remove the fuse cover: If the fuse is housed inside a compartment, use a screwdriver to open the cover and expose the fuse. With some string lights, the fuse may be accessible without the need for removing a cover.
- Inspect the fuse: Examine the fuse for any signs of damage, such as a burnt appearance or a broken filament. This will confirm if the fuse has blown and needs to be replaced.
- Replace the fuse: If the fuse is faulty, carefully remove it from its socket. Insert the new fuse into the empty socket, making sure it fits securely. Ensure that the replacement fuse matches the specifications of the old one.
- Close the fuse cover: If you had to open a fuse compartment or cover, securely close it using the screwdriver, ensuring that it is properly sealed.
- Plug in the lights: Once the new fuse is in place and the cover is closed, plug the string lights back into the power source to test if they are functioning correctly.
- Test the lights: Use a test device such as a voltage tester or multi-meter to ensure that the lights are receiving proper electrical current. This will help confirm that the new fuse is working as intended.
By following these steps, you can easily replace the blown fuse in your string lights and restore their functionality. However, if the lights still do not work even after changing the fuse, there may be other underlying issues that require further troubleshooting.
Next, we will provide some troubleshooting tips to help identify and resolve common problems with string lights.
Troubleshooting Tips
If you’ve replaced the fuse in your string lights and they still aren’t working properly, here are some troubleshooting tips to help you identify and resolve common issues:
- Check the power source: Ensure that the outlet or power source you’re using is working properly by plugging in another device. If there’s no power, you may need to check the circuit breaker or contact an electrician.
- Inspect the bulbs: Examine each bulb in the string to see if any are loose, broken, or burnt out. Replace any faulty bulbs as they can disrupt the electrical flow and cause the entire string to malfunction.
- Check the wiring: Inspect the wiring along the string lights, looking for any signs of frayed or damaged wires. If you find any, it’s crucial to replace the damaged section or consider getting a new set of lights.
- Verify the connectors: If your string lights have connectors, ensure that they are securely plugged in or connected. Loose or faulty connectors can lead to intermittent power issues.
- Bypass extension cords or splitters: If you’re using extension cords or splitters, remove them temporarily and plug the string lights directly into an outlet to see if that solves the problem. Faulty or overloaded extension cords can cause power disruptions.
- Check for outdoor weather issues: If you’re using outdoor string lights, make sure they are protected from rain or snow. Exposure to moisture can damage the wiring and cause the lights to malfunction.
- Inspect the fuse again: Double-check that the new fuse you replaced is the correct type and rating. Using the wrong fuse can lead to ongoing issues with the string lights.
- Consult the manufacturer: If you’ve tried all the troubleshooting tips and the string lights still don’t work, it may be helpful to reach out to the manufacturer for further assistance or to inquire about warranty information.
By following these troubleshooting tips, you can often identify and resolve common problems with string lights, ensuring they work properly and continue to brighten up your space.
Now that you’re armed with troubleshooting knowledge, let’s address some frequently asked questions about changing the fuse in string lights.
Frequently Asked Questions
Here are some frequently asked questions about changing the fuse in string lights:
Q: Can I use any type of fuse to replace the blown fuse in my string lights?
A: It is important to use the correct type and rating of fuse that matches the specifications of your string lights. Using the wrong fuse can lead to electrical issues or even compromise safety.
Q: How do I determine the correct type and rating of fuse for my string lights?
A: Check the specifications of the old fuse or refer to the manufacturer’s instructions to identify the correct type and rating. It is crucial to match these specifications to ensure proper functioning and safety.
Q: Can I replace the fuse with a higher rating to prevent it from blowing?
A: No, it is not recommended to replace the fuse with a higher rating. The fuse is designed to break the circuit when the electrical current exceeds a certain level. Using a higher-rated fuse can potentially overload the system and lead to more severe damages.
Q: How often should I check and replace the fuse in my string lights?
A: The frequency of checking and replacing the fuse depends on the usage and electrical conditions. It is a good practice to periodically inspect the fuse for any signs of damage or wear, especially before using the string lights for special occasions or extended periods.
Q: What should I do if the string lights continue to have issues even after changing the fuse?
A: If the string lights still have problems after replacing the fuse, it may indicate other underlying issues. You can try the troubleshooting tips mentioned earlier in this article or reach out to the manufacturer for further assistance or guidance.
Q: Can I change the fuse in LED string lights?
A: LED string lights typically do not have a replaceable fuse, as they have built-in circuit protection. However, it is still important to read the manufacturer’s instructions or reach out for support in case of any issues.
Remember, if you are unsure about any aspect of changing the fuse or troubleshooting the string lights, it is recommended to consult a professional electrician for assistance.
With these frequently asked questions answered, you now have a comprehensive understanding of changing the fuse in string lights and resolving common issues that may arise.