
Step 1: Gather the Necessary Supplies
Before beginning the process of changing the water filter in your Maytag refrigerator, it is important to gather all the necessary supplies. Having everything you need readily available will make the process smoother and more efficient. Here are the supplies you will need:
- Replacement water filter: Make sure to purchase the correct filter model that is compatible with your Maytag refrigerator. Check the refrigerator’s user manual or the official Maytag website to find the appropriate filter part number.
- Water filter bypass plug (optional): Some Maytag refrigerators have a bypass plug that allows you to temporarily bypass the water filter. This can be useful if you need to change the filter but don’t have a replacement on hand.
- Pliers or a wrench: These tools will come in handy if the filter is difficult to remove or install.
- Bucket or towels: It’s always a good idea to have a bucket or towels on hand to catch any water that may spill during the filter change process.
By preparing these supplies in advance, you will ensure a smooth and hassle-free experience while changing your Maytag refrigerator’s water filter. Once you have gathered all the necessary supplies, you can proceed to the next step of locating the water filter.
Step 2: Locate the Water Filter
Locating the water filter in your Maytag refrigerator is essential for the successful replacement process. The exact location of the filter may vary depending on the model and design of your refrigerator. Here are some common places where you can find the water filter:
- Inside the upper right corner: In many Maytag refrigerator models, the water filter is located inside the upper right corner of the refrigerator compartment. Look for a small filter housing or a compartment with a filter icon.
- Behind the grille: Some Maytag refrigerators have the water filter located behind the front grille at the base of the unit. Gently remove the grille by pulling it outward and locate the filter housing.
- Inside the refrigerator compartment: In certain models, the water filter can be found inside the refrigerator compartment. Open the refrigerator door and check for a filter cartridge or a housing near the back wall.
If you are having trouble locating the water filter, refer to your refrigerator’s user manual or the Maytag website for specific instructions. Once you have identified the filter’s location, you are ready to proceed to the next step of turning off the water supply.
Step 3: Turn Off the Water Supply
Before removing the old water filter in your Maytag refrigerator, it is crucial to turn off the water supply to avoid any leaks or potential water damage. Follow these steps to safely turn off the water supply:
- Locate the water shut-off valve: The shut-off valve is usually located behind the refrigerator, near the wall. It may be a lever-style valve or a twist valve.
- Turn off the water supply: If you have a lever-style valve, simply flip it to the “off” position. If you have a twist valve, turn it clockwise until it stops, indicating that the water supply is off.
- Verify the water is off: To ensure the water supply is fully shut off, dispense water from the refrigerator’s water dispenser. If no water comes out, the supply is successfully turned off.
Turning off the water supply is an important step to prevent any water from spilling out or causing damage during the filter replacement process. Once you have confirmed that the water supply is off, you can proceed to the next step of removing the old water filter.
Step 4: Remove the Old Water Filter
With the water supply turned off, you can now proceed to remove the old water filter from your Maytag refrigerator. Follow these steps to safely and properly remove the filter:
- Open the filter housing: Depending on the model of your Maytag refrigerator, the filter housing may have a small button or a release mechanism. Press the button or release the latch to open the housing.
- Gently twist the filter counterclockwise: With the housing open, locate the old water filter and grip it firmly. Begin twisting it counterclockwise to loosen it from the filter housing.
- Remove the old filter: Once the filter is loosened, carefully pull it out of the housing. Be prepared for some water to spill out, so it’s best to have a bucket or towels handy to catch any drips.
It’s important to note that the old water filter may still contain some water and impurities, so handle it with care. If there is any resistance or difficulty in removing the filter, you can use pliers or a wrench for added grip and leverage.
Once the old water filter has been successfully removed from the housing, you can proceed to the next step of preparing the new water filter for installation.
Step 5: Prepare the New Water Filter
After removing the old water filter, it’s time to prepare the new one for installation in your Maytag refrigerator. Follow these steps to properly prepare the new water filter:
- Unpack the new water filter: Start by carefully unpacking the new filter from its packaging. Ensure that you remove any protective covers or seals.
- Inspect the new filter: Take a moment to examine the new water filter for any visible defects or damage. Ensure that it matches the model and specifications required for your Maytag refrigerator.
- Flush the filter (if required): Some water filters require an initial flushing to remove any carbon fines or particles. Refer to the manufacturer’s instructions included with the filter to determine if this step is necessary and follow the recommended flushing procedure, if applicable.
Preparing the new water filter is a crucial step to ensure its proper functioning and effectiveness in providing clean and fresh water. By carefully unpacking and inspecting the filter, as well as flushing it if required, you are setting the foundation for a successful installation process.
Once you have prepared the new water filter, you can move on to the next step of inserting it into the filter housing in your Maytag refrigerator.
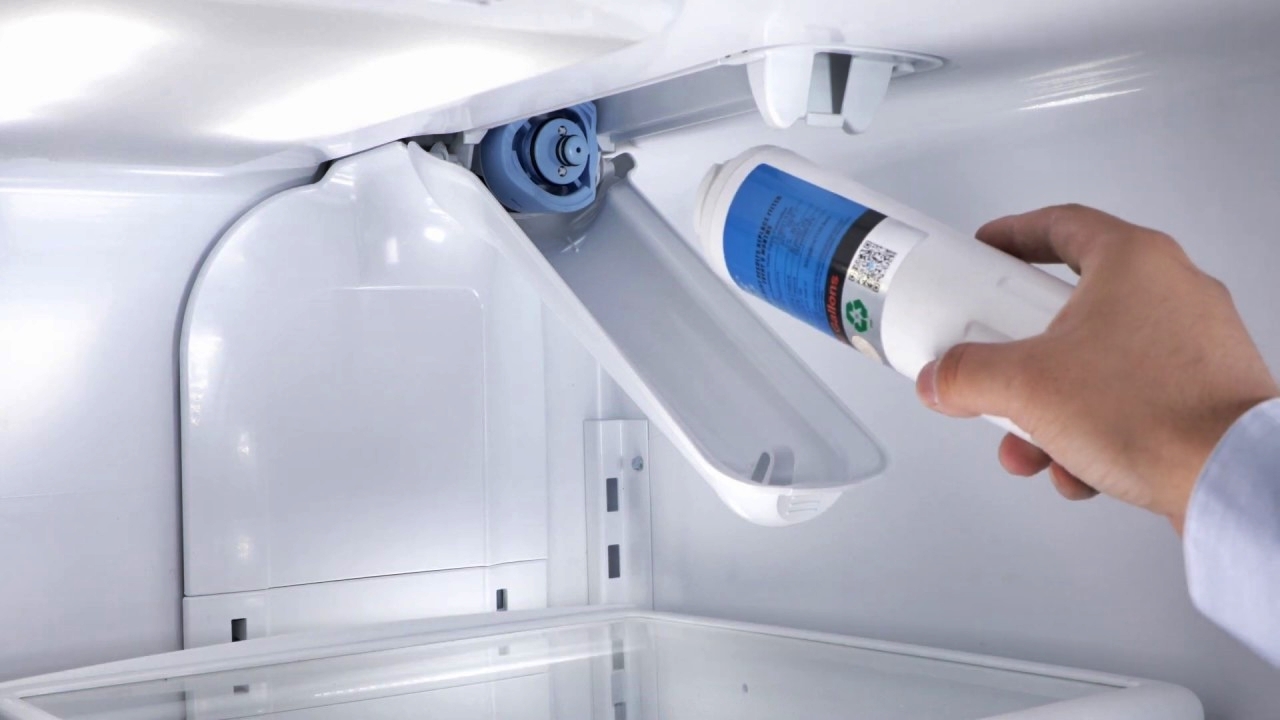
Step 6: Insert the New Water Filter
Now that you have prepared the new water filter, it’s time to insert it into the filter housing of your Maytag refrigerator. Follow these steps to properly insert the new water filter:
- Locate the filter housing: Refer to the user manual or the previous steps to locate the filter housing in your Maytag refrigerator.
- Position the new filter: Hold the new water filter in your hand and align it with the opening of the filter housing. Ensure that the arrows or markings on the filter are facing upwards or towards the housing.
- Insert the filter: Gently push the new filter into the housing and begin twisting it clockwise. Rotate it until you feel it lock into place.
- Close the filter housing: If applicable, close the filter housing by pressing it back into position or securing the latch. Ensure that it is completely sealed to prevent leaks.
When inserting the new water filter, it’s important to be gentle and avoid using excessive force. If the filter does not easily go in or if you encounter any resistance, double-check the alignment and try again.
Once the new water filter is securely inserted into the housing and the housing is closed, you can proceed to the next step of resetting the water filter indicator light, if applicable.
Step 7: Reset the Water Filter Indicator Light
After installing the new water filter in your Maytag refrigerator, you may need to reset the water filter indicator light. Some Maytag models have a built-in indicator light that alerts you when it’s time to replace the filter. Follow these steps to reset the indicator light:
- Refer to the user manual: Consult the user manual or look up the model-specific instructions to determine the reset procedure for your Maytag refrigerator’s water filter indicator light.
- Locate the reset button: If your refrigerator has a reset button, it is typically located near or on the control panel. Look for a small button labeled “Reset” or an icon resembling a filter.
- Press and hold the reset button: Once you’ve located the reset button, press and hold it for a few seconds. The indicator light should flash, and you may hear a beep or see a confirmation message on the display.
- Verify the reset: Confirm that the indicator light is no longer illuminated or that the filter status on the control panel indicates that the filter has been replaced.
Resetting the water filter indicator light is important to ensure that the filter replacement is accurately reflected in the refrigerator’s system. This will help you keep track of when the next filter change is due.
Once you have successfully reset the water filter indicator light, you can move on to the next step of turning on the water supply.
Step 8: Turn On the Water Supply
With the new water filter installed and the indicator light reset, it’s time to turn on the water supply to your Maytag refrigerator. Follow these steps to safely and properly turn on the water supply:
- Locate the water shut-off valve: Refer to the previous steps to locate the water shut-off valve for your refrigerator. It is typically located behind the appliance, near the wall.
- Turn on the water supply: If you have a lever-style valve, flip it to the “on” position. If you have a twist valve, turn it counterclockwise until it stops, indicating that the water supply is on.
- Check for leaks: Once the water supply is turned on, carefully inspect the area around the filter housing and the shut-off valve for any signs of leaks. Look for dripping water or moisture.
It’s important to turn on the water supply gradually and check for leaks to ensure that the new water filter is properly installed and there are no issues with the connections or housing. If you notice any leaks, turn off the water supply immediately and troubleshoot the problem before proceeding.
Once you have confirmed that there are no leaks, you can proceed to the next step of running water through the dispenser to flush out any air or impurities.
Step 9: Run Water Through the Dispenser
After turning on the water supply, it’s important to flush out any air or impurities that may have accumulated in the new water filter. Running water through the dispenser will help ensure that you are getting clean and fresh water from your Maytag refrigerator. Follow these steps to run water through the dispenser:
- Locate the water dispenser: Look for the water dispenser on the front of your Maytag refrigerator. It usually has a lever or button that you can press to dispense water.
- Activate the dispenser: Press and hold the dispenser lever or button. Allow the water to flow for about 2-3 minutes or until the water runs clear.
- Discard the initial water: The first few cups of water may contain air, carbon fines, or other impurities. Discard the initial water by either drinking it or pouring it down the sink.
- Check for cleanliness: Examine the water coming out of the dispenser to ensure that it appears clean and is free from any odor or discoloration.
Running water through the dispenser is an important step in the filter replacement process as it helps remove any trapped air or loose particles. It also ensures that the water you consume from your Maytag refrigerator is of the highest quality.
Once you have run water through the dispenser and ensured its cleanliness, you can move on to the next step of checking for any potential leaks.
Step 10: Check for Leaks
After completing the water filter replacement and running water through the dispenser, it’s important to check for any potential leaks in your Maytag refrigerator. This step ensures that the installation was successful and that there are no issues with the connections or filter housing. Follow these steps to check for leaks:
- Inspect the filter housing: Carefully examine the area around the filter housing for any signs of moisture or dripping water. Pay close attention to the connections between the housing and the refrigerator.
- Check the water lines: Look at the water supply lines leading to and from the filter housing. Ensure that there are no visible leaks or dampness along the lines.
- Examine the dispenser area: Inspect the water dispenser area for any signs of water pooling or leakage. Check the dispenser itself, as well as the drip tray if applicable.
- Keep an eye out for continued leaks: If you notice any initial leaks during the previous steps, verify that they have been resolved. Watch the housing and connections for a few minutes to see if there are any persistent leaks.
Checking for leaks is crucial to prevent water damage and ensure the proper functioning of your Maytag refrigerator. If you do detect any leaks, turn off the water supply immediately and troubleshoot the problem before continuing to use the refrigerator.
Once you have confirmed that there are no leaks or resolved any issues, you have successfully completed the water filter replacement process for your Maytag refrigerator.
Step 11: Dispose of the Old Water Filter
Proper disposal of the old water filter is an important step in completing the filter replacement process for your Maytag refrigerator. Follow these guidelines to ensure responsible disposal:
- Wrap the old filter: Take the old water filter and wrap it in a plastic bag or wrap to contain any residual moisture or contaminants.
- Check for recycling options: Some water filters are recyclable. Check with your local recycling facilities or waste management guidelines to see if you can recycle the filter. They may have specific instructions on how to prepare and recycle the filter.
- Dispose of in regular trash (if necessary): If recycling is not an option, you may dispose of the wrapped old filter in your regular household trash. Consider placing it in a bag to prevent any potential leaks.
It’s important to dispose of the old water filter properly to minimize environmental impact. Following recycling guidelines or employing responsible disposal methods ensures that the filter is disposed of in the most appropriate and environmentally-friendly manner.
By disposing of the old water filter correctly, you have successfully completed the entire process of changing the water filter in your Maytag refrigerator. Now you can enjoy clean and fresh water from your upgraded filtration system.
Step 12: Repeat the Process Regularly
Now that you have successfully replaced the water filter in your Maytag refrigerator, it’s important to remember that this is not a one-time task. Regular filter replacement is necessary to maintain the quality of your drinking water and the optimal performance of your refrigerator. Follow these guidelines for regularly repeating the filter replacement process:
- Refer to the recommended schedule: Check your refrigerator’s user manual or the manufacturer’s guidelines to determine how often the water filter in your specific model should be replaced. Typically, it is recommended to replace the filter at least every six months.
- Mark the replacement date: Keep track of the date when you installed the new filter. Use a calendar reminder or write the date on a sticker and attach it to the refrigerator as a reminder of when to replace the filter next time.
- Purchase the correct replacement filter: Ensure that you purchase the correct replacement filter for your Maytag refrigerator. Refer to the model number or the part number mentioned in the user manual or on the manufacturer’s website.
- Follow the same steps: When it’s time to replace the filter again, simply follow the same steps outlined in this guide, starting from Step 1. Remember to turn off the water supply, remove the old filter, insert the new one, and reset the water filter indicator light if necessary.
By regularly repeating the water filter replacement process, you are guaranteeing the continued delivery of clean and fresh drinking water from your Maytag refrigerator. Following the recommended schedule and maintaining a routine will ensure that your refrigerator functions efficiently and provides the highest quality water for you and your family.
Make it a habit to replace the water filter at the recommended intervals to optimize the performance of your refrigerator and enjoy the benefits of purified water.