
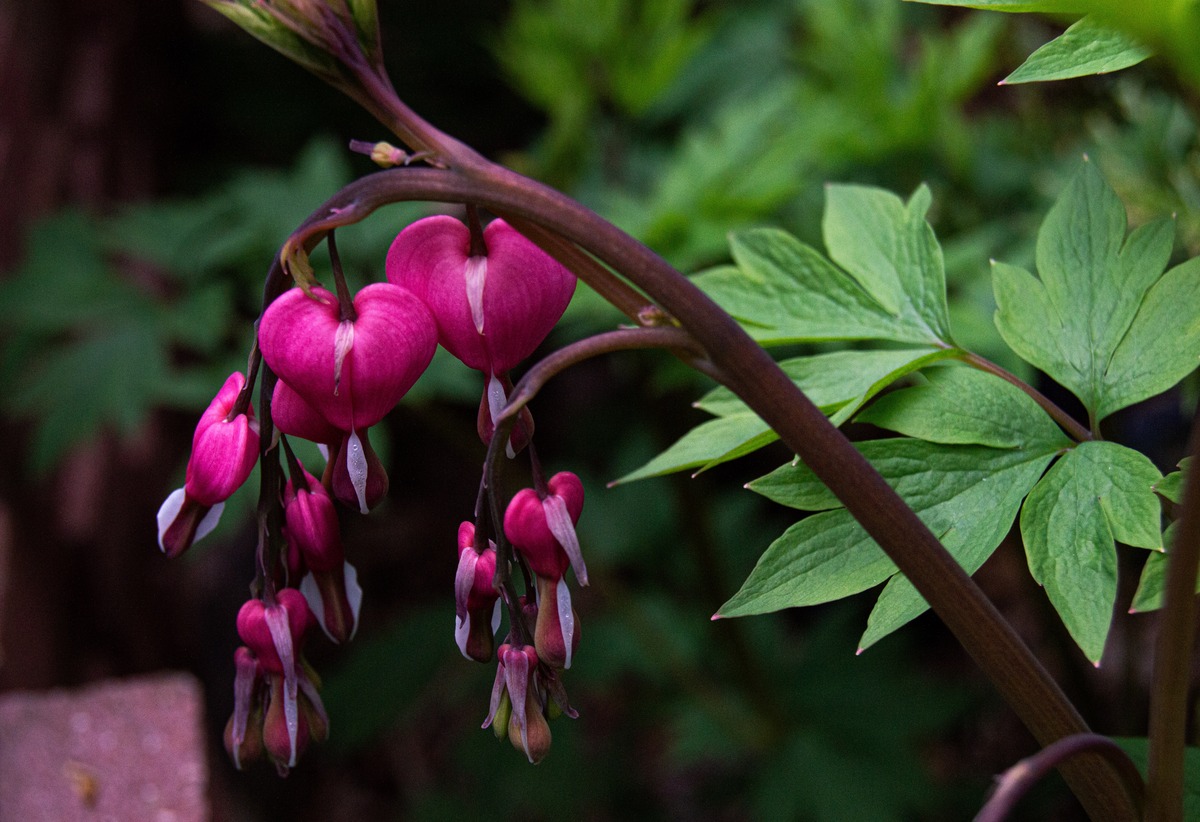
Choosing the Right Location
When it comes to caring for your bleeding heart plant, one of the most important factors to consider is choosing the right location. This beautiful flowering plant thrives best in areas with partial shade, preferably with morning sun and afternoon shade. Too much direct sunlight can scorch the delicate foliage, while too little light can lead to weak growth and reduced blooming.
Before planting your bleeding heart, assess the light conditions in your garden. Look for a location that receives bright but filtered light, such as under a tree or along a north-facing wall. Avoid areas with excessive heat, as this can cause the plant to wilt or go dormant during the peak of summer.
Additionally, it’s important to ensure that the soil in the chosen location is well-draining. Bleeding hearts prefer moist, humus-rich soil that is high in organic matter. Avoid waterlogged or compacted soils, as these can lead to root rot and hinder the plant’s growth.
Consider the overall aesthetic of your garden when selecting a location for your bleeding heart. These fern-like plants with their delicate, heart-shaped flowers make a charming addition to shaded borders, woodland gardens, or even large containers. Placing them near other shade-loving plants like hostas or ferns can create a visually appealing and harmonious display.
Remember to also take into account the size of the bleeding heart plant when choosing a location. While some varieties of bleeding heart can grow quite tall and bushy, others remain more compact. Make sure to space the plants accordingly, leaving enough room for them to grow and spread without crowding each other.
By carefully considering these factors and selecting the right location for your bleeding heart plant, you will establish a solid foundation for its growth and ensure that it thrives in your garden for years to come.
Planting Bleeding Heart
Once you have chosen the perfect location for your bleeding heart plant, it’s time to begin the planting process. Follow these steps to ensure a successful and thriving garden addition:
1. Prepare the soil: Before planting, prepare the soil by loosening it with a garden fork or tiller. Blend in compost or other organic matter to improve drainage and add nutrients. This will create a favorable environment for the bleeding heart roots to establish and grow.
2. Dig the hole: Dig a hole that is slightly larger and deeper than the root ball of your bleeding heart plant. The hole should be wide enough to accommodate the entire root system without crowding or bending the roots.
3. Place the plant: Gently remove the bleeding heart plant from its container and place it in the center of the hole. Ensure that the top of the root ball is level with or slightly above the soil surface. This will prevent the plant from sinking too deep into the ground after watering.
4. Backfill and firm: Fill the hole around the bleeding heart plant with the soil mixture, making sure to eliminate any air pockets. Lightly firm the soil with your hands, but avoid compacting it too tightly to maintain good drainage.
5. Water thoroughly: Once planting is complete, thoroughly water the bleeding heart plant to settle the soil and provide essential hydration. Keep the soil consistently moist but not waterlogged throughout the growing season.
6. Apply mulch: Mulching around the base of the plant can help retain soil moisture, regulate temperature, and suppress weed growth. Apply a layer of organic mulch, such as shredded bark or compost, around the bleeding heart, leaving a small space around the stem to prevent rotting.
7. Monitor and adjust: Regularly monitor the moisture levels of the soil and adjust watering as needed. Remember that bleeding hearts prefer consistently moist soil, so make sure to water during dry spells or hot summer months.
By following these steps and providing the necessary care, you can ensure a successful planting of your bleeding heart plant and set the stage for a vibrant and flourishing garden display.
Watering Requirements
Proper watering is crucial for the health and vitality of your bleeding heart plant. While these plants prefer consistently moist soil, they are also susceptible to rot and other issues if overwatered. Follow these guidelines to meet the watering needs of your bleeding heart:
1. Moisture levels: Bleeding hearts thrive in moist, well-draining soil. Aim to keep the soil consistently moist but avoid waterlogging, as excessive moisture can lead to root rot. Use your finger to check the moisture level by inserting it about an inch into the soil. If it feels dry at this depth, it’s time to water.
2. Watering frequency: The frequency of watering will depend on various factors such as climate, rainfall, and soil type. In general, watering your bleeding heart plant once or twice a week should be sufficient. However, during hot summer months or prolonged dry spells, you may need to increase the frequency to prevent the soil from drying out.
3. Deep watering: When watering, aim for deep saturation. Apply enough water to thoroughly moisten the root zone of the bleeding heart, which extends about 6 to 8 inches below the soil surface. This encourages the roots to grow deeply and helps the plant withstand periods of drought.
4. Watering technique: To ensure effective watering, use a drip irrigation system or a watering can with a narrow spout to deliver water directly to the base of the plant. Avoid over-spraying the foliage, as this can lead to fungal diseases. Watering in the morning allows the excess moisture to dry off during the day, reducing the risk of fungal infections.
5. Mulch for moisture retention: Applying a layer of organic mulch around the base of the bleeding heart plant can help retain soil moisture and reduce the frequency of watering. Mulch also acts as an insulator, regulating soil temperature and preventing weed growth. Maintain a mulch layer of about 2 to 3 inches, replenishing it as needed.
6. Monitor and adjust: Regularly monitor the moisture levels of the soil, especially during hot or dry periods. Adjust your watering schedule accordingly to ensure your bleeding heart plant receives adequate water without being oversaturated.
By following these watering guidelines, you can provide optimal moisture for your bleeding heart plant, helping it thrive and produce its charming heart-shaped flowers throughout the growing season.
Fertilizing Tips
Fertilizing your bleeding heart plant can help promote healthy growth, vibrant blooms, and overall plant vigor. While these plants don’t require excessive feeding, providing the necessary nutrients can ensure optimal performance. Follow these tips for effective fertilizing:
1. Choose the right fertilizer: When selecting a fertilizer for your bleeding heart, opt for a balanced, slow-release fertilizer. Look for a formulation with a balanced ratio of nitrogen (N), phosphorus (P), and potassium (K), such as a 10-10-10 or 14-14-14 blend. This will provide the necessary nutrients for both foliage and flower development.
2. Timing: Apply fertilizer in early spring before new growth emerges. This will help provide a nutrient boost as the plant enters its active growing phase. Avoid fertilizing late in the season, as this can encourage lush foliage growth instead of focusing on flower production.
3. Application method: Sprinkle the recommended amount of fertilizer evenly around the base of the bleeding heart plant. Avoid direct contact with the stems and foliage to prevent burning. Gently incorporate the fertilizer into the top layer of soil and water thoroughly to promote nutrient absorption.
4. Additional organic matter: To supplement the fertilizer, consider adding organic matter to the soil. Well-rotted compost, aged manure, or leaf mold can enrich the soil with beneficial organic nutrients and improve its structure and moisture-retaining capabilities.
5. Plant-specific fertilizers: If desired, you can choose specific fertilizers formulated for flowering plants or perennials. These fertilizers often contain micronutrients and trace elements that are beneficial for the overall health and vitality of the bleeding heart plant.
6. Monitor and adjust: Regularly monitor the growth and appearance of your bleeding heart plant to assess its fertilizer needs. If you notice pale foliage or weak growth, it may indicate a lack of nutrients. Adjust the fertilization schedule or increase the amount of fertilizer applied, following the manufacturer’s recommendations.
7. Avoid overfertilization: While fertilizing is important, it’s crucial to avoid overfertilization, as this can lead to excessive foliage growth and reduced flowering. Follow the recommended dosage and frequency provided on the fertilizer packaging to prevent nutrient imbalances and plant stress.
By following these fertilizing tips, you can provide the necessary nutrients to support the growth and blooming of your bleeding heart plant, ensuring its health and beauty for seasons to come.
Mulching Techniques
Mulching is an essential practice for maintaining the health and vitality of your bleeding heart plant. Mulch offers numerous benefits, including moisture retention, temperature regulation, weed suppression, and soil enrichment. Follow these mulching techniques to maximize the benefits for your bleeding heart:
1. Timing: Apply mulch around your bleeding heart plant in early spring, once the soil has warmed up and dried out a bit. This will help prevent the development of fungal diseases and allow the plant to emerge and grow without hindrance.
2. Mulch material: Organic mulch, such as shredded bark, wood chips, leaf mold, or compost, is ideal for bleeding heart plants. These materials not only provide insulation and moisture retention but also break down over time, enriching the soil with essential organic matter and nutrients. Avoid using mulches made from stones or plastic, as they can hinder water and air circulation around the plant’s roots.
3. Application method: Spread a layer of mulch around the base of the bleeding heart plant, extending it outward to the drip line of the plant’s foliage. Aim for a depth of 2 to 3 inches, making sure to leave a small space around the stem to prevent rotting. Avoid piling the mulch directly against the stem, as this can create a moist environment and attract pests or promote diseases.
4. Mulch maintenance: Regularly check the mulch layer throughout the growing season. If the mulch becomes compacted or begins to decompose, replenish it as needed to maintain the desired depth. This will help ensure its effectiveness in retaining moisture, insulating the soil, and suppressing weeds.
5. Weed control: Mulch plays a crucial role in suppressing weed growth around your bleeding heart plant. The thick layer of mulch acts as a natural barrier, preventing sunlight from reaching weed seeds and hindering their germination. However, do a quick inspection periodically to remove any weeds that manage to penetrate the mulch layer.
6. Consider color: Depending on your garden aesthetic, you can choose mulch that complements the colors of your bleeding heart plant or surrounding foliage. Dark-colored mulch can create a dramatic contrast, while lighter-colored mulch can provide a softer, more natural look.
7. Seasonal adjustment: In colder regions, consider adding an extra layer of mulch in late fall to provide additional insulation and protect the plant’s root system during the winter months. This will help prevent frost heave and ensure the plant’s survival in harsh conditions.
By following these mulching techniques, you can create a favorable environment for your bleeding heart plant, enhancing its growth, beauty, and overall health.
Pruning and Deadheading
Pruning and deadheading are important maintenance practices for your bleeding heart plant. Regular pruning helps maintain its shape, promotes healthy growth, and encourages continuous blooming. Deadheading, on the other hand, helps remove spent flowers, tidies up the appearance, and redirects the plant’s energy toward producing new blooms. Here are some tips for effective pruning and deadheading of your bleeding heart:
1. Pruning timing: Pruning bleeding heart plants should be done in early spring when new growth begins to emerge. This allows you to remove any dead or damaged foliage from the previous year and shape the plant for the coming season. Avoid pruning too late in the season, as this can remove emerging flower buds.
2. Pruning tools: Use clean and sharp pruning shears or scissors to make precise cuts. This minimizes the risk of injury to the plant and reduces the chances of spreading diseases.
3. Removing dead foliage: Start by removing any dead or yellowed foliage from the base of the bleeding heart plant. Trim these leaves close to the ground to promote air circulation and prevent diseases caused by damp, decaying foliage.
4. Shaping and thinning: Bleeding hearts have a tendency to become dense and overgrown. To maintain a neat and attractive appearance, selectively prune any overcrowded or crossing stems. Aim to maintain an open and balanced form, allowing light and air to reach all parts of the plant.
5. Deadheading: To promote continuous blooming and prevent the formation of seed pods, regularly deadhead the faded flowers. Snip off the flower stem just above a healthy set of leaves or buds. This redirects the plant’s energy into producing new flowers rather than seed production.
6. Division and rejuvenation: Every few years, bleeding heart plants may benefit from division to maintain their vigor and prevent overcrowding. After the plant has finished flowering in early summer, carefully dig up the clump and divide it into smaller sections with healthy roots. Replant the divisions in well-prepared soil and water thoroughly to encourage root establishment.
7. Clean up and disposal: After pruning and deadheading, clean up any debris and dispose of it properly to minimize the risk of diseases and pests. Compost the healthy plant material, but discard any diseased or pest-infested parts to prevent the spread of problems to other plants.
By incorporating regular pruning and deadheading into your bleeding heart maintenance routine, you can keep your plant tidy, healthy, and blooming beautifully throughout the growing season.
Dealing with Pests and Diseases
While bleeding heart plants are generally resistant to pests and diseases, they are not completely immune. It’s important to be vigilant and take proactive measures to prevent and address any issues that may arise. Here are some tips for dealing with common pests and diseases that can affect your bleeding heart:
1. Slugs and snails: These slimy creatures can quickly devour the tender foliage of bleeding heart plants. To deter them, try placing copper tape or diatomaceous earth around the base of the plant. You can also handpick them off the plant in the early morning or evening when they are most active.
2. Aphids: Aphids are tiny, sap-sucking insects that can gather on the leaves and stems of bleeding heart plants. A strong blast of water from a garden hose can dislodge them, or you can use insecticidal soap to control their population. Ladybugs and lacewings are natural predators of aphids and can help keep their numbers in check.
3. Powdery mildew: This fungal disease appears as a white, powdery coating on the leaves of the bleeding heart plant. To prevent powdery mildew, provide good air circulation by spacing plants appropriately and avoiding overhead watering. If necessary, treat the plant with a fungicide labeled for powdery mildew control.
4. Leaf spot: Leaf spot is a fungal disease that causes dark spots to develop on the foliage of bleeding heart plants. To control leaf spot, remove and destroy any infected leaves as soon as they are noticed. Avoid overhead watering and provide adequate spacing between plants to reduce humidity and promote air circulation.
5. Crown rot: Crown rot is a fungal disease that affects the crown and roots of the bleeding heart plant, often resulting from overly wet or poorly drained soil. To prevent crown rot, ensure that the soil is well-draining and avoid overwatering. If crown rot is suspected, remove the affected plant and improve the soil drainage before replanting.
6. Virus diseases: Some virus diseases, such as the impatiens necrotic spot virus (INSV), can affect bleeding heart plants. These diseases are usually transmitted by insects. Prevention is key, so make sure to monitor and control the insect population around your garden. If virus symptoms are present, remove and destroy the infected plants to prevent the spread of the disease.
7. Regular monitoring: Regularly inspect your bleeding heart plants for any signs of pests or diseases. Early detection and intervention can help prevent the spread of issues and minimize plant damage. Promptly address any problems by using appropriate treatments or seeking advice from a local gardening professional.
By staying vigilant and taking proactive measures, you can keep your bleeding heart plants healthy and free from pests and diseases, allowing them to flourish and bring beauty to your garden.
Dividing and Transplanting Bleeding Heart
Dividing and transplanting bleeding heart plants is an essential maintenance task that helps rejuvenate the plant, control its size, and propagate new plants. Follow these steps to successfully divide and transplant your bleeding heart:
1. Timing: The best time to divide bleeding heart plants is in early spring or late summer when the plant is not in active growth. This allows the plant to recover more easily from the process.
2. Prepare the new location: Choose a new location that has similar soil conditions and light requirements to the original planting site. Prepare the soil by loosening it and incorporating organic matter to improve drainage and nutrient content.
3. Dig up the clump: Carefully dig up the bleeding heart clump, being careful not to damage the fragile roots. Dig around the drip line of the plant, keeping a generous distance to ensure you capture the entire root system.
4. Divide the clump: Once the clump is out of the ground, gently separate the individual crowns or root sections using a sharp knife or garden fork. Each division should have healthy roots and several buds or shoots.
5. Replant the divisions: Plant each division in the prepared location at the same depth it was previously growing. Space the divisions adequately to allow for future growth and development. Water thoroughly after planting to settle the soil and promote root establishment.
6. Water and care: Keep the newly transplanted bleeding heart divisions consistently moist in the first few weeks after transplanting. Monitor their progress regularly and provide proper care, including regular watering, mulching, and fertilizing to support their establishment and growth.
7. Transplant shock: It’s common for divided bleeding heart plants to experience some transplant shock, such as wilting or temporary decline. However, with proper care and time, they will usually recover and start growing vigorously.
8. Transplanting potted bleeding heart: If you have a bleeding heart plant in a container, the process is similar. Gently remove the plant from the pot, loosen the root ball if necessary, and follow the steps above to replant it in a new location.
By dividing and transplanting your bleeding heart plants, you can rejuvenate older plants, control their size, and expand your garden with new additions. With proper care and attention, the divided plants will continue to delight you with their charming heart-shaped blooms for years to come.
Winter Care for Bleeding Heart
Proper winter care is essential for ensuring the survival and health of your bleeding heart plants during the dormant season. While bleeding hearts are generally hardy, a few considerations can help protect them from harsh winter conditions. Follow these guidelines for winter care:
1. Cut back foliage: After the first frost, the foliage of bleeding heart plants will naturally die back. Trim the foliage to within a few inches of the ground, removing any dead stems and leaves. This helps prevent the plant from becoming a breeding ground for pests or diseases during the winter.
2. Mulch for insulation: Apply a layer of mulch around the base of the bleeding heart plant to provide insulation and protect the roots from extreme temperature fluctuations. Use organic mulch, such as straw, wood chips, or shredded leaves, and apply a layer of about 2 to 3 inches in depth. Avoid piling the mulch directly against the stem.
3. Protect from frost heave: In regions with freezing temperatures and fluctuating soil conditions, bleeding heart plants are susceptible to frost heave. This occurs when repeated freezing and thawing of the soil pushes the plant roots upward. Monitor the soil around the plant during winter and gently press the plant back into the ground if needed to prevent damage.
4. Shield from harsh winds: Strong winds, especially when coupled with cold temperatures, can cause drying and damage to the foliage and stems of bleeding hearts. Protect the plants by situating them near a windbreak, such as a fence or building, or by wrapping them with burlap or frost cloth.
5. Avoid excessive watering: During winter, bleeding hearts are in a dormant state and require less water. Avoid overwatering, as it can lead to root rot in the cold and wet conditions. Monitor the moisture levels and only water if the soil becomes excessively dry.
6. Container plants: If you have bleeding heart plants in containers, consider moving them to a protected location, such as an unheated garage or basement, during the coldest part of winter. Ensure the soil is slightly moist and check on them periodically to maintain proper moisture levels.
7. Spring cleanup: Once winter has passed and the danger of frost has subsided, remove the mulch and any debris around the base of the plant. Gently rake away any dead leaves or other organic matter. This allows the plant to have a fresh start in the spring.
By providing appropriate winter care, you can protect your bleeding heart plants from the harsh conditions and give them the best chance of thriving when the warmth of spring returns. Remember that despite their delicate appearance, bleeding hearts are hardy perennials that can withstand winter with good care.