
Choosing the Right Materials
When building a storage shelf, selecting the right materials is essential to ensure durability and longevity. Here are some factors to consider when choosing the materials for your project:
- Wood: Opt for sturdy and durable wood, such as pine or plywood, that can withstand the weight of items you plan to store. Consider the thickness and quality of the wood to ensure it can support the load without sagging or buckling.
- Metal: Metal shelves are a popular choice for heavy-duty storage. Look for steel or aluminum materials that are strong and resistant to corrosion. Keep in mind that metal shelves may require welding or special mounting hardware for installation.
- Plastic: Plastic shelves are lightweight, affordable, and resistant to moisture and rust. They are a great option for areas prone to humidity or if you need portable storage solutions. Make sure to choose shelves made from sturdy, high-quality plastic for maximum durability.
- Hardware: Selecting the right hardware, such as screws and brackets, is crucial for ensuring the stability and strength of your storage shelf. Use screws that are appropriate for the material you are working with and consider using brackets or supports to reinforce the structure.
- Finish: If you plan on using wood for your storage shelf, consider applying a finish or sealant to protect it from moisture, stains, and scratches. This will help extend its lifespan and keep it looking good for years to come.
It’s important to choose materials that suit your specific storage needs and the environment in which the shelf will be located. Take into account factors such as weight capacity, resistance to moisture or rust, and aesthetic preferences.
By carefully selecting the right materials, your storage shelf will not only provide functional storage space but also enhance the overall appearance of your space. Now that you’ve chosen the materials, it’s time to move on to the next step: measuring and planning.
Measuring and Planning
Before you start building your storage shelf, it’s crucial to measure the space and plan out the dimensions. Here are the key steps for measuring and planning your project:
- Measure the Space: Take accurate measurements of the area where you intend to install the storage shelf. Consider the height, width, and depth that will fit your storage needs while leaving sufficient clearance for access and movement.
- Determine Shelf Spacing: Think about the items you’ll be storing and how much space each shelf will require. You may want to adjust the spacing between shelves to accommodate larger or taller items.
- Create a Sketch: Use graph paper or a digital design tool to create a rough sketch of your storage shelf. Include dimensions for the overall structure, individual shelves, and any additional features like dividers or compartments.
- Consider Accessibility: Think about how you will access and retrieve items from your storage shelf. If you plan on storing heavy or bulky items, you may need to leave extra space for maneuverability.
- Check for Obstructions: Take note of any obstructions in the space, such as outlets, pipes, or vents. Adjust your design to ensure the shelf doesn’t block access or disrupt the functionality of these elements.
By carefully measuring and planning the dimensions of your storage shelf, you can ensure that it not only fits the available space but also meets your storage requirements. Consider the items you’ll be storing, the accessibility needed, and any limitations in the area before finalizing your design.
Once you have the measurements and plan in place, you’re ready to gather the tools and supplies needed for the construction process. Gather everything you need and get ready to bring your storage shelf to life.
Gathering the Tools and Supplies
Before you start building your storage shelf, it’s essential to gather all the necessary tools and supplies. Having everything prepared ahead of time will ensure a smooth and efficient construction process. Here’s a list of the common tools and supplies you’ll need for building a storage shelf:
- Tape Measure: This will be used for accurate measurements of the space and materials.
- Saw: Depending on the materials you’ve chosen, you may need a handsaw, circular saw, or miter saw for cutting wood or metal.
- Drill: A power drill or screwdriver will be essential for creating pilot holes and attaching the components together.
- Screws and Nails: Choose the appropriate size and type of screws or nails based on the materials you’re working with. Consider using screws for added strength and durability.
- Level: A level will help ensure that your storage shelf is properly aligned and straight.
- Clamps: Clamps are useful for holding pieces together while they’re being secured.
- Sanding Tools: Sandpaper or a sanding block will come in handy for smoothing rough edges and surfaces.
- Paint or Stain: If you plan on finishing your storage shelf, gather the appropriate paint or stain, brushes, and other necessary painting supplies.
- Protective Gear: Safety should always be a priority, so gather safety goggles, gloves, and a dust mask to protect yourself during construction.
Make sure to check your project plan and consider any additional tools or supplies specific to your design. Having everything within reach will save time and effort throughout the construction process.
Now that you have all the necessary tools and supplies, it’s time to start building the frame of your storage shelf. Follow the next section to learn how to construct a sturdy and reliable frame for your storage needs.
Building the Frame
Building a sturdy and reliable frame is the foundation of a well-constructed storage shelf. The frame provides structural support and stability for the shelves and ensures that your storage solution can withstand the weight of the items you plan to store. Here’s a step-by-step guide on how to build the frame:
- Cut the Pieces: Referencing your project plan and measurements, use a saw to cut the pieces of wood or metal for the frame components. This includes the vertical supports, horizontal beams, and any additional cross braces or corner brackets.
- Pre-Drill Holes: Before attaching the pieces together, pre-drill pilot holes to prevent the wood or metal from splitting. Use a drill and a drill bit slightly smaller than the size of your screws or nails.
- Assemble the Vertical Supports: Starting with the vertical supports, align them according to your design and secure them to the floor or wall, depending on your installation preference. Use a level to ensure they are straight and plumb.
- Attach Horizontal Beams: Once the vertical supports are in place, attach the horizontal beams or shelves supports to create the framework. Use a drill, screws, and any additional brackets or braces to secure them firmly.
- Add Cross Braces: To reinforce the frame and increase its stability, add cross braces between the vertical supports. This will prevent wobbling and ensure the frame can support the weight of items on the shelves.
Remember to follow your project plan and double-check your measurements at each step to ensure accuracy. Take your time to assemble the frame properly, ensuring that all components are securely fastened and aligned correctly.
Once the frame is built, you’re ready to move on to the next step: installing the shelves. This is where you’ll create the actual storage space and make your storage shelf fully functional. Continue reading to discover how to install the shelves effectively.
Installing the Shelves
Now that the frame of your storage shelf is complete, it’s time to move on to installing the shelves. Properly installed shelves will provide the storage space you need while ensuring stability and durability. Follow these steps to effectively install the shelves:
- Measure and Mark: Measure the desired height for your shelves, keeping in mind the items you’ll be storing. Use a tape measure and a pencil to mark the positions on the vertical supports where you’ll be placing the shelves.
- Attach Shelf Supports: Depending on your design, you may need to attach shelf supports or brackets to the vertical supports. Use a drill and screws to secure them in place at the marked positions.
- Place the Shelves: Carefully place the shelves on top of the supports or brackets. Make sure they sit flush and level. Use a level to double-check the horizontal alignment of each shelf.
- Secure the Shelves: To prevent the shelves from sliding or shifting, secure them to the supports or brackets using screws or nails. Be sure to use the appropriate fasteners for the material of your shelves.
- Test Stability: Give the shelves a gentle shake to test their stability. Make any necessary adjustments or reinforcements to ensure they can support the weight of your items without sagging or wobbling.
Take your time during the installation process to ensure each shelf is properly aligned and securely attached. The stability and reliability of your storage shelf depend on the accuracy and attention to detail at this stage.
With the shelves successfully installed, your storage shelf is taking shape. However, to reinforce the structure and increase its overall strength, it’s recommended to proceed with the next step: reinforcing the frame.
Reinforcing the Structure
To ensure the long-term durability and stability of your storage shelf, reinforcing the structure is a crucial step. Reinforcements can help distribute weight evenly, prevent sagging, and increase the overall strength of the shelf. Here are some methods to reinforce the structure:
- Add Corner Braces: Install metal corner braces at the joints between the vertical supports and horizontal beams. These braces provide additional support and prevent the frame from becoming loose or wobbly.
- Use L-Brackets or Shelf Clips: For adjustable shelves, consider using L-brackets or shelf clips to secure the shelves in place. These brackets help distribute weight evenly and prevent the shelves from shifting or falling.
- Install Backing Boards: Adding backing boards to the back of your storage shelf can provide stability and keep items from falling off the back. Use screws or nails to attach the boards to the vertical supports.
- Use Angled Braces: Angled braces can strengthen the corners of your storage shelf and prevent side-to-side movement. Install them at the top corners of the structure for added reinforcement.
- Consider Diagonal Supports: Diagonal supports can provide extra stability to the frame. Install them diagonally across the back of the storage shelf, connecting the vertical supports to the horizontal beams.
Reinforcing the structure of your storage shelf is vital for ensuring that it can withstand heavy loads and remain stable over time. Take the time to assess the stability of your shelf and determine which reinforcements are needed based on your specific design and storage requirements.
Once you have reinforced the structure, it’s time to focus on the finer details. Sanding and finishing the surfaces of your storage shelf will not only enhance its appearance but also protect the materials from wear and tear. Read on to learn how to achieve a smooth and beautiful finish.
Sanding and Finishing
After constructing and reinforcing your storage shelf, it’s time to give it a smooth and finished look. Sanding and finishing the surfaces not only enhance the appearance but also protect the materials from damage and extend their lifespan. Here’s how you can achieve a professional finish:
- Sand the Surfaces: Use sandpaper or a sanding block to carefully sand all visible surfaces of the storage shelf. Start with a coarse grit to remove any rough spots or imperfections, then gradually switch to finer grits for a smoother finish.
- Round the Edges: To prevent sharp edges and splintering, use sandpaper to round off the edges of the shelves and frame components. This will make the storage shelf more user-friendly and visually appealing.
- Fill Gaps and Holes: If there are any noticeable gaps or holes in the wood or material, fill them with wood filler or putty. Once dry, sand the repaired areas to make them level with the surrounding surfaces.
- Clean the Surfaces: Remove all dust and debris from sanding by thoroughly cleaning the surfaces. Use a vacuum or a damp cloth to wipe away any residual dust and ensure a clean surface for finishing.
- Apply a Finish: Decide on the desired finish for your storage shelf, such as paint, stain, or varnish. Follow the manufacturer’s instructions to apply the chosen finish evenly to the surfaces. Apply multiple coats if necessary, allowing each coat to dry before applying the next.
- Protective Coating: For added protection and durability, apply a clear protective coating to the finished surfaces. This will help guard against scratches, moisture damage, and UV rays, ensuring your storage shelf stays in good condition for years to come.
Remember to work in a well-ventilated area and follow safety precautions when sanding and applying finishes. Take your time to achieve a smooth and flawless finish, as this final step adds the perfect touch to your storage shelf.
With your storage shelf beautifully sanded and finished, it’s time to organize and store your items on the shelves. Continue reading to discover some helpful tips on effective organization and maximizing your storage space.
Organizing and Storing Items
Now that your storage shelf is complete and ready for use, it’s time to focus on organizing and storing your items effectively. Proper organization not only maximizes the available space but also ensures easy access and efficient retrieval of your belongings. Here are some tips to help you organize and store items on your storage shelf:
- Categorize Items: Sort your items into categories based on their type or usage. This will help you determine the most suitable shelves or sections for each category.
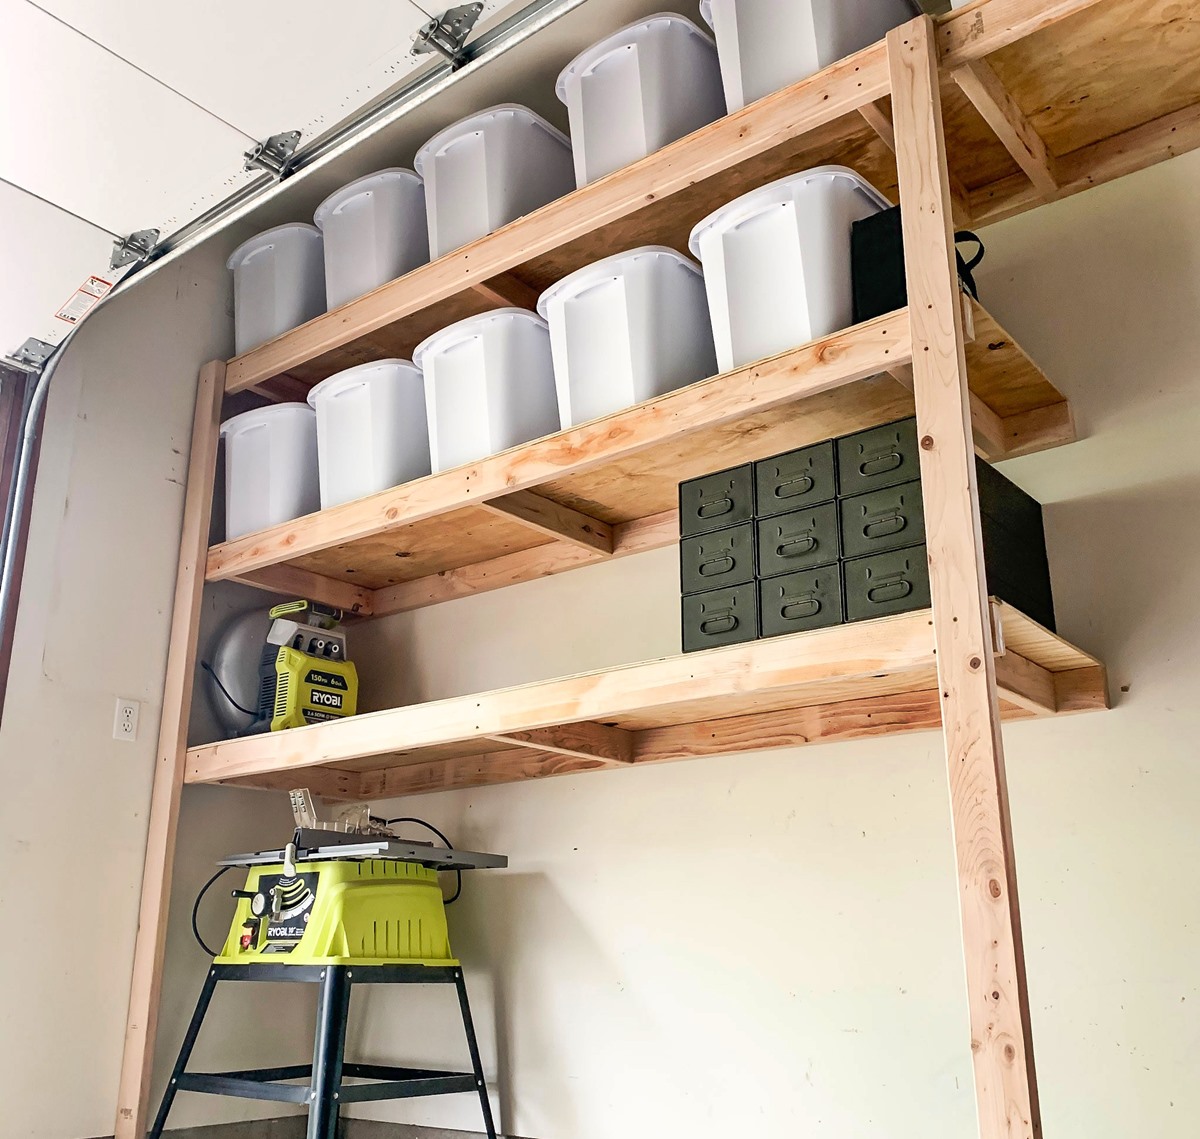
- Utilize Storage Containers: Use storage containers, baskets, or bins to keep small items organized and prevent clutter. Label each container for quick identification.
- Arrange by Frequency of Use: Place frequently used items within easy reach and store lesser-used items on higher or lower shelves. Utilize the middle shelves for items that are accessed occasionally.
- Maximize Vertical Space: Stack items vertically to make the most of the available space. Use shelf dividers or adjustable shelving to create additional compartments and prevent items from toppling over.
- Leave Room for Future Expansion: Allow some empty space on shelves to accommodate future additions or changes in your storage needs. This will prevent overcrowding and make it easier to reorganize when necessary.
- Label and Maintain: Label shelves and containers to easily identify the contents. Regularly maintain your storage shelf by decluttering, adjusting item placement, and ensuring items are stored securely.
By following these organization tips, you’ll optimize the space on your storage shelf and make it more functional. You’ll also enjoy the convenience of easily locating and accessing your stored items.
With your storage shelf successfully organized and items neatly stored, you’ve completed the project. Take a step back and admire your well-constructed, organized, and functional storage solution. Congratulations on a job well done!