
Materials Needed for Building Rug Runners
Creating your own rug runners can be a rewarding and cost-effective way to add a personalized touch to your home decor. To get started on this DIY project, you will need to gather a few essential materials. Here is a list of items you’ll need to build your rug runners:
- Fabric: Choose a durable and high-quality fabric that suits your style and complements your home’s aesthetic. Opt for materials like cotton, wool, or synthetic blends that can withstand heavy foot traffic. Consider the color and pattern of the fabric to ensure it enhances the desired atmosphere of the space.
- Measuring Tape: Accurate measurements are crucial when creating a rug runner that fits perfectly in your designated area. Invest in a reliable measuring tape to ensure precision and avoid wasted materials.
- Fabric Scissors: A good pair of fabric scissors is essential for cutting the fabric to the desired dimensions. Choose sharp and durable scissors that can effortlessly glide through thick fabrics.
- Straight Pins: These small pins are helpful for keeping the fabric pieces in place during cutting and sewing. Opt for stainless steel pins with a sharp point to securely hold the fabric without damaging it.
- Sewing Machine: Unless you prefer hand-sewing, a sewing machine can significantly speed up the process of piecing your rug runner together. Ensure your sewing machine is in good working condition with the appropriate needles and thread.
- Thread: Select a thread color that complements or matches your chosen fabric. Opt for a sturdy thread that can withstand heavy use and won’t easily unravel.
- Iron: An iron is essential for properly pressing the fabric and seams, resulting in crisp edges and a professional finish. Make sure your iron is in working order and has adjustable heat settings suitable for different types of fabric.
- Non-Slip Backing: To ensure safety and prevent your rug runners from sliding on hardwood or tile floors, consider adding a non-slip backing. This can be rubberized or adhesive and is readily available in most home improvement stores.
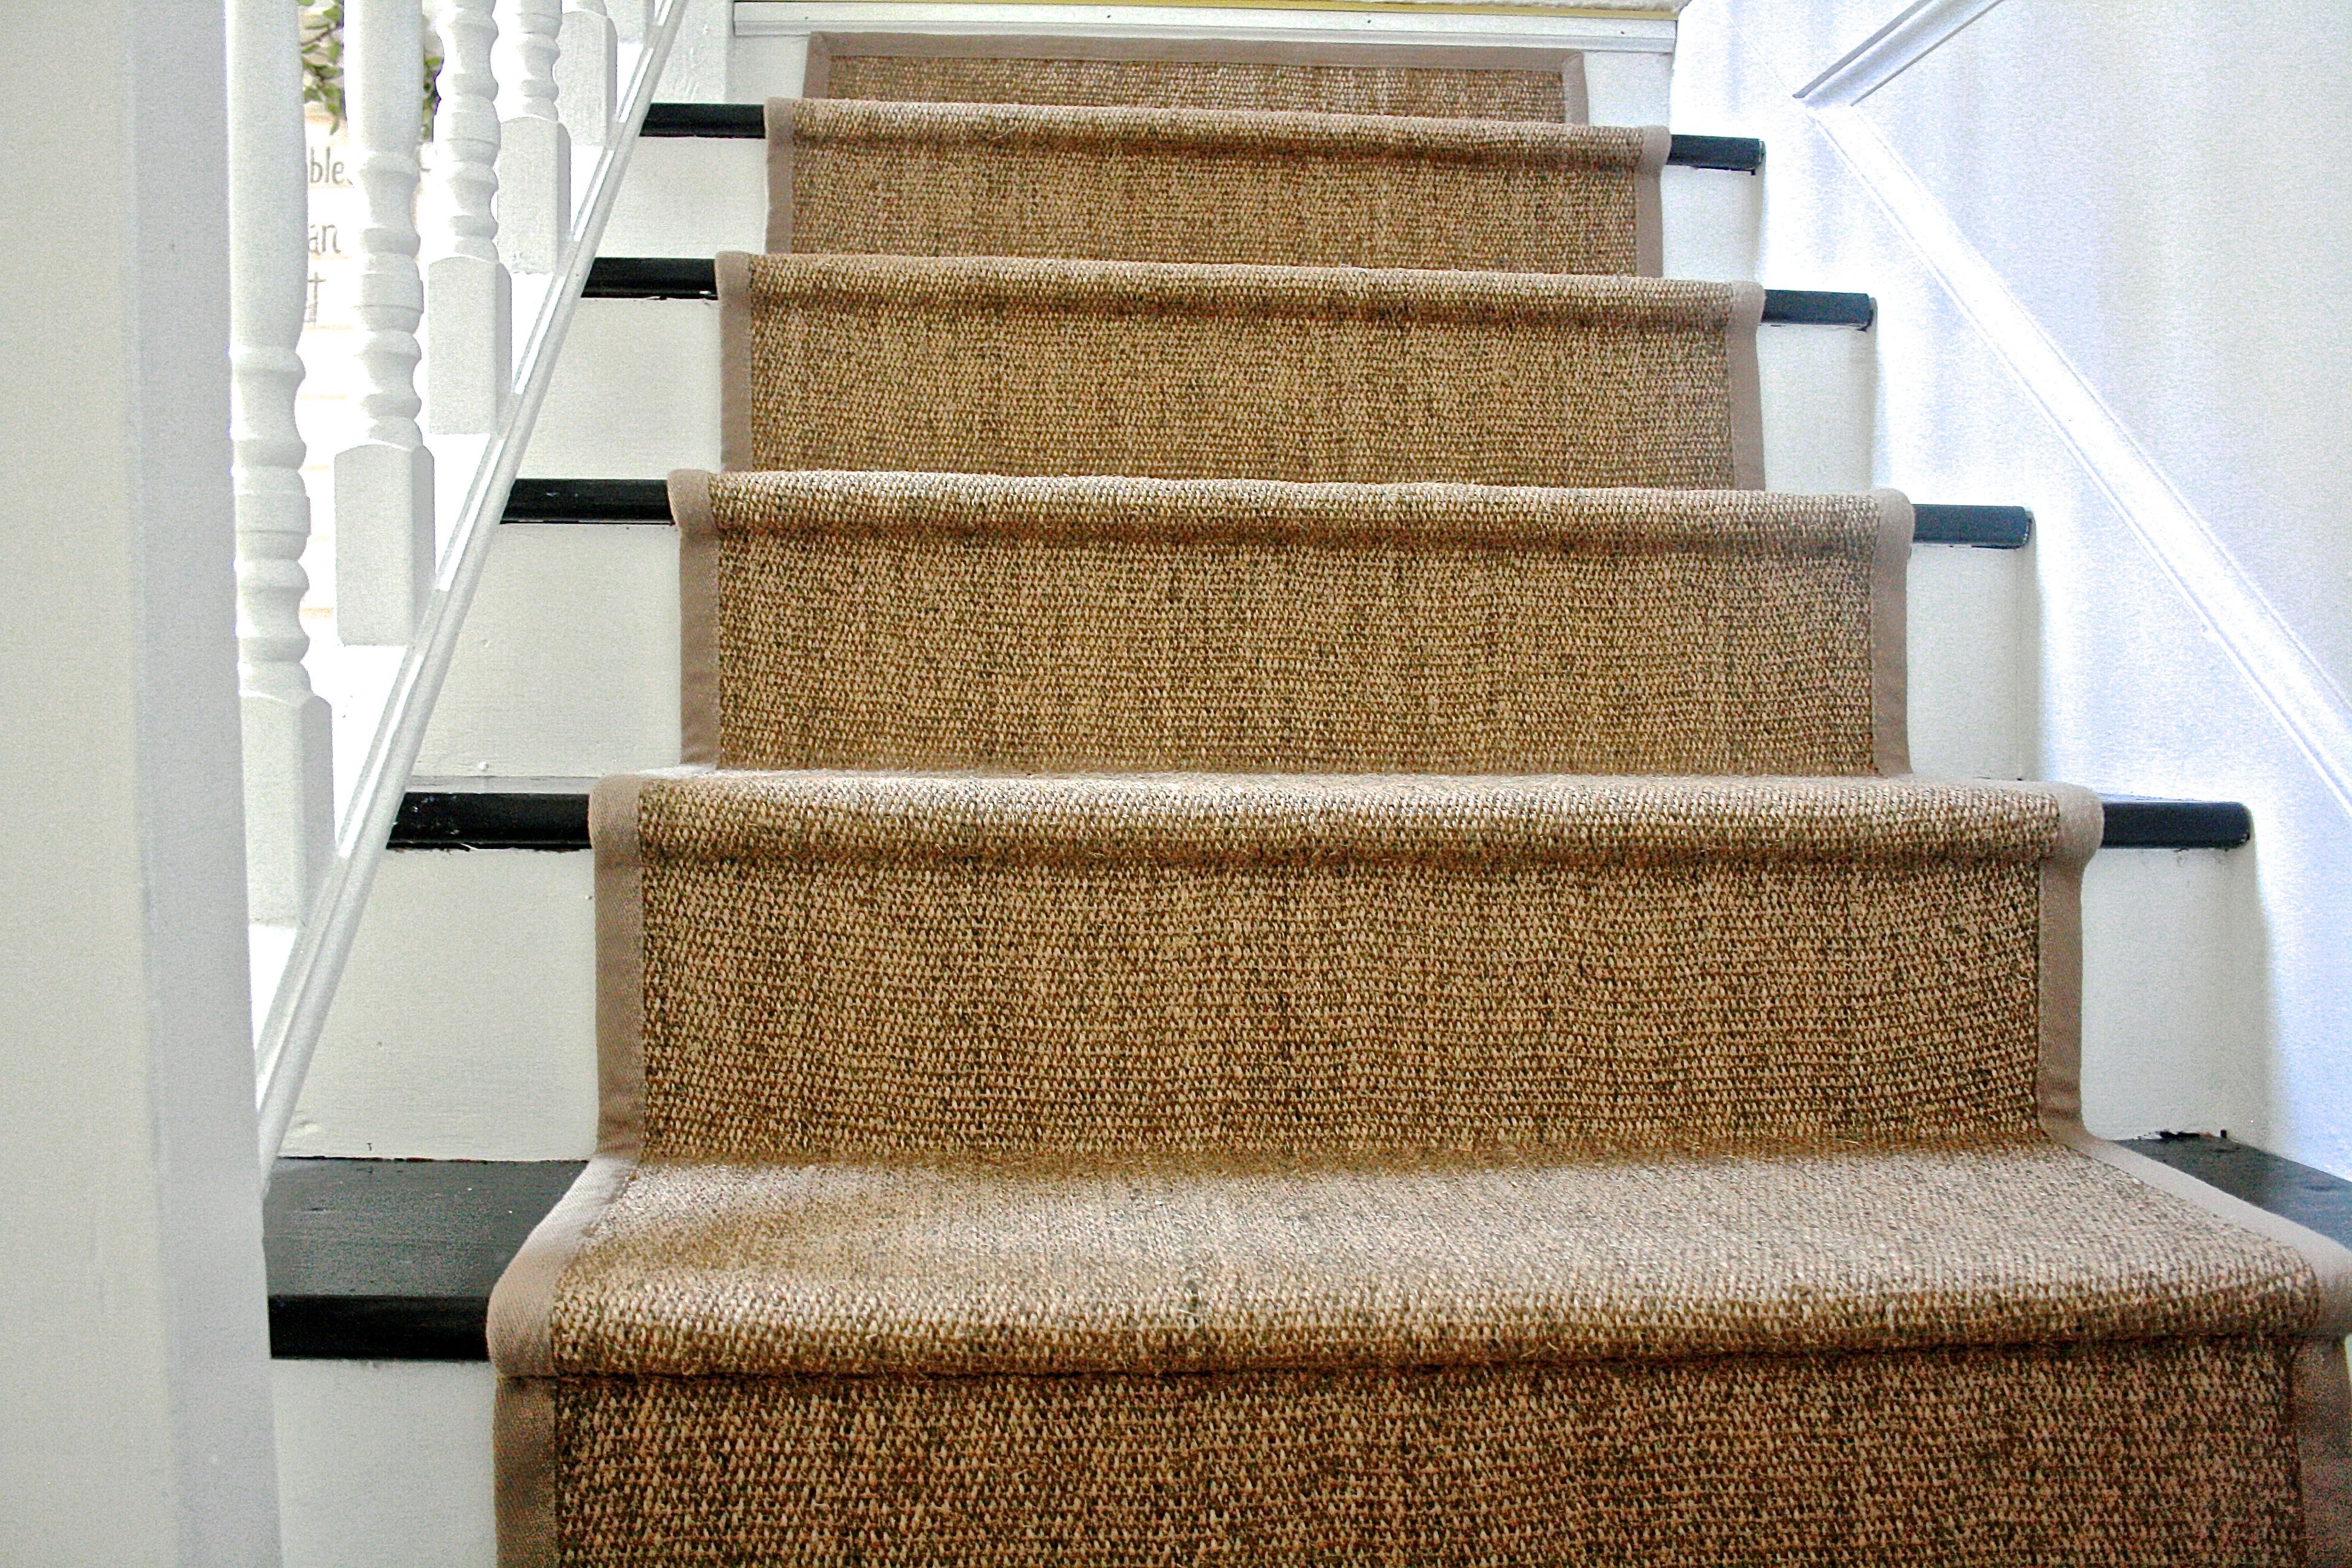
- Optional Embellishments: If desired, you can add extra touches to customize your rug runners. Consider decorative fringe, fabric bindings, or embellishments that complement your personal style and enhance the overall appearance of the rug runners.
With these materials on hand, you’re now ready to move on to the next steps in constructing your own beautiful rug runners. Remember to choose high-quality materials and take your time with each stage of the process to ensure a rug runner that will enhance the beauty and functionality of your home.
Choosing the Right Size and Shape for your Rug Runner
When building rug runners, one of the crucial aspects to consider is the size and shape. The dimensions of your rug runner should be carefully determined to ensure a perfect fit in the intended space. Here are some key factors to keep in mind when choosing the size and shape of your rug runner:
Consider the Space: Before deciding on the size, examine the area where you plan to place the rug runner. Take note of any obstacles, such as furniture or doorways, that may affect the placement or dimensions of the runner. Aim for a size that allows for a comfortable walkway and doesn’t overcrowd the space.
Measure Properly: Use a measuring tape to determine the ideal length and width of your rug runner. Measure the length of the area you want to cover, accounting for any specific design preferences or layout considerations. Keep in mind that it’s better to have a slightly longer rug runner than one that falls short.
Consider Proportions: The shape of your rug runner should also be considered carefully. A rectangular shape is the most common choice for runners, but you can also opt for a round or oval shape if it better suits the space. Consider the proportions of the room and any existing furniture or architectural features when selecting the shape.
Focal Point or Subtle Accent: Determine the intended purpose of your rug runner. If you want it to be a standout focal point, consider a larger size that draws attention and becomes a prominent feature in the room. On the other hand, if you prefer a more subtle accent, a smaller rug runner that complements the surrounding decor may be ideal.
Functional Considerations: Think about how you will be using the rug runner. If it will be placed in a high-traffic area, such as a hallway or entryway, choose a size that can withstand the constant foot traffic. For areas prone to spills or dirt, consider a rug runner that is easy to clean and maintain.
By carefully considering the size, shape, and function of your rug runner, you can ensure that it seamlessly integrates into your space while serving its intended purpose. Remember to measure accurately and take the overall aesthetics and practicality into account to create a rug runner that enhances the beauty and functionality of your home.
Selecting the Best Fabric for your Rug Runner
When building a rug runner, choosing the right fabric is essential for ensuring both durability and visual appeal. The fabric you select will determine how well your rug runner stands up to foot traffic, as well as how it complements your overall decor. Here are some key factors to consider when selecting the best fabric for your rug runner:
Durability: Since rug runners are often placed in high-traffic areas like hallways or entryways, it’s crucial to choose a fabric that can withstand constant use. Opt for materials such as wool, nylon, or synthetic blends, which are known for their durability and resistance to wear and tear.
Stain Resistance: If you anticipate spills or heavy foot traffic that may lead to stains, consider fabrics that are easy to clean and maintain. Look for stain-resistant fabrics with protective coatings or treated fibers, as they can make cleaning up spills a breeze.
Texture: Think about the texture and feel you want for your rug runner. Do you prefer a soft, plush fabric or something more firm and structured? Consider the overall aesthetic of your space and choose a fabric that adds the desired texture to your room’s decor.
Color and Pattern: The fabric of your rug runner should harmonize with the existing color scheme and patterns in the room. If you want your rug runner to be a focal point, bold and vibrant patterns or colors can make a statement. For a more subtle look, opt for neutral tones or patterns that complement the surrounding decor.
Ease of Care: Consider the maintenance requirements of the fabric you choose. Some fabrics may require professional cleaning or specialized care, while others can be easily cleaned at home. If you prefer a low-maintenance option, look for machine-washable or spot-cleanable fabrics.
Budget-Friendly: Lastly, consider your budget. While premium materials like wool can be more expensive, they offer superior quality and longevity. However, there are also affordable options like synthetic blends that provide durability at a more budget-friendly price point.
By considering factors such as durability, stain resistance, texture, color, ease of care, and budget, you can select the best fabric for your rug runner. Take your time to explore different options and choose a fabric that not only looks great but also stands the test of time in terms of functionality and style.
Measuring and Cutting the Fabric for your Rug Runner
Accurate measurements and precise cutting are essential when creating a rug runner that fits perfectly in your desired space. Here are the steps to properly measure and cut the fabric for your rug runner:
Step 1: Measure the Area: Use a measuring tape to determine the length and width of the area where you plan to place the rug runner. Make sure to measure the entire length, accounting for any nuances such as curves or angles.
Step 2: Add Extra Length: To allow for any potential shrinkage or fraying, add a few extra inches to both the length and width measurements. This will ensure that your rug runner fits comfortably in the designated area.
Step 3: Mark the Measurements: Using a fabric marker or pins, mark the dimensions on the fabric. Ensure that the lines are straight and parallel to each other for a clean and professional look.
Step 4: Cut the Fabric: Using sharp fabric scissors, carefully cut along the marked lines. Take your time to ensure clean and straight edges, as they will contribute to the overall appearance of your rug runner.
Step 5: Check for Accuracy: Once you have cut the main piece of fabric, take a moment to double-check the measurements. Lay the fabric in the designated area to ensure that it fits well and aligns properly with the surroundings.
Step 6: Consider Pattern Matching: If your fabric has a pattern or design, take the time to align and match the pattern correctly. This will create a cohesive and visually appealing look for your rug runner.
Step 7: Cut Additional Pieces (Optional): If your rug runner requires multiple fabric pieces, such as a border or contrasting panels, measure and cut these additional pieces accordingly. Double-check the measurements and alignment before proceeding to the next steps.
By following these steps, you can ensure that your fabric is accurately measured and cut for your rug runner. Taking the time to measure carefully and double-check your cuts will result in a rug runner that fits perfectly in your space and adds a touch of style to your home.
Preparing the Edges of the Fabric for your Rug Runner
Before sewing the fabric pieces together, it is important to properly prepare the edges of the fabric for your rug runner. This step ensures that the edges are neat, prevents fraying, and creates a polished finish. Here is how you can prepare the edges of the fabric:
Step 1: Iron the Edges: Start by ironing the edges of the fabric to create crisp and smooth edges. Set your iron to the appropriate heat setting for the fabric type and press along the edges, folding them inward by about half an inch. Use pins to hold the folded edges in place if needed.
Step 2: Apply Fray-Resistant Sealant: To prevent fraying, apply a fray-resistant sealant along the folded edges of the fabric. You can find fabric sealants in craft stores or use a fabric glue that dries clear. Apply the sealant evenly along the folded edges, allowing it to dry according to the manufacturer’s instructions.
Step 3: Double Fold for Extra Strength (Optional): If your fabric is particularly prone to fraying or you want extra reinforcement, you can double-fold the edges. Fold the edges inward again, enclosing the raw edge within the fold. This will create a clean and secure edge.
Step 4: Secure with Pins: Use straight pins to hold the folded edges in place before sewing. Insert the pins perpendicular to the folded edges, ensuring they penetrate through both layers of fabric. The pins will help keep the edges aligned during the sewing process.
Step 5: Repeat for all Edges: Repeat these steps for all edges of the fabric that will be sewn together to form the rug runner. Take your time and ensure that all edges are folded, sealed, and pinned effectively.
Step 6: Trim Excess Fabric (Optional): If you have excess fabric after folding and securing the edges, you can trim it using fabric scissors. Be careful not to cut too close to the fold, as this may cause unraveling or weakening of the edge.
Step 7: Remove the Pins: Before sewing the fabric pieces together, remove the pins from the edges. This will prevent them from interfering with the sewing machine and ensure a smooth stitching process.
By following these steps and properly preparing the edges of the fabric for your rug runner, you will create a finished product that is visually appealing, durable, and resistant to fraying. Taking the time to prepare the edges will contribute to the overall quality and longevity of your rug runner.
Sewing the Fabric Pieces Together for your Rug Runner
Now that you have prepared the edges of the fabric for your rug runner, it’s time to sew the fabric pieces together. Sewing ensures that the rug runner maintains its shape, durability, and longevity. Follow these steps to sew the fabric pieces together:
Step 1: Set up your Sewing Machine: Prepare your sewing machine by inserting a suitable needle and threading it with a thread color that matches or complements the fabric. Adjust the stitch length and tension settings as needed, according to the fabric type and your desired outcome.
Step 2: Align the Fabric Pieces: Lay the fabric pieces on a flat surface and align the edges that need to be sewn together. Ensure that the right sides of the fabric are facing each other for a hidden seam. Use pins or clips to hold the fabric pieces in place before sewing.
Step 3: Start Sewing: Begin sewing along the edges, starting with a backstitch to secure the seam. Guide the fabric through the sewing machine, keeping the edges aligned and the seam straight. Remove the pins or clips as you sew, ensuring the fabric remains smooth and flat.
Step 4: Maintain Consistent Seam Allowance: As you sew, maintain a consistent seam allowance, typically around ⅜ to ½ inch from the fabric edge. Use the markings on your sewing machine as a guide or create your own reference points for consistent stitching.
Step 5: Backstitch to Secure the End: Once you have sewn along the desired length, finish with a backstitch to secure the end of the seam. Trim any excess thread, leaving a small tail for easy tying or knotting.
Step 6: Inspect and Press the Seams: After sewing, inspect the seams to ensure they are even and secure. Press the sewn seams with an iron, using a medium heat setting suitable for your fabric type. This will help flatten any wrinkles and create a professional finish.
Step 7: Continue Sewing all Fabric Pieces: Repeat the sewing process for all the fabric pieces that need to be joined together to form the complete rug runner. Take your time and ensure that each seam is aligned and sewn correctly.
By following these steps, you can successfully sew the fabric pieces together to create your rug runner. Taking care to align the pieces, sew straight seams, and press the finished seams will result in a rug runner that is visually pleasing and built to last.
Adding Fringe or Bindings to your Rug Runner
To give your rug runner a finished and stylish look, you can consider adding fringe or bindings to the edges. Fringe and bindings not only enhance the overall aesthetic appeal but also provide additional durability and protection. Here are the steps to add fringe or bindings to your rug runner:
Step 1: Choose Fringe or Binding Material: Decide whether you prefer fringe or binding for your rug runner. Fringe adds a decorative and traditional touch, while binding provides a clean and finished edge. Consider the style and theme of your space when making this decision.
Step 2: Measure and Cut the Fringe or Binding Material: Measure the length of each edge of your rug runner that requires fringe or binding. Add a few extra inches to account for any overlaps or corners. Cut the fringe or binding material to the desired length, ensuring it is uniform across all edges.
Step 3: Attach Fringe: If you have chosen fringe, pin it along the edges of your rug runner, making sure that the fringed side faces inward towards the fabric. Sew the fringe in place, removing the pins as you go. Repeat this process for each edge that requires fringe.
Step 4: Attach Binding: If you have chosen binding, unfold the binding material and align it with the edge of your rug runner, ensuring that the raw edge of the fabric is tucked inside the binding. Pin the binding in place, leaving a small overhang at each corner. Sew the binding to the fabric, removing pins as you proceed. Miter the corners for a clean and professional finish. Repeat this process for each edge that requires binding.
Step 5: Secure the Ends: Once you have attached the fringe or binding to all edges, secure the loose ends. For fringe, tie a knot or add a dab of fabric glue to hold the ends in place. For binding, fold the end of the binding material under itself and stitch it closed to create a neat and secure finish.
Step 6: Trim Excess Material (Optional): If there is any excess fringe or binding material beyond the desired length, trim it carefully with fabric scissors, leaving a clean and even edge. Be cautious not to cut too close to the sewn portion.
Step 7: Press the Fringe or Binding (Optional): To ensure a polished look, use an iron on a low setting to lightly press the attached fringe or binding. Take care not to press on the fabric itself, as some materials can be sensitive to heat. The pressing will help the fringe or binding lay flat and appear more refined.
By following these steps, you can add fringe or bindings to your rug runner, elevating its appearance and reinforcing the edges. Whether you choose fringe for a decorative touch or bindings for a clean finish, both options will enhance the overall look and durability of your rug runner.
Attaching a Non-Slip Backing to your Rug Runner
To ensure safety and prevent your rug runner from slipping or sliding on smooth surfaces, it’s important to attach a non-slip backing. A non-slip backing provides additional stability and grip, making your rug runner safer to walk on. Here are the steps to attach a non-slip backing to your rug runner:
Step 1: Choose a Non-Slip Backing: There are various non-slip backing options available, such as rubberized mats, adhesive sheets, or spray-on coatings. Choose one that works best for your rug runner material and the type of flooring it will be placed on.
Step 2: Cut the Non-Slip Backing: Measure the length and width of your rug runner and cut the non-slip backing material to match these dimensions. Ensure the backing is slightly smaller than the rug runner, so it remains hidden from view.
Step 3: Position the Non-Slip Backing: Lay your rug runner on a flat surface with the wrong side facing up. Carefully place the non-slip backing on top, aligning it with the edges of the rug runner. Make sure that the backing covers the entire surface and remains hidden under the edges of the rug runner.
Step 4: Secure the Non-Slip Backing: Depending on the type of non-slip backing you have chosen, there are various methods to secure it to the rug runner. If using a rubberized mat or adhesive sheet, remove the backing and press the non-slip material firmly onto the rug runner, ensuring it adheres well. If using a spray-on coating, follow the manufacturer’s instructions and evenly spray the backing onto the wrong side of the rug runner.
Step 5: Trim Excess Non-Slip Backing (Optional): If there is any excess non-slip backing protruding beyond the edges of your rug runner, carefully trim it with scissors, ensuring a neat and clean finish. Take care not to cut into the rug runner fabric itself.
Step 6: Test the Non-Slip Backing: Once the non-slip backing is attached, test its effectiveness by placing your rug runner on the desired surface. Walk on it and check if it remains secure and in place. Make any necessary adjustments or reattachment if needed.
Step 7: Clean and Maintain: Regularly clean the non-slip backing following the manufacturer’s instructions to maintain its grip and effectiveness. This will help ensure the longevity of your rug runner and keep it safe to walk on.
By following these steps, you can attach a non-slip backing to your rug runner, providing additional stability and safety. With the non-slip backing in place, you can enjoy your rug runner without worrying about it shifting or slipping on smooth surfaces.
Finishing Touches: Cleaning and Caring for your Rug Runner
After completing your rug runner, it’s vital to establish a cleaning and care routine to ensure its longevity and maintain its appearance. Regular cleaning and proper care will keep your rug runner looking fresh and vibrant for years to come. Here are some tips for cleaning and caring for your rug runner:
Vacuum Regularly: Vacuum your rug runner on a regular basis to remove dust, dirt, and debris. Use a vacuum cleaner with a brush attachment or a handheld vacuum to gently clean the surface. Avoid using a beater bar or excessive suction, as it can damage the fabric.
Spot Clean Stains: Treat any spills or stains promptly to prevent them from setting. Blot the stain gently with a clean cloth or paper towel to absorb as much liquid as possible. Avoid rubbing the stain, as it can push it deeper into the fabric. Use a mild detergent solution or a stain remover recommended for the fabric type, following the instructions carefully.
Proper Storage: If you need to store your rug runner, ensure it is clean and completely dry before doing so. Roll the rug runner gently, with the fabric side facing inwards, to prevent dust and damage. Store it in a cool, dry place away from direct sunlight to prevent fading or discoloration.
Rotate Periodically: To prevent uneven wear and tear, rotate your rug runner periodically. This will distribute the foot traffic and sunlight exposure more evenly, helping to maintain its appearance over time.
Professional Cleaning: Consider having your rug runner professionally cleaned every few years or as needed, especially if it is heavily soiled or has deep-set stains. Professional cleaners have the expertise and equipment to deep clean and restore your rug runner effectively.
Protect from Sunlight: If your rug runner is exposed to direct sunlight, consider using window coverings or UV-protective film on your windows to prevent fading. Ultraviolet rays can cause the colors of your rug runner to fade over time.
Avoid Sharp Objects: Keep sharp objects away from your rug runner to prevent snags or tears. Be cautious when moving furniture or heavy objects across the rug runner, using furniture sliders or lifting instead of dragging them.
Regular Inspection: Periodically inspect your rug runner for any signs of wear, loose threads, or damage. Attend to any repairs promptly to prevent further deterioration.
By following these cleaning and caring tips, you can ensure that your rug runner remains clean, vibrant, and in excellent condition for years to come. Taking the time to properly maintain your rug runner will extend its lifespan and keep it looking beautiful in your home.