
Materials
Building a hexagon shelf requires a few materials that are easy to find at your local hardware store. Here’s a list of what you’ll need:
- Plywood or MDF board
- Measuring tape
- Pencil
- Circular saw or jigsaw
- Sandpaper (rough and fine grits)
- Drill
- Countersink bit
- Wood glue
- Clamps
- Hanging hardware (screws and wall anchors)
- Paint or wood stain (optional)
- Paintbrush or sponge
It’s important to choose a quality plywood or MDF board to ensure stability and durability. The thickness of the board will depend on the size and weight of your desired hexagon shelf. Additionally, you may want to consider the type of finish you’d like for your shelf, whether it’s a natural wood look or a painted color to match your decor.
Other tools such as a circular saw or jigsaw, a drill with a countersink bit, and sandpaper are necessary for cutting and shaping the wood, as well as providing a smooth finish. Wood glue and clamps will help hold the pieces together securely. Lastly, hanging hardware like screws and wall anchors will be needed to ensure the shelf is properly mounted on the wall.
Overall, gathering these materials beforehand will ensure a smooth and efficient construction process for your hexagon shelf project.
Tools
To successfully build a hexagon shelf, you’ll need a few essential tools to help you through the process. Here are the key tools you’ll need:
- Measuring tape: This will help you accurately measure and mark the dimensions of your hexagon shelf.
- Pencil: Use a pencil to make precise markings on the wood and guide your cutting and assembly.
- Circular saw or jigsaw: Depending on your preference and availability, a circular saw or jigsaw can be used to cut the wood into the desired shapes.
- Sandpaper (rough and fine grits): Sandpaper will help smoothen the edges of the wood and create a polished finish.
- Drill: A drill with the appropriate size of drill bit will be necessary for pre-drilling holes on the wood.
- Countersink bit: This tool will allow you to create shallow holes with a wider mouth to accommodate screws.
- Wood glue: Using a strong wood glue will help ensure the stability and longevity of the hexagon shelf.
- Clamps: Clamps will assist in keeping the pieces of wood securely joined as the glue dries.
- Hanging hardware (screws and wall anchors): These hardware items will be needed to safely mount your hexagon shelf on the wall.
- Paint or wood stain (optional): If you wish to add color to your shelf, you’ll need a paintbrush or sponge to apply paint or wood stain.
Having these tools ready and accessible will make the construction process easier and more efficient. Ensure that you have proper safety gear, such as goggles and gloves, to protect yourself while using power tools.
Remember to familiarize yourself with the instructions and safety guidelines for each tool before using it. This will help you complete your hexagon shelf project with precision and ease.
Step 1: Measure and Mark
The first step in building a hexagon shelf is to carefully measure and mark the dimensions on your selected piece of plywood or MDF board.
Start by determining the desired size of your hexagon shelf. Consider the available space on your wall and the objects you plan to display on the shelves. Using a measuring tape, mark the length of each side of the hexagon on the board.
Next, mark the depth of the shelves. This will determine how far the shelves will extend from the back of the hexagon. Measure and mark the desired depth along each side of the hexagon.
Once you have marked the dimensions, use a straight edge or ruler to connect the marks and create the outlines of the hexagon shape. Double-check your measurements to ensure accuracy before moving on to the next step.
If you plan to have multiple shelves within the hexagon, repeat this process to mark the appropriate locations for each shelf.
Pro tip: To ensure a symmetrical hexagon, measure and mark the dimensions from multiple points along each side and connect the marks. This will help you achieve a more precise and balanced shape.
By taking the time to accurately measure and mark the dimensions, you will lay the foundation for a well-balanced and visually appealing hexagon shelf. Precision at this stage will help the subsequent steps in the construction process go smoothly and result in a professional-looking end product.
Step 2: Cut the Wood
Now that you have the dimensions marked on your plywood or MDF board, it’s time to cut the wood into the individual pieces that will form the hexagon shelf.
Using a circular saw or jigsaw, carefully cut along the marked lines to separate the hexagon shape from the larger piece of wood. Take your time to ensure clean and precise cuts.
If you plan to have multiple shelves within the hexagon, repeat the cutting process for each shelf. Ensure that the shelves are cut to the desired depth as marked in Step 1.
When cutting, always follow proper safety precautions. Wear protective eyewear and work in a well-ventilated area. Make sure to secure the wood to a stable surface before cutting to prevent any accidents.
Pro tip: To make the cutting process easier, consider clamping a straight edge or guide along the marked lines. This will help you achieve straight and accurate cuts.
After cutting all the pieces, set them aside and double-check that they fit together properly. Now is the time to make any necessary adjustments or sanding to ensure a snug fit and smooth assembly.
Cutting the wood to the correct dimensions is a crucial step in the construction of your hexagon shelf. Take your time and pay attention to detail to achieve clean and precise cuts, resulting in a well-formed and symmetrical shape.
Step 3: Sand the Edges
After cutting the wood, it’s important to sand the edges to create a smooth and professional finish for your hexagon shelf.
Start with a rough-grit sandpaper to remove any rough or uneven spots along the cut edges. Hold the sandpaper firmly and move it in a back-and-forth motion along the edges. Be careful not to sand too aggressively, as this may result in an uneven shape.
Once the rough edges have been smoothed out, switch to a fine-grit sandpaper to further refine the edges. This will help create a polished and smooth edge on your hexagon shelf.
Pay special attention to the corners of the hexagon, as they tend to be sharper and may require more sanding to achieve a rounded and smoothed look.
Throughout the sanding process, periodically run your hand along the edges to check for any rough spots. If you come across any, continue sanding until the edges feel smooth and uniform.
Pro tip: To achieve an even smoother finish, consider using sanding blocks or a sanding sponge. These tools provide a firm and controlled grip, allowing for precise sanding on the edges of the wood.
Once you have finished sanding, gently wipe away any dust or debris from the wood using a clean cloth. This will ensure that the surface is clean and ready for the next step in the construction process.
Sanding the edges of the wood is a crucial step in achieving a professional and finished look for your hexagon shelf. Take your time and pay attention to detail during this process to achieve smooth and rounded edges that add to the overall aesthetic appeal of your shelf.
Step 4: Pre-drill Holes
Before assembling the hexagon shelf, it’s important to pre-drill holes in the wood to ensure a secure and sturdy construction.
Begin by selecting an appropriate drill bit size for your screws. The size of the bit should be slightly smaller than the diameter of your screws to allow for a snug fit.
Place the wood on a stable surface and carefully mark the locations where you will be attaching the pieces together. These marks will serve as guides for drilling the holes.
Using a drill with the selected drill bit, gently drill holes along the marked locations. Be sure to drill straight down and maintain a consistent depth to avoid any complications during assembly.
For added strength, you can also use a countersink bit to create a wider hole at the entrance of your drilled holes. This will allow the screw heads to sit flush with the surface, giving your hexagon shelf a neat and professional appearance.
After drilling the holes, check to ensure that they are clean and free of any debris or splinters. Gently sand the holes if necessary to remove any rough edges.
Pro tip: To prevent the wood from splitting, especially when working with thinner pieces, consider using a smaller drill bit to create a pilot hole before drilling with the larger bit.
Pre-drilling holes is an essential step in the construction of your hexagon shelf, as it ensures a secure and stable assembly. Taking the time to properly drill and prepare the wood will not only make the assembly process easier but also contribute to the longevity and durability of your shelf.
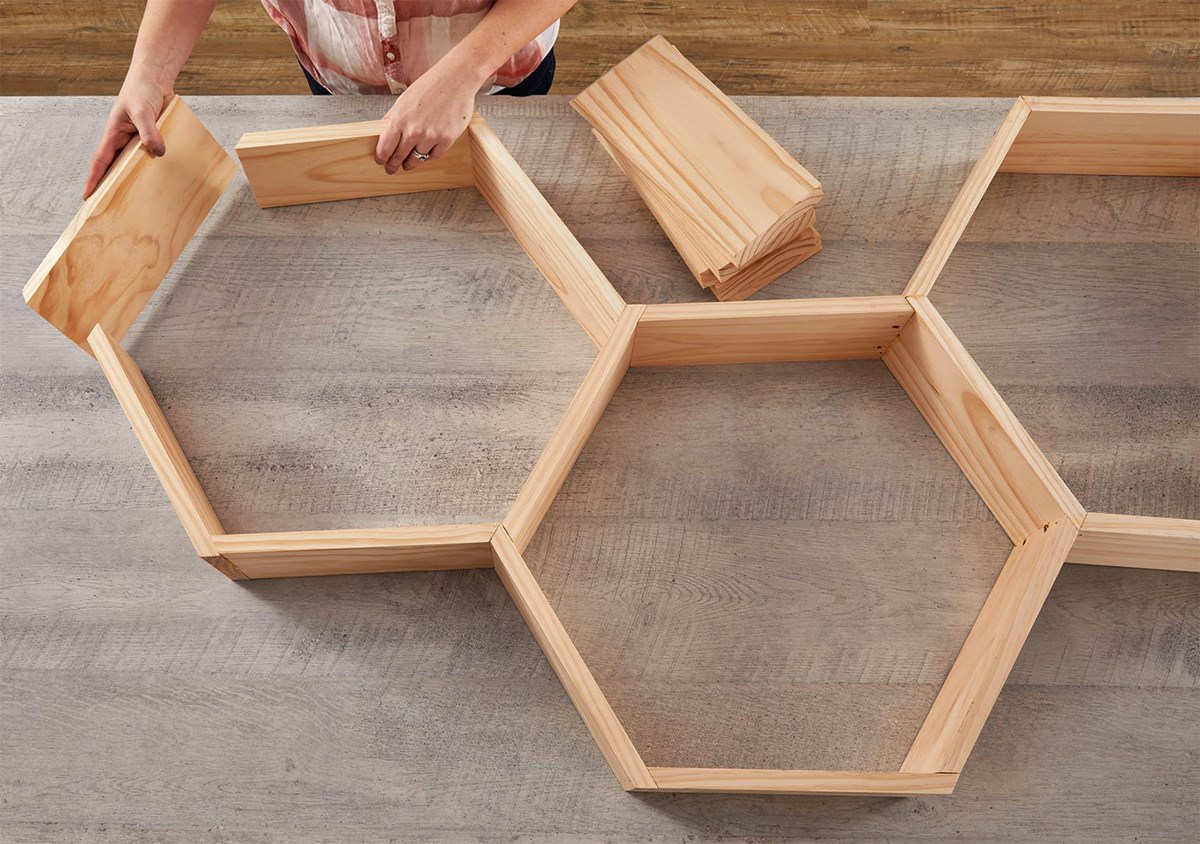
Step 5: Assemble the Sides
With the pre-drilled holes in place, it’s time to start assembling the sides of your hexagon shelf. This step involves joining the individual pieces of wood together to form a cohesive structure.
Begin by applying a generous amount of wood glue to the edges of the hexagon pieces that will be joined together. Spread the glue evenly using a brush or your finger to ensure a strong bond.
Once the wood glue is applied, carefully align the edges of the hexagon pieces, making sure they fit snugly together. Use clamps to hold the pieces in place and maintain steady pressure as the glue dries.
For added stability, you can also insert screws through the pre-drilled holes. Starting with one side of the hexagon, align the pre-drilled holes and drive the screws in using a power screwdriver or screwdriver bit attached to a drill.
Continue attaching each side of the hexagon, applying wood glue, and securing with screws or clamps as you go. Take your time to ensure each piece is properly aligned and the hexagon shape is symmetrical.
Once all the sides are joined together, wipe away any excess wood glue that may have seeped out. Use a damp cloth to remove the glue while it is still wet, as it will be easier to clean at this stage.
Allow the wood glue to dry according to the manufacturer’s instructions before moving on to the next step.
Pro tip: If you are using clamps, place small pieces of scrap wood between the clamps and the hexagon pieces to prevent indentation or damage to the wood surface.
Assembling the sides of your hexagon shelf will bring your project one step closer to completion. Take your time during this process to ensure a strong and seamless bond between the wood pieces, resulting in a sturdy and visually appealing hexagon shape.
Step 6: Attach the Shelves
Now that the sides of your hexagon shelf are securely assembled, it’s time to attach the shelves. This step will provide functional storage space within the hexagon structure.
Begin by determining the desired placement of the shelves within the hexagon. Measure and mark the locations on each side where the shelves will be attached.
Apply a layer of wood glue to the edges of the shelf pieces that will come into contact with the sides of the hexagon. Ensure the glue is spread evenly to create a strong bond.
Align the shelves with the marked locations on the hexagon sides and press them firmly into place. The wood glue will help hold the shelves in position while you secure them with screws.
Using the pre-drilled holes on the sides of the hexagon, insert screws through the sides and into the shelves. Drive the screws in using a power screwdriver or screwdriver bit attached to a drill.
Repeat this process for each shelf, ensuring they are all level and securely attached to the sides of the hexagon.
Once all the shelves are attached, wipe away any excess wood glue that may have seeped out. Use a damp cloth to remove the excess glue while it is still wet.
Allow the wood glue to dry completely before moving on to the next step. This will ensure a strong and stable connection between the shelves and the sides of the hexagon.
Pro tip: To add additional support, you can use corner brackets or L-brackets underneath each shelf. Attach these brackets to the sides and bottom of each shelf using screws.
Attaching the shelves brings functionality to your hexagon shelf, allowing you to display and organize your items. Take your time to ensure each shelf is properly aligned and securely fastened for a sturdy and reliable storage solution.
Step 7: Add Hanging Hardware
With the construction of your hexagon shelf complete, it’s time to add the necessary hanging hardware to ensure it can be securely mounted on the wall.
Start by deciding on the placement of the hanging hardware. Measure and mark the location on the backside of the hexagon where the wall anchors or screws will be inserted.
If you are using wall anchors, carefully drill pilot holes at the marked locations. Insert the wall anchors into the holes and tap them gently with a hammer until they are flush with the surface of the wood.
If you prefer to use screws directly into the wall, drill pilot holes at the marked locations, ensuring they are slightly smaller than the diameter of the screws.
When attaching the hanging hardware, it’s important to consider the weight of the fully assembled hexagon shelf and choose hardware that can support it securely. Be sure to follow the manufacturer’s guidelines for the specific type of hardware you are using.
If you are uncertain about the strength of the wood or the stability of the wall, it is recommended to use wall anchors or consult a professional for guidance.
Once the hanging hardware is in place, carefully lift and position the hexagon shelf against the wall. Ensure that it is level and securely aligned with the hanging hardware.
With the hexagon shelf in position, attach it to the hanging hardware by inserting screws through the backside of the hexagon and into the wall anchors or directly into the wall. Use a power screwdriver or screwdriver bit attached to a drill to fasten the screws securely.
Pro tip: To prevent potential damage to your wall, consider placing adhesive felt pads behind the corners of the hexagon shelf that will come into contact with the wall. This will provide a cushioned barrier and minimize any potential scuff marks.
Adding the appropriate hanging hardware ensures that your hexagon shelf is securely mounted on the wall, allowing you to display your items with confidence. Take the time to follow proper installation techniques and safety precautions for a stable and reliable hanging solution.
Step 8: Finish and Paint
Once the construction of your hexagon shelf is complete, you have the option to finish and paint it to achieve the desired look and enhance its durability.
Start by ensuring the surface of the wood is clean and free of any dust or debris. Use a damp cloth to wipe down the entire shelf, removing any lingering residue.
If you prefer a natural wood finish, you can apply a clear protective coat such as polyurethane or varnish. This will help protect the wood from moisture and wear while maintaining its natural beauty. Follow the manufacturer’s instructions for application and drying time.
If you prefer to add color to your hexagon shelf, choose a paint or wood stain of your liking. Apply the paint or stain evenly using a paintbrush or sponge, following the grain of the wood. Allow each coat to dry thoroughly before applying additional coats for a more vibrant finish.
You can also get creative with your paint or stain choices. Consider using multiple colors, creating patterns, or adding a distressed finish for a unique and customized look.
While painting, pay attention to detail and ensure that all areas of the hexagon shelf, including the edges and inside of the shelves, are thoroughly covered.
Pro tip: If you prefer a rustic or distressed look, lightly sand the painted surface after each coat is dry to create a worn and weathered appearance.
After the finish or paint has dried completely, inspect the surface for any imperfections or areas that may need touch-ups. Make any necessary corrections or additional coats to achieve the desired finish.
Finishing and painting your hexagon shelf not only adds protection but also gives it a personal touch that matches your decor style. Take your time during this step to ensure a smooth and flawless finish that completes the overall aesthetic appeal of your hexagon shelf.
Step 9: Hang the Shelf
Now that your hexagon shelf is finished and ready to be displayed, it’s time to hang it securely on the wall.
Start by selecting the desired location for your shelf. Use a level to ensure the shelf will be perfectly horizontal. Mark the positions where the wall anchors or screws will be inserted.
If you are using wall anchors, carefully drill pilot holes at the marked positions. Insert the wall anchors into the holes, tapping them gently with a hammer if needed. Ensure the wall anchors are secure and flush with the wall.
If you are using screws directly into the wall, drill pilot holes at the marked positions, matching the size of the screws.
With the wall anchors or pilot holes ready, carefully lift the hexagon shelf and align it with the holes. Ensure that the shelf is level and securely positioned against the wall.
If using wall anchors, insert screws through the backside of the hexagon and into the wall anchors, using a power screwdriver or screwdriver bit attached to a drill. If using screws directly into the wall, drive the screws into the pilot holes until firmly in place.
Once the shelf is securely attached to the wall, give it a gentle tug to ensure it is stable. Check that each side is level and adjust if necessary.
Finally, step back and admire your hexagon shelf. Take a moment to ensure it is level, visually appealing, and securely mounted on the wall.
Pro tip: To prevent the shelf from scratching or damaging the wall, consider placing adhesive felt pads behind the corners of the hexagon that will come into contact with the wall.
Hanging the shelf is the final step in completing your hexagon shelf project. Take the time to ensure it is securely mounted, level, and enhances the overall aesthetics of the space. Step back and appreciate your craftsmanship as you enjoy your new functional and stylish hexagon shelf.
Tips and Variations
Building a hexagon shelf allows for creativity and customization. Here are some tips and variations to consider as you embark on your project:
- Experiment with different wood finishes: Besides painting or staining, you can try techniques like distressing, whitewashing, or using a wood burning tool to create unique finishes.
- Add decorative elements: Consider incorporating decorative elements like trim, molding, or metal accents to enhance the visual appeal of your hexagon shelf.
- Create asymmetrical designs: While traditional hexagon shelves are symmetrical, you can explore asymmetrical designs by varying the length of each side or adding multiple smaller shelves.
- Use different materials: Instead of wood, you can experiment with materials like acrylic, metal, or reclaimed materials to give your hexagon shelf a distinct look.
- Install lighting: Incorporate LED strip lights or wall-mounted lighting fixtures behind or underneath the hexagon shelf to create a warm and inviting ambiance.
- Personalize with color: Play with an array of paint colors to match your room’s theme or create a bold statement piece.
- Consider different shapes: While hexagons are popular, you can explore other geometric shapes like triangles, squares, or pentagons to create a unique and eye-catching shelf.
Remember to take accurate measurements, exercise caution when working with power tools, and use proper safety gear throughout the construction process. Avoid rushing the project and focus on attention to detail to achieve a high-quality end result.
Let your creativity shine as you customize your hexagon shelf to suit your style and needs. Don’t be afraid to experiment with different finishes, materials, and shapes to create a truly one-of-a-kind piece of functional art.