
Step 1: Locate the upholstery tool
When it comes to deep cleaning upholstery, the Rug Doctor machine offers a convenient and effective solution. Before you can attach the upholstery tool to the machine, you need to locate it first. The upholstery tool is a separate component of the Rug Doctor machine specifically designed for cleaning fabric surfaces such as sofas, chairs, and car seats.
To find the upholstery tool, begin by inspecting the various attachments and accessories that came with your Rug Doctor machine. These may be included in a separate compartment or storage bag that accompanies the machine. The upholstery tool is typically distinguishable by its unique shape and structure, featuring a nozzle, brush, and trigger mechanism.
If you are unable to locate the upholstery tool among the provided attachments, consult the user manual or the manufacturer’s website for further guidance. They may provide specific instructions or illustrations on where to find the upholstery tool and how it should look.
Alternatively, you can also visit a local Rug Doctor retailer or contact their customer support for assistance. They can help you identify the upholstery tool or provide a replacement if it is missing.
Once you have located the upholstery tool, make sure you have it within easy reach before proceeding to the next step. This will ensure a smooth and efficient attachment process.
Step 2: Prepare the Rug Doctor machine
Before attaching the upholstery tool to your Rug Doctor machine, it’s important to properly prepare the machine for optimal performance. Follow these steps to ensure your machine is ready:
- Fill the clean water tank: Begin by removing the clean water tank from the machine, usually located at the base or rear. Unscrew the cap and fill the tank with hot tap water. Be sure to follow the machine’s specific instructions regarding water temperature and capacity.
- Add cleaning solution: After filling the water tank, it’s time to add the appropriate Rug Doctor cleaning solution. Refer to the instructions on the bottle to determine the correct amount of cleaning solution to use. Pour the solution into the designated solution tank on the machine.
- Reattach the clean water tank: Once the cleaning solution is added, securely reattach the clean water tank to the Rug Doctor machine. Make sure it is properly aligned and snapped into place to prevent any leaks during operation.
- Plug in the machine: Locate a nearby electrical outlet and plug the Rug Doctor machine’s power cord into it. Ensure that the power cord is not damaged and the outlet is functioning correctly.
- Position the machine: Place the Rug Doctor machine in a suitable location near the area you wish to clean. Make sure it is on a stable surface and that there is ample space to move around comfortably while using the upholstery tool.
By following these steps to prepare the Rug Doctor machine, you are ensuring that it is ready to deliver exceptional cleaning results. This will help to make the attachment of the upholstery tool and subsequent cleaning tasks more efficient and effective.
Step 3: Align the upholstery tool with the machine
Now that you have located the upholstery tool and prepared the Rug Doctor machine, it’s time to align the upholstery tool with the machine. Follow these steps to ensure a proper alignment:
- Position the machine’s handle: If the handle of the Rug Doctor machine is in the collapsed or storage position, gently release it and extend it to its full upright position. This will provide you with better control and maneuverability while attaching the upholstery tool.
- Identify the attachment point: Look for the attachment point on the machine where the upholstery tool will be connected. It is typically located near the front or side of the machine and may be marked or labeled for easy identification.
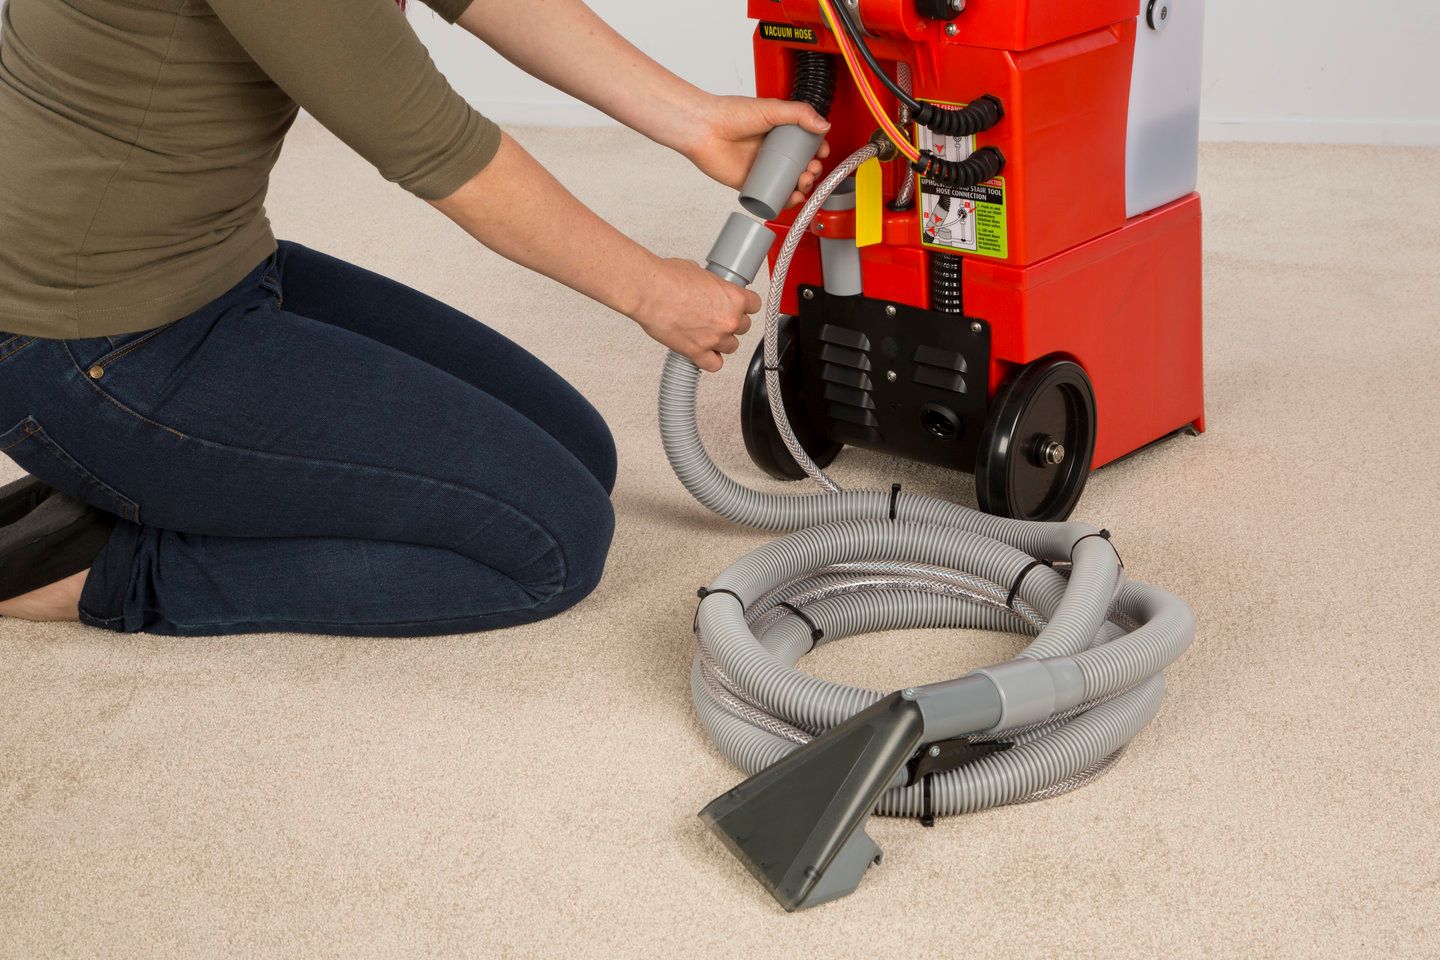
- Examine the upholstery tool: Take a closer look at the upholstery tool itself and locate the corresponding attachment point or connector. It is usually a nozzle or tube that will fit into the machine’s attachment point.
- Align the tool with the machine: Holding the upholstery tool in one hand, carefully align the attachment point of the tool with the attachment point on the Rug Doctor machine. Ensure that they are properly aligned and there are no obstructions or misalignments.
- Insert the tool into the attachment point: Once aligned, insert the upholstery tool firmly into the machine’s attachment point. Apply gentle pressure and make sure it clicks or locks into place. This will ensure a secure connection during operation.
By following these steps, you are aligning the upholstery tool with the Rug Doctor machine, creating a secure connection that will enable effective cleaning of furniture and other fabric surfaces. Proper alignment is essential for optimal performance and efficient use of the upholstery tool.
Step 4: Attach the upholstery tool to the Rug Doctor machine
Now that you have aligned the upholstery tool with the Rug Doctor machine, it’s time to attach the tool securely. Follow these steps to ensure a proper attachment:
- Confirm the connection: After aligning the upholstery tool with the machine’s attachment point, double-check that the tool is firmly inserted and locked into place. Confirm that it is securely attached and there is no wobbling or loose connection.
- Secure the attachment: Some Rug Doctor machines have additional mechanisms or levers to secure the attachment. Check if your machine has any such features, such as a locking lever or twist-lock mechanism. If present, follow the manufacturer’s instructions to securely fasten the upholstery tool to the machine.
- Tighten any fasteners: If there are any screws or fasteners near the attachment point or on the upholstery tool, make sure they are properly tightened. This will further ensure a secure connection and prevent any potential issues during cleaning.
- Inspect the attachment: Take a moment to visually inspect the upholstery tool and its connection to the Rug Doctor machine. Look for any signs of instability, loose parts, or potential hazards. If you notice anything concerning, recheck the attachment and make any necessary adjustments.
- Check the trigger mechanism: If the upholstery tool has a trigger mechanism for dispensing cleaning solution, test it to ensure it is functioning properly. Press the trigger and verify that the solution is being sprayed correctly. If there are any issues, consult the user manual or contact Rug Doctor’s customer support for assistance.
By following these steps, you can confidently attach the upholstery tool to your Rug Doctor machine. A secure attachment is crucial for efficient and effective cleaning of upholstery and fabric surfaces. Take the time to ensure everything is properly connected and functioning before proceeding to the next step.
Step 5: Secure the upholstery tool in place
Now that you have attached the upholstery tool to your Rug Doctor machine, it’s essential to secure it in place to prevent any accidental detachment during the cleaning process. Follow these steps to ensure the upholstery tool remains securely attached:
- Tighten any fasteners: Check if there are any screws or fasteners near the attachment point or on the upholstery tool itself. Ensure they are tightened securely to keep the tool in place throughout the cleaning process.
- Confirm proper alignment: Verify that the upholstery tool is still aligned correctly with the machine. Check if it is centered properly and there are no signs of misalignment or uneven attachment.
- Test the stability: Gently wiggle the upholstery tool to test its stability. It should be firmly attached and not exhibit any excessive movement or looseness. If you detect any instability, recheck the attachment and make necessary adjustments to secure it firmly in place.
- Engage any locking mechanisms: Some Rug Doctor machines may have additional locking mechanisms to secure the upholstery tool. Refer to the machine’s user manual or instructions to identify if any locking features are present, and engage them to ensure the tool remains securely attached.
- Ensure proper positioning: Confirm that the upholstery tool is positioned correctly for effective cleaning. Adjust the angle or orientation if needed, depending on the type of upholstery or fabric surface you plan to clean.
By following these steps, you can be confident that the upholstery tool is securely attached to your Rug Doctor machine. A stable attachment ensures efficient and safe cleaning, allowing you to achieve desirable results on your upholstery and fabric surfaces.
Step 6: Test the attachment by turning on the Rug Doctor machine
After securely attaching the upholstery tool to your Rug Doctor machine, it’s time to test the attachment to ensure everything is working correctly. Follow these steps to verify the attachment:
- Double-check the power: Confirm that the Rug Doctor machine is properly plugged into a functioning electrical outlet. Ensure that the power cord is not damaged and there are no loose connections.
- Switch on the machine: Locate the power switch on the Rug Doctor machine, usually situated on the control panel or handle. Turn the machine on by flipping the switch to the “On” or “Power” position.
- Listen for motor sound: As the machine powers on, listen for the sound of the motor running. It should start smoothly and operate without any unusual noises or vibrations. If you notice any strange sounds or issues, turn off the machine immediately and investigate the problem before proceeding.
- Test the trigger mechanism: If your upholstery tool has a trigger mechanism for dispensing cleaning solution, test it by pressing the trigger. Confirm that the solution is being sprayed from the nozzle correctly and there are no leaks or malfunctions.
- Check the suction power: With the machine turned on, hold the upholstery tool against your hand or a piece of fabric and feel the suction power. It should exhibit strong suction force, indicating that the attachment is properly connected and aligned with the machine.
By performing these tests, you can ensure that the attachment of the upholstery tool to your Rug Doctor machine is successful. If you encounter any issues during the testing process, refer to the user manual or contact Rug Doctor’s customer support for further assistance. Once you are satisfied with the performance of the attachment, you are ready to begin using the upholstery tool for cleaning.
Step 7: Begin using the upholstery tool for cleaning
With the attachment of the upholstery tool successfully tested on your Rug Doctor machine, it’s time to put it to use and start cleaning your upholstery and fabric surfaces. Follow these steps to effectively use the upholstery tool:
- Prepare the surface: Before using the upholstery tool, ensure that the surface you wish to clean is free from any large debris or loose dirt. Vacuum or brush the surface thoroughly to remove any loose particles.
- Apply cleaning solution: Depending on the type of upholstery or fabric you are cleaning, apply the appropriate Rug Doctor cleaning solution. Follow the instructions on the cleaning solution bottle regarding the amount to use and the application method.
- Position the upholstery tool: Hold the upholstery tool in a comfortable grip, ensuring that your hand is positioned on the trigger mechanism for easy operation. Orient the tool at the appropriate angle for the surface you are cleaning.
- Activate the trigger: As you move the upholstery tool over the surface, press the trigger to release the cleaning solution onto the fabric. Keep the trigger pressed for a few seconds and then release to pause the solution flow. This ensures an even distribution of the cleaning solution.
- Move the tool in overlapping strokes: As you continue cleaning, move the upholstery tool in overlapping strokes to ensure complete coverage. This helps to break down dirt and stains while deep cleaning the fabric surface.
- Work in manageable sections: Divide larger surfaces into smaller sections to make the cleaning process more manageable. Focus on one section at a time, moving systematically across the area until all fabric surfaces are cleaned.
- Monitor cleaning progress: Keep an eye on the cleaning progress and adjust your technique or amount of cleaning solution used as needed. Pay special attention to heavily soiled areas or stubborn stains, applying additional cleaning solution if required.
- Allow the fabric to dry: After cleaning, allow the fabric to air dry completely. Avoid using the furniture or sitting on the cleaned surfaces until they are fully dry to prevent any damage or re-soiling.
By following these steps, you can effectively use the upholstery tool attached to your Rug Doctor machine for deep cleaning your upholstery and fabric surfaces. Remember to follow any additional instructions provided by the manufacturer for best results. Regular cleaning and maintenance of your upholstery will help to keep it looking fresh and extend its lifespan.