
Choosing the Right Wire
When it comes to creating a wire sculpture, choosing the right wire is crucial to the success of your project. The wire you select will determine the durability, flexibility, and overall appearance of your sculpture. Here are some factors to consider when choosing the right wire:
- Wire Gauge: The gauge of the wire refers to its thickness. Thicker wires offer more strength and stability, while thinner wires allow for more flexibility and intricate detailing. Consider the size and complexity of your sculpture when selecting the appropriate wire gauge.
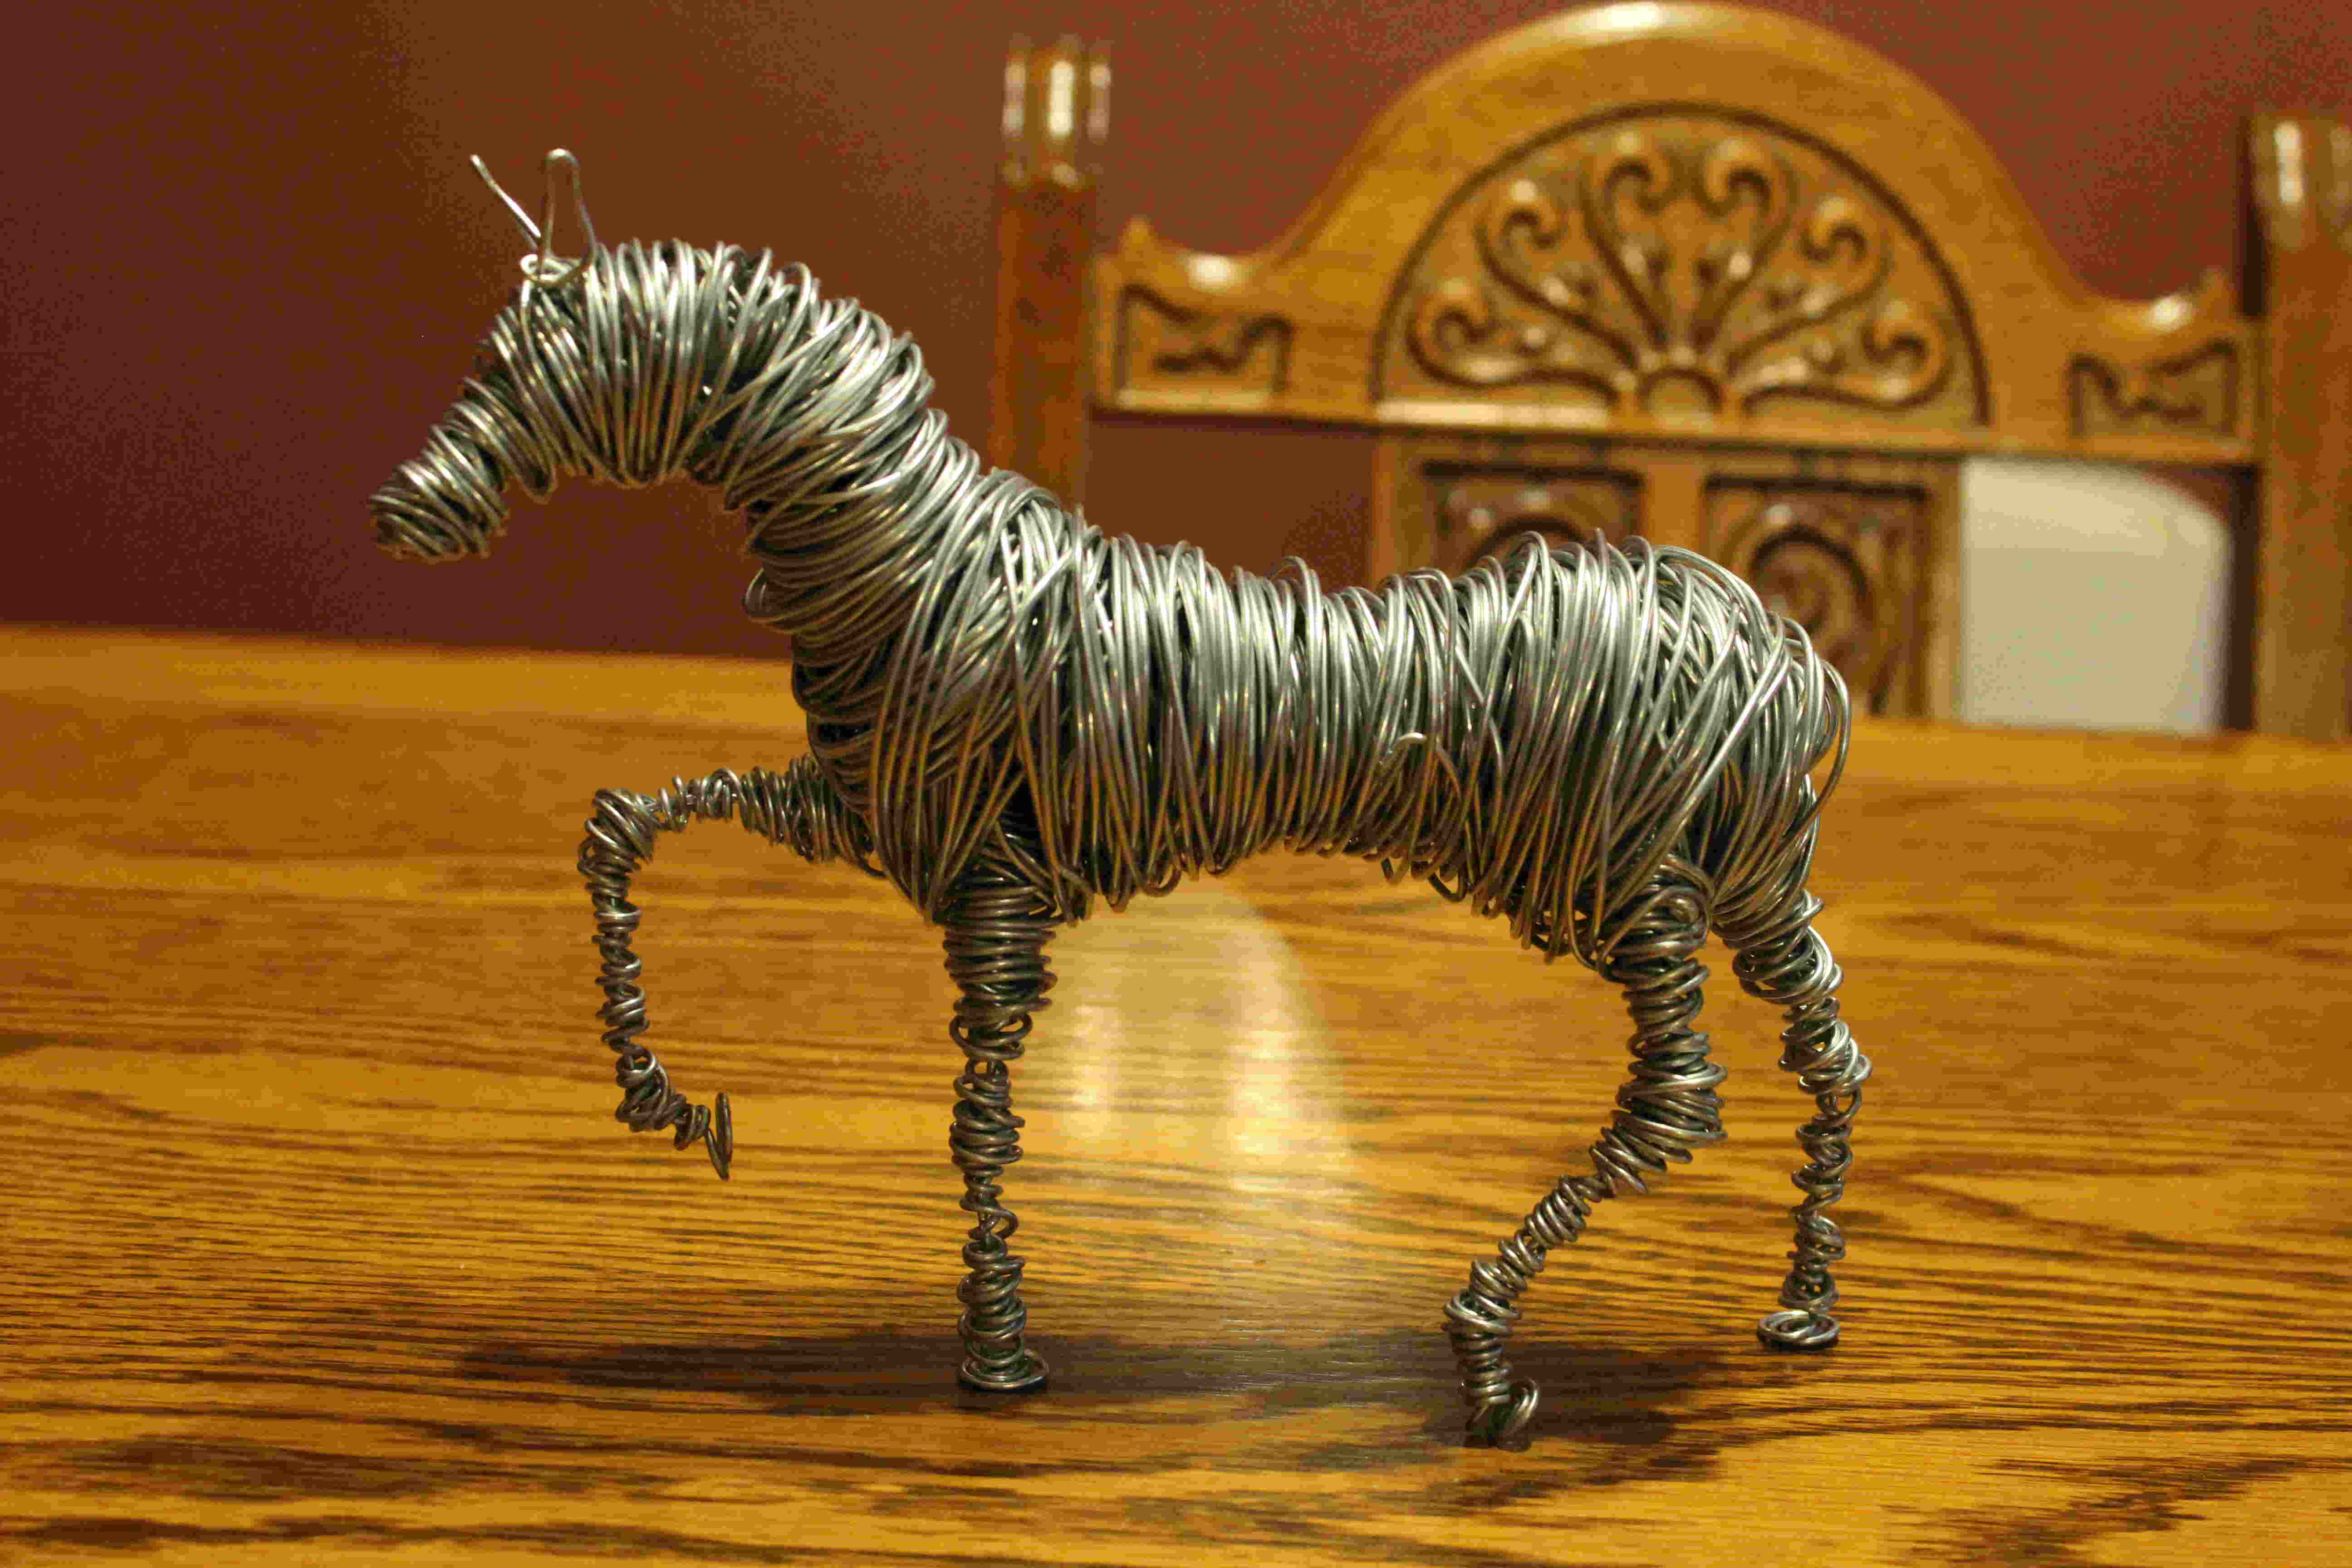
- Wire Material: Different wire materials have different properties and appearances. Common choices include copper, aluminum, and steel. Copper wire is malleable and offers a warm, rich color, while aluminum wire is lightweight and easy to manipulate. Steel wire is strong and suitable for larger sculptures. Choose a material that best suits your desired outcome.
- Wire Coating: Some wires come with a coating or finish to enhance their appearance or protect against corrosion. Galvanized wire, for example, features a zinc coating that prevents rust. Consider the intended location of your sculpture and select a wire with the appropriate coating to ensure its longevity.
- Wire Color: The color of the wire can greatly impact the final look of your sculpture. Opt for a wire color that complements or contrasts with the materials or environment you plan to display it in. Consider whether you prefer a natural metallic color or if you want to experiment with colored wires.
- Availability and Price: Finally, consider the availability and price of the wire. Determine if the desired wire is readily available for purchase and if it fits within your budget. Keep in mind that higher quality wires may come at a slightly higher price, but the investment will be worth it for the longevity and overall appearance of your sculpture.
By carefully considering these factors, you can choose the right wire for your sculpture. Remember, the wire you select will greatly influence the success of your project, so take your time and make an informed decision. Once you have chosen the perfect wire, you can move on to the next step in creating your wire sculpture.
Gathering the Necessary Tools
Before diving into the process of creating a wire sculpture, it’s important to gather all the necessary tools. Having the right tools on hand will make the sculpting process smoother and more enjoyable. Here are some essential tools you’ll need:
- Wire Cutters: Wire cutters are essential for trimming and cutting the wire to your desired lengths. Opt for a pair of cutters specifically designed for cutting metal wire.
- Pliers: Pliers are used for bending and shaping the wire. Needle-nose pliers work well for intricate details, while round-nose pliers are great for creating loops and curves.
- Wire Straightening Tool: A wire straightening tool can be helpful if you’re working with thicker wire or need to straighten out any bends or kinks. This tool makes it easier to work with the wire and achieve the desired shape.
- Work Surface: It’s important to have a dedicated work surface to protect your work area and keep your tools organized. A sturdy table or workbench covered with a soft cloth or non-slip mat will provide a suitable surface for sculpting.
- Safety Gear: When working with wire, it’s important to prioritize safety. Wear safety glasses to protect your eyes from any flying debris or sharp wire edges. Additionally, consider wearing gloves to protect your hands from cuts or abrasions.
- Sketchbook and Pencil: While not a tool in the traditional sense, a sketchbook and pencil are invaluable for planning your sculpture. Use them to sketch out your design and make notes on measurements or specific wire placements.
Having these tools readily available will ensure that you can work efficiently and achieve the desired results. Keep them organized and within reach before you start your wire sculpture project. Once you have all the necessary tools, you can move on to planning your design and bringing your creative vision to life.
Planning Your Design
Before you start shaping the wire, it’s essential to spend time planning your design. This step will help you visualize the sculpture and ensure that you have a clear roadmap to follow. Here’s how to effectively plan your wire sculpture:
- Research and Inspiration: Start by gathering inspiration for your sculpture. Look up wire sculptures created by other artists and explore different styles and techniques. This research will help you generate ideas and spark creativity for your own unique design.
- Conceptualize Your Design: Once you have some inspiration, it’s time to conceptualize your own design. Consider the theme, subject matter, and overall aesthetic you want to achieve. Sketch out different concepts and variations to explore different possibilities.
- Consider Size and Proportions: Think about the size and proportions of your sculpture. Consider where it will be displayed and the available space. Take measurements and visualize how the sculpture will interact with its surroundings.
- Think About Structural Integrity: Keep in mind the structural integrity of your design. Consider how the wire will support itself and maintain its shape. Plan for interlocking or overlapping sections to provide stability and prevent sagging or collapsing.
- Take Note of Wire Placement: Make note of where different wires will intersect and connect. Consider if you want certain wires to appear more prominent or if you want to create a specific visual effect with the wire placements.
- Experiment and Refine: Don’t be afraid to experiment and refine your design as you go. Adjustments and tweaks may be necessary to achieve the desired outcome. Use your sketchbook to make notes and sketches of any modifications you want to make.
By thoroughly planning your design, you’ll have a clear vision of what you want to create. This preparation will save you time and ensure that your wire sculpture turns out exactly as you envision. Once you are satisfied with your design, you can move on to the next step: creating the armature.
Creating the Armature
The armature serves as the framework or skeleton of your wire sculpture. It provides support and structure to the sculpture, allowing you to shape and manipulate the wire around it. Follow these steps to create a solid armature for your wire sculpture:
- Choose a Base: Start by selecting a base or foundation for your sculpture. This can be a wooden block, a metal stand, or any other stable object that can support the weight of the wire and maintain the desired position of the sculpture.
- Prepare the Base: If needed, prepare the base by drilling holes or attaching any additional supports to ensure stability. Make sure the base is secure and won’t wobble or topple over during the sculpture process.
- Shape the Armature: Using your chosen wire, begin shaping the armature. Start with the main wire that will outline the general shape of your sculpture. You can use pliers or your hands to bend and shape the wire according to your design plan.
- Secure the Armature to the Base: Attach the armature securely to the base. This can be done by drilling holes into the base and wrapping or threading the wire through the holes to secure it in place. Ensure that the armature is tightly connected to the base and will not shift or move during the sculpting process.
- Add Support Wires: Depending on the size and complexity of your sculpture, you may need to add additional support wires. These wires can help to strengthen weak points and provide stability. Attach them to the main armature, making sure they are firmly connected.
- Check Stability: Once the armature is complete, carefully check its stability. Ensure that it stands upright and that there are no weak or wobbly sections. Make any necessary adjustments to the armature before moving on to the next step.
Creating a solid and secure armature is essential for the success of your wire sculpture. It provides a stable foundation upon which you can build and shape the wire. Take your time to ensure that the armature is strong and accurately represents your intended design. With the armature in place, you are now ready to move on to the exciting step of bending and shaping the wire to bring your sculpture to life.
Bending and Shaping the Wire
Now that you have your armature in place, it’s time to start bending and shaping the wire to bring your sculpture to life. This step allows you to add dimension, form, and intricate details to your piece. Follow these guidelines to effectively bend and shape the wire:
- Start with the Main Contours: Begin by bending the wire along the main contours of your design. Use your hands or pliers to carefully shape the wire, following the lines and curves of your armature. This will establish the basic shape and overall structure of your sculpture.
- Create Organic Curves: Wire sculptures often have flowing and organic curves. Use the pliers to create smooth curves and bends in the wire, giving your sculpture a sense of movement and fluidity. Experiment with different techniques to achieve the desired shapes.
- Add Intricate Details: Once the main contours are in place, you can start adding the finer details to your sculpture. Use smaller gauge wire or manipulate the existing wire to create intricate patterns, textures, or features. Take your time and be patient when working on these smaller elements.
- Secure the Wire: As you shape and bend the wire, make sure to secure it to the armature. Wrap the wire tightly around the armature or use adhesive to hold it in place. This will ensure that the wire stays in position and maintains its intended shape.
- Regularly Step Back and Assess: Throughout the process of bending and shaping, step back regularly to assess your progress. Take a moment to evaluate the overall look and balance of your sculpture. Make any necessary adjustments to maintain symmetry and a cohesive composition.
- Experiment and Embrace Mistakes: Don’t be afraid to experiment with different bending and shaping techniques. Wire sculpture is a flexible and forgiving art form, so embrace mistakes and unexpected outcomes. Sometimes, these “happy accidents” can lead to unique and interesting features in your sculpture.
Remember, bending and shaping wire requires patience and precision. Take your time and enjoy the process of bringing your sculpture to life. As you continue to manipulate the wire, you’ll see your design take on a three-dimensional form. Once you are satisfied with the shaping, you can move on to adding additional elements or refining the sculpture further.
Adding Additional Elements
As you near the completion of your wire sculpture, you may want to consider adding additional elements to enhance its visual appeal and storytelling. These elements can provide more depth, texture, and detail to your artwork. Here are some ways to incorporate additional elements into your wire sculpture:
- Wire Wrapping: Consider incorporating wire wrapping techniques to enhance certain areas of your sculpture. This involves wrapping thin wires around the main wire structure to create decorative patterns or textured effects.
- Attachment of Found Objects: Explore the possibility of attaching found objects to your wire sculpture. These can include beads, stones, shells, or other small trinkets that complement the theme or concept of your sculpture. Secure them using wire or adhesive, ensuring they are firmly attached.
- Addition of Mixed Media: Don’t limit yourself to just wire. Experiment with incorporating other materials such as fabric, paper, or clay to add variety and richness to your sculpture. This combination of different textures and materials can bring a unique dimension to your artwork.
- Coloring the Wire: Consider coloring or painting the wire to add vibrancy or visual interest. You can use acrylic paints, enamel, or specialized wire coloring agents to achieve the desired effect. This technique can make certain elements of your sculpture stand out or create a cohesive color palette.
- Embellishments: Explore the use of embellishments such as beads, sequins, or gemstones to add sparkle and luxurious accents to your sculpture. These can be secured onto the wire using adhesive or by incorporating them into the wire wrapping technique.
- Experiment with Lighting: Think about incorporating lighting elements to enhance the overall impact of your sculpture. LED lights or small string lights can be strategically placed within or behind the wire structure, creating visually stunning effects when illuminated.
Adding these additional elements allows you to showcase your creativity and further personalize your wire sculpture. These choices can infuse your artwork with intrigue and captivate viewers. Explore different options and don’t be afraid to take risks and try new techniques. Once you are satisfied with the additional elements, you can move on to refining and adding the finishing touches to your masterpiece.
Refining and Finishing Touches
As you approach the final stages of creating your wire sculpture, it’s time to refine and add those finishing touches that will make your artwork truly shine. This step is crucial in bringing your vision to life and ensuring that your sculpture is polished and complete. Here’s what you can do to refine and add those final touches:
- Smooth Out Rough Edges: Carefully inspect your sculpture for any rough or sharp edges. Use sandpaper or a file to smooth them out, ensuring a safer and more aesthetically pleasing finish.
- Make Adjustments for Balance: Check the balance of your sculpture. If necessary, make slight adjustments to ensure that it stands securely and maintains a harmonious equilibrium.
- Double-Check Wire Connections: Take the time to reevaluate all wire connections and attachments. Make sure that everything is secure and tightly fastened to ensure the longevity and stability of your sculpture.
- Refine Details and Proportions: Pay close attention to the finer details of your sculpture. Make any necessary refinements to the shapes, curves, and proportions of the wire. This step may involve bending or tweaking the wire to achieve the desired visual impact.
- Evaluate the Overall Composition: Step back and take a critical look at your sculpture as a whole. Assess its overall composition, balance, and visual flow. Make any final adjustments to ensure that it’s visually compelling from every angle.
- Clean and Polish: Give your sculpture a final clean and polish to remove any residue or fingerprints. This step will give it a professional and finished appearance.
- Consider Display and Mounting: Think about how you want to display your wire sculpture. Explore different mounting options such as a display base, pedestals, or wall brackets to showcase and protect your artwork.
By refining and adding those finishing touches, you can elevate the overall quality and impact of your wire sculpture. This step requires attention to detail and a critical eye, but it’s well worth the effort. Take your time and don’t rush the process as it is these final refinements that will truly bring your sculpture to life.