
Materials Needed
To create a toothbrush holder pottery clay, you will need the following materials:
- Clay: Choose a high-quality pottery clay suitable for hand building. Make sure to have enough clay for your desired size of the toothbrush holder.
- Water: A small amount of water will be needed to moisten the clay and keep it workable.
- Clay tools: Gather basic clay tools such as a clay knife, sponge, rib, and modeling tools. These tools will help in shaping and detailing the clay.
- Rolling pin: Use a rolling pin to flatten the clay and create an even thickness for the base and walls of the toothbrush holder.
- Templates: Optional, but you can create templates out of cardboard or plastic to help with shaping and measuring the clay.
- Texturing tools: If desired, you can use various texturing tools such as stamps, shells, or other objects to create patterns and textures on the surface of the clay.
- Bat or board: Prepare a bat or board to place your clay on during the drying process to ensure it stays flat and supported.
- Kiln and kiln furniture: If you plan to fire your pottery at home, make sure you have access to a kiln and appropriate kiln furniture to hold your toothbrush holder during firing.
- Glaze: Choose a food-safe glaze in the color of your choice to give your toothbrush holder a finished and polished look.
- Brushes: Have a selection of brushes ready to apply the glaze onto the pottery surface.
Once you have gathered these materials, you will be ready to start creating your toothbrush holder. Remember to work in a well-ventilated area and follow all safety precautions provided with your clay and glaze materials. Let’s move on to the next step, kneading the clay.
Step 1: Kneading the Clay
Before you begin shaping your toothbrush holder, it’s essential to knead the clay. Kneading helps to remove air bubbles and ensures the clay is pliable and easy to work with.
To knead the clay, follow these steps:
- Start by cutting off a manageable piece of clay from the bulk. The size will depend on the desired dimensions of your toothbrush holder.
- Roll the clay into a ball shape and gently press it down onto a clean, flat surface.
- Using the heel of your hand, push down and away from you, exerting pressure on the clay. This motion helps to stretch and compress the clay, working out any air pockets.
- Fold the clay in half and rotate it 90 degrees. Repeat the pushing and folding process several times until you notice the clay becoming more pliable and uniform in texture.
- If the clay feels sticky, dust your hands and the work surface with a small amount of dry clay or cornstarch to prevent excessive sticking.
- Continue kneading the clay until it has a smooth and consistent texture, free from any lumps or air bubbles.
- Once the clay is properly kneaded, shape it back into a ball and let it rest for a few minutes. Resting allows the clay to relax and makes it easier to work with.
By kneading the clay thoroughly, you are preparing it for the next steps of shaping and molding. This process also helps to improve the overall strength and durability of the clay object.
Now that your clay is properly prepared, we can proceed to the next step: shaping the base of the toothbrush holder.
Step 2: Shaping the Base of the Toothbrush Holder
Now that you have kneaded the clay, it’s time to shape the base of the toothbrush holder. The base provides stability and serves as a foundation for the rest of the holder.
Follow these steps to shape the base:
- Take a portion of the kneaded clay and roll it into a ball shape.
- Place the clay ball onto a clean, flat surface.
- Using a rolling pin, flatten the clay ball to create a circular shape. Ensure that the thickness is even throughout the circle.
- If necessary, use a template or a circular object of the desired diameter to guide your rolling pin and achieve the desired size of the base.
- Once you have the desired shape and thickness, carefully lift the clay off the surface and place it on a bat or board for support during the drying process.
- Smooth the edges of the base with your fingers or a damp sponge to remove any imperfections or rough edges.
- Using your clay tools, create a raised edge around the circumference of the base. This will help contain the toothbrushes and prevent them from falling off.
- Once you are satisfied with the shape and design of the base, set it aside and proceed to the next step.
By shaping a sturdy and well-formed base for your toothbrush holder, you are ensuring its stability and functionality. The smooth edges and raised edge will provide a polished look and help keep the toothbrushes in place.
With the base complete, we can now move on to the next step: creating the compartments for the toothbrushes.
Step 3: Creating the Compartments for the Toothbrushes
Once you have shaped the base of your toothbrush holder, it’s time to create the compartments where the toothbrushes will be stored. This step involves carefully shaping the clay to accommodate the toothbrushes while maintaining functionality and aesthetics.
Follow these steps to create the compartments:
- Decide on the number of toothbrushes you want the holder to accommodate and plan the layout accordingly.
- Using your clay tools or a pointed object, mark the positions where each toothbrush will be placed on the base. Ensure that the marks are evenly spaced and aligned.
- Begin shaping the compartments by gently pressing the clay with your fingers or using modeling tools. Create indentations on the base, ensuring that they are deep enough to hold the toothbrushes securely.
- If desired, you can create decorative patterns or textures on the compartments using texturing tools or stamps. This will add visual interest and uniqueness to your toothbrush holder.
- Smooth the edges of the compartments to ensure there are no sharp or rough surfaces that could potentially damage the toothbrushes.
- Take extra care in shaping the compartments, ensuring that they are deep enough and properly sized to accommodate toothbrushes of different sizes and handle thicknesses.
- Once the compartments are formed to your satisfaction, inspect the overall shape and alignment before moving on to the next step.
By creating well-defined and carefully shaped compartments, you are ensuring that your toothbrush holder can securely hold and organize the toothbrushes. The decorative elements, if added, will also enhance the visual appeal of the holder.
With the compartments in place, it’s time to move on to the next step: adding decorative elements to personalize your toothbrush holder.
Step 4: Adding Decorative Elements
Now that you have shaped the compartments for the toothbrushes, you can add decorative elements to personalize and enhance the visual appeal of your toothbrush holder. Adding decorative touches will make it unique and aesthetically pleasing.
Follow these steps to add decorative elements:
- Consider the overall design and theme you want for your toothbrush holder. This could be geometric patterns, floral motifs, or any other design that reflects your style.
- Using your clay tools or texturing tools, create the desired patterns or textures on the surface of the toothbrush holder. This could be done by making impressions, carving, or adding small clay details.
- Experiment with different techniques and tools to achieve the desired visual effect. You can use stamps, shells, or even your fingertips to create unique textures and patterns.
- Pay attention to the aesthetics and balance of the design. Ensure that the decorative elements complement the overall shape and functionality of the toothbrush holder.
- Be mindful of the depth and placement of the decorative elements to prevent them from interfering with the functionality of the toothbrush compartments.
- Smooth out any rough edges or imperfections created during the decorative process to ensure a polished and professional finish.
- Take your time to craft the decorative elements, enjoying the process of adding your personal touch to the toothbrush holder.
By adding decorative elements to your toothbrush holder, you are transforming it into a unique and visually appealing piece. Whether it’s simple textures, intricate carvings, or personalized details, these decorative elements will make your toothbrush holder stand out.
With the decorative elements complete, let’s move on to the next step: drying the clay.
Step 5: Drying the Clay
After shaping and adding decorative elements to your toothbrush holder, it is important to allow the clay to dry thoroughly. Drying the clay properly will ensure that it retains its shape and strength during the firing process.
Follow these steps to dry the clay:
- Place the toothbrush holder in a well-ventilated area away from direct sunlight or heat sources.
- Avoid abrupt temperature changes, as they can cause the clay to crack or warp. Keep the drying process gradual and controlled.
- If you live in a humid climate, consider using a fan or a dehumidifier to speed up the drying process and prevent moisture-related issues.
- Allow the toothbrush holder to air dry for a few days until it feels completely dry to the touch.
- Flip the toothbrush holder periodically during the drying process to ensure even drying and prevent warping.
- Check for any signs of cracking or deformation. If you notice any issues, gently moisten those areas with water and smooth them out with your fingers or a damp sponge.
- Be patient during the drying process, as rushing it may lead to structural weaknesses or cracks in the clay.
- Once the toothbrush holder is completely dry, it is ready for the next step: preparing for firing.
Proper drying is crucial to prevent any mishaps during the firing process. Take the necessary precautions and time to ensure that your toothbrush holder is thoroughly dried before moving on to the next step.
Now that your clay is dry and ready, let’s proceed to the next step: preparing for firing.
Step 6: Preparing for Firing
Once your toothbrush holder is completely dry, it’s time to prepare it for firing. Firing involves subjecting the clay to high temperatures in a kiln to transform it into a durable and long-lasting piece of pottery.
Follow these steps to prepare your toothbrush holder for firing:
- Ensure that your kiln is clean and in good working condition. Remove any debris or residue from previous firings.
- If using a kiln shelf or kiln furniture, make sure they are clean and positioned correctly to support your toothbrush holder during firing.
- Inspect the toothbrush holder for any remaining dust or particles. Use a soft brush or compressed air to gently remove any loose materials.
- Consider placing a kiln wash or shelf paper on the kiln shelf to prevent the toothbrush holder from sticking during firing. This is especially important if you’re not glazing the entire piece.
- Position the toothbrush holder on the kiln shelf, making sure it is stable and properly supported.
- Follow the instructions provided by the kiln manufacturer for loading and firing ceramics. Ensure that you understand the firing schedule, including temperature ramp-up, temperature hold, and cooling down.
- Place the loaded kiln shelf into the kiln and close the kiln door securely.
- Set the kiln to the appropriate firing temperature based on the type of clay and glaze being used. Refer to your clay and glaze specifications for the recommended temperature range.
- Monitor the kiln throughout the firing process, ensuring that the temperature is maintained within the designated range.
- Once the firing is complete, allow the kiln to cool down gradually. Avoid quick temperature changes, as it can cause thermal shock and potentially damage the pottery.
- Once the kiln has reached room temperature, you can carefully open the kiln door and remove the toothbrush holder.
It’s important to follow the manufacturer’s guidelines and safety precautions during the firing process. Every kiln is different, so refer to your specific kiln’s documentation for the most accurate instructions.
With your toothbrush holder successfully fired, it’s time to move on to the next step: glazing the toothbrush holder.
Step 7: Firing the Pottery
After properly preparing your toothbrush holder, it’s time to fire the pottery in a kiln. Firing involves subjecting the clay to high temperatures, which will transform it into a durable and vitrified piece of pottery.
Follow these steps to fire your pottery:
- Ensure that your kiln is in good working condition and the kiln elements are functioning properly. Clean the kiln and remove any debris or residue from previous firings.
- If using a kiln shelf or kiln furniture, make sure they are clean and positioned correctly to support your toothbrush holder. If needed, apply kiln wash or shelf paper to prevent the pottery from sticking.
- Place your toothbrush holder on the kiln shelf, ensuring that it is stable and properly supported.
- Close the kiln door securely, and set the kiln temperature according to the recommended firing temperature for your clay type. The firing temperature will depend on the clay and glaze specifications.
- Set the kiln to the temperature ramp-up rate specified for your clay. Most clays require a slow ramp-up to minimize the risk of cracking.
- Monitor the kiln temperature throughout the firing process using a pyrometer or kiln controller. It’s important to follow the recommended firing schedule for your specific clay type.
- Once the kiln reaches the desired firing temperature, hold it at that temperature for the recommended duration to ensure proper firing and vitrification of the clay.
- After the holding time, gradually cool down the kiln. Rapid cooling can cause thermal shock and lead to cracks in the pottery. Follow the recommended cooling schedule for your clay type.
- Allow the kiln to cool to room temperature before opening the kiln door. Opening the kiln too soon can cause the pottery to crack due to sudden temperature changes.
- Carefully remove the toothbrush holder from the kiln, taking precautions to avoid dropping or mishandling it.
Firing pottery is a critical step that brings the clay to its final form. Follow all safety guidelines and consult the recommended firing schedules provided by your clay and kiln manufacturer for optimal results.
With the firing complete, it’s time to move on to the next step: glazing the toothbrush holder.
Step 8: Glazing the Toothbrush Holder
Glazing your toothbrush holder is an essential step to add color, texture, and a protective coating to the pottery surface. Glazes are formulated to melt and fuse with the clay during firing, resulting in a smooth and glossy finish.
Follow these steps to glaze your toothbrush holder:
- Clean the toothbrush holder to remove any dust, fingerprints, or debris that may interfere with the glaze application. Use a soft brush or a damp sponge to gently clean the surface.
- Choose a food-safe glaze that is compatible with your clay type and firing temperature. Read the glaze manufacturer’s instructions for proper application and firing guidelines.
- Stir or shake the glaze thoroughly to ensure it is well-mixed. If necessary, thin the glaze with water according to the manufacturer’s recommendations.
- Apply the glaze using a soft brush or a dipping method, depending on the desired effect. Ensure that the glaze is applied evenly and covers the entire surface of the toothbrush holder.
- If desired, layer multiple glazes or apply different glazes to different areas of the toothbrush holder to create depth and visual interest.
- Take care to avoid glazing the areas where the pottery will come into contact with the kiln shelf or kiln furniture to prevent sticking during firing.
- Allow the glaze to dry completely before proceeding to the firing process. Follow the recommended drying time provided by the glaze manufacturer.
- Inspect the glazed toothbrush holder for any imperfections or drips. Use a damp sponge or a clean brush to remove any excess glaze or smooth out uneven areas.
- Refer to the glaze manufacturer’s instructions for the recommended firing temperature and firing program. Place the toothbrush holder on a kiln shelf or kiln furniture and load it into the kiln.
- Follow the kiln firing schedule for glaze firing, paying attention to the temperature ramp-up and hold times specified for the glaze you are using.
- Once the firing is complete, allow the kiln to cool down gradually to room temperature before opening the kiln door. This gradual cooling helps to prevent thermal shock and maintain the integrity of the glaze.
Glazing your toothbrush holder adds a beautiful finishing touch and provides protection to the pottery surface. Enjoy the creative process and experiment with different glaze combinations to achieve the desired look for your toothbrush holder.
With the toothbrush holder glazed and fired, it’s time to move on to the next step: firing the glaze.
Step 9: Firing the Glaze
After applying the glaze to your toothbrush holder, it is time to fire the glaze. Firing the glaze will transform it into a beautiful, durable, and glass-like finish.
Follow these steps to fire the glaze:
- Ensure that your kiln is clean and in good working condition. Remove any debris or residue from previous firings to prevent potential contamination of the glaze.
- Inspect your toothbrush holder to ensure that the glaze is applied evenly and there are no drips or pooling of the glaze.
- Place the toothbrush holder on a kiln shelf or kiln furniture, making sure it is properly supported and won’t tip during firing.
- Close the kiln door and set the kiln to the recommended firing temperature for the glaze you are using. Refer to the glaze manufacturer’s instructions for the specific temperature range.
- Set the kiln to the temperature ramp-up rate specified for the glaze firing. It’s important to follow the recommended firing schedule to ensure proper melting and bonding of the glaze.
- Monitor the kiln temperature throughout the firing process using a pyrometer or kiln controller. Ensure that the kiln reaches and maintains the desired firing temperature for the glaze.
- Once the kiln reaches the desired firing temperature, maintain that temperature for the recommended hold time. This will allow the glaze to melt and flow, creating a smooth and glossy surface.
- After the hold time is complete, begin the controlled cooling process. Gradually lower the kiln temperature to room temperature to prevent thermal shock and potential damage to the glazed surface.
- Allow the kiln to cool completely before opening the kiln door. Opening the kiln prematurely can cause rapid temperature changes and may lead to glaze defects or fractures.
- Once the kiln has cooled down, carefully remove the toothbrush holder from the kiln. Inspect it for any flaws or imperfections.
Firing the glaze is the final step in the pottery-making process. It brings out the vibrant colors and smooth finish of the glaze, transforming your toothbrush holder into a functional and visually appealing piece.
With the glaze firing complete, it’s time for the last step: final touches and inspection.
Step 10: Final Touches and Inspection
After firing the glaze, your toothbrush holder is almost complete. The final step involves adding any finishing touches and conducting a thorough inspection to ensure the quality of your pottery piece.
Follow these steps for the final touches and inspection:
- Inspect the toothbrush holder for any defects, such as cracks, chips, or glaze imperfections. If you notice any flaws, evaluate if they can be repaired or if the piece needs to be discarded.
- Use sandpaper or a smoothing tool to remove any rough edges or blemishes on the pottery surface. Be cautious when sanding near the glaze to avoid damaging it.
- Wash the toothbrush holder with mild soap and water to remove any residual dust or debris accumulated during the firing process.
- Dry the toothbrush holder thoroughly before using or displaying it in your bathroom. Ensure that it is completely dry to prevent any potential mold or mildew growth.
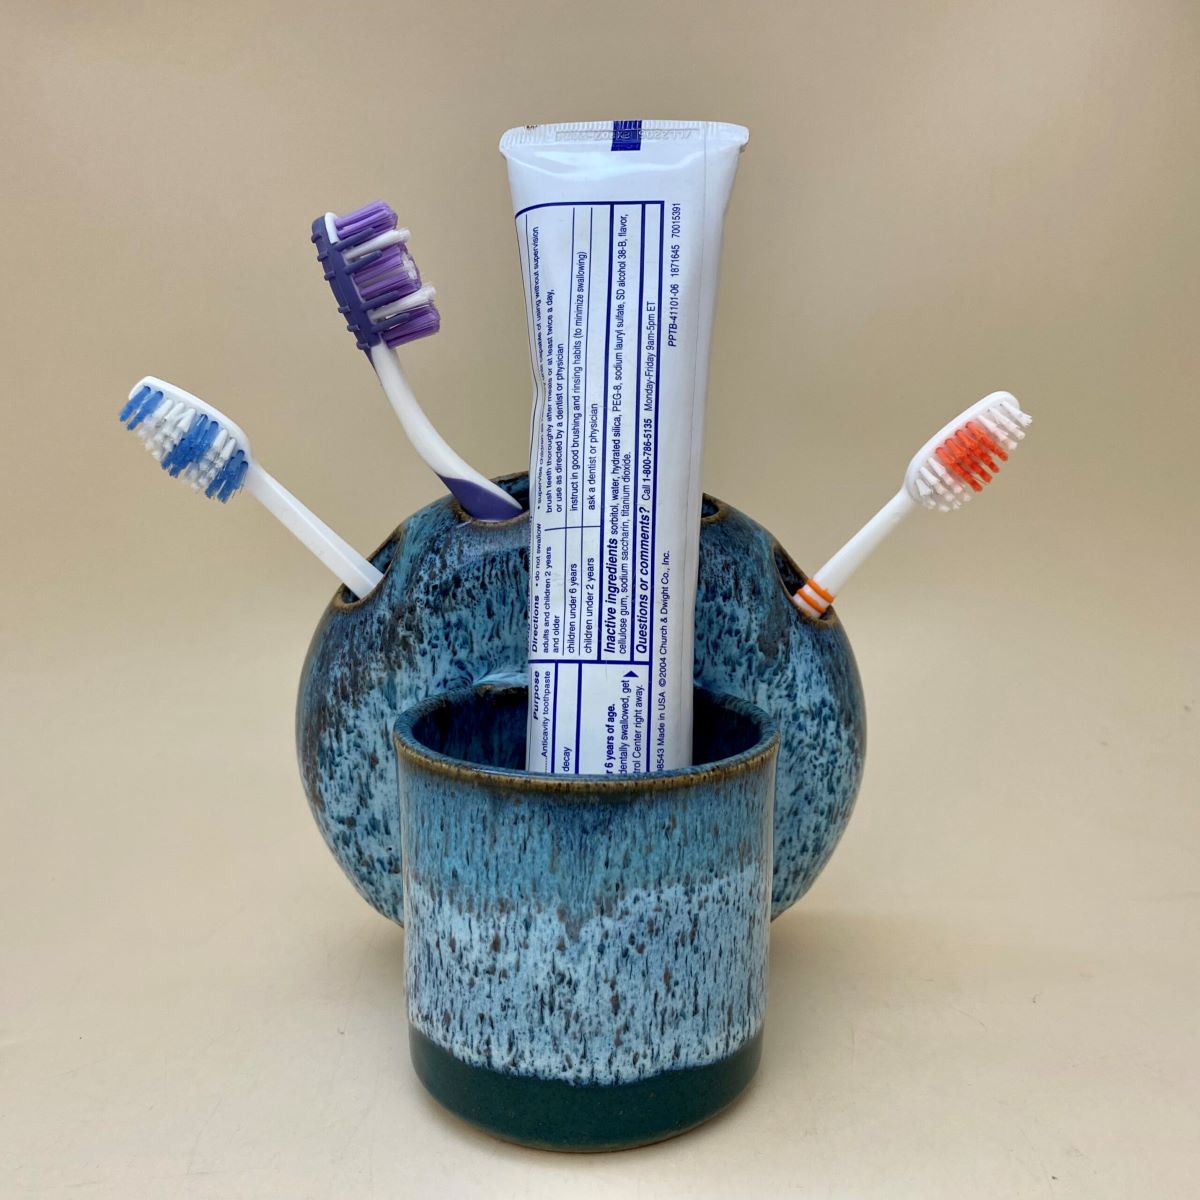
- Inspect the functionality of the toothbrush compartments, ensuring that they securely hold the toothbrushes and provide easy access when needed.
- Check the overall appearance of the toothbrush holder, verifying that the glaze has formed a smooth, even layer and that any decorative elements have turned out as desired.
- If desired, you can apply a food-safe sealant to further protect the glaze and enhance its longevity.
- Once you are satisfied with the final touches and inspection, your toothbrush holder is ready to be used and enjoyed in your bathroom!
By conducting a thorough inspection and adding any necessary final touches, you are ensuring that your toothbrush holder meets your expectations in terms of functionality and aesthetic appeal. Enjoy your handmade pottery creation!