
Materials and Tools Needed
Before you begin building your snowboard storage rack, gather the following materials and tools:
- 1-inch thick wooden board (length will depend on the number of snowboards you want to store)
- Measuring tape
- Pencil
- Saw (circular saw or miter saw)
- Sandpaper (medium and fine grit)
- Drill
- 1/4-inch drill bit
- Wood screws (1 1/2 inch)
- Level
- Paint or stain (optional)
- Paintbrush or foam brush
- Wall anchors and screws
These materials and tools are readily available at most hardware stores. Make sure to choose a sturdy wooden board that can support the weight of your snowboards.
Adding a fresh coat of paint or stain can give your storage rack a polished look, but it’s optional. Feel free to customize your rack to match your personal style and complement your snowboard collection.
Having all the necessary materials and tools on hand before you start will ensure a smooth and efficient construction process for your snowboard storage rack.
Step 1: Measure and Mark
The first step in building your snowboard storage rack is to measure and mark the dimensions of the rack on the wooden board. This will ensure that your rack is customized to fit the size of your snowboards.
Start by determining the height and width you want for your rack. Consider the number of snowboards you plan to store and the available space on your wall.
Once you’ve determined the dimensions, use a measuring tape and pencil to mark the measurements on the wooden board. Make sure the lines are straight and accurate.
For example, if you’re building a rack for three snowboards, you may measure a height of 36 inches and a width of 12 inches. Adjust the measurements according to your preferences and the size of your snowboards.
Double-check your measurements to ensure accuracy before proceeding to the next step. Taking the time to measure and mark correctly will prevent any issues during the assembly process and ensure a well-fitted and secure snowboard storage rack.
Step 2: Cut the Wood
With your measurements and markings in place, it’s time to cut the wooden board to create the individual components of your snowboard storage rack.
Using a saw, such as a circular saw or miter saw, carefully cut along the marked lines to create the desired pieces for your rack. This will typically include two side panels and one or two shelves, depending on the design you have chosen.
Make sure to follow all safety precautions when operating the saw, such as wearing protective eyewear and using clamps to secure the wood for stability.
As you make your cuts, be precise and take your time to ensure clean and accurate edges. Smooth any rough edges with sandpaper to prevent splinters and create a polished finish.
Remember to double-check your measurements before cutting to avoid any errors that could impact the overall functionality and appearance of your snowboard storage rack.
Once you have completed the cutting process, you should have all the necessary components ready for the next steps of assembly. Congratulations on successfully cutting the wood for your snowboard storage rack!
Step 3: Sand the Wood
After cutting the wood, the next step is to sand the surfaces to ensure a smooth and professional-looking finish for your snowboard storage rack.
Start by using medium-grit sandpaper to remove any rough spots and imperfections on the cut edges and surfaces of the wooden components. Sand in the direction of the grain for best results.
Once you have smoothed out the rough areas, switch to a finer-grit sandpaper to achieve an even smoother finish. This will give the wood a polished look and eliminate any remaining roughness.
Pay extra attention to the edges and corners, as these areas tend to be more prone to splintering. Rounded edges will not only provide a better aesthetic, but they will also minimize the risk of accidental injuries when handling the rack.
Make sure to wipe away any dust or debris created during the sanding process using a clean cloth or tack cloth. This will help prepare the wood for any optional painting or staining you may choose to do later.
Sanding the wood is an essential step in creating a professional and visually appealing snowboard storage rack. Take your time and ensure that each piece is smooth and free of any roughness or splinters before moving on to the next step of assembly.
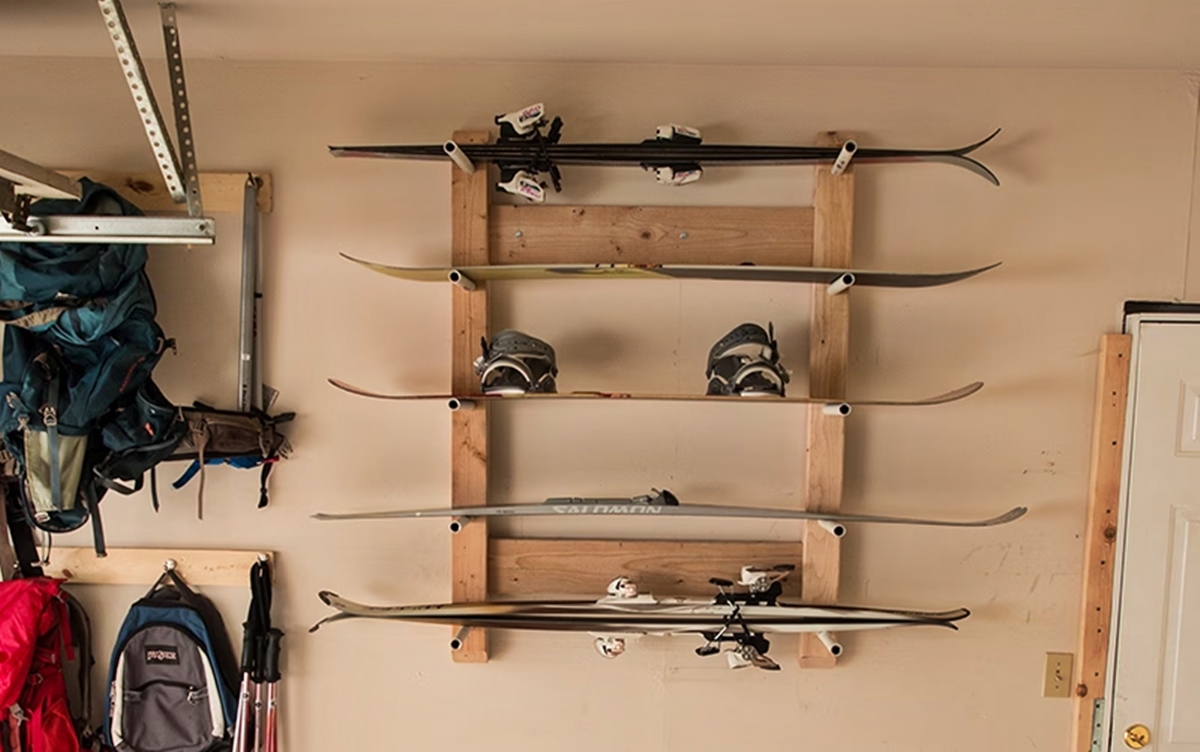
Step 4: Attach the Bottom Shelf
Now that you have prepared the wooden components of your snowboard storage rack, it’s time to start assembling them. Begin by attaching the bottom shelf, which will provide support for your snowboards.
- Position one of the side panels vertically on a flat surface. This will serve as the main support for the rack.
- Place the bottom shelf horizontally along the bottom edge of the side panel. Make sure it aligns with the markings you made earlier.
- Using a drill and a 1/4-inch drill bit, create pilot holes through the side panel into the bottom shelf. This will prevent the wood from splitting when you insert the wood screws.
- Secure the bottom shelf to the side panel by inserting wood screws through the pilot holes. Ensure that the shelf is level and securely attached.
- Repeat the process on the other side by attaching the second side panel to the opposite edge of the bottom shelf.
As you attach the bottom shelf, it’s important to double-check that everything is level and aligned properly. This will ensure that your snowboards have a stable and secure position on the rack.
If desired, you can add additional screws along the length of the bottom shelf for added stability. However, be mindful of the spacing to avoid interfering with the placement of your snowboards.
Once the bottom shelf is securely attached, you’re ready to move on to the next step and add the top shelf to complete your snowboard storage rack.
Step 5: Attach the Top Shelf
With the bottom shelf securely in place, it’s time to attach the top shelf to your snowboard storage rack. The top shelf will provide additional support and organization for your snowboards.
- Position the top shelf horizontally along the top edge of the side panels, aligning it with the markings made earlier.
- Using a drill and a 1/4-inch drill bit, create pilot holes through the side panels into the top shelf.
- Secure the top shelf to the side panels by inserting wood screws through the pilot holes. Make sure the shelf is level and firmly attached.
- To add extra stability, you can also attach L-brackets or corner braces to reinforce the connection between the top shelf and the side panels.
When attaching the top shelf, ensure that it is at a suitable height to accommodate the size of your snowboards. Leave enough space between the top shelf and the bottom shelf to comfortably fit your snowboards.
As with the bottom shelf, you can add additional screws along the length of the top shelf for added stability, if desired. Just be careful not to obstruct the space where the snowboards will be placed.
Once the top shelf is securely attached, your snowboard storage rack is starting to take shape. Continue on to the next step to ensure the rack is properly secured for mounting on the wall.
Step 6: Secure the Racks
With the shelves in place, it’s crucial to secure the snowboard storage rack to the wall to ensure stability and prevent accidents. Follow these steps:
- Choose a suitable location on the wall where you want to mount the rack. Make sure it’s at a convenient height and can support the weight of the rack and snowboards.
- Use a level to ensure the rack is properly aligned and straight before marking the spots where you will mount it on the wall.
- Once you have determined the spots, use a drill and appropriate wall anchors to insert screws into the marked areas. This will provide extra strength and stability to the rack.
- With the wall anchors in place, carefully lift the rack and position it against the wall, aligning it with the screws. Slowly lower it onto the screws, making sure they go through the pre-drilled holes on the side panels.
- Tighten the screws to secure the rack firmly to the wall, but avoid over-tightening, as it may cause damage to the wood or wall surface.
Once the snowboard storage rack is securely mounted on the wall, give it a gentle shake to test its stability. If it feels wobbly or unstable, double-check the screws to ensure they are tight and secure.
It’s important to follow the appropriate mounting techniques based on your wall type (e.g., drywall, concrete, or studs) to ensure the rack is properly supported.
By securely mounting the rack, you can confidently display and store your snowboards without worrying about them falling or causing any damage.
Step 7: Paint or Stain (Optional)
At this point, your snowboard storage rack is fully assembled and functional. However, if you want to add a touch of personalization and enhance its visual appeal, you can choose to paint or stain the wood.
Painting or staining the rack allows you to match the storage rack to your home decor or create a unique look that showcases your style. Follow these steps to complete this optional step:
- If you choose to paint, select a high-quality paint suitable for wood. Consider using a paintbrush or foam brush to apply an even coat on all visible surfaces of the rack. Allow the first coat to dry completely before applying additional coats if needed.
- If you prefer to stain the wood, choose a wood stain that enhances the natural beauty of the wood grain. Apply the stain using a brush or cloth, following the manufacturer’s instructions. Wipe off any excess stain and allow it to dry according to the product recommendations.
- For both paint and stain, consider adding a protective topcoat to seal and protect the wood from wear and tear. A clear polyurethane or varnish can provide durability and a smooth finish.
- Allow sufficient drying time before handling or mounting the rack to avoid any damage or smudging of the paint or stain.
Remember to work in a well-ventilated area and follow safety guidelines when using paint or stain products.
Painting or staining your snowboard storage rack is an optional step that can add a personal touch and enhance its overall appearance. Take your time to select the colors or finishes that best suit your style and preferences.
Step 8: Mount the Rack
Now that your snowboard storage rack is assembled and potentially painted or stained, it’s time to mount it on the wall to complete the installation process. Follow these steps:
- Choose the final location where you want to mount the rack. Ensure it provides enough space for your snowboards and is easily accessible.
- Hold the rack against the wall at the desired height and use a pencil to mark the spots where the screws will go.
- Using a drill, create pilot holes at the marked spots. Make sure the pilot holes are slightly smaller in diameter than the screws you will use for mounting.
- Position the rack against the wall again, aligning the pilot holes with the marked spots. Insert screws through the holes and into the wall, making sure they go in securely.
- Tighten the screws carefully, ensuring that the rack is level and securely attached to the wall. Avoid over-tightening, as it may damage the wood or wall surface.
Once the rack is mounted, give it a gentle shake or push to test its stability and ensure it can securely hold the weight of your snowboards.
Make any necessary adjustments or tighten the screws more if needed to further enhance the stability of the rack.
By properly mounting the rack, you can confidently display and store your snowboards, knowing they are securely held in place.
Step 9: Add Finishing Touches
With the snowboard storage rack successfully mounted on the wall, you can now add some finishing touches to complete the project and optimize its functionality. Consider the following suggestions:
- Padding: To protect your snowboards from scratches or damage, you can attach soft foam padding or felt strips to the areas where the boards come into contact with the rack. This will create a cushioned surface and prevent any potential marks.
- Hooks or Clips: Install hooks or clips on the rack to hang additional gear, such as helmets, goggles, or gloves. This will keep all your snowboarding essentials organized and easily accessible in one place.
- Labels or Tags: For better organization and quick identification, attach labels or tags to each section of the rack, indicating the specific snowboards or gear stored there. This will make it easier to locate and retrieve the items you need.
- Decoration: If desired, you can add decorative elements to the rack, such as stickers or decals related to snowboarding or your favorite snowboard brands. This will personalize your storage rack and showcase your passion for the sport.
By implementing these finishing touches, you can enhance the functionality and aesthetics of your snowboard storage rack, creating a visually appealing and efficient storage solution for your snowboarding equipment.
Remember to regularly inspect and maintain the rack to ensure it remains in good condition and continues to provide a safe and secure storage space for your snowboards.
Tips and Tricks
Here are some helpful tips and tricks to keep in mind as you build and maintain your snowboard storage rack:
- Secure Mounting: Ensure your rack is securely mounted to the wall by using appropriate anchors and screws that can support the weight of the snowboards.
- Proper Spacing: Leave enough space between the shelves to accommodate the width of your snowboards without them touching or overlapping. This will prevent any damage or scratches.
- Regular Maintenance: Regularly inspect the rack for any loose screws or signs of wear. Tighten any screws as needed and replace any damaged components to maintain stability and safety.
- Careful Handling: When placing or removing snowboards from the rack, do so gently to avoid causing any damage to the rack or the boards.
- Weight Distribution: Distribute the weight of the snowboards evenly across the rack, placing heavier boards on the bottom and lighter ones on top. This will help maintain balance and stability.
- Optimal Location: Consider placing the rack in a cool, dry area away from direct sunlight to prolong the life of your snowboards and prevent warping or fading.
- Customization: Feel free to customize the rack design to fit your specific needs. You can modify the dimensions, add extra shelves, or incorporate additional features like hooks or storage compartments.
- Regular Cleaning: Clean the rack periodically to remove any dust or dirt buildup that can accumulate. Use a damp cloth or gentle cleaner, and dry thoroughly to prevent moisture damage.
- Check Weight Capacity: Be mindful of the weight capacity of your rack and avoid overloading it with excessive snowboards or gear. This will help maintain its structural integrity.
By following these tips and tricks, you can ensure the optimal functionality, durability, and longevity of your snowboard storage rack, keeping your gear organized and protected for many seasons to come.