
Choosing the Right Pumpkin
When it comes to making a pumpkin into a vase, selecting the right pumpkin is crucial. The size, shape, and condition of the pumpkin will determine how well it can hold and display the flowers. Here are some tips to help you choose the perfect pumpkin:
- Size: Consider the size of the floral arrangement you have in mind. If you’re planning on creating a large centerpiece, opt for a larger pumpkin. For smaller arrangements or individual vases, a medium-sized pumpkin will suffice.
- Shape: Look for pumpkins with a relatively flat top. This will make it easier to arrange the flowers and ensure that they stay upright. Avoid pumpkins with odd shapes or excessive bumps, as they may affect the stability of the vase.
- Condition: Inspect the pumpkin for any signs of rot, mold, or blemishes. A healthy pumpkin should feel firm and be free from soft spots or discoloration. Avoid pumpkins that have already started to decay, as they won’t provide a suitable base for your floral arrangement.
- Color: Consider the color of the pumpkin in relation to the flowers you plan to use. A vibrant orange pumpkin can complement warm-toned blooms, while a white or pale pumpkin can provide an elegant backdrop for any color scheme.
Remember, the key is to choose a pumpkin that not only looks visually appealing but also provides stability and durability for your floral arrangement. With these tips in mind, you’re well on your way to finding the perfect pumpkin to transform into a stunning vase.
Preparing the Pumpkin
Once you’ve selected the ideal pumpkin for your vase, it’s time to prepare it for the floral arrangement. Follow these steps to ensure your pumpkin is ready for its new role:
- Clean the pumpkin: Start by gently wiping the surface of the pumpkin with a damp cloth or sponge. This will remove any dirt or debris and give you a clean canvas to work with.
- Trim the stem: If the stem of the pumpkin is too long, consider trimming it to a more suitable length. Use a sturdy pair of shears to carefully cut the stem, ensuring that you leave enough to hold onto and maintain the pumpkin’s aesthetic appeal.
- Level the bottom: To prevent the pumpkin from wobbling or tipping over, it’s important to create a stable base. Use a sharp knife to carefully trim a small portion of the bottom of the pumpkin, creating a flat surface.
- Optional: Seal the pumpkin: If you want to extend the lifespan of your pumpkin vase, you can apply a sealant to the inside of the pumpkin. This will help slow down the decomposition process. Be sure to use a food-safe sealant to ensure it doesn’t affect the flowers.
By taking the time to properly prepare the pumpkin, you’ll ensure that it not only looks great but also provides a stable foundation for your flower arrangement. With these steps completed, you’re ready to move on to hollowing out the pumpkin to create the perfect vase.
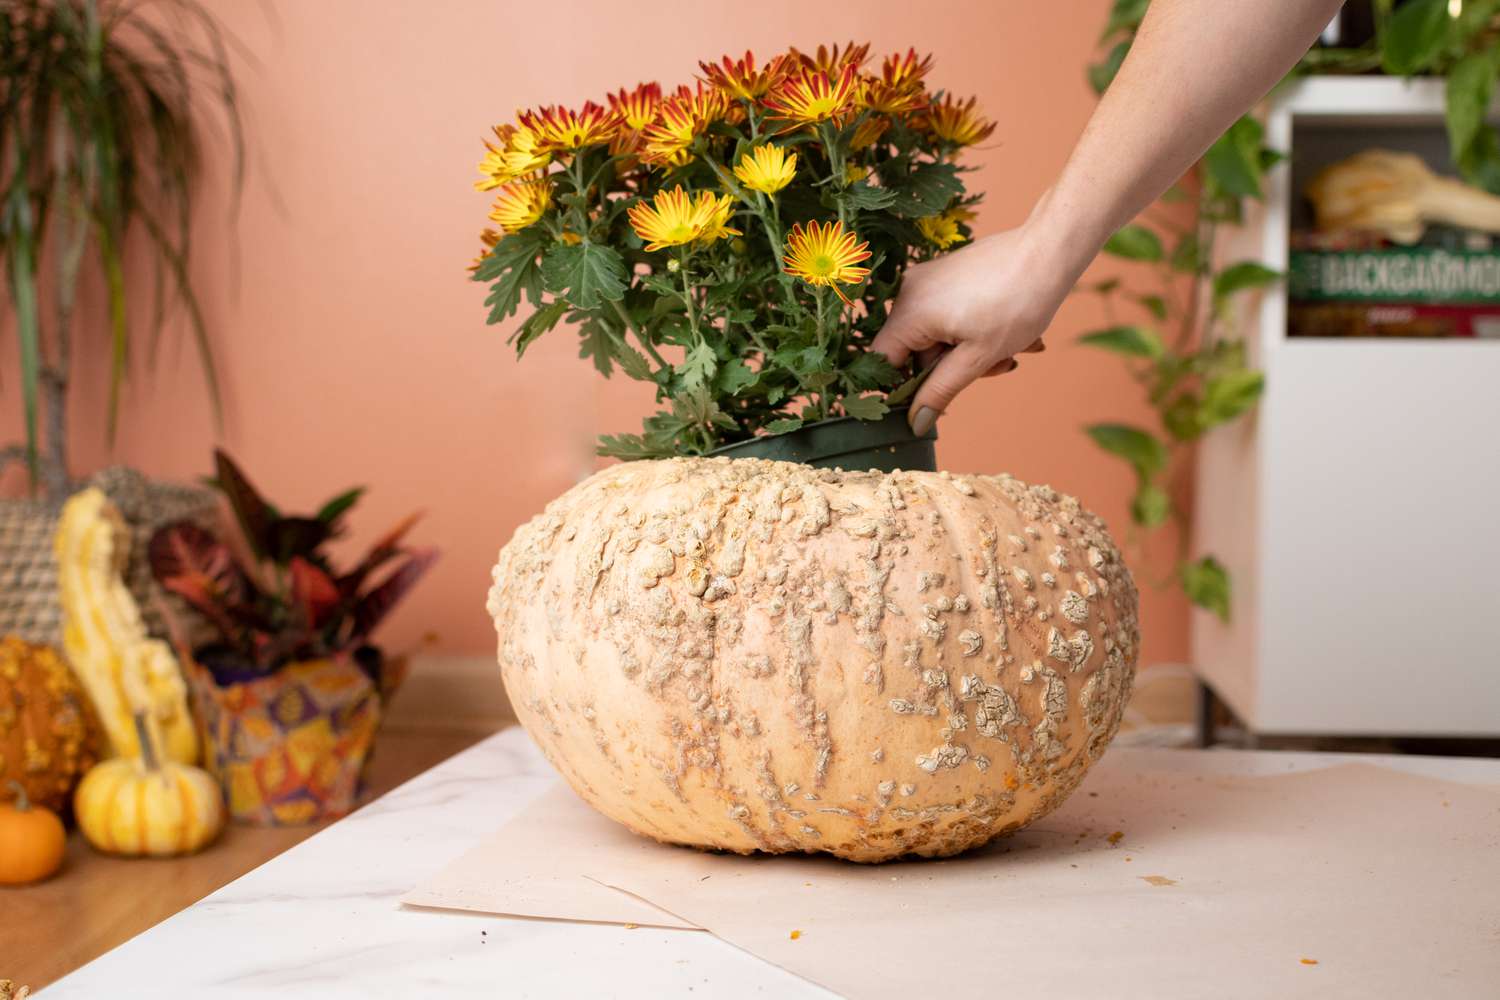
Hollowing Out the Pumpkin
Now that you’ve prepared the pumpkin, it’s time to hollow it out to transform it into a functional vase. Follow these steps to hollow out the pumpkin:
- Mark an opening: Decide where you want the opening of your pumpkin vase to be. You can choose to create a large opening on the top or opt for a more unique design by carving a smaller opening on the side. Mark the area with a marker or pencil.
- Remove the lid: If you’ve chosen to have the opening on the top, carefully cut along the marked line to remove the lid of the pumpkin. Make sure to angle the knife slightly inward to create a slightly flared opening instead of a straight cut. This will help the lid sit securely later.
- Scoop out the pulp and seeds: Use a large spoon or an ice cream scoop to remove the pulp and seeds from the pumpkin. Be gentle but thorough as you scrape the insides, making sure to remove all the stringy parts and seeds. Reserve the seeds if you want to roast them later!
- Optional: Thin the walls: If the walls of the pumpkin are thick, you can choose to thin them out slightly to create more space for your flowers. Use a sharp spoon or a scoop to carefully scrape away a thin layer of the pumpkin flesh, being mindful not to remove too much.
Once you’ve successfully hollowed out the pumpkin, give it a quick rinse to remove any residual pulp or seeds. Allow it to dry completely before moving on to the next step. With the pumpkin now prepared and hollowed out, you’re ready to move on to preserving it to ensure it lasts as long as possible.
Preserving the Pumpkin
To ensure that your pumpkin vase stays fresh and vibrant for as long as possible, it’s important to take steps to preserve it. Follow these tips to extend the lifespan of your pumpkin:
- Clean and dry: Before adding water and flowers, make sure the inside of the pumpkin is clean and completely dry. Any moisture can speed up the decomposition process.
- Apply a sealant: To further slow down the decay, you can apply a thin layer of petroleum jelly or clear acrylic spray to the interior walls of the pumpkin. This will help prevent moisture loss and maintain the freshness of the pumpkin.
- Refrigerate overnight: If possible, place the pumpkin vase in the refrigerator overnight or for a few hours before arranging the flowers. The cool temperature will help preserve the pumpkin and keep the blooms fresh for longer.
- Add water carefully: When it’s time to place the flowers in the pumpkin, add water to the vase slowly and carefully. Pour the water to a level that won’t oversaturate the pumpkin, as excess moisture can lead to quicker decay.
- Change the water regularly: To prevent the growth of bacteria, change the water and trim the stems of the flowers every couple of days. This will help prolong the life of both the pumpkin and the flowers.
By following these preservation tips, you can enjoy your pumpkin vase for an extended period, delighting in the beauty of the flowers and the rustic charm of the pumpkin. Taking a few extra steps to care for your arrangement will ensure its longevity and keep it looking fresh and vibrant.
Preparing the Flowers
Before arranging the flowers in your pumpkin vase, it’s important to properly prepare them to ensure they stay fresh and vibrant. Follow these steps to get your flowers ready:
- Choose fresh flowers: Select flowers that are in their prime and free from any wilting or browning. Look for blooms with firm stems and vibrant colors.
- Trim the stems: Using sharp floral shears or a knife, trim the stems of the flowers at a diagonal angle. This will create a larger surface area for water absorption and facilitate better hydration.
- Remove excess foliage: Remove any leaves or foliage that will be submerged in the water. This will prevent them from decaying and keep the water cleaner for longer.
- Optional: Use flower food: If you have flower food available, dissolve it in water and use it to soak the stems of the flowers for a few minutes. Flower food contains nutrients that will help prolong the life of the blooms.
- Place in water immediately: After preparing the flowers, place them in a vase filled with fresh water. Allow them to hydrate for a few hours before arranging them in the pumpkin vase.
Properly preparing the flowers will ensure they have the best chance of staying fresh and looking beautiful in your pumpkin vase. Following these steps will help extend the life of the flowers and allow you to enjoy the arrangement for longer.
Arranging the Flowers
Now that you have your pumpkin vase and prepared flowers, it’s time to bring them together and create a stunning floral arrangement. Follow these tips to arrange the flowers in your pumpkin vase:
- Create a focal point: Choose one or a few larger blooms to serve as the focal point of your arrangement. This could be a stunning rose, a vibrant sunflower, or any other large flower you prefer.
- Add height and volume: Place taller flowers towards the center of the arrangement to add height. Fill in the sides with medium-sized blooms to create volume and fullness.
- Add texture and color: Incorporate flowers with different textures and colors to add visual interest. Consider using filler flowers like baby’s breath or greenery to add depth and softness to the arrangement.
- Include trailing elements: To add an elegant touch, incorporate flowers or foliage with trailing vines or branches. These can gracefully cascade down the sides of the pumpkin vase.
- Trim and adjust: As you arrange the flowers, continuously trim the stems as needed to ensure they fit the height of the pumpkin vase. Trim any excess foliage or flowers that might overcrowd the arrangement.
- Step back and evaluate: Take a step back and look at the arrangement from different angles. Make any necessary adjustments to balance the heights, colors, and overall composition of the floral design.
Remember, there are no strict rules for arranging flowers in a pumpkin vase. Feel free to explore your creativity and experiment with different flower combinations and placements. The goal is to create an arrangement that is visually appealing and suits your personal taste.
Once you’re satisfied with the arrangement, place it in a prominent spot and admire the beauty of your pumpkin vase filled with gorgeous blooms.
Caring for the Pumpkin Vase
Just like any other floral arrangement, it’s essential to properly care for your pumpkin vase to ensure it stays fresh and appealing. Here are some essential care tips to keep in mind:
- Keep the pumpkin hydrated: Check the water level in the pumpkin vase daily and add more as needed. The pumpkin will absorb some water, so replenishing it regularly will help maintain the freshness of the flowers.
- Change the water: Every two to three days, change the water in the pumpkin vase. Fill it with fresh water and add flower food if desired. This will prevent the growth of bacteria and keep the flowers vibrant.
- Trim the stems: Every time you change the water, trim the stems of the flowers by cutting off a small portion at an angle. This will improve water absorption and extend the lifespan of the blooms.
- Avoid direct sunlight and heat: Place the pumpkin vase in a location away from direct sunlight and sources of heat. Exposure to excessive heat can accelerate the decomposition process and cause the flowers to wilt faster.
- Remove wilted flowers: As flowers start to wilt or fade, remove them from the arrangement to maintain the overall visual appeal. This will also prevent any decaying flowers from affecting the other blooms.
- Display with caution: Be mindful when moving or handling the pumpkin vase. The pumpkin may become softer over time, so handle it with care to avoid any accidental damage or breakage.
By following these care tips, you can ensure that your pumpkin vase and the flowers it holds stay beautiful and fresh for longer. Regular maintenance and attention will help extend the lifespan of your arrangement, allowing you to enjoy its beauty throughout the autumn season.
Decorating the Pumpkin Vase
While a simple, natural pumpkin vase can be stunning on its own, you can also enhance its beauty by adding some decorative touches. Here are a few ideas to help you decorate your pumpkin vase:
- Ribbon or twine: Tie a decorative ribbon or twine around the base of the pumpkin, creating a bow or knot. Choose a ribbon in a color that complements your flower arrangement.
- Fall foliage: Add a touch of autumn by incorporating colorful fall leaves or branches around the base of the pumpkin. This will add texture and enhance the seasonal feel of the arrangement.
- Pinecones: Glue small pinecones around the stem or scatter them around the pumpkin vase for a rustic touch. You can also spray paint the pinecones in metallic colors for a more glamorous look.
- Glitter or metallic paint: Create a festive and eye-catching effect by applying a layer of glitter or metallic paint to the outside of the pumpkin. Use a brush or spray paint to add shimmer and sparkle to the pumpkin’s surface.
- Seasonal accents: Incorporate small seasonal accents like miniature pumpkins, acorns, or dried corn husks alongside the floral arrangement. These elements will enhance the overall autumnal vibe.
- Table runner or cloth: Set your pumpkin vase on a beautiful fall-themed table runner or cloth to create a cohesive and inviting display. Opt for warm colors and patterns that complement the colors of the pumpkin and flowers.
Remember, decorating your pumpkin vase is an opportunity to personalize and customize your arrangement to suit your style and preferences. Get creative and choose decorations that align with the overall aesthetic you want to achieve.
Whether you choose a simple ribbon or go all out with glitter and metallic accents, adding decorative elements will elevate your pumpkin vase and make it a stunning centerpiece or focal point in any autumn-themed setting.
Variations and Ideas for Pumpkin Vases
While the traditional pumpkin vase is a classic choice, there are numerous variations and ideas that you can explore to create unique and eye-catching arrangements. Here are some creative ideas to inspire you:
- Painted pumpkins: Instead of using a natural pumpkin, paint the exterior with acrylic or spray paint in your desired color. You can create an ombre effect, geometric patterns, or even paint a whimsical design to match the theme of your event or space.
- Carved pumpkin vases: For a more intricate and decorative approach, consider carving patterns or designs into the pumpkin. Use carving tools to create intricate patterns, floral motifs, or even monograms to personalize the pumpkin vase.
- Stacked pumpkin vases: Create a cascading effect by stacking multiple pumpkins of different sizes on top of each other. Cut out openings in each pumpkin and place a smaller pumpkin or floral arrangement inside each one, allowing the blooms to spill out beautifully.
- Mini pumpkin vases: Instead of using a large pumpkin, opt for miniature pumpkins to create individual vases. Carve or cut out the top of each mini pumpkin and place a single flower or a small posy inside each one. These make charming place settings or party favors.
- Pumpkin succulent arrangements: Replace traditional flowers with succulents to create a unique and long-lasting pumpkin vase. Cut out a large opening on the top of the pumpkin, fill it with succulent soil, and arrange various succulent plants inside. This arrangement can be enjoyed for a long time with minimal maintenance.
- Seasonal fruit and flower mix: Combine small pumpkins with seasonal fruits like apples, pears, or berries for a delightful harvest-themed display. Use floral foam to secure the fruits and arrange the flowers and foliage around them for an abundant and colorful arrangement.
These are just a few ideas to get your creative juices flowing. Feel free to experiment with different pumpkin sizes, shapes, colors, and decorations to create your own unique pumpkin vase arrangements. Let your imagination run wild and enjoy the process of designing and creating stunning autumn-inspired floral displays.