
Materials Needed
To make a picture frame out of old fence panels, you will need the following materials:
- Old fence panels
- Measuring tape
- Saw (hand saw or power saw)
- Sandpaper (medium-grit and fine-grit)
- Wood glue
- Clamps
- Paint or stain
- Paintbrushes or foam rollers
- Picture wire or hooks
- Nails or screws
- Screwdriver or hammer
- Level
These materials can be easily sourced from a local home improvement store or you may already have some of them on hand. It’s important to note that the quantity of materials needed will depend on the size and number of picture frames you plan to make. Make sure to gather all the necessary materials before getting started on the project.
Using old fence panels not only gives your picture frame a unique and rustic look, but it also helps repurpose materials that may have otherwise gone to waste. So, let’s dive into the step-by-step process of turning those old fence panels into a beautiful picture frame.
Step 1: Gather old fence panels
The first step in making a picture frame out of old fence panels is to gather the necessary materials. Begin by finding old fence panels that are no longer in use. These can be sourced from your own backyard, a local salvage yard, or even from neighbors or friends who may have spare panels lying around.
Inspect the fence panels to ensure they are still in good condition and free from any rot or damage. Choose panels that are solid and sturdy, as they will form the foundation of your picture frame. If needed, clean the panels to remove any dirt, dust, or debris that may have accumulated over time.
It’s worth mentioning that using reclaimed materials not only adds a unique character to your picture frame but also contributes to sustainable and eco-friendly practices. By repurposing old fence panels, you are giving them a new life and reducing waste.
Once you have gathered the old fence panels, set them aside in a clean and dry area. It’s important to have all the necessary materials ready before proceeding to the next steps of the project. So, gather your fence panels and get ready to transform them into a beautiful picture frame.
Step 2: Prepare the fence panels
After gathering the old fence panels, it’s time to prepare them for the picture frame construction. This step involves removing any existing hardware or attachments from the panels and ensuring they are clean and ready for the next stages of the project.
Begin by inspecting the fence panels and identifying any nails, screws, or other hardware that need to be removed. Use a screwdriver or a hammer to carefully detach these elements without causing any damage to the panels. This step is crucial as it will ensure a smooth and even surface for the picture frame.
Next, take the time to clean the fence panels to remove any dirt, grime, or old paint. You can use a stiff brush or a pressure washer to scrub away any stubborn debris. If necessary, you can also use a mild detergent or wood cleaner to help with the cleaning process.
Once the panels are clean, allow them to dry thoroughly before moving on to the next steps. This is important to prevent any moisture from affecting the construction and durability of the picture frame. You can place the panels in a well-ventilated area or use a fan to speed up the drying process.
Preparing the fence panels sets a solid foundation for creating a sturdy and visually appealing picture frame. By ensuring that the panels are free from attachments and cleaned properly, you can proceed with the next steps of measuring, cutting, and assembling the frame without any hindrance.
Step 3: Measure and cut the fence panels
With the fence panels prepared, it’s time to move on to the next step – measuring and cutting the panels to the desired size for your picture frame. This step requires precision and careful planning to ensure that the frame fits your artwork perfectly.
Start by measuring the length and width of your artwork. Take these measurements and add a few inches to each dimension to allow for an overlap, typically around 1-2 inches on each side. This will ensure that the artwork fits comfortably within the frame.
Using a measuring tape, mark the measurements on the fence panels. Make sure to double-check your measurements to avoid any errors. Remember, it’s always better to measure twice and cut once to ensure accurate results.
Once you have marked the measurements, use a saw – either a hand saw or a power saw – to cut the fence panels along the marked lines. Take your time and use steady, controlled movements to achieve clean and precise cuts.
After cutting the panels, double-check their dimensions to ensure they match your desired frame size. If needed, use sandpaper to smooth out any rough edges or uneven surfaces resulting from the cutting process. Start with a medium-grit sandpaper to remove any splinters or rough spots, and finish with a fine-grit sandpaper for a smoother finish.
Remember, accurate measurement and precise cutting are key to creating a well-fitting and visually appealing picture frame. Put in the effort and attention to detail at this stage to ensure your frame will enhance and showcase your artwork beautifully.
Step 4: Sand the edges
After cutting the fence panels to the desired size for your picture frame, it’s important to sand the edges to create a smooth and polished finish. Sanding the edges not only enhances the overall appearance of the frame but also prevents any potential splinters or roughness.
Start by inspecting the cut edges of the fence panels. Look for any rough spots, splinters, or unevenness that may have occurred during the cutting process. These imperfections can be easily addressed with sandpaper.
Begin by using a medium-grit sandpaper to smooth out any rough areas. Gently sand the edges, applying even pressure and using a back-and-forth motion. This will help remove any splinters or unevenness, creating a clean and smooth surface.
After sanding with the medium-grit sandpaper, switch to a fine-grit sandpaper for a finer finish. Repeat the sanding process, paying attention to any remaining rough areas and ensuring that all edges are uniformly smooth.
Remember to sand both the front and back edges of the fence panels to achieve a consistent look. Take your time and be thorough, as the quality of the sanding will greatly contribute to the final result of your picture frame.
Once you have finished sanding the edges, wipe away any dust or debris with a clean cloth or brush. This will prepare the panels for the next steps in the picture frame construction.
Sanding the edges of the fence panels is an essential step in creating a professional-looking and visually appealing picture frame. The smooth and polished finish achieved through sanding will ensure a comfortable and safe handling of the frame while adding a touch of refinement to your artwork display.
Step 5: Assemble the picture frame
Now that you have prepared the fence panels, measured and cut them, and sanded the edges, it’s time to assemble the picture frame. This step brings all the pieces together to create a solid structure for your artwork.
Begin by laying out the fence panels on a flat surface, arranging them in the desired orientation for your frame. Make sure the edges align properly and that the frame is square. Use a level to ensure the panels are straight and even.
Apply a thin, even layer of wood glue along the edges of the fence panels. Make sure to cover the entire length of each edge that will be joined together to form a corner. The wood glue will provide strong adhesion and increase the stability of the frame.
Once the glue is applied, carefully connect the corners of the frame, pressing the edges firmly together. Use clamps to hold the corners in place while the glue dries. Place the clamps at each corner to ensure a secure bond.
Allow the glue to dry completely according to the manufacturer’s instructions. This usually takes a few hours, but it’s recommended to leave it overnight to ensure a strong and durable bond between the fence panels.
After the glue has dried, remove the clamps and inspect the frame. Check for any gaps or areas where the edges may not be perfectly aligned. If necessary, apply additional glue and use clamps or tape to hold the corners together until the glue sets.
Assembling the picture frame is a critical step that requires precision and careful attention to detail. Take your time to ensure that the corners are tightly joined and that the frame is square. A properly assembled frame will provide the necessary support and stability for your artwork.
Step 6: Attach the picture frame corners
Once the picture frame is assembled, the next step is to attach the picture frame corners. These corners not only add decorative detail to the frame but also provide additional strength and stability to the structure.
There are several options available for attaching the corners of your picture frame. One common method is to use metal picture frame hardware. These corner brackets or plates can be easily secured to the frame using screws or nails. Make sure to choose hardware that is appropriate for the size and weight of your frame.
Another popular option is to use wooden mitered corners. This involves cutting the ends of the frame panels at 45-degree angles to create a seamless join. Apply wood glue to the mitered edges and press them together, aligning the corners perfectly. Use clamps or tape to hold the corners in place until the glue sets.
For a more rustic and organic look, you can also opt for decorative wooden or metal corner pieces. These pieces are often available in a variety of designs and can be attached to the corners of the frame using screws or nails.
When attaching the corners, make sure they are aligned properly and flush with the edges of the frame. Use a level to ensure they are straight and even. Once attached, double-check the corners to ensure they are securely in place and provide the desired aesthetic appeal.
Adding picture frame corners not only enhances the overall look of the frame but also reinforces its structural integrity. It’s an important step in creating a sturdy and visually appealing frame for your artwork.
Step 7: Paint or stain the picture frame
Now that the picture frame is assembled and the corners are attached, it’s time to add a finishing touch by painting or staining the frame. This step allows you to customize the frame’s appearance to match your personal style and complement your artwork.
Before applying any paint or stain, it’s important to prepare the surface of the frame. Start by lightly sanding the entire frame using fine-grit sandpaper. This will help create a smooth surface and remove any imperfections or roughness.
If you prefer a natural look, you can choose to leave the frame as is, showcasing the natural grain and texture of the old fence panels. In this case, simply apply a clear protective coat or varnish to protect the wood and enhance its natural beauty.
If you decide to paint the frame, choose a color that complements your artwork or matches your home decor. Consider using acrylic paint or spray paint for a smooth and even finish. Apply thin coats of paint, allowing each coat to dry before applying the next. This will ensure a durable and professional-looking result.
If staining the frame is your preference, select a wood stain that enhances the richness of the old fence panels. Apply the stain using a brush or a cloth, following the specific instructions on the stain container. Wipe off any excess stain and allow it to dry completely.
Remember to protect your work area with a drop cloth or newspaper to avoid any accidental spills or stains. Also, make sure to paint or stain the frame in a well-ventilated area to prevent inhalation of fumes.
Painting or staining the picture frame provides the final touch to your DIY project. Not only does it enhance the frame’s appearance, but it also protects the wood and ensures its longevity. Choose the right finish for your frame and let your creativity shine through.
Step 8: Attach picture wire or hooks
With the picture frame painted or stained to perfection, it’s time to attach the picture wire or hooks for hanging your artwork. This step is crucial to ensure that your frame is securely mounted on the wall.
When it comes to hanging the frame, you have a couple of options. One common method is to attach picture wire to the back of the frame. Start by measuring the width of the frame and cut a piece of picture wire slightly longer than that measurement. Attach the wire to the back of the frame using screws or eye hooks. Ensure that the wire is taut and securely fastened.
Alternatively, you can use picture hanging hooks. These hooks are designed to be mounted on the back of the frame and provide a convenient way to hang the frame directly on the wall. Follow the instructions provided with the hooks to properly attach them to the frame.
Before attaching the picture wire or hooks, determine the best placement for hanging your artwork. Consider the weight of the frame and the position you want it to be displayed. Use a level to ensure the wire or hooks are aligned correctly.
If you’re uncertain about the weight of your artwork or the stability of the wall, it’s a good idea to use wall anchors or screws specifically designed for hanging heavy objects. These will provide added support and ensure your frame hangs securely on the wall.
After attaching the picture wire or hooks, give them a gentle tug to make sure they are securely in place. Hang the frame on the wall and step back to ensure it is level and properly aligned. Make any necessary adjustments to ensure the frame is straight and secure.
Attaching picture wire or hooks is the final step in preparing your frame for hanging your artwork. Take the time to properly install them, ensuring that your frame will be properly supported and displayed on the wall.
Step 9: Hang your picture frame
After all the hard work and attention to detail, it’s finally time to hang your picture frame and showcase your artwork. This step involves carefully placing the frame on the wall and ensuring it is securely mounted.
Start by selecting the desired location for your picture frame. Consider factors such as the size of the artwork, the room’s layout, and the height at which you want the frame to be displayed. Use a tape measure to determine the exact placement and mark the spot on the wall.
Before mounting the frame, it’s crucial to ensure that the wall surface is suitable for hanging. If you’re hanging the frame on a stud, use a stud finder to locate the studs in the wall. This will provide additional support and stability. If you’re not able to locate a stud, use wall anchors or screws specifically designed for hanging frames or artwork.
Next, hold the frame against the wall at the desired height and make sure it is level using a spirit or bubble level. Adjust the position as needed to achieve a straight and even placement. Once you’re satisfied with the positioning, make a small mark on the wall to indicate where the frame should be mounted.
Now, it’s time to secure the frame to the wall. If using screws, carefully drive them through the picture wire or hooks into the wall, making sure they go through any anchors or studs if necessary. If using wall anchors, follow the manufacturer’s instructions for proper installation. Ensure that the frame is secure and flush against the wall.
After mounting the frame, give it a gentle tug to ensure it is securely attached and level. Step back and admire your completed project. Take a moment to make any final adjustments if needed.
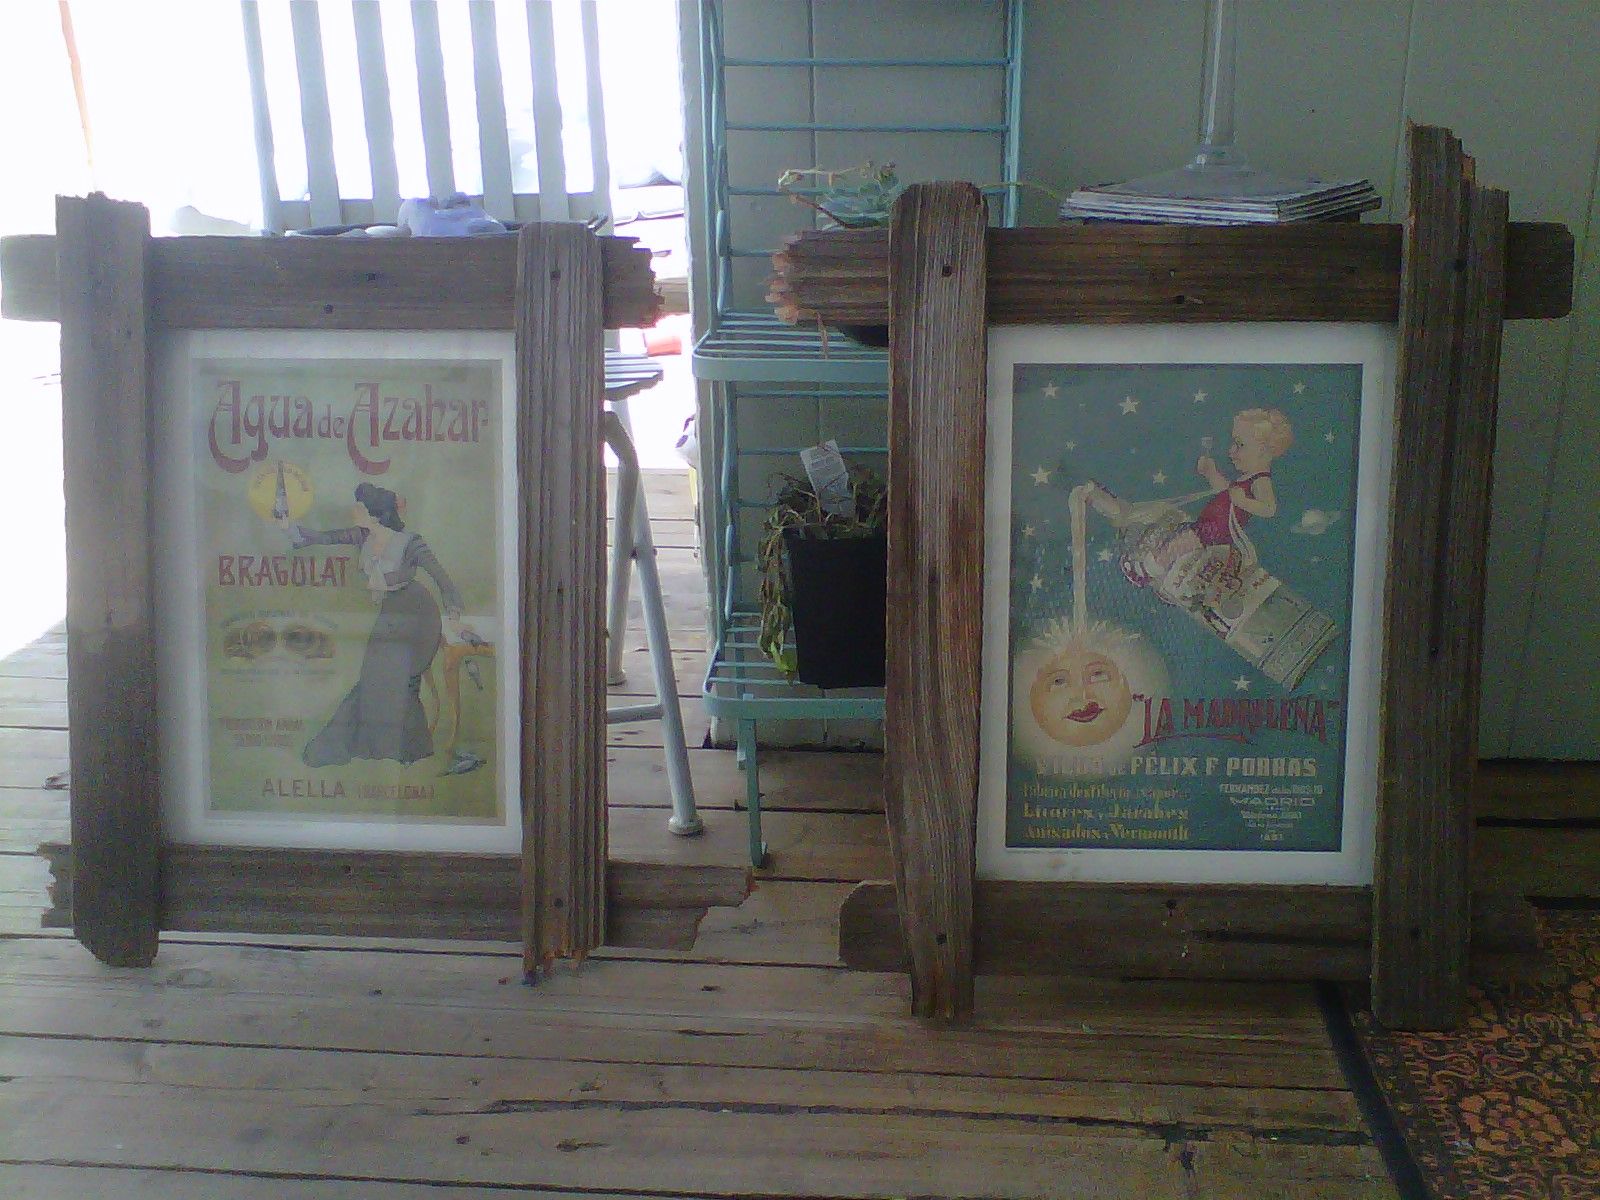
Now that your picture frame is securely hanging on the wall, it’s time to step back and admire your artwork. Enjoy the pride and satisfaction that comes with completing a DIY project and transforming old fence panels into a beautiful and personalized picture frame that showcases your art in style.
Step 10: Enjoy your DIY picture frame
Congratulations! You have successfully completed the process of making a picture frame out of old fence panels. Now, it’s time to step back, admire your handiwork, and enjoy the fruits of your labor.
Hang your artwork within the frame and see how it transforms the space. Take a moment to appreciate the unique touch that the old fence panels bring, adding a rustic and charming element to your artwork display. Each time you look at your framed art, you’ll appreciate the effort and creativity that went into creating the frame.
Invite others to admire your DIY project, as they may be inspired by your resourcefulness and ability to repurpose materials. Share the story behind your homemade picture frame, highlighting how you turned something old and forgotten into a beautiful piece of home decor.
Remember to periodically check the frame to ensure it remains securely mounted on the wall. Make any necessary adjustments or repairs as needed, keeping the frame in top condition to preserve your artwork and maintain its visual appeal.
Don’t be afraid to experiment with different types of artwork and switch them out to give your space a fresh look. Your DIY picture frame can be a versatile and ever-changing gallery that showcases your favorite photos, prints, paintings, or cherished memorabilia.
Beyond the satisfaction of creating something with your own hands, using old fence panels to make a picture frame also promotes sustainability and reduces waste. You have not only created a beautiful piece of decor but also made an eco-friendly choice by repurposing materials that might otherwise have ended up in a landfill.
So, sit back, relax, and enjoy the beauty of your DIY picture frame. Let it serve as a reminder of your creativity and ability to transform the ordinary into something extraordinary. Take pride in the fact that you have not only created a unique piece of art but also embraced the joys of DIY crafting.