
Materials Needed
Creating your very own homemade lava lamp is not only a fun and engaging activity, but it also requires just a few simple materials that you may already have at home. Before getting started, make sure you have the following items on hand:
- A clear plastic or glass container: You will need a container to hold your lava lamp mixture. It can be a glass jar, a plastic soda bottle, or any other transparent vessel.
- Vegetable oil: Opt for a clear oil, such as vegetable or canola oil. The amount you will need depends on the size of your container, but a cup or two should be sufficient.
- Water: You will need water to create the solution that will interact with the oil. Again, the amount will vary depending on the size of your container.
- Food coloring: Choose your favorite colors to make your lava lamp visually appealing. Liquid food coloring works best, as it easily mixes with the water.
- Effervescent tablets (e.g., Alka-Seltzer): These tablets create the bubbly effect in your lava lamp. You will only need a few tablets for the experiment.
That’s it! With just these few materials, you are ready to embark on your lava lamp-making adventure. The ingredients are easy to find and inexpensive, making this a perfect project to enjoy with kids or to amaze your friends at a party.
Step 1: Gather the Ingredients
Before diving into the exciting process of creating your homemade lava lamp, it’s important to gather all the necessary ingredients. By collecting everything you need at the beginning, you can ensure a smooth and hassle-free experience. Here’s what you’ll need:
- A clear plastic or glass container: Select a container that is transparent so that you can fully appreciate the mesmerizing lava lamp effect. You can use a glass jar, a plastic soda bottle, or any other vessel of your choice.
- Vegetable oil: Opt for a clear oil such as vegetable or canola oil. The amount you’ll need will depend on the size of your container, but typically a cup or two should suffice.
- Water: The water will create the solution that interacts with the oil to produce the lava lamp effect. The amount of water needed will vary based on the size of your container.
- Food coloring: Choose your favorite colors to make your lava lamp visually appealing. Liquid food coloring works best as it easily mixes with the water to create vibrant hues.
- Effervescent tablets (e.g., Alka-Seltzer): These tablets will be responsible for the bubbling effect in your lava lamp. A few tablets are sufficient to create the desired reaction.
Make sure you have all these ingredients ready before starting the lava lamp-making process. It’s a good idea to check your pantry or make a quick trip to the grocery store to ensure you have everything you need. Once you have gathered these materials, you’re now ready to move on to the next step: preparing the container.
Step 2: Preparing the Container
Now that you have gathered all the necessary ingredients, it’s time to prepare the container for your homemade lava lamp. The container you choose will be the vessel in which the magic happens, so it’s essential to get this step right. Follow these simple steps to ensure your container is ready for the lava lamp mixture:
- Clean the container: Start by thoroughly cleaning the container to ensure there are no residues or impurities that could affect the lava lamp’s appearance. Wash it with warm soapy water and rinse it well.
- Choose an appropriate size: Consider the size of your container and the amount of oil and water you will be using. Ideally, you want to leave some space at the top to allow the liquid to move freely when the lava lamp is in action.
- Attach the lid (if applicable): If your container has a screw-on or snap-on lid, make sure it is securely fastened. This will prevent any spills or leaks during the experiment.
Once you have cleaned the container and ensured it is the right size, you are ready to move on to the next step: creating the oil solution. Preparing the container may seem like a simple task, but it sets the foundation for the success of your homemade lava lamp. Take your time with this step to ensure a visually pleasing final result.
Step 3: Creating the Oil Solution
With the container cleaned and prepared, it’s time to move on to the next step in making your homemade lava lamp: creating the oil solution. The oil solution is a key component that will form the base of the lava lamp and provide the mesmerizing movement. Follow these steps to create the oil solution:
- Pour the vegetable oil into the container: Start by carefully pouring the clear vegetable oil into the prepared container. The amount of oil needed will depend on the size of your container, but aim to fill it about halfway.
- Allow the oil to settle: After pouring the oil, allow it to sit undisturbed for a few minutes. This will give the oil a chance to settle and separate from any air bubbles that may have formed.
Once you’ve poured the oil and allowed it to settle, you now have your oil solution ready. The oil will serve as the medium through which the colorful bubbles rise and fall, creating the captivating lava lamp effect. Now, let’s move on to the next step: preparing the water solution.
Step 4: Preparing the Water Solution
With the oil solution ready, it’s time to move on to the next step in creating your homemade lava lamp: preparing the water solution. The water solution will interact with the oil to create the mesmerizing lava lamp effect. Follow these steps to prepare the water solution:
- Fill a separate container with water: Take a separate container and fill it with water. The amount of water needed will depend on the size of your lava lamp container, but aim to fill it about a quarter of the way.
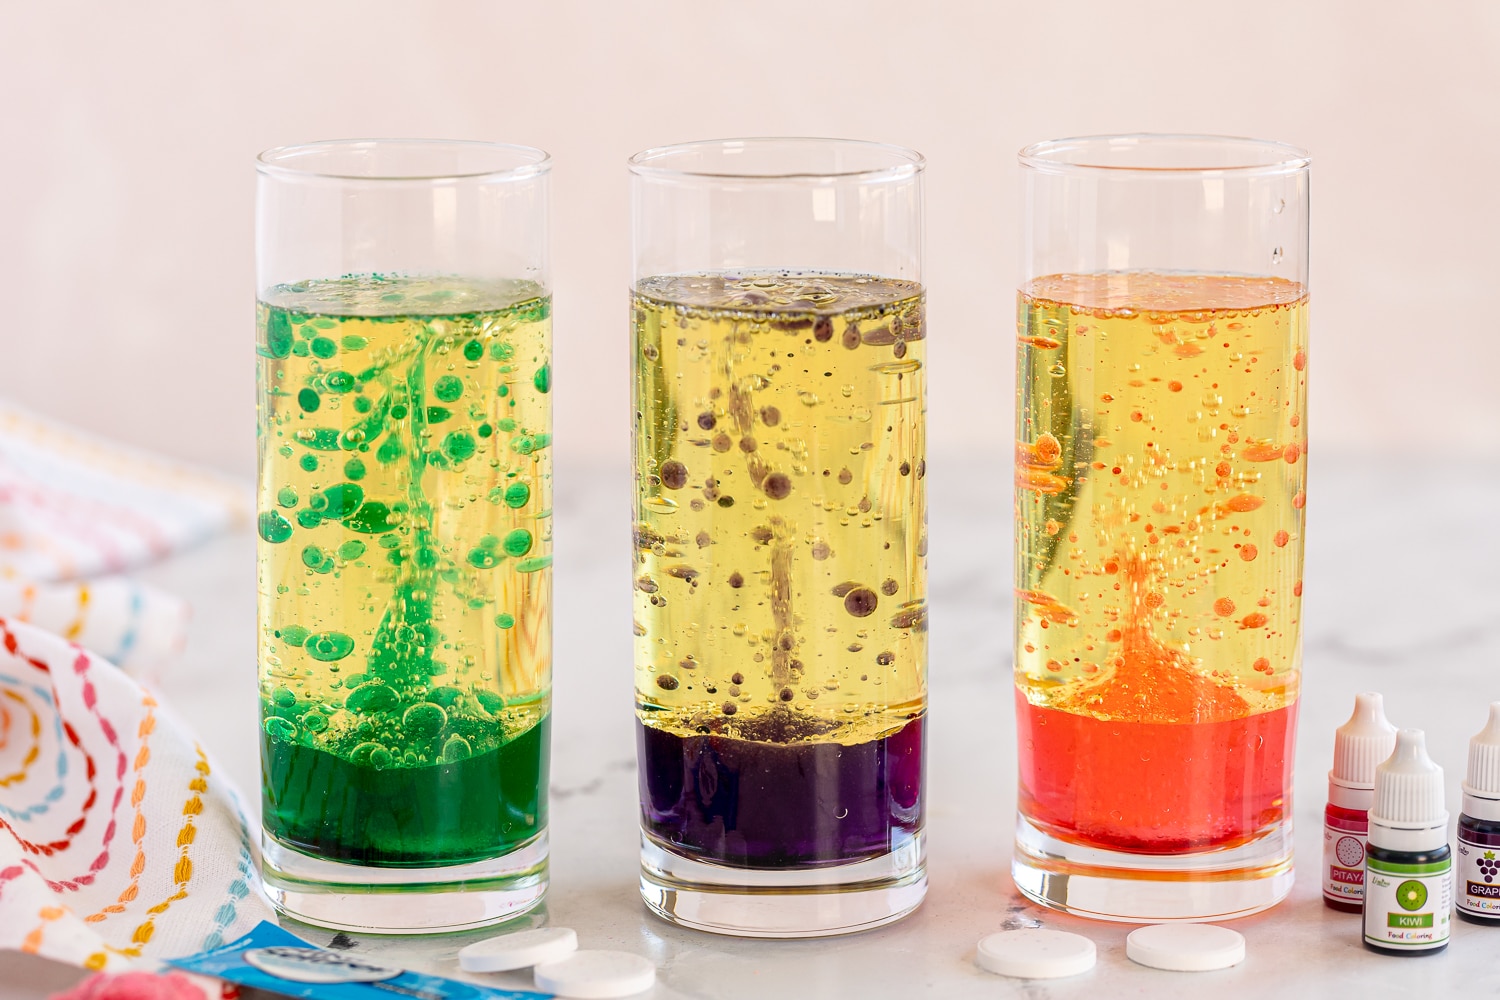
- Add food coloring: Choose your desired colors and drop a few drops of liquid food coloring into the water. Mix well to ensure that the color is evenly distributed throughout the solution. Remember, the more food coloring you add, the more vibrant the lava lamp will be.
Once you have prepared the water solution by adding the desired food coloring, you now have the essential ingredient needed to create the lava lamp effect. The water solution will combine with the oil solution to create mesmerizing bubbles and movement. Now, let’s move on to the next step: adding the food coloring to the mixture.
Step 5: Adding the Food Coloring
Adding food coloring to your lava lamp mixture is an exciting step that brings vibrant colors to your creation. The food coloring will blend with the water solution to create visually stunning effects. Follow these steps to add the food coloring:
- Start by gently stirring the oil solution in the container. This ensures that the oil is evenly distributed and any settled impurities are mixed in.
- Next, take the water solution with the added food coloring and slowly pour it into the container with the oil solution. Watch as the colored water sinks through the oil and settles at the bottom.
- Observe the mesmerizing separation of colors and the beautiful layered effect. The food coloring will remain in the water and create distinct bands of color within the oil solution.
Remember, you can experiment with different colors and combinations to create your desired effect. The food coloring adds an element of creativity and personalization to your homemade lava lamp, making it truly unique.
Now that you’ve added the food coloring to your mixture, it’s time to move on to the next step: combining the oil and water solutions.
Step 6: Combining the Solutions
Now that you have prepared the oil solution and the water solution with food coloring, it’s time to combine them to create the mesmerizing lava lamp effect. Follow these steps to combine the solutions:
- Gently pour the colored water solution into the container containing the oil solution. Take your time and pour slowly to avoid splashing or creating air bubbles.
- As the colored water sinks through the oil, watch in awe as it forms separate droplets or blobs. These blobs will rise and fall within the oil, creating the dynamic lava lamp effect.
- Observe and enjoy the mesmerizing display of colorful blobs moving around in the oil solution, reminiscent of a lava lamp in action.
This step is where the magic happens, as the combination of the oil solution and the colored water produces the captivating lava lamp effect. Take a moment to marvel at the unique patterns and movements created by the merging solutions.
Now that you have successfully combined the solutions, it’s time to add the final ingredient that will bring your homemade lava lamp to life: the Alka-Seltzer tablets. Let’s move on to the next step to see the bubbling action!
Step 7: Adding the Alka-Seltzer
Adding Alka-Seltzer tablets to your homemade lava lamp is the final step that will create the bubbling action. These effervescent tablets will react with the water in the mixture, causing bubbles to rise and fall, adding an extra element of fascination to your lava lamp. Follow these steps to add the Alka-Seltzer tablets:
- Break an Alka-Seltzer tablet into smaller pieces. You can use a whole tablet or adjust the amount based on the size of your container and your desired level of bubbling.
- Add the smaller Alka-Seltzer pieces one at a time to the mixture in the container. Take note of the reaction that occurs as the tablet interacts with the water.
- Observe as the bubbles are formed and start to rise and fall within the oil solution, creating the mesmerizing lava lamp effect.
- If desired, you can repeat this step by adding more Alka-Seltzer pieces to prolong and enhance the bubbling action.
The addition of Alka-Seltzer tablets is what brings the true “lava” effect to your homemade lava lamp. As the tablets dissolve, they release gas bubbles, which rise through the oil and create the captivating motion that resembles the movement of flowing lava.
With the Alka-Seltzer tablets added, your homemade lava lamp is now in full action with colorful blobs and bubbling. It’s time to sit back, relax, and enjoy the mesmerizing display!
Step 8: Admire the Lava Lamp in Action!
Congratulations! You have successfully created your very own homemade lava lamp. Now it’s time to sit back, relax, and admire the mesmerizing display of colorful blobs and bubbling. Here’s how to fully appreciate your lava lamp in action:
- Find a dark or dimly lit room: To truly appreciate the vibrant colors and the captivating movement of your lava lamp, it’s best to place it in a room with minimal lighting.
- Turn on a light source: Place a small lamp or flashlight near your lava lamp to create a gentle glow that accentuates the colors and adds an enchanting ambiance to the room.
- Watch the blobs rise and fall: As the Alka-Seltzer tablets create the bubbling action, observe how the colorful blobs move within the oil solution, creating a hypnotic and soothing effect.
- Take a moment to relax and unwind: The mesmerizing display of your homemade lava lamp can help create a calming and contemplative atmosphere. Sit back, relax, and let your thoughts drift away as you watch the hypnotic patterns.
Whether you’re enjoying your lava lamp alone or sharing it with friends and family, the experience is sure to be a source of fascination and delight. Take the time to appreciate the unique creation you’ve made and enjoy the soothing and mesmerizing display.
Remember, when you’re done marveling at your lava lamp, you can save it for future use by placing the lid securely and storing it in a cool, dry place.
Now, it’s time to bask in the beauty of your homemade lava lamp and enjoy the awe-inspiring show it provides!