
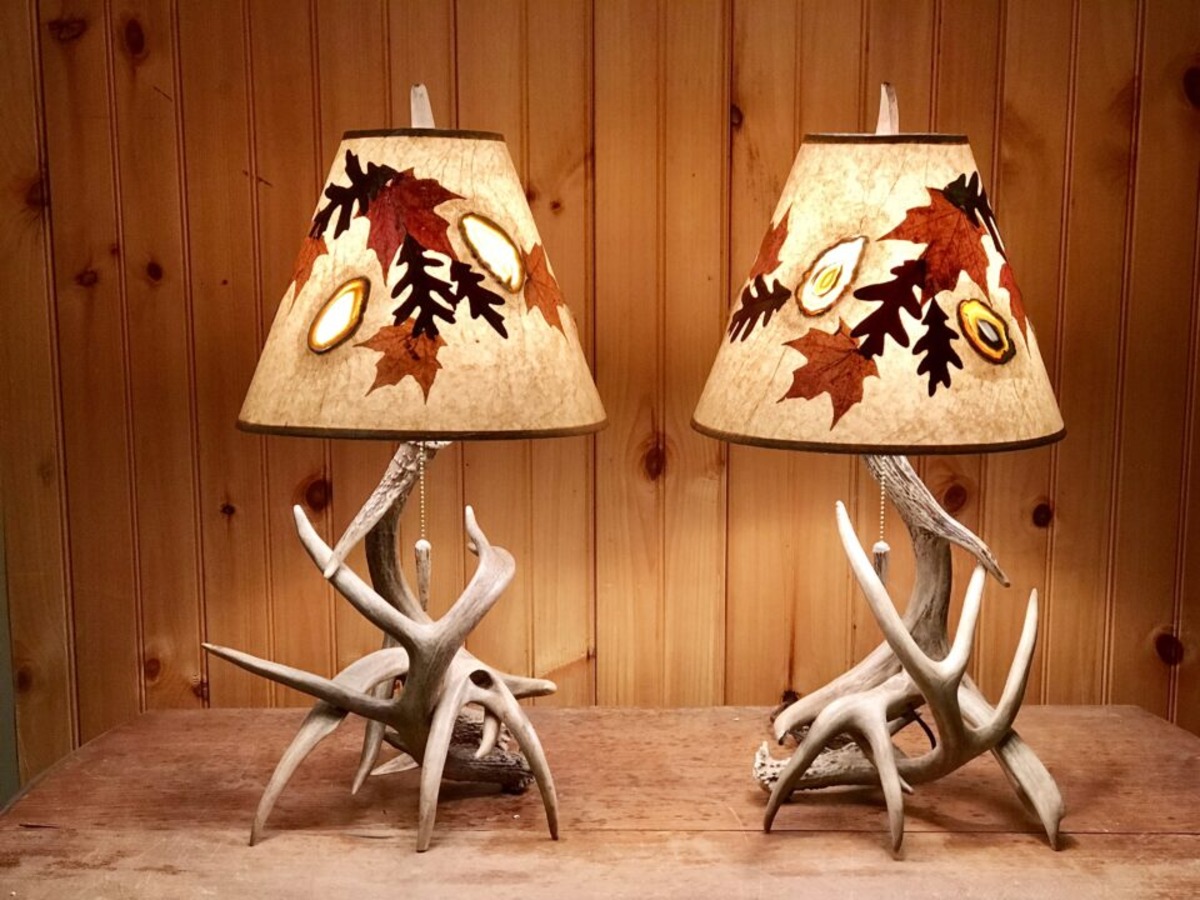
Choosing the Right Deer Antlers
When creating a deer antler lamp, one of the most important steps is choosing the right deer antlers. The antlers will be the centerpiece of your lamp and can greatly impact its overall appearance. Here are some essential factors to consider when selecting deer antlers for your lamp:
- Size: The size of the antlers will depend on the desired height and scale of your lamp. Consider the space where the lamp will be displayed and choose antlers that are proportionate to the surrounding environment.
- Shape: Antlers come in various shapes, from symmetrical to asymmetrical. Consider the visual aesthetic you want to achieve and select antlers that complement your desired style.
- Condition: Inspect the antlers for any damage or cracks. While some imperfections can add character, ensure that the antlers are sturdy enough to support the lamp structure.
- Color: Deer antlers can vary in color, ranging from light tan to dark brown. Consider the color scheme of your space and choose antlers that will harmonize with the surroundings.
- Source: It’s important to procure deer antlers ethically and legally. Check local regulations and purchase antlers from reputable sources to ensure they were obtained legally and sustainably.
Once you have carefully considered these factors, you will be ready to move on to the next steps of your deer antler lamp project. Remember, the right deer antlers will serve as the foundation for your lamp and contribute to its unique and rustic charm.
Cleaning and Preparing the Antlers
Before you can begin assembling your deer antler lamp, it’s crucial to clean and prepare the antlers properly. This process will ensure that your lamp is free from dirt, odor, and any potential pests. Follow these steps to clean and prepare your antlers:
- Remove Loose Debris: Start by removing any loose dirt, dust, or cobwebs from the antlers. Use a soft brush or cloth to gently wipe away the debris, being careful not to damage any delicate parts.
- Sanitize: To eliminate any potential odors or bacteria, mix a solution of warm water and mild soap. Dip a cloth into the solution and gently wipe down the antlers, ensuring to reach all crevices and surfaces. Rinse the antlers with clean water and pat them dry with a towel.
- Deodorize: If the antlers still have a lingering odor, you can use a solution of baking soda and water to deodorize them. Create a paste by mixing the two ingredients and apply it to the antlers. Let it sit for a few hours, then rinse off the paste and dry the antlers thoroughly.
- Inspect for Pests: Carefully check the antlers for signs of any pests, such as small holes or droppings. If you discover any infestation, consult with a professional pest control expert for safe and effective removal.
- Seal and Preserve: To protect the antlers and enhance their natural beauty, consider applying a clear sealant or varnish. This will help to preserve the antlers and prevent them from drying out or becoming brittle over time.
By following these steps, you will ensure that your deer antlers are clean, sanitized, and ready to be incorporated into your lamp. Properly preparing the antlers is crucial for maintaining their aesthetic appeal and prolonging their lifespan.
Creating the Base of the Lamp
The base of the deer antler lamp is what provides stability and support for the antlers and the electrical components. Creating a sturdy and visually appealing base is essential for a successful lamp. Follow these steps to construct the base of your deer antler lamp:
- Select a Base Material: Choose a base material that complements the rustic aesthetic of the antlers. Options include wood, metal, or stone. Ensure that the base is wide enough and heavy enough to support the weight of the antlers.
- Measurements: Measure the dimensions of your antlers to determine the appropriate size for the lamp base. Make sure there is enough space to securely attach the antlers while leaving room for the electrical wiring later on.
- Cut and Shape the Base: Use a saw or appropriate tool to cut the selected base material into the desired shape. A square or rectangular shape typically works well, but you can get creative with different shapes and angles to add unique elements to your lamp.
- Smooth and Sand: Smooth any rough edges or surfaces of the base material using sandpaper. This will ensure a polished and professional finish.
- Stain or Paint: Consider staining or painting the base material to enhance its appearance. Choose a color that complements the overall design of the lamp. Apply multiple coats and allow sufficient drying time between each layer.
- Drill Holes: Measure and mark the spots where the antlers will be attached to the base. Use a drill to create holes that are the appropriate size for the hardware you will use to secure the antlers.
- Attach the Antler Mounting Hardware: Install the necessary mounting hardware, such as threaded inserts or metal brackets, securely into the drilled holes. This will ensure a stable and secure attachment for the antlers.
By following these steps, you will create a sturdy and visually appealing base for your deer antler lamp. The base will serve as a foundation for the antlers, allowing them to be securely attached while providing stability and balance to your lamp.
Assembling the Electrical Components
Once you have prepared the base of your deer antler lamp, it’s time to assemble the electrical components. Properly wiring the lamp ensures that it is safe, functional, and ready to illuminate your space. Follow these steps to assemble the electrical components of your deer antler lamp:
- Gather the Electrical Components: Collect all the necessary electrical components for your lamp, including a lamp socket, lamp cord, plug, and a lamp harp. These can be purchased at a local hardware store or online.
- Insert the Lamp Socket: Begin by inserting the lamp socket into a pre-drilled hole in the lamp base. Ensure it fits securely and is centered within the hole.
- Thread the Lamp Cord: Thread the lamp cord through the lamp base, starting from the bottom and pulling it up through the hole where the lamp socket is inserted. Leave enough cord length for easy access and connection later.
- Wire the Lamp Socket: Carefully strip the ends of the lamp cord wires, exposing the individual copper strands. Follow the instructions provided with the lamp socket to connect the wires to their respective terminals. Typically, this involves twisting the wires around the screws and tightening them securely.
- Secure the Lamp Socket: Once the wires are connected, secure the lamp socket in place within the lamp base. This may involve tightening a retaining ring or screwing it into position, depending on the lamp socket design.
- Attach the Lamp Harp: Unscrew the finial at the top of the lamp socket and attach the lamp harp. The lamp harp provides support for the lampshade and is essential for positioning it correctly.
- Connect the Plug: Strip the other end of the lamp cord and connect it to the plug following the manufacturer’s instructions. Double-check that the wires are securely connected and that no exposed copper is visible.
- Test the Lamp: Before proceeding, plug in the lamp and test that it functions properly. Flip the switch on the lamp socket to ensure that the light turns on and off as expected.
By following these steps, you will successfully assemble the electrical components of your deer antler lamp. Remember to prioritize safety, double-check all connections, and follow the instructions provided with the electrical components for a seamless assembly process.
Wiring and Attaching the Lampshade
Wiring and attaching the lampshade is the final step in creating your deer antler lamp. This process involves connecting the lampshade to the lamp socket and ensuring it is securely in place. Follow these steps to wire and attach the lampshade to complete your deer antler lamp:
- Choose the Lampshade: Select a lampshade that complements the style and size of your deer antler lamp. Consider the shape, color, and material to achieve the desired look and lighting effect.
- Place the Lampshade: Position the lampshade onto the lamp harp, ensuring that it rests securely and evenly. Use the adjustable screws on the lamp harp to hold the lampshade tightly in place.
- Install the Lampshade Mounting Bracket: If your lampshade requires additional support, install a lampshade mounting bracket at the base of the lamp socket. Follow the manufacturer’s instructions to securely attach the bracket.
- Attach the Lampshade to the Bracket: Depending on the lampshade and bracket design, there may be different attachment methods. Follow the instructions provided and ensure that the lampshade is firmly attached to the bracket.
- Check the Lampshade Position: Once the lampshade is attached, double-check its position and make any necessary adjustments. Ensure that it sits straight and level, aligning with the base of the lamp and the antlers.
- Thread and Tuck the Lamp Cord: Arrange and tuck the lamp cord neatly along the lamp base, ensuring that it is hidden from view. Use clips or adhesive cord holders to secure the cord in place.
- Test the Lamp and Adjust: Plug in the lamp and test it once again to ensure it functions properly with the lampshade attached. Check for any loose connections, flickering, or other issues. Make any necessary adjustments or repairs before continuing.
By following these steps, you will successfully wire and attach the lampshade to your deer antler lamp. Take your time to ensure that everything is securely in place, and double-check all connections before enjoying the final result of your beautiful and functional deer antler lamp.
Mounting the Antlers onto the Lamp Base
Mounting the antlers onto the lamp base is a crucial step in completing your deer antler lamp. Properly securing the antlers ensures stability and a visually appealing design. Follow these steps to mount the antlers onto the lamp base:
- Prepare the Antlers: Clean and dry the antlers thoroughly before mounting them. Ensure that any loose debris, dust, or dirt is removed.
- Position the Antlers: Determine the desired placement and arrangement of the antlers on the lamp base. Experiment with different configurations to find the most visually appealing arrangement.
- Mark the Mounting Points: Use a pencil or marker to mark the spots on the antlers where they will be attached to the lamp base. This will ensure accurate positioning and alignment.
- Attach the Mounting Hardware: Depending on the lamp base and antler design, choose the appropriate hardware for attaching the antlers. It can be screws, brackets, or other suitable fasteners.
- Pre-Drill Holes: To prevent the antlers from cracking or splitting, pre-drill small holes at the marked mounting points. The size of the holes should correspond to the size of the mounting hardware you are using.
- Secure the Antlers: Place the antlers onto the marked positions and secure them firmly to the lamp base using the selected mounting hardware. Ensure that the antlers are level and aligned correctly.
- Tighten the Hardware: Carefully tighten the mounting hardware to ensure a secure connection between the antlers and the lamp base. Avoid overtightening, as it may cause damage to the antlers or lamp base.
- Double-Check Stability: After securing the antlers, gently shake the lamp to check for any looseness or instability. If any movement is detected, further tighten the hardware or make necessary adjustments.
By following these steps, you will successfully mount the antlers onto the lamp base, giving your deer antler lamp its distinct and captivating appearance. Take your time to ensure the antlers are securely attached, and step back to admire your unique creation.
Finishing Touches and Decoration
Adding finishing touches and decoration to your deer antler lamp will elevate its visual appeal and personalize it to suit your taste and style. These final steps allow you to put your creative touch on the lamp, making it a unique and eye-catching piece. Here are some suggestions for adding those finishing touches:
- Lampshade Decor: Consider embellishing the lampshade with decorative trims, ribbons, or fabric accents that complement the overall design. You can also customize the lampshade by painting or stenciling patterns onto it.
- Antler Treatment: Enhance the natural beauty of the antlers by applying a clear varnish or wood polish. This will add a subtle sheen and protect the antlers from wear and tear.
- Base Embellishments: Personalize the lamp base by adding decorative elements such as engraved metal plaques, beads, or painted designs. These embellishments can complement the overall theme or add a touch of whimsy.
- Light Bulb Selection: Choose a light bulb that suits the lamp’s ambiance and illuminates the space effectively. Consider different bulb types, such as LED or Edison bulbs, to create the desired lighting effect.
- Additional Décor: Enhance the overall presentation of the lamp by adding complementary elements, such as a table runner, decorative branches, or a small tray to hold other decorative items. These additional touches will help create a cohesive and visually appealing display.
Remember, the finishing touches will allow you to customize your deer antler lamp to your preferences, making it truly one-of-a-kind. Take your time to experiment and find the right combination of elements that best reflect your style and enhance the lamp’s overall aesthetic.